What do we mean by cable heated floors?
The heating element of a cable heated floor is an electric cable. Unlike a regular electric cable, which by definition should not heat up, a heated floor cable is specially made to heat up when an electric current passes through it. It is for these technological features that such cables are called heating or thermal. You can read in detail about heating cables Heating electric cable, here I will briefly remind you.
- There are two types of heating cables: resistive and self-regulating;
- The cable cross-section is round (for floors) or flat (for pipes);
- There may be one or two cores in the cable. Today, two-core heating cables are the most popular due to their ease of installation;
- There are shielded and unshielded cables to suppress electromagnetic interference;
- Each heating cable has a specific power characteristic (W/meter), which is basic to understand the design of a cable heated floor.
Types of heating cables for “warm floors”
For electric floor heating systems, resistive type cables can be used (with traditional heating of the conductor when an electric current is passed through it) or semiconductor cables (the principle is somewhat different there).
Resistive heaters for “warm floors”
They, in turn, are divided into single- and double-wire (or single- and double-wire). And this difference, from the point of view of ease of installation of the system, is very serious.
Single wire heating cable is shown in the illustration below:
Diagram of a single-wire heating cable
1 - a wire (core) with a certain electrical resistance necessary for heating when passing an alternating current of 220 volts.
2 — heat-resistant PVC insulation of the conductor.
3 — shielding copper braiding of the cable.
4 — external general PVC insulation of the heating cable, resistant to the alkaline environment of the concrete screed.
5 - switching couplings in which the electrical connection of the connecting wire and the cold ends is made and insulated (item 6 ). The cable is single-core, so there are two such couplings, but one at each end.
7 — stripped ends of the wires for connection to the thermostat terminals. Two pieces - this is the conductor itself, for connecting to N or L, and the braid - for connecting to the PE grounding, if it is organized in a home network.
Now let’s immediately compare it with a two-wire analogue.
Despite all the similarities, the differences are still very serious
Let's just look at the differences:
1a - instead of one, the cable has two cores (two conductors). They both can be resistive, that is, they participate in heating. But there are cable models in which there is still only one heating core, and the second serves only for switching the circuit.
2a - more serious isolation. That is, first, each core is wrapped in its own heat-resistant PVC insulation, and then, before the copper braid, there is also a common layer.
5a - commutation coupling - there is only one, as well as one “cold end” (pos. 6a ). But at this end there are already three conductors (pos. 7a ) - for connection in the terminals to L, N and PE.
8 — the end sleeve is typical only for two-core cables. It closes an electrical circuit between two conductors, followed by reliable insulation of this node.
It is easy to understand that with equal electrical characteristics and the same required length of the heating cable, a two-wire cable is much more convenient to install. Proof of this is the following diagram:
The difference is in the layout of a single-core (left) and two-core heating cable.
Exactly identical rooms and cable laying pattern. But with a single-core version (on the left, on a greenish background), a prerequisite is that both ends of the cable must converge in one section - to connect to the thermostat. This can significantly complicate installation, also taking into account the fact that cable crossings on the floor are unacceptable. The example, let’s say, is not particularly illustrative, with a very simple circuit, but there are also very complex configurations, and you have to “rack your brain” how to meet all these requirements.
It’s a different matter - a two-wire one, suitable for the thermostat only at one end. The second end with the coupling may be “lost” somewhere in the vastness of the premises - this is completely unimportant, since the electrical circuit is still closed.
heating cable for underfloor heating
Expert opinion
Afanasyev E.V.
Chief editor of the pol-exp.com project Engineer.
There are many ready-made kits on sale, in which the cables (usually two-core) are already laid in a snake pattern on a mesh base. This simplifies the installation of the system, and in addition, it allows you to lay the floor with ceramic tiles directly over the installed heaters, simply making the layer of tile adhesive slightly thicker. Very convenient, especially for “warm floors” in the bathroom, toilet, kitchen, etc.
Mesh mat with laid heating cable
But in essence, these are varieties of a regular resistive cable, just in a slightly “modified frame.”
Self-regulating semiconductor heating cables
But semiconductor cables stand apart, since their ability to generate and dissipate heat is fundamentally different.
Structure of a heating semiconductor self-regulating cable
Such a cable also has two wires (item 1), but neither of them becomes a source of heating. These are just conductors, one of which is connected to the phase, the second to zero.
The wires are enclosed in a semiconductor matrix (item 2). Thus, when the power is turned on, the parallel wires in the matrix set only the potential difference (along their entire length). And conductivity and heating occur precisely due to its unique matrix - we’ll talk about this a little lower.
The rest of the structure is simple - several layers of insulation (item 3), shielding braiding (item 4) and external reliable insulation (item 5), which can easily withstand even immersion of the cable in water (such heating cables are often used for winter heating of water pipes, even with placement inside the pipe).
On one side of such a cable, “cold ends” are connected, on the opposite side it ends with an end sleeve that performs exclusively insulating functions. The wires are not short-circuited anywhere!
How does the matrix work? It is called semiconductor because its conductivity and heat generation directly depend on external conditions, and specifically on temperature.
Change in conductivity of a self-regulating cable matrix depending on temperature
Let's take a look at the diagram. The change in external temperature is shown in shades - from purple to orange. Light dots on the matrix conventionally show open “conductivity paths”, dark dots indicate areas blocked for the passage of current.
Look what happens. The colder the environment around the cable, the more the matrix passes electric current through itself, heating up and giving off heat. But as the temperature rises in a certain area, the conductivity there begins to decrease. And when it reaches a certain level, it generally comes to a minimum, with almost complete blocking of the matrix. It is interesting that all sections (of arbitrary length) are absolutely independent, that is, such self-regulation is differentiated by temperature throughout the entire cable.
Need I say that such a scheme can provide a very significant energy saving effect? And in addition, the likelihood of the cable heating up and the occurrence of any fire hazard for this reason is practically reduced to zero.
SELF-REGULATING HEATING CABLE EASTEC
Cable power, heat loss and tie thickness
If we look at how cable heated floors work, many further calculations will be clear.
A heating cable laid in the floor distributes thermal radiation in all directions. This means that, by definition, the cable will heat both the floor in the room and the base on which it is laid. If the first heating is important for the tasks being performed, then heating the base is the direct heat loss of the heated floor.
To reduce these heat losses, it is reasonable to place heat-reflecting material under the heating cable. Look at the table of heat loss depending on the thickness of the insulating layer.
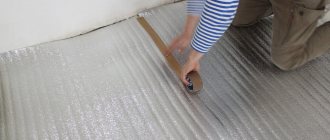
To reduce heat loss and increase the efficiency of electric heated floors, foil insulation on foamed polyethylene of the brands Izolon, Folgoizol, Ecofol, Penofol, Isoflex is used as the basis for laying the heating cable. Its thickness is from 2 to 10 mm.
If these thicknesses are not enough for the heated floor to operate effectively, extruded polystyrene foam in slabs is used as additional thermal insulation. It is durable, has various technological thicknesses and does not react with the solution. It is laid under foil insulation.
For example, for heated floors on loggias and balconies, it is recommended to make a thermal insulation layer of at least 50 mm. This thickness can only be achieved by using polystyrene foam in combination with foil insulation.
Other options for arranging a warm electric floor
It will take a lot of time to make a warm electric floor; this work cannot be done in a short time. Most of the time is spent ensuring that the screed solution completely hardens. The mixture must be laid in a layer at least 6–7 centimeters thick.
A linear meter of cable is inexpensive, but to the costs of installing a heated floor, you should add the costs of installing a screed, thermal insulation, purchasing fastening tape and other materials.
Taking into account the above information, before making a final decision, it would not hurt to familiarize yourself with other options for arranging a warm electric floor, for example, using film and rod heaters. They emit heat in the infrared range, which is well perceived by the human body, which is their huge advantage.
When heating with infrared heated floors, the temperature seems comfortable, although it is several degrees lower than with thermal radiation. As a result, energy costs are reduced. Among the advantages of the infrared rod floor is its ability to self-regulate.
Heating cable power
For each type of floor and the presence of thermal insulation on the floor, the required specific power of the heated floor is selected. The specific power of the heated floor (W/sq. meter) is calculated based on the power of the heating cable (W/meter). That is, knowing the type of floor, you can calculate which heating cable should be used and how it should be laid.
Tables for selecting the required specific power of a future heated floor can be considered quite acceptable. From it you can further calculate the power of the heating cable and the method of its installation.
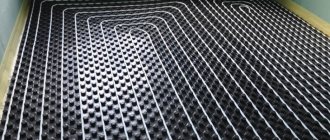
Infrared film heated floors.
This type of heated floors can be laid in a layer of tile adhesive, under laminate or under linoleum. These floors are produced in the form of rolls, which can be cut into sections of the desired length. Heating is carried out using infrared radiation. This type of electric heated floor is the easiest to install, which distinguishes it from the cables and mats described above.
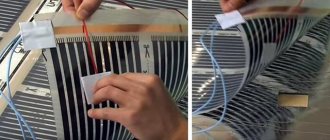
Installation of film heated floor.
As mentioned above, infrared film heated floors can be installed under tiles, decorative stone, parquet or laminate. To install such a warm floor, the following requirements exist:
- Level the floor surface to avoid film creases.
- It is necessary to make a groove for the temperature sensor and place it in the corrugation. If the film is laid under the tile, then the end of the corrugation must be hermetically sealed. Without this, it will not be possible to replace the sensor in the event of a breakdown.
- Using a crown of the appropriate diameter, it is necessary
- When laying under laminate or parquet, foil thermal insulation made of foamed polyethylene must be laid under the film.
- The maximum length of a section of a heated floor should not exceed 7-8 meters.
- The heated film floor must be laid with a distance of 10 cm from the furniture standing on the floor. To do this, the installation site must be pre-marked.
- It is advisable to place strips of film along the long wall of the room. This will help reduce the number of streaks.
The inclusion and operation of such floors is no different from those described above.
Features of heating cable installation
The heating cable is laid on the base of the floor in a spiral. The spiral has two dimensional characteristics: thread pitch and thread length. If the length of the threads is not of great importance for calculating the cable floor, then the laying step is important. Let me explain with an example.
Let's assume the heating cable has a power of 16 W per meter.
- If we put it on 1 sq. meter of floor cable in one thread, we get the specific power of the future heated floor of 16 W/sq. meter;
- If there are two threads (step 50 cm), the power will be 32 W sq. meter.
- If the pitch is 100 mm, there will be 9-10 threads per meter of floor, the floor power will be about 160 W.
- If we make the step 75 mm, then the power of the heated floor will be 13 threads × 16 W = 214 W.
- According to Table 1, we look at the expected heat loss and according to Table 2 we look at which floor such a warm floor is suitable for.
Note: Such calculations are usually carried out in stores when purchasing cables for heated floors. However, you must understand the design and future installation of the cable heated floor in order to calculate the floor level.
Installation of water heated floor
Warm water floors were initially popular in Europe. This is not surprising, because it is in European countries that residents know how to save their budget and use quality services for minimal money. With this type of heating, a comfortable room temperature is achieved 20% faster than with radiator heating. The automatic temperature control mode in the underfloor heating system makes it possible to save 25% of thermal energy.
In Russia and Belarus, this type of heating in private homes is gradually replacing the radiator type, but capital investments and the complex process of their installation often stop room owners from installing heated floors. Often, apartment and house owners do not understand that a one-time investment in this type of heating can significantly save their budget for many years to come. Let's understand all the intricacies of installing a water heated floor.
Features of installation of water heated floors
Once you have decided to install a water heated floor, you need to decide on the method of laying the pipe on the floor surface. The number of pipes, the type of components and the degree of complexity of installation depend on this.
There are several ways to lay pipes:
- snail;
- snake;
- combined.
If we consider hydraulic losses, then snail laying is considered the most optimal way to install pipes. In this case, the water in the pipes flows faster, encountering fewer turns along its path than with other types of pipe installation. The pipes are placed around the perimeter of the room and as the number of circles increases, the “snail” should gradually become narrower towards the center. The pipes are installed by skipping one row, thereby leaving a distance for laying the return pipes.
Laying pipes using the snake type is based on installing pipes along the perimeter of the wall, and are led in a wavy line to the opposite wall. The advantage of this system is the simplicity of its design and installation. It is believed that with this installation method there is a less uniform distribution of heat, and there is also a certain difficulty in installation with small steps between pipes. The advantage of this method is the ease of design and installation.
The combined type of pipe installation includes elements of a snail and a snake. It is used in rooms with complex layouts and in order to compensate for the disadvantages of the two above methods.
Preparatory activities
Calculate the number of pipes and laying pitch
To correctly calculate the required amount of pipe, you need to draw a drawing of the room on graph paper or a checkered piece of paper. Mark the layout of the pipes according to the selected type of installation on it. We plan the distance between the turns of pipes to be no more than 30-35 cm. A pipe with a 16-gauge diameter can heat a distance of 15 cm on both sides of itself. The distance from the walls should be about 20 cm.
To correctly calculate the installation step, you need to know the heat loss of the room. These data have already been calculated and verified by the experience of owners of heated floors and calculated for our Belarusian winters: the laying step is at least 12 cm, if no other heating is provided. If heated floors are combined with radiator heating, then the laying step can be 15-20 cm. In the case of a laying step of up to 12 cm per 10 m2, then you need to pump about 3 liters. With a step of 20 cm of water, you need to pump 1-2 liters per minute. As a result, it is necessary to pump 0.4 liters per minute per 10 m of pipe. It follows from this that the shorter the pipe, the less water needs to be pumped through the pipes.
The drawing shows the location of the mixing manifold. The pipe must begin and end at the mixing manifold. Then, using a ruler, measure the length of the pipes in the drawing and multiply it by its scale. To this number you must add 10%, which will go towards cutting and installing the system.
We determine the volume of area for installation of heated floors
Official directories contain information that the area for installation of a heated floor system should not exceed 40 m2. But in practice, if the floor length is more than 10 m, then the room must be divided into several parts. Warm floors tend to expand when exposed to high temperatures.
A damper tape is laid in the area where the floor area is divided. The entire circuit is mounted within one part of the floor. This means that the contour does not intersect with the damper tape. It turns out that the damper tape separates the flow of heated floors passing along one circuit (pipe mounted by one branch). At the point where the floors are divided by damper tape, the distance between the heated floors constantly changes and installing pipes in this place can damage them.
We calculate the number of heated floor circuits in the mixing unit
It is better to use pipes with a diameter of 16mm - they bend easily, and the installation pitch is convenient even for sharp turns. For example, there were 6 circuits with a length of approximately 80 meters with a flow rate of 3 liters per minute. According to the table, the pressure loss was 2.16 meters. The total flow rate can be found out: circuits with a flow rate of 3 l. per minute They produce a total consumption of 18 liters. As a result, the head is 2.5 meters, using the data from the table. The table verifies that the flow rate of the 80 meter circuit is located in the 3 liters column. As a result, the calculated number of circuits corresponds to the correct technology.
Stages of laying water floors in a concrete screed
- The surface for laying pipes is prepared - it is cleaned, and the level of the concrete floor is checked in different areas. A floor difference of no more than 1 cm is allowed. If the difference is greater, then it is necessary to level the surface using a self-leveling floor;
- For moisture protection, a special film with waterproofing properties is spread on the surface as the first layer;
- Using a damper tape, install edge insulation along the walls to the height of the planned heated floor;
- You can begin thermal insulation - it should be mounted using insulation in the form of slabs. The thickness will depend on the wishes of the owner and can be from 1 to 5 cm. This insulation comes with reflective properties on the surface;
- The next step is the installation of a vapor barrier;
- The reinforcement process can be carried out before or after the installation of water pipes. They mainly use reinforcing mesh with 20 cm cells. It helps to lay the pipes evenly over the surface, fasten the screed and evenly distribute the load;
- Next we lay the pipes. First of all, the pipe is mounted to the outlet of the supply manifold. The pipes should be spaced at a distance of about 30 cm from each other if heated floors will be used as additional heating and 20 cm when this type of heating is the main one;
- The pipes are attached to the reinforced mesh with special construction clips. If a volute system is used, then space is required to lead the pipe back to the manifold. For one circuit, the pipe length can be up to 85 m. If the task is to heat a large room, then the system is laid in two circuits. For 10 m2, approximately 67 m of pipe are required with a distance between them of 15 cm. After installing the pipe, its end clings to the outlet of the receiving collector;
- You can check the operation of the heating system. To do this, it is necessary to run the collector for a short time and ensure that the pressure gradually decreases by 0.03 MPa every hour and at the same time the water must have a constant temperature. The temperature of the water in the pipes may differ from the temperature of the floor slab by 10-20 degrees;
- If the system check is completed successfully, you can begin screeding the floors. The wet screed should exceed the height of the pipes by 2-3 cm;
- The floor covering should be laid no earlier than 25-28 days after completion of the screed.
All these nuances of installing heated floors will help you install them yourself or supervise the work of specialists. This type of heating will make the room cozy and warm. This heating technology is especially useful for families with children. Parents will not worry about their children playing on the floor staying warm and feeling comfortable.
Thickness of the screed over the heating cable
A little higher, I explained why reflective insulation is needed under the heating cable. However, this is not the only important thing for the effective operation of an electric heated floor. The layer covering the heating cable is of great importance. Let me explain.
Imagine you have a sheet of iron and a stone. Now imagine you are simultaneously heating a sheet of iron and a stone in a fire. Then you take them out of the fire and try to warm up. What will heat you longer and better? That's right, a stone.
That is why, for maximum efficiency of a cable heated floor, it (the cable) must be covered with a layer of cement screed. Heated floors under tiles are less effective. However, their effectiveness increases if you use non-ceramic tiles, porcelain stoneware or natural stone.
To select the thickness of the screed over the heating cable of a heated floor, I offer another table.
General structure of a “warm floor” with a heating cable
In order to make a decision on choosing one or another “warm floor”, it is necessary, I think, to understand what the chosen system is and what will be encountered during the installation work.
So, underfloor heating using an electric cable.
Approximate diagram of a “warm floor with an electric heating cable.”
1 - floor slab.
2 - thermal insulation necessary for the effective operation of the “warm floor” system.
3 - a thin screed covering the thermal insulation and leveling the surface for laying the heating cable.
4 - thin thermal insulating substrate, usually made of foamed polyethylene, with a foil surface. The reflective foil surface should face up.
5 - laid heating cable for “warm floor”.
6 — Mounting tapes (tires) to facilitate cable laying. An optional element - the cable is often simply tied to a reinforcing polymer mesh, as shown in the first illustration of this publication.
7 - cement-sand screed, 20 to 50 mm thick, covering the cable, becoming not only the basis for the subsequent laying of the final floor covering (item 8), but also a distributor and accumulator of the heat generated by the cable.
9 - couplings that ensure connection of the heating cable with power wires, or, as they are also called, “cold ends” (item 10).
11 - temperature sensor in a tube embedded in the screed to constantly monitor the heating temperature of the “warm floor”.
12 - Thermostat located in a user-friendly location. Performs the functions of general switching of all suitable wires (“cold ends”, 220 V home power supply cable, temperature sensor signal wire) and control - a well-functioning system will maintain the surface heating temperature specified by the user or according to a programmed algorithm.
The diagram is, of course, only approximate, and in reality there may be both minor and quite serious changes, depending on the design of the floor. But the general principle remains the same: in any case, there must be a layer of thermal insulation under the heating cable.
A screed poured over the cable is the optimal solution. But if you look more closely at the projects published on the Internet, you will see that sometimes they even do without it. An example is shown in the illustration below.
One of the options for placing a heating cable in the “bowels” of a wooden floor
In this example, rigid slabs of high-performance insulation with an external foil covering are laid between the joists of a wooden floor. The heating cable was laid along them. The cable is not filled with anything from above - the floorboards are simply installed along the joists.
Yes, such a scheme will also work, but we must correctly understand that high efficiency cannot be expected from it. To create some kind of “comfort zones” is possible, but as an alternative to heating it is out of the question.
How to attach the cable
The question of how to attach the cable to the base is not idle. I have already talked about the importance of spiral laying and the importance of clear distances between the spiral threads. Therefore, the cable must be firmly secured before pouring concrete.
Two methods are offered:
- On the reinforcing mesh using plastic clamps;
- On special strips of fastenings, which themselves are attached to the base.
The first option is preferable, since there is no need to drill into the underlying foil to attach the mounting strips.
Now we have all the parameters to present:
Option 7. Cable heated floor under the tiles
- Preparing the base for tiles;
- Electric heating mat;
- Tile.
Option 8. Cable heated floor over a dry screed
- Dry screed device;
- Mounting tape;
- Cable;
- Finish screed 5 -10 mm.
Option 8. Cable heated floor in a wooden house with a rigid base
- Laying logs on the base;
- Thermal insulation between joists;
- Laying reflective plates/reflective foil between joists;
- Laying the cable between the joists through the cuts;
- Hard base flooring.
Option 9. Cable heated floor in a wooden house, 2nd floor
- Laying thermal insulation between joists;
- Laying reflective plates/reflective foil between joists;
- Laying the cable between the joists through the cuts;
- Construction of the second floor floor.
conclusions
As you can see, the installation of cable heated floors can be very diverse. What I would like to draw your attention to in conclusion:
- Be sure to use insulation under the heating cable, preferably foil.
- Cover the heating cable with a cement screed of at least 5 cm.
- When installing cement screeds less than 5 cm, do not forget to add fiber.
- The best option would be to attach the cable to the reinforcing mesh and then install a tie.
©Opolax.ru