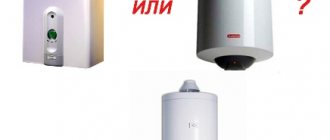
Types of water heaters
There are two large groups of such devices:
- Storage boilers.
- Instantaneous water heaters.
Both options cope with their functions and provide residents with hot water. But at the same time, they have fundamental differences.
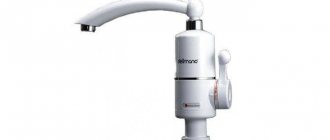
Instantaneous water heater
The principle of operation is to heat water passing through a pipe, without using a storage tank.
Main characteristics of the device:
- compact size and light weight;
- high power - for normal operation you will need 6-8 kilowatts;
- work for a short time, only when the tap is turned on;
- ease of installation.
To connect an instantaneous water heater you will need a reinforced cable. Because The load when it is turned on is quite large.
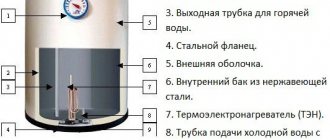
Storage boiler
It differs from the flow type in its operating principle. It uses a large container in which the water is heated.
Main characteristics:
- large sizes - a tank for a family of 2-3 people should be 80-100 liters. Therefore, the boiler in the bathroom takes up additional space;
- low power - the heater consumes only 2-2.5 kilowatts;
- long heating of water - there will be no hot water until the entire volume has warmed up;
- constant support of the set temperature.
Thus, the boiler does not impose strict requirements on the electrical network. But, on the other hand, it is more difficult to mount it for a set of much greater weight.
There are two main ways to install a water heater in a bathroom:
- The device is mounted directly near the point of consumption. For example, next to a shower or tap and only works for one consumer. This option is quite justified when the apartment is connected to a central hot water supply system and it is turned off once a year. In addition, the neat appearance of the heater will not spoil the interior of the bathroom.
- If interruptions in hot water are a constant occurrence, the first option will not work. In this case, it is advisable to install the device so that hot water reaches all consumers. Therefore, the heater is mounted at the entrance to the apartment, immediately after the meter.
In the second case, although hot water will flow to all points, due to the distance that the water must travel through the pipes, heat loss will increase. And consequently, electricity consumption will increase.
Renovating a bathroom in a Khrushchev building - how to do it optimally, read our article on the website.
You can learn about methods for restoring a cast iron bathtub from this article.
Storage water heater
As for storage water heaters, they are the best option for housing equipped with electric stoves: the meter with electrical wiring meets all necessary standards.
Pros:
- There is no need to modify the electrical network; the device plugs into a regular outlet.
- Heaters are characterized by economical energy consumption; they consume the same amount of energy as household vacuum cleaners. Some models have a function that allows you to adjust the heating power, the value of which affects the time spent heating the required volume of water to a certain temperature.
- Possibility to make connections to the toilet and kitchen area.
Minuses:
Storage-type equipment has only one significant drawback - heavy weight and impressive dimensions, but today leading manufacturers produce models that make it possible to save internal space in premises.
Temporary connection
This type of DIY water heater installation is needed when hot water is needed in the house, but you have not had time to connect to the central water supply. As soon as you manage to make the connection, the device is simply dismantled and can be used in the future if necessary.
Select a location for the heater and secure it with dowels and screws. It is necessary to disconnect the shower head from the shower hose and connect the hose to the water heater inlet. At the outlet of the water heater, connect the watering can included in the package.
Connection methods
Fixing the structure on the wall
Before use, it is important to know how to connect a instantaneous water heater yourself at home. The choice of installation method is influenced by the installation system, the availability of equipment and spare parts, and conditions for warranty service. To commission a boiler or geyser, it is recommended to use the services of a professional technician. Before fixing the device, you need to determine the thickness of the wall, the pressure in the water supply system, and assess the condition of the wiring. Installation of an electric instantaneous water heater is as follows:
- Check the electrical network: alternating current with a voltage of 220 W, three-core copper cable with a diameter of 3x2.5 mm, protection 30 A, mandatory grounding.
- Select the location where to connect the device.
- Secure the device.
- Connect to electricity.
- Connect the water.
After checking the electrical wiring, select the location for connecting the water heater: above or below the sink, on the side of the mixer. If the device comes with a hose with nozzles, you need to install a fixing point for additional parts. The main factor when determining the location is accessibility to the control unit for regulating pressure and temperature. To provide boiling water for the kitchen, bathroom, or shower room, it is recommended to connect to a busy water point or riser. Low-power or non-pressure equipment is fixed near the tap being used.
The main types of fastenings for a flow device are special hinges and brackets that must be installed in holes in the wall. The elements are already included in the initial package. The instantaneous water heater must be installed in a horizontal position relative to the planes in order to avoid the formation of air pockets and incomplete filling of heating devices with water, which leads to damage to the device. Installation steps:
- Set the water heater to the off mark.
- Mark the location for the holes using the mounting plate that is included with the product.
- Drill holes in the wall with a drill.
- Insert dowels, screw in screws.
- Open the panel of the device, make a hole for water to enter.
After installation work, the connection of the structure to the power supply begins by installing the cable included in the kit into a special hole behind the rubber plug on the rear panel of the water heater. Before connecting, you need to strip the wires, insert phase, neutral and ground into the junction box and secure with mounting screws. It is prohibited to secure the device without grounding or a shield with an automatic shutdown device; it is prohibited to conduct electricity.
The method of connecting to the water supply depends on the equipment model. Low-power types, which are installed at one liquid supply point, are equipped with a shower head for releasing boiling water. A flexible hose with a twisted watering can or a stationary metal or plastic pipe is connected to a free outlet, and the valve located nearby is unscrewed.
For powerful water heaters, diverter adapters are used that connect 4 valves in the hot and cold water pipes. To heat and circulate the liquid, the valves installed on the device must be open, and the valves located on the pipes must be closed. You can connect the equipment to a central water supply system, a boiler, even a swimming pool or well with a cleaning filter.
Always connected
The photo of the step-by-step installation of the water heater shows that you will need to additionally use tees with shut-off valves. After connection, hot water comes out of the mixer; after completing the installation work, do not forget to check the tightness of the connections.
Important! Turn on the heater only when its coil is completely filled with water, otherwise the part will break.
Sequence of steps when connecting:
- Open the valve.
- Transfer cold water to the water heater.
- Wait until cold liquid flows from the watering can.
- Turn on the device, after a short time interval (from 30 to 60 seconds) heated water begins to come out.
Installation of a flow-through water heating system
Installation and assembly of such a structure can be done in two different ways. In the first case, the hot water outlet from the device is connected directly to the mixer using a shower hose with the nozzle removed. With this installation, the hot and cold water supply will be adjusted using the mixer control lever. When the mode knob on the tap is switched to shower mode, hot water is supplied to the mixer. And in tap mode, cold liquid flows from the water supply.
For country houses, a major installation of the device is appropriate
Of course, it is advisable, if possible, to connect the plumbing equipment in a more serious way than using an unreliable rubber shower hose. To do this, it is necessary to carry out a major installation of the product to the pipeline. A shut-off valve should be installed on the water supply pipe to the heater.
Close the valve at the entrance of the water supply to the apartment. In the selected area, using tow or fum tape, install a coupling - an adapter, with the help of which water will be supplied to the device. Seal connections carefully.
The device should be powered with electricity while complying with the safety requirements for connecting electrical heating equipment. It should be remembered that the energy intensity of the heating elements may exceed the permissible load in the electrical network of your apartment. At best, this will lead to knocking out plugs or automatic fuses, but it is possible that the wiring will catch fire. Before purchasing an electric heater, consider this point carefully. The device is powered by electricity through an outlet, which must be grounded.
Marking the wall for drilling holes for mounting an instantaneous water heater
Next, the device must be mounted on the wall. The heater is fixed using dowels driven into pre-prepared holes. After this, the product can be connected to the water supply.
The shut-off valve is connected to the inlet pipe of the heating element, and water is supplied to it using a hose or metal-plastic pipes. After this, the device is ready for use.
The next step is to install the faucet or shower mixer included in the delivery of the product. Now you can perform a test run of the equipment. To do this, you need to open the tap and turn on the electrical equipment. After a short period of time, 10–15 seconds, heated water will flow out of the mixer drain hole. Depending on the energy class, it can even be hot. The water pressure and temperature are regulated using a mixer - if you open the tap a little, hot water will flow, and if you open it completely, cooler water will flow.
You should know that using flow-through heaters it is almost impossible to obtain high-temperature water. If you need very hot water, it makes sense to think about how to install a boiler in the bathroom.
In cases where tap water does not meet quality standards, it is advisable to install a filter in front of the water heater inlet pipe. This will extend the life of the product. Use branded pipes and plumbing fittings.
Related article: How to get rid of pigeons on the balcony: a proven method
Installation of a storage type heater
Any model of such a heater requires permanent installation:
Mark a location on the wall for the heater, keeping in mind that the surface must be strong enough to withstand the load. A tank designed for a large volume (more than 200 liters) is recommended to be installed on the floor.
Sitz baths that can be installed in a small bathroomConnecting an automatic washing machine without running water in a country house or village
Review of pumping stations for water supply at home: connection diagrams and installation rules
Installation of a storage water heater is carried out using special devices, below is a complete list of them - a hammer drill for concrete walls or an electric drill for brick walls, a marker, a construction tape, a level, fasteners, a drill for working with tiles, FUM tape and a safety valve.
Installation is carried out at a distance of 150-200 mm from the ceiling, so that it is convenient to hang and remove the tank. Using a drill or hammer drill, make holes the depth of which should correspond to the length of the mounting hooks.
Dowels are first driven into the holes, and then screws are screwed into them, leaving a gap to subsequently place the mounting strip. The tank is mounted on the mounts.
Place a safety valve at the cold water inlet, which allows you to relieve excessive pressure; connect the drain pipe to the sewer system or lead it into the toilet cistern.
At the heater inlet, connect the cold water supply, install a safety valve, and at the outlet, connect the hot water outlet pipe.
- Wall-hung toilet with installation: recommendations for selection and installation
Decorative screens for a heating radiator: overview of types of grilles and do-it-yourself installation
Hygienic shower for toilet: types and step-by-step installation guide
Installation work is not difficult, the main thing is to follow the provisions of this manual in the specified sequence.
Installation
Before installation, you must carefully study the instructions to know how to properly connect the heater to the water supply network.
Having determined the location of the boiler, it is necessary to mark the points for the anchor bolts. The height of the mounting line is determined by fitting the boiler. Draw a horizontal line with a marker or pencil. The distance between the mounting points is measured between the holes on the bracket on the back of the boiler.
If the wall is tiled, then first drill holes into the concrete without using impact drilling mode, and moisten the drilling site with water. Then holes are drilled in the main wall where the bolts are inserted. Having secured the anchors, the storage device is hung on them.
The diameter of the drill must be larger than the diameters of the anchor bolt and the drill, since when drilling through the wall through the tiles, this lining will crack.
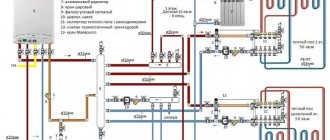
Before connecting to the water supply, you need to study the diagram again. In a new apartment, when planning the internal water supply network, connections for connecting the boiler can be immediately provided, to which it is connected using flexible hoses.