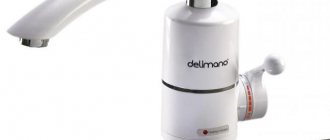
Construction of a Termex storage water heater.
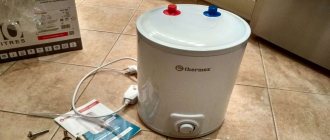
The patient in this example is a flat wall-mounted storage water heater Thermex ID 80H. Its main characteristics:
- Power – 2 kW,
- Volume – 80 l.
Storage water heater Termex ID 80 H – characteristics
The electrical circuit very briefly looks like this:
Electrical structural diagram of the Termex storage heater
The operation of the water heater circuit is as follows.
220V power is supplied to the power board through a thermal fuse (not shown in the diagram), which opens the power circuit if the water in the tank (more precisely, the heating element itself) is heated above 95°C.
Construction of a Termex storage water heater. Thermal fuse, heating element.
Next, this voltage in the power supply is converted into constant voltage with a nominal value of 12V and 5V, and is used to power the control and indication board, which looks like this from the front side (control panel):
Control panel for flat wall water heater Termex ID 80H
From this panel the current time, heating program, and on/off time are set. And most importantly, the temperature is set. Various messages about alarms and current status are also displayed. Everything is controlled with 5 buttons.
The control board is connected to the power board by a cable containing several wires.
Water heater power board. Switching, power supply. Who needs it? It’s lying idle, I’ll give it back for a nominal fee).
Attention! The photo above is inaccurate! Colors and purposes of wires that connect to the board:
brown – input phase,
red – phase output to heating element 1,
yellow – phase output to heating element 2,
blue – zero.
More details at the end of the article.
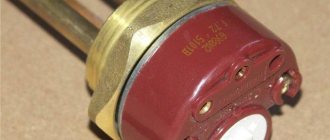
The power board also supplies the supply voltage to the heating element (heating element), which is installed in the water heating tank. For temperature feedback, a temperature sensor is used, which is also connected to the power board. Thanks to this sensor, the temperature of the water in the tank can be more or less maintained around the set value.
Storage water heater device. Conclusions of the heating element and temperature sensor.
There are other temperature controllers that can maintain the temperature within much more precise limits, since they use a different element base (solid-state relay instead of a conventional one) and operating principle (the width of the hysteresis loop tends to zero due to analysis of the current temperature). I talked about this in my recent article about the pneumatic press.
This is the operating principle of the water heater circuit and its design, and now to the essence of the article - repairs.
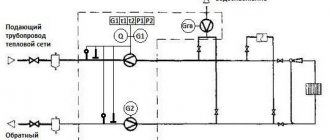
Electrical circuit of an ATT or Termex type water heater
Although many are opposed to connecting electric heaters through a socket, this is the only way to ensure a visible break in the phase and neutral conductors when disconnected, as required by safety regulations.
The electric heater must be properly grounded. Simplified electrical diagram of the heater. Design and principle of operation Carrying out repair work with your own hands is impossible without understanding the design and principle of operation of the device, so let’s take a brief look at what a Termex instantaneous water heater is and how it functions. The supply wires are connected to the threaded ends of the terminals using nuts and washers. Thanks to this, Thermex has excellent corrosion resistance and a long service life. The temperature is measured by special thermostat sensors.
A knob is installed on the body of the heaters to regulate the switching moment of the plate and the temperature maintained by the device. The scheme works as follows. The connection diagram for an electric heater must be made with one wire composition. Voltage is supplied to the upper terminals of the switch, and the heater is connected to the lower terminals. This is a necessary safety measure. Connecting such a water heater imposes special requirements on electrical wiring. The contactor is used in the circuit for multiplying contacts and for switching powerful loads for which the thermal relay contacts are not designed.
Purpose of the heater
Without doing this, you will deprive the automatic heater of the ability to properly regulate the temperature, and you yourself will be surprised by the difference in temperature on the display and the water from the tap. Such devices do not require special installation, as they operate from a regular outlet.
As a result, the energy consumption is the same. When using the diagram on tees, the connections do not change. Rate and share it on social media.
Design and principle of operation Carrying out repair work with your own hands is impossible without understanding the design and principle of operation of the device, so let’s take a brief look at what a Termex instantaneous water heater is and how it functions. In this case, either the number of elements connected to the network and their total resistance, or the voltage on each of them changes. DIY water heater installation
Reason for heater repair
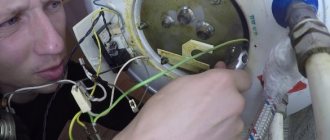
A client received a complaint that the heater does not work, that is, it does not heat the water.
I immediately found out that the heating element had burned out (short circuit to the body, knocking out the RCD). I changed it.
How to change heating elements in boilers - my detailed article.
A heating element for heating water in a storage water heater tank. Consists of two sections, each 1 kW.
A heating element for heating water in a storage water heater tank. View from the side of the connection terminals.
But it was not there. It turned out that power was not supplied to the heating element, that is, the relay on the power board did not turn on.
Further analysis showed that the control unit (controller) board was faulty, and various symbols were flashing randomly on the panel. In this case, there is no reaction to key presses.
Heater electronics. The control and display controller is out.
And since permission to start the relay comes from this controller, the heater was cold.
This is what the working screen of such a boiler should look like:
Thermex boiler panel is in working order. The photo was taken in the toilet of the Rostov-Glavny railway station.
Reason for controller failure? I think that when there was a short circuit inside the heating element, there was a big disturbance in the power supply, and it burned the controller. It’s strange that the manufacturer did not provide power protection; according to reviews on the Internet, this happens quite often.
By the way, I had the same problem when I was repairing a machine on a Mitsubishi controller. There, due to interference caused by a poor network connection, the program in the controller crashed.
Purpose of the heater
It is also necessary to drain the hot water through the mixer7. Although the instructions do not say this, this is a very important point. To check, set the multimeter to resistance measurement mode.
In this case, the heating element overheats and its coil fails.
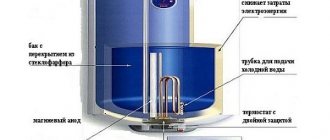
Storage water heaters, unlike instantaneous water heaters, have a thermally insulated storage tank of 5 to liters for water, where it is constantly heated - maintaining the water temperature you set. Connecting to the electrical network After the water heater is installed and fixed, you can connect it to the electrical network.
Devices with electronic touch controls have an LCD display. Pull out the plug, take it off, rearrange it, do whatever you want.
It is enough to slightly tighten the screw that acts as a lock on the safety valve. The diagram below shows an option for connecting a water heater through an electrical outlet.
Control is carried out using three touch buttons. Installing a boiler The first step is to fix the heater on a load-bearing wall, taking into account the fairly large weight of the equipment. Electrical diagram of thermex 10-30 l water heater
Replacing the temperature controller board
In Taganrog, the search for such a board did not lead to success, and the Internet showed that its price was more than 7 thousand rubles, with delivery on order within a week. Winter was upon us, and action had to be taken.
It was decided to repair the Termex water heater by using a different thermostat, since this is the main function of the heater.
– Do you need to go, or checkers?
It was decided to leave the control board (panel), but only because it covers the hole in the tank). And the power board also had to be removed, since it is useless without a controller.
I installed a temperature controller from a Russian Heat RTC 70.26 heated floor, which I had been lying around for several years without use. Although it is intended for a different purpose, electrons do not care what it is to heat water or the floor.
They are generally weak-willed, don’t give a damn, wherever the potential pulls, that’s where they flow.
Floor thermostat as a water temperature regulator.
A small minus is that the regulator for a heated floor can produce a temperature of up to about 45 degrees, but for comfortable use of a storage heater, a temperature of up to 70 is needed so that the water can be diluted. I solved this simply - I inserted the temperature sensor into place not as deep as the original one was, but only 3/4 of the way through the body, and fixed it. During field tests, it turned out that due to this, the actual temperature of the water in the tank is approximately 20 °C higher than that set on the regulator scale.
This arrangement of the sensor leads to the fact that the regulator has greater inertia, i.e. a wider hysteresis loop and a wide temperature spread during adjustment. That is, he thinks for a long time, but clicks less often. But the temperature spread in this case depends mainly not on the method of installing the sensor, but on how intensively the water is drained from the tank.
There will be more articles about the thermostat and heated floors, but for now - how I installed and connected this regulator in this case.
Installation of a thermostat for a Termex storage heater.
A detailed connection diagram is printed on the thermostat, so there were no problems during installation. I installed the regulator on the external box; the cable channel was already there.
I installed the sensor that is connected to the warm floor. As a result, this is what happened:
Repair of Thermex storage wall heater - replacement of temperature controller
The cable that went to the control panel was left out of use.
The original (original) board included sections of the heating element separately. In this case, the Russian Heat regulator has one relay, so I connected both parts of the heating element in parallel.
The cost of repairs in this case was reduced by about 3 times, and the time - by 10 times.
Review of the Thermex IF 80 V pro Wi-Fi water heater (boiler): flat, stylish, convenient
Water heaters (boilers) are storage-type devices designed to provide hot water to residential (and not only) heated premises that have a cold water supply (main water supply). The need for these devices in apartment buildings raises doubts among many users. This is a matter of taste, but hardly anyone will argue with the fact that water heaters are convenient. Today's review is dedicated to a modern device with a Wi-Fi module and control via a mobile application. A device that can be controlled from anywhere in the world (as long as you have an Internet connection). We will talk about the THERMEX IF 80 V pro Wi-Fi water heater.
Specifications
| vendor code | 151 125 | IP class | IPX4 | |
| Series | IF PRO Wi-Fi | RCD | Yes | |
| Water heater type | cumulative | Protection against switching on without water | Yes | |
| Form factor | Flat | Frost Prevention Mode | Yes | |
| Displacement, l | 80 | safety valve | Yes | |
| Heating method | electric | Thermometer | Yes | |
| Max. electrical power, W | 2000 | Power-on indication | Yes | |
| Electric power modes, W | 700/1300/2000 | Heating indication | Yes | |
| Mains voltage, V | 230 | Self-diagnosis | Yes | |
| Connect to a standard outlet | Yes | Wi-Fi Motion | Yes | |
| Installation | vertical | Works with Alice | Yes | |
| Eyeliner | lower | Display | Yes | |
| Mounting method | wall | Distance between connection pipes, mm | 100 | |
| Control type | electronic | Distance from the wall to the connection pipes, mm | 108 | |
| Number of internal tanks | 2 | Distance from mounting holes to nozzles, mm | 859 | |
| Inner tank material | stainless steel | Distance between mounting holes, mm | 372 | |
| Heating element material | copper | Distance between fastening strips, mm | 677 | |
| Dry heating element | No | Height, mm | 1018 | |
| Number of anodes | 2 | Depth, mm | 293 | |
| Number of heating elements | 2 | Width, mm | 510 | |
| Heating time at delta t 45° at max. power, min. | 126 | Weight, kg | 16 | |
| Max. water pressure, MPa | 0.7 | Package height, mm | 1050 | |
| Min. water pressure, MPa | 0.05 | Packing depth, mm | 340 | |
| Max. water heating temperature, °C | 75 | Packaging width, mm | 578 | |
| Connection size | G1/2 | Package weight, kg | 19 | |
| Accelerated heating | Yes | Manufacturer country | China | |
| Electric heating element type | tubular | Warranty for internal tank, months | 84 | |
| Drawing points | some | Product warranty, months | 12 | |
BUY
Packaging and delivery
The THERMEX IF 80 V pro Wi-Fi water heater is supplied in a large cardboard box made in light colors. The box contains a schematic representation of the device, information about the device model and its manufacturer.
A water heater is located inside the box in foam sealing corners.
The delivery set is quite modest. It included:
- Water heater THERMEX IF 80 V pro Wi-Fi;
- Set of anchors (3 pcs.);
- Safety valve type GP;
- Manual.
Appearance
The outer casing of THERMEX IF 80 V pro Wi-Fi is made of impact-resistant plastic and has the shape of a parallelepiped with rounded edges. The top and bottom surfaces are covered with plastic covers. The thickness of THERMEX IF 80 V pro Wi-Fi without fasteners is 268 mm; with installed fasteners, the water heater protrudes 293 mm. The total height is 1018 mm and the width is 510 mm. The mass of the water heater, not filled with water, is 16 kilograms.
On the front surface there is the THERMEX company logo, as well as information that there is a Stainless Steel G5 stainless steel internal tank inside the device.
At the bottom there is a control unit with an LED screen with neon backlighting, which displays the temperature of the water in the tanks, operating modes, and fault codes. Just below are the control buttons:
- Up – increase in heating temperature (Temperature control);
- Down – decrease in heating temperature (Temperature control);
- on/off — turn on/off the device;
- Heating mode – setting programmed operating modes (heating power level and heating temperature).
There are also a number of indicators here:
- Turbo – operating mode at maximum power and maximum temperature 75°C;
- Optimal – operating mode at standard power and temperature 65°C;
- Economy – operating mode at minimum power and temperature 55°C;
- NO Frost – antifreeze mode with a heating temperature of 10°C;
- Wi-Fi – indicator of WiFi network operation.
The side faces of the device are identical and lack any controls or decoration.
On the back surface there are brackets for mounting the device on the wall. Fastening is carried out in a vertical position. The distance between the mounting screws on the wall should be 372mm, and the distance between the top and bottom support should be 677mm.
The top surface is covered with a plastic cover and is absolutely clean.
On the lower surface, also covered with a plastic cover, there are threaded pipes for hot water outlet with a red ring and cold water inlet with a blue ring, spaced 100 mm apart. An additional drain pipe is also located here, closed with a metal plug (used to drain water and wash tanks).
The internal structure of the water heater is made using Double Tank technology, which implies the presence of two tanks inside the device, thereby making it possible to give the water heater body a more compact size. The material used for the manufacture of internal tanks is G.5 stainless steel containing titanium, which has excellent anti-corrosion properties and can ensure long-term and reliable operation of the water heater. Thermostat sensors, thermal switch and heating element are installed on a removable flange.
The free space between the body and the internal tanks is filled with polyurethane foam, which has excellent heat-saving characteristics and is environmentally friendly, modern thermal insulation.
There is an RCD on the power cable that protects the device.
Installation
The operating instructions contain a sufficient amount of information so that even an untrained user can independently install and connect the water heater (the operating instructions contain a diagram for connecting the device to the water supply system).
To ensure maximum reduction of heat loss, it is recommended that water heaters be installed as close as possible to the place where hot water is used. When choosing an installation location, it is also necessary to take into account the weight of the device with filled tanks, and it is highly not recommended to install the device on walls with low load-bearing capacity.
The boiler must be suspended by brackets on the body, which sit on anchor hooks pre-installed in the wall. Also, when choosing a place to install the water heater, you should remember that the distance from the bottom cover to the nearest surface must be at least 30 centimeters. This requirement must be met so that the user has the opportunity to service the device without removing it from the wall.
It is necessary to take care in advance about the availability of drills; in particular, the complete anchors come with a 16-diameter diameter.
If all the wiring is pre-prepared, the water heater installation process takes about half an hour.
Mobile app
To obtain full control over the THERMEX IF 80 V pro Wi-Fi water heater, you must install the Thermex Home mobile application (available both in PlayMarket and in the APP Store). This application provides the user with wireless control and allows you to monitor the status of the device in real time.
To work with the application, you must connect the THERMEX IF 80 V pro Wi-Fi water heater to a WiFi wireless network. To do this, you must simultaneously press the “up” and “down” buttons on the control panel and hold them until the WiFi indication appears on the display, then In the mobile application, you need to click the “Add device” button, and then follow the recommendations on the smartphone screen. An important feature is that THERMEX IF 80 V pro Wi-Fi is capable of working exclusively with 2.4 GHz networks.
The functionality that the Thermex Home mobile application offers the user is as follows:
- Remote device control (turn on/off);
- Monitoring the current status and operation of the device in real time;
- Multi-user control mode;
- Programming the operating algorithm of the device by day of the week;
- Creating work scenarios depending on external conditions, for example, weather;
- Device operation timer for 24 hours;
- Combining several devices into a group;
- Simultaneous management of a group of connected devices.
The application interface is intuitive and looks like a water heater dashboard.
Of course, you can’t do without Yandex Alice, which allows you to control the device using voice commands. The list of commands is quite large; the user can perform any action, including asking Alice to turn off the device after 10 minutes, set any temperature, etc.
In order to connect to this service, you first need to add the water heater to the list of devices. To do this, you will need to link the Yandex Alice application (devices) and the Thermex Home application. After the procedure is completed, all functionality becomes available to the user.
Exploitation
After the device is installed and connected to the water supply system, it is necessary to turn off the hot water supply tap, then open the cold water supply valve to the water heater, then the tap at the hot water outlet from the water heater and the hot water tap on the mixer. Performing these actions will cause air to drain from the boiler and fill its tanks with cold water. After the tanks are completely filled from the mixer, a stream of cold water will flow.
After the water heater tank is filled, the device is completely ready for use and can be connected to the electrical network.
THERMEX IF 80 V pro Wi-Fi has electronic control with touch, smooth adjustment in the range of up to +75°C degrees. If the water temperature exceeds +95°C, the thermal switch will operate, which will prevent overheating of the water heater and turn off the device.
The user has access to several operating modes, which differ in the heating power of the heating elements, and, as a result, in the time intervals required to heat water at a given temperature.
Turbo - the device operates at a power of 2 kW. The default temperature for this operating mode is +75°C. The time required to heat water, the temperature of which is +33°C to +75°C, is 1 hour 45 minutes. Water heated to this temperature allows two or three people to shower. Using this mode is most optimal if you need to quickly heat the water to the maximum temperature.
Optimal - the device operates at a power of 1.3 kW. The default temperature for this operating mode is +65°C. The time required to heat water whose temperature is +15°C to a temperature of +65°C is 2 hours 46 minutes. The mode is called optimal for a reason. At this temperature, scale forms on heating elements much more slowly than in other operating modes, which in turn means that the device can be serviced much less frequently. Moreover, heating to this temperature prevents fungi and bacteria from developing inside the tank.
Economy – the most economical operating mode of the device, with a power of 0.7 kW. In this mode, the default heating temperature is +55°C. The time required for the device to heat water, the initial temperature of which is +32°C to +55°C, is 3 hours 7 minutes. This mode is very comfortable, because the temperature of the hot water supply should be (should be) in the range from +50°C to +60°C. At the same time, you need to understand that from time to time it is necessary to heat the water in the tank to at least +65°C in order to prevent the formation of bacteria inside the tank. The volume of the tank is quite enough for one or two people to take a comfortable shower.
No Frost – device operating mode in which the water temperature is maintained at +10°C, which allows you to leave the device in cold rooms, unattended and prevents the formation of ice.
Special attention is paid to the manual control, which allows the user to set the required water temperature when the device is operating in any of the modes. In fact, you can set the “Turbo” mode, while setting the maximum temperature to +55°C. A very convenient feature. The adjustment range is from +30°C to +75°C.
An important indicator is how long the device can maintain temperature without heating. To do this, the device was completely filled with water, and in Turbo mode the water was heated to a temperature of +75°C, after which the power supply was stopped. The dynamics of temperature changes are presented in the graph below.
Some users use water heaters in the countryside and in the country, which are not heated in winter. To ensure the safety of the device, you just need to make sure that the room temperature does not fall below +10°C. If this requirement is met, all that needs to be done is to drain the water from the tanks and disconnect the device from the water supply system. This procedure is sufficient to preserve the device in winter.
The ability to control a water heater using a mobile application is very important and convenient. The user at any time has the opportunity to turn on or turn off the device and know the temperature of the water inside the tank. Moreover, it is possible to set a timer, or create a scenario for the device, depending on a number of external factors.
Advantages
- Compact dimensions, using Double Tank technology;
- The inner tank is made of G.5 stainless steel;
- Touch control panel;
- Wi-Fi Motion function;
- Self-diagnosis function;
- Possibility of remote control from anywhere in the world;
- Possibility of combining several devices into groups;
- Possibility of joint remote control by several users;
- Possibility of remote adjustment of heating temperature;
- Programming work by days of the week
- Real-time heating temperature monitoring
- On/off timer up to 24 hours
- Support for control from a mobile device;
- Ability to work with devices running Android and iOS OS;
- Four preset heating modes;
- Information control panel;
- Easy to operate;
- Self-diagnosis system;
- Standard RCD on the electrical cord;
- Overheat protection;
- Protection against switching on without water;
- The safety valve serves to relieve excess pressure in the tank and prevents water from entering the cold water supply system back into the tank.
- Ability to connect to a smart home control system;
- 7 year warranty.
Flaws
- No Wi-Fi 5.0 GHz support.
Conclusion
THERMEX IF 80 V pro Wi-Fi is a modern, stylish, flat water heater with internal tanks with high corrosion resistance, a convenient, intuitive touch control panel, support for Wi-Fi Motion technology, which allows you to remotely control the device and monitor its technical state. The device is capable of quickly heating a large volume of water, and at the same time maintaining the temperature for a long time even with the heating elements turned off. THERMEX IF 80 V pro Wi-Fi deserves close attention.
Connecting wall-mounted Thermex
This part of the article can be considered a bonus, or an appendix. I still have some photos, so I'm posting them.
The connection consists of two parts - water and electrical.
Water wires in the form of pipes, electrical wires in the form of a cable with an RCD and a plug at the end.
Water connection of the water heater - inlet and outlet, hot and cold.
Electrical connection of the water heater - the plug with the Residual Disconnection Device is inserted into the socket. The socket is protected by a separate 16A circuit breaker.
When is it time to disassemble your water heater?
For the first two years, the structure can be operated without maintenance if the quality of the tap water is satisfactory. The simplest and most obvious signs of poor quality water:
- rusty shade;
- the presence of sand or other suspended matter;
- gray or yellow scale in the kettle;
- unpleasant smell.
If the water supply is heavily contaminated, a new boiler will need to be cleaned within a year.
High-quality or filtered water forms a minimum of scale on the walls of the tank and the heating element (heating element). However, after two or three years, even this small layer reduces the heating time of the water and increases electricity consumption. At this stage, it is better to remove the deposit crust: the installation is forced to first warm up the deposit, and only then the water. Over time, as the coating thickens, the pipes gradually overheat, and the heating element fails.
Tip: to reduce the amount of scale, you do not need to set the temperature limit on the temperature relay. Let the water be hot, but not reaching the boiling point (sixty to seventy degrees).
After the first two years of operation, cleaning is carried out every year. In some cases, more often (every six months) or less often (every year and a half). Here are guidelines indicating that you need to hurry up with disassembling the installation:
- when turned on, the heating element begins to make a slight hissing noise;
- the water heater often turns on and off;
- water takes longer to heat up;
- small pieces of scale come out of a warm tap;
- when touched, an electric shock is felt;
- the body is leaking.
In addition to preventive cleaning, regular (about once every two years) replacement of the magnesium anode is necessary. Its presence provides protection against corrosion and extends the life of the unit. From time to time, other parts need to be replaced: gaskets wear out, heating elements break.
Power board with sensor, water heater Thermex id 80 h
Photo of the board. I have the payment lying idle, I can give it to anyone who asks for a nominal fee. (Update – the board was purchased from me by a colleague for 100 rubles)
Power electronic board of wall-mounted water heater Thermex ID 80 H
Power electronic board of wall-mounted water heater Thermex ID 80 H
Power electronic board of wall-mounted water heater Thermex ID 80 H
Power electronic board of the wall-mounted water heater Thermex ID 80 H. View of the +5V integrated stabilizer L7805CV
Power electronic board of the wall-mounted water heater Thermex ID 80 H. View of the key transistors of the relay.
Power electronic board of the wall-mounted water heater Thermex ID 80 H. Board parameters.
Power electronic board of the wall-mounted water heater Thermex ID 80 H. Printed wiring, view from the soldering side.
Boiler board connection details
Reader Vov4ik, who carefully reads all my articles, found an inaccuracy in my article, which he stated in a comment dated May 19, 2021.
I am posting a photo with details of connecting the board and the boiler diagram that he sent:
Wires to heating elements by color
Transformer and relay contacts
Connection diagram for heating elements with wire colors
Heating element terminals indicating wire color
Thank you!