Self-leveling floors are very popular due to their many advantages. First of all, this is a modern type of coating that can be used both for city apartments and country houses. But how well does this design combine with underfloor heating? Are temperature changes capable of destroying the self-leveling floor?
Do-it-yourself self-leveling heated floor
Design advantages
Self-leveling flooring has a number of advantages compared to other types of coatings:
Types of self-leveling floors
- with its help you can create a perfectly flat surface. There will be no joints or seams that are observed if you make a regular screed in different rooms;
- During the production process of the mixture for self-leveling flooring, components that are safe for human health are used. They do not emit toxic substances throughout the entire period of operation;
- there are no pores on the surface of the resulting coating, which prevents the accumulation of dust and dirt, which can cause allergies in people in the room;
Advantages of self-leveling floors - high aesthetic value of self-leveling floor. They give it any color. Also, using this technology, a realistic 3D image can be reproduced on the surface;
- This coating is highly durable. It is able to withstand significant loads that are generated from furniture being placed, falling objects with significant weight;
Preparing the base for self-leveling floor installation - The mixture being laid is characterized by high crack resistance. It is plastic and shrinks after hardening;
- durability of the coating. It does not deteriorate throughout the entire period of operation (about 40 years), does not lose its aesthetic qualities;
- high resistance to various aggressive compounds. The self-leveling floor can be cleaned by any means, since they are not capable of destroying it;
- high degree of fire resistance, which allows the use of self-leveling floors in both residential and public buildings;
- the resulting coating is moisture resistant.
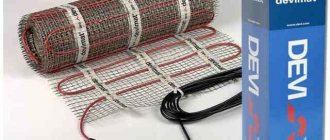
Electric mat installation
The electric mat is somewhat different from previous systems. It does not need to be poured into the screed. If a self-leveling floor is installed in an apartment on the second and subsequent floors, insulation will not be required. You need to level the base and prime it. A mat is laid on top.
A recess is also made in the wall to install a thermostat sensor. The groove must also run along the floor. Moreover, the sensor from the thermostat is necessarily located in the corrugated pipe. It should be located between any two turns of wire.
The mat is fixed with construction tape. After this, you can start pouring directly. The thickness of the self-leveling floor under a warm electric floor should not exceed 1.5 cm. Otherwise, the system will not be able to warm up the thick layer.
Pipes with circulating coolant
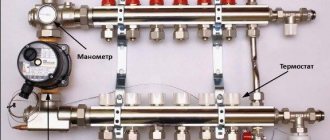
A water heated floor is formed from pipelines that are laid on a prepared base according to a certain pattern - in the shape of a spiral, a snake. The coolant circulates through the installed circuit. Thermal energy is produced using boilers of various types. Also, water heated floors can be connected to existing heating. To regulate the temperature of the coolant, a collector unit is used, to which the supply and return pipes are connected.
Connection diagram for water heated floor circuits
Water heated floors are a cost-effective, efficient and reliable type of heating. Its disadvantage is the complexity of installation. To fix the pipelines, it is necessary to pour a thick layer of solution. Also, if there are coolant leaks in one place, the entire system fails.
Features of electrical systems
It is worth considering that there are many varieties in the category of electric heating elements. This could be a wire, mat or infrared film. The wire is relatively thick. It fits into the screed. The mats are meshes made of polymer material on which a thin wire is laid out.
The mats are mounted directly under the tiles without screed. Tile adhesive is applied to such systems. Next, install the flooring as usual. Self-leveling floor heating under tiles is also a good option. When installing it, the floor level in the room rises less than when installing water heated floors or cables under the screed.
The third type is film infrared floors. They are intended exclusively for dry installation. In other words, there should be no solution on the surface of the film. If you do not adhere to this recommendation, the heated floor will quickly fail.
Electrical cable
An electric heated floor is formed from a heating cable, which is laid in a specific pattern. It can be single-core or double-core and have different powers. To facilitate installation, such cables are installed on a special base in the form of a grid. Manufacturers of electric heating mats produce a finished product that only needs to be laid on the surface of the base and fixed. This is done using a thin layer of solution.
Warm electrical cable connection diagram
The operation of the cable heated floor is controlled using a special device - a thermostat. It records the system parameters through a temperature sensor, which is installed in the floor structure between the turns of the heating elements. It is possible to automatically adjust the heating temperature, which can significantly reduce electricity consumption.
Types of heating systems
Almost anyone can install a warm floor under a self-leveling floor with their own hands. This procedure is carried out according to a certain technique. There are several types of heated floors. They differ in heating principle, cost and installation features.
All systems that are used today in arranging such heating can be divided into two large groups. These are water and electric heating systems. In the first case, pipes are laid out on the floor surface. The coolant heated by the boiler circulates in them.
Electric heated floors are a cable that connects to the network. This system is easier and faster to install than pipes. At the same time, the consumption of coolants in this case will be less. However, if there is a boiler in their own home, it is sometimes more profitable for the owners to install water systems. The electrical wire is ideal for installation in an apartment or private house.
Thermal film
An infrared heated floor is formed from thin heating elements in the form of a film. To install it, there is no need to pour a thick screed. Thermal film is laid over the entire surface of the base and fixed with ordinary tape. The operating parameters of the system are adjusted using a thermostat. With its help, you can set the required temperature of the underfloor heating, set the system to automatically turn on and off in accordance with the specified characteristics.
Installation of infrared heated floor
The self-leveling floor is ideally combined with this system. The only limitation to the installation of this coating is that the solution must be poured in a thin layer so as not to damage the film heating elements.
Technology for arranging a heating system under a self-leveling floor
When making a heating system in a residential building, a heated floor can be the only source of heat, which is not recommended, or additional to radiator heating. Installation of a heating system and pouring of floors is carried out in a strict sequence, the knowledge of which is necessary for any owner of country property in Moscow or any other city.
Where to start?
The surface is cleaned, leveled, and cracks are eliminated. In places where there will be a circuit or film of the floor heating system, the following points should be taken into account:
- When laying infrared film, avoid places where heavy or massive objects will stand;
- The distance from the walls must comply with the requirements of building codes;
- If there are heating devices in the room, the heated floor contour should be located at a distance of 20 cm or more from them;
- To minimize heat loss, it is worth making a thermal insulation layer, for which foil sheets secured with tape are suitable.
Installation of heated floors
Infrared floors are laid using grommets, connected with wires and included in an installation with a thermostat. The temperature sensor in the corrugation and the thermostat are synchronized - the elements must warm up, otherwise it is necessary to look for faults.
The cable-type system is laid like a film, but one cable is not allowed to overlap another. In addition, heating can only be started after the self-leveling floor has dried. The temperature sensor cannot be filled. Particular care should be taken to avoid the formation of voids or bubbles in the layer.
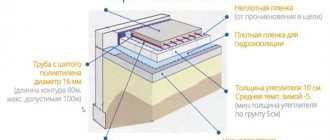
Water floors are formed by a pipeline on the surface filled with a solution. According to experts, copper or metal-plastic pipes will last longer than polypropylene pipes.
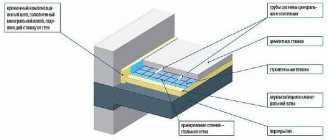
Self-leveling heated floor device
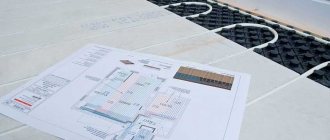
Self-leveling heated floors are installed according to the following scheme:
How to make a self-leveling floor correctly
- A regular screed is poured to level the base.
- The selected type of thermal insulation is installed - polystyrene foam, mineral wool, penofol and other types.
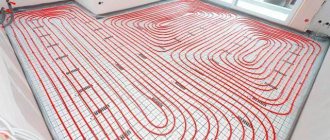
- Installation according to the established scheme of any type of heating elements.
- Prepare the mixture for pouring. To do this, you need to connect the individual components, which are sold as one set. To do this you need to use a drill with a mixer attachment.
- The resulting mixture is poured onto the prepared base.
- The surface is processed using a needle roller. This will remove air bubbles.
- The mixture is allowed to dry for 12-24 hours.
At the last stage, the surface is coated with a protective colorless varnish. When a day has passed, you can begin using the installed heated floor.
What is the self-leveling floor made of?
The screed or layers under the floor covering are made from special mixtures, the distinctive feature of which is their special fluidity. This is the only way to make a surface without recesses, pits or deformations.
The solution can be prepared either manually or mechanically. When choosing the composition of the mixture, experts recommend taking into account the moisture level of the resulting coating, as well as the overall thickness of the floor being installed. The solution is mixed with ordinary water, which gives additional fluidity.
There are anhydrous mixtures in which anhydrates are added. Usually, during their manufacture, modifiers are added - superplasticizers to increase fluidity or defoamers against bubbles in the mass. A screed made with a mixture of modifiers has additional advantages:
- The surface is formed perfectly smooth;
- The mixture hardens quickly;
- The solution retains heat well;
- During operation, the level of shrinkage is minimal.
In mixtures with anhydrite, moisture disappears almost completely within 10-14 days. Minimal shrinkage does not cause cracks, and heat retention will reduce heating bills for a residential building.
What screed thickness to choose for an effective floor heating installation
According to the screed technology under a heated floor, it is most often necessary to pour concrete mortar on top of the heating elements. This is necessary not only to create a level surface for the flooring, but also to protect all components. At the same time, the thickness of the fill layer will differ in different situations. Even the manufacturers themselves avoid this issue in their instructions for installing screeds under heated electric floors. It is the thickness that should be determined in the process of laying the components.
Purpose of the screed
A conventional screed is characterized by the following functions that it performs:
- Protection from external mechanical influence of heating elements and other components of a heated floor.
- Creation of a strictly horizontal surface necessary for high-quality installation of the selected flooring option.
- Uniform heat transfer from heating elements to the base of the floor.
- Load distribution on the base from furniture and household appliances.
- “Mediator” in the transfer of heat from heating elements to indoor air.
But it must not only fulfill the tasks assigned to it, but also meet certain requirements, among which are the duration of the operational period, which depends on the quality of the filling and preparation of the solution, as well as the ability to withstand constant temperature changes. At the same time, it should not have any negative impact on heating cables or other elements of a warm electric floor.
All recommendations from manufacturers for pouring screed should be followed at every stage, not forgetting about the optimal thickness of the heated floor screed. When installing a warm screed, you should take into account the nuance that such a fill will be more susceptible to thermal expansion. Therefore, it will be necessary to create all the conditions for the ability to withstand all obstacles.
Recommendations
When carrying out work on pouring the solution for screeding a heated electric floor, you should adhere to certain recommendations that will allow you not only to efficiently lay the heated floor under the screed, but also to select the minimum thickness of the screed.
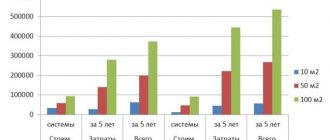
Much will depend on the power of the heating elements of the indoor heating system. The larger it is, the thicker the grout layer will have to be created:
- 80-120 W/m2 – the screed layer will be up to 20 mm.
- 100-140 W/m2 – 30-50 mm.
- 160-200 W/m2 – 60-100 mm. Thickness of the heated floor “pie”
When installing an electric heated floor, the thickness of the screed must be observed depending on the specific conditions of execution and the parameters of the room.
But at the same time, attention is drawn to the fact that the time during which the base of the floor will be completely heated will depend on the thickness of the filling layer. So it is not always very beneficial to create a thick layer of the prepared solution. In this case, a large amount of electricity will be spent heating the room.
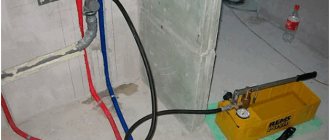
Before pouring an electric heated floor, you should check several times that the heating elements are installed correctly, as well as the wiring and connection of all components. In the future, to eliminate the malfunction, you will have to dismantle the screed. All wiring and electrical appliances must be insulated. This also applies to the temperature sensor placed in the corrugated pipe.
If you position the temperature sensor correctly, then if it fails you will not have to break the tie to remove it. It will simply be removed from the corrugated pipe and replaced with a similar one. It is worth noting that the thermostat cannot be installed in a room where there is a constantly high level of humidity.
You can also fill the cable floor with an adhesive solution. But this is provided only if tiles or porcelain stoneware are used as flooring.
Rough base
Before distributing the heating elements according to a pre-prepared pattern, you should check and prepare the base for the heated floor. It does not always meet all the requirements; it has defects in the form of potholes and height differences throughout the room. This should be dealt with so as not to encounter poor heating efficiency of the heated floor.
After removing the old floor covering and dismantling the concrete base, you can begin leveling using a rough screed. For this, a classic sand-cement mortar is used. Further activities can be started after it has completely dried and set. Otherwise, you can forget about high quality. The thickness of the screed over an electric heated floor here is usually up to 50 mm. The most important thing is to hide all the unevenness of the base and prepare the surface for laying heated floor heating elements.
Next, remove all unnecessary debris from the surface and, if possible, dust. A construction vacuum cleaner can help cope with the task here. A layer of thermal insulation is laid on top of the rough screed and the subsequent distribution of the underfloor heating cable or heating mat. In some cases, a do-it-yourself floor screed under a heated floor is installed on top of an infrared heated floor. True, this slightly reduces its efficiency during operation.
Laying heated floor components
In order for the underfloor heating system to function fully, before pouring the concrete screed, the mounting locations of the main sensors and components should be determined. The thermostat is installed on the wall surface and, if possible, close to an existing outlet. The distance from the floor should be at least 30 cm, since the temperature from the base will somewhat distort the transmitted information.
The temperature sensor is placed in the base of the floor, onto which the prepared solution will subsequently be poured. It is worth noting here that if the solution comes into direct contact, it may fail. To avoid this, the temperature sensor is placed in a corrugated pipe that leads from the thermostat on the wall. All open areas of the corrugation are sealed with sealant so that the solution does not get into them during pouring. It would not be superfluous to additionally install a special plug at the end of the tube at the base.
The heating elements are laid based on the drawn diagram, where the step of their installation will also be displayed. You should not deviate from the drawing, since all the little things are pre-calculated on it. After completing work with the underfloor heating components, you need to check their functionality by connecting them to the electrical network. The resistance of the cable is measured, which must correspond to the data specified in the passport for it. If the result is positive, you can proceed directly to pouring the concrete solution.
Screed device
The best option for making screeds is to use special ready-made dry mixtures for heated floors. They contain all the necessary components, including a plasticizer. This significantly increases the quality of the finished solution. It should be distributed carefully so as not to damage the heating cable of the warm electric floor. In addition, the mixture should be distributed evenly over the entire surface.
When pouring the solution, no matter how much screed there should be above the heated floor, air pockets must not be allowed to form. This will help reduce heat transfer from the heating elements to the base.
As mentioned earlier, the optimal thickness of the screed for heated floors should be from 30 to 50 mm. There may be cases when the minimum screed thickness for electric heated floors is reduced. But then you will have to add appropriate additives (plasticizer) to the solution.
Until the concrete screed dries, you cannot start the heated floor. Otherwise, the solution will not be able to gain the necessary strength and set. After a period of 28 days, you can begin trimming the protruding elements of the damper tape and thermal insulation, as well as turn on the heated floors after the screed. The heated floor after screed is covered with the selected flooring option.
There may be cases when the area of the room is more than 20 m2 or one of the walls in the room is more than 5 meters in length. In this case, you should not only create different circuits from the heating elements, but also fill the screed in two stages. Expansion joints must be created between the contours of the heated floor so that the integrity of not only the concrete screed during operation of the heating system, but also the floor covering is maintained.
All these subtleties allow us to get an answer to the question of how to properly make a screed for a heated floor. There are no particular difficulties if you strictly follow the sequence of actions and recommendations from the manufacturers. After laying the floor covering, the air in the room will be heated to the required level.
Source: https://sdelalremont.ru/tolshhina-styazhki-elektricheskogo-teplogo-pola.html