Heating area measurement
The first step in laying a heating mat under a tile is to measure the area. To do this, step back from the wall about 100 millimeters and place the mat on the area that needs to be heated. We recommend not heating the floors where stationary furniture will be located: wardrobes, bedside tables, chests of drawers, etc. This area must be excluded from the heating area. Measure the resulting area. Let's assume the measured area is 5 square meters. We select a heating mat based on the required installation area.
→ choose heating mats for tiles
What is a heating mat?
Heating mats are designed to heat the floor for a short time. They are used when there is no possibility or desire to make a screed for a heated floor and, thereby, increase the thickness of the floor. The mats are laid in a layer of tile adhesive while laying the tiles. In this case, they are placed in a 2-3 mm layer of glue. The temperature regulation process occurs using a thermostat, which is connected to a temperature sensor built into the floor.
Installation of heating mats
Structurally, heating mats are heating cables of small diameter (2.5-4.5 mm), laid in waves on a fiberglass mesh with a fixed pitch. The step width is usually 50 centimeters. themselves can be either single-core or two-core . Naturally, they have increased insulation to ensure electrical safety. The heating cables have a protective reflective screen at the bottom. They are connected to a 220 V household network using a regular wire. The connection between the heating cables and a regular wire occurs through a coupling, which also has a protective sheath.
Advantages and disadvantages of heating mats
Let us say right away that it is impossible to say anything unambiguously about the advantages and disadvantages of this system, since everything is quite relative. In fact, they have no disadvantages, but they have their own characteristics. For example, let's take the following point. Two-core heating mats have one cold end (for connection to the network). Therefore, the installation process will be a little easier, because... you do not need to extend the second side of the mat to the thermostat attachment point (in principle, to the beginning). Single-core ones have 2 wires for connection and therefore you will have to return one of the wires to the beginning of the installation. At first glance it may seem that the second option is more problematic, but this is not entirely true.
The use of 1-core heating mats leads to certain benefits compared to their 2-core counterparts. The benefits will be the following:
1. Single-core systems will be cheaper than 2-core systems; 2. 1-core is thinner than its analogues; 3. 1-wire have increased power and because of this the heating rate will be higher.
If you look at the level of electromagnetic radiation, then with heating mats it is significantly lower than with ordinary wiring and, therefore, can be used at home without fear.
How to choose heating mats
The process of selecting a heating mat is based on the heated area. That is, you need to calculate the area in your room that will be heated and then select a mat of the required size. The peculiarity of choosing heating mats is that their size cannot be reduced. You can only reduce the length of wires for connecting to the network. This is why you will need to buy the material that is closest in size to your heated area.
For example, you need to heat an area of 9.3-9.7 m². The closest mat sizes are 9 and 10 m². Therefore, you will have to buy the 9 m² size.
Placement of the mat on the floor
Clean the floor from dirt. Place the heating mat on the area marked for heating, securing it to the floor, for example with a glue gun. It is best to start laying the heating mat by laying the so-called cold end of the power cable, which is laid in a groove and brought out to the floor. Place the heating mat on the heated area, if necessary, cutting the glass mesh to turn the mat in the desired direction. Be careful not to damage the heating cable.
Installation of heating mats
Laying must be carried out with the utmost care, as mechanical damage to the heating cables is possible. Do not use cutting or sharp objects during work. In addition, it is advisable that you wear soft shoes, this, again, to prevent damage to the cable. You should try not to step on them, but if you have to, make sure there is no debris. Upon completion of laying the tiles, you should also not lose your vigilance, because... When stripping seams, damage can also be caused. Heating mats can be mounted on the following coatings in the following sequences.
Concrete bases:
1. Concrete base; 2. Thermal insulation layer; 3. Leveling screed; 4. Shock-absorbing material that works under thermal expansion; 5. Heating system; 6. A layer of tile adhesive; 7. Tiles.
Wooden base:
1. Wood base; 2. Thermal insulation (EPP or foam); 3. Heating system; 4. Leveling layer (chipboard, fiberglass boards); 5. Finish coating.
Sequencing
The installation process of heating mats occurs in the following sequence
1. Preparation of a work plan and installation diagram; 2. Fastening the installation boxes and tube for the temperature sensor in accordance with the diagram; 3. Preparing the base of the floor - if necessary, leveling or removing cracks; 4. Checking the electrical resistance of the mats; 5. Cutting the material; 6. Laying and fixing mats; 7. Checking electrical resistance. At this stage, it is allowed to turn on the system for a short time; 8. Laying tiles; 9. Checking electrical resistance. 10. Installation of temperature controller.
Please pay attention! It is prohibited to put the system into operation until the tile adhesive has completely hardened.
Preparation for installation
Before you begin, you need to check the surface of the base. If there are various cracks, they need to be repaired. The floor surface must be free of debris, dirt or dust. If the work is carried out on a wooden base (slab), then all elements must be rigidly fixed.
As mentioned above, before starting work you need to prepare a wiring diagram. It should contain the heating area, mat laying pattern, installation points for the sensor and temperature controller. In addition, you need to prepare in advance and connect the power line to the installation point of the temperature controller.
Also, before laying heating mats in the floor, it is necessary to make a groove for laying the temperature sensor tube. The tube should be attached to the groove at a distance equidistant from the heating cables and should be installed level with the top end of the mat. On one side, the tube needs to be covered with something to prevent tile adhesive from getting into it. To do this, use electrical tape or tape.
Laying methods
Heating mats can be installed in two main ways. Below we will talk about them in more detail.
Method 1 – heating cables are directed upwards.
This method is the most popular. In principle, this method is logically correct, but the second method also exists. Its essence is as follows. The heating mat is laid on the surface with the mesh down, and the heating cables remain at the top. Then it is fixed to the floor using glue. After fixing, tile adhesive is applied on top and the tiles are laid directly. When applying glue, you need to ensure that no voids appear. They can cause overheating and burnout of the cable.
Method 2 – heating cables are directed downwards.
Its technology is as follows. Heating mats are cut out and laid with heating cables down. It is necessary to cut the mesh, but you need to be careful not to cut the cables themselves. After such a pattern, the mat should be re-rolled, and after that the first layer of glue (up to 3 mm) should be applied. You then roll the heating mat over the applied tile adhesive and press the cables down slightly. During this procedure, you need to ensure that there is a distance of at least 5 centimeters between the heating cables. Next, a second layer of glue is applied, on which the tiles will be laid.
Types of electric heating mats
At the moment, there are two types of this heating system:
- single-core;
- two-core.
How to choose the required type?
In a single-core system, the heating element is a specially designed wire. When installation is carried out, you need to connect the two ends of this cable to the temperature controller. That is, the ends of the heating element will converge in one place.
Due to the distinctive design of the first type, electromagnetic field radiation occurs - this is a feature of a single-core heating mat. There is no harm to human health; however, single-core heating mats are not recommended for use in rooms where people regularly live or work. It is worth noting that the cost on the construction market of a single-core heating mat is much less than that of two-core ones. Therefore, this type is best installed in the bathroom.
A two-wire system contains not only a special wire, but also an ordinary electrical one. On one side they are located in a connecting device (coupling). On the other hand, they are connected to a temperature controller. Thanks to this factor, the electromagnetic field is extinguished. Also, due to the simple design, it is much easier to install electric mats. Therefore, double-core mats were chosen because they are safer.
If we compare the reliability of each variety, then the indicators are equal. Each manufacturer of this system has its own design power. You need to familiarize yourself with the data, then choose.
Let's look at the advantages of this floor heating design.
Types of electric heated floors under tiles
Types of electric heated floors under tiles
- cable – resistive heating cable for underfloor heating in a reel (coil). It is attached by clamping to a special strip. You can buy a ready-made kit containing a minimal or complete set of components. Some kits even include a tool. The price of the kit depends on its power, cable length and configuration. You can save by selecting the elements yourself and doing the installation yourself. When choosing, you need to take into account that the floor heating cable can be single- or double-core. The second option is preferable because it is more reliable, the first is cheaper;
- heating mats (cable). Experts advise choosing this option if you plan to install it yourself. The cost of the mats is a third more expensive, but in terms of ease of calculation and installation it is significantly superior to the previous option;
- film (infrared) heated floor. The most expensive option, but the most reliable in terms of security. Primarily due to the absence of electromagnetic waves.
After analyzing user reviews and recommendations from experts, it can be noted that cable flooring in mats is the most preferable option for installing an electric heated floor system. While cable under tile floors are less common. This is mainly due to the need to fill the screed, which:
- increases the load on the floor slab (which is undesirable in multi-story buildings);
- reduces ceiling height;
- pouring the screed is accompanied by wet work, which is not always acceptable for users;
- long drying period (hardening of the concrete solution).
In addition, calculating the length of a heating cable is more difficult than that of heating mats.
Do-it-yourself installation of electric heated floors under tiles
You should know that the technology for laying an electric floor under tiles differs somewhat depending on the type of floor, but some of the steps for them are identical:
Operating principle
Warm electric floor is a heating system that can be used as a main or additional heating system. Thermomats often play a supporting role, providing maximum comfort. At the same time, standard heating radiators are primarily responsible for heating the room.
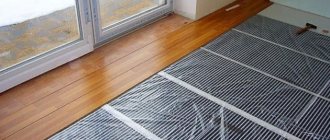
Warm floor on mats
Heated floors consume a large amount of energy. That is why it is primarily suitable for use as an additional heating system. To reduce costs, it can be turned off when it is not needed.
When using an electric heated floor, you can adjust the temperature and change the operating mode.
How to regulate temperature
In this underfloor heating system, the temperature range is adjusted using thermostats (thermostats) and temperature sensors. They are needed for:
1. Maintaining the required temperature; 2. Regulation of the current temperature; 3. Economical operation of the system.
Typically, temperature controllers have an adjustment range from 10 to 50 ⁰С, with the adjustment accuracy being +1⁰С.
One temperature controller is capable of regulating several heating mats, which are connected in parallel. When connected, the maximum switching current should not be more than 16 Amps, which is equal to 3.6 kW of power. When the total power of the connected elements is more than 3600 W, it is necessary to install control cabinets. The following equipment is installed in them:
- Introductory machine;
- RCD – residual current device. Necessary for electrical safety;
- Power relay;
- Circuit breakers along lines.
When installing this entire system, you need to know that all power cables, materials and elements must be made in accordance with the requirements of the Electrical Installation Rules.
How to install a temperature controller
It is advisable to place temperature controllers next to the existing wiring if you do not need to conduct separate electrical wiring for the heated floor. The installation location should be as convenient as possible for you and should be accessible after installing all the furniture.
Thermostats are installed in the same way as the socket is installed. During the installation process you will need to do the following:
1. Make a hole in the wall for mounting the regulator; 2. Make grooves for the wires from the regulator to the power connection point. You can find out how to make grooves in the wall here; 3. Make grooves for laying wiring from the regulator to the floor; 4. Mount the regulator in its place; 5. Connect the wiring; 6. Mount temperature sensors in a corrugated tube. As already mentioned, on one side the tube needs to be closed. The second side of the tube should be inserted into the box. The tube must be securely secured between the heating cables at the same distance, no less than 20 centimeters.
Necessary factors for selection
Before purchasing electric heating mats, you need to pay attention to the following factors:
- At the very beginning, you need to draw up a plan for your premises. On the plan you should definitely note the location of your furniture and household appliances in the room.
- Next, you should make calculations of the area that the “warm floors” will occupy.
- Then you need to select a model that has dimensions that match the calculations.