Requirements for the chimney device
The installation of heating devices is subject to the requirements set out in the regulatory documentation.
Installation of devices is regulated by the provisions of SNiP 2.04.05–91 and DBN V.2.5-20-2001 . Also, before drawing up a project, it is advisable to study materials about heating systems ( SNiP 41-01-2003 ), about heat generation devices ( NPB 252–98 ), about technical conditions for the operation of thermal devices ( GOST 9817–95 ), about the rules and regulations for the operation of smoke ducts (VDPO).
Some of the requirements are addressed specifically to the installation of chimneys. The design of the structure can be anything, but the material must be non-flammable.
The materials used for the construction of chimneys can be:
Without exception, all structures are prefabricated, and the installation itself is fragmentary, since the chimney passes through several rooms (for example, a room and an attic).
In order for a structure to meet fire safety requirements, its parameters must be correctly calculated, and all component parts must be sized accordingly. When installing factory equipment, you must follow all the recommendations set out in the instructions, including the assembly procedure and methods for installing parts.
The documentation contains certain provisions that also need to be taken into account, for example:
- the length of the chimney can be any, but not less than 5 m (the height of the ventilation ducts is not less);
- the cross-section of the pipe must correspond to or exceed the inlet hole in the generator;
- each heat generator requires a separate chimney;
- the speed of flowing air inside the pipe is from 15 m/s to 20 m/s;
- the thickness of the pipes is determined by the material of manufacture (the norm for steel is at least 0.5 mm);
- for regular inspection and cleaning activities, chimneys are equipped with pockets (niches) 0.25 m deep;
- the maximum number of chimney turns is 3;
- the radius of curvature must exceed the diameter of the channel;
- the height of the pipe above the roof is regulated by the roof structure: on a flat one – 0.5 m; 0.5 higher than the roof if it is located at a distance of 1.5 m (or less) from the ridge; equal to or greater than the ridge axis if located at a distance of 1.5-3 m.
The order of construction of the structure has been established - always from the bottom up, that is, from the heat generator (boiler, furnace) through the floors to the roof. In prefabricated structures, each subsequent pipe part is inserted into the previous one.
The operating temperature of sealants used to fix parts must be at least 1000º. The connections are equipped with clamps on the outside; fastening material should not get inside the chimney.
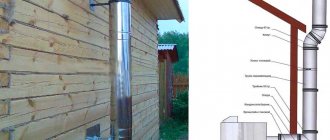
The regulatory documentation defines the places where chimneys are allowed to be installed. The wall material must be non-flammable, but if this condition is not met (for example, in a building with wooden walls), then during installation, for protection purposes, cap or crown pipes should be used.
General requirements for chimneys
The choice of chimney depends on what heating equipment is intended to be used. So, there are chimneys for different types of boilers:
- gas;
- diesel;
- solid fuel;
- universal;
- combined.
Since the safety of using heating equipment directly depends on the chimney (and the correctness of its installation), it is necessary to take a very responsible approach to choosing a smoke exhaust system. There are a number of requirements that a chimney must meet. These are requirements such as:
- smooth surface and smooth rounded shape (promote stable traction);
- low condensation formation; heat resistance and tightness;
- compliance with fire safety requirements; ease of installation and subsequent maintenance.
It is also important that modular chimneys correspond to the power for which the heating equipment used is designed. In addition, it is necessary to consider how access to the chimney will be provided. This is important so that it is convenient to clean and maintain during operation.
Instructions for laying a brick chimney
The most ancient chimneys known to mankind were made of stone, and then of brick, along with the first stoves. Natural material is still used to this day for the construction of heating systems in private homes. Let's look at the main stages of constructing a brick chimney.
Design features of a brick pipe
There are two options for connecting a brick pipe. The first, lighter one, is installed directly on the stove, the second is built nearby and connected with an adapter. The fact is that the weight of a brick chimney with a height of 5 m or more is quite large, and not every heat generator can withstand it.
To build one pipe, from 500 to 800 bricks are required (depending on the height of the ceilings and roof), each of them weighs 3.8 kg.
In any case, a chimney is not just a hollow structure, but a complex structure consisting of several functional parts.
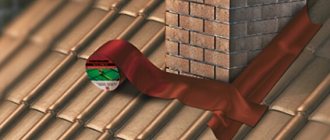
When the chimney passes through the ceiling, a fluff is created, which is a thickening. The next thickening of a similar configuration is constructed when the pipe passes through the roof. It's called " otter ".
The part of the pipe from the fluff to the otter is the outer chimney. A neck rises above the roof , ending with a cap (an alternative to a deflector).
The main safety condition is the distance from the internal channel through which hot smoke and gases pass to the surface of the walls and ceiling elements. It is equal to 0.25 m - this is exactly the length of one building element, a red solid brick.
The second condition concerns the location of the chimney. It must be erected strictly vertically, the maximum possible error is 3 degrees. And the third condition is the ideal tightness of the masonry, in which there should be no through holes or cracks.
Varieties
There are several types of chimneys. They are classified depending on their location relative to the furnace itself:
- Mounted pipe. Due to its simplicity of design and ease of installation, it is perhaps the most common. The mounted pipe is mounted directly above the heating structure, being its continuation. Often installed on cast iron or small sauna stoves.
- Root chimney. Such a pipe is mounted next to the furnace on its own foundation, closely adjacent to one of its sides. The basic structure is convenient to use for multi-story buildings, where several heating elements on different floors can be connected to one chimney. For such cases, an accurate calculation of the parameters is required, otherwise the chimney will not provide the necessary draft.
- Wall pipe. Built into the external or internal main wall of the house. The external version should be carefully insulated, since due to the difference in temperatures inside and outside the structure, condensation can accumulate in the chimney, leading to the accumulation of soot and a decrease in draft.
We recommend that you read: DIY gazebo from a profile pipe
Based on their location to the building, chimneys can be divided into internal and external:
- Internal chimneys provide good draft, but are more difficult to install because they require transitions through the ceilings and roof.
- External chimneys are more convenient in terms of installation (especially in an already built residential building) and maintenance. It is not always possible to give such chimneys an aesthetic shape. In addition, the external surfaces of the structure need to be insulated.
How to install a chimney correctly with your own hands: all the nuances when installing a chimney
In your private home or bathhouse, if you have a heating boiler, fireplace or stove, it is very important to correctly choose the method of getting rid of combustion products. And the main one is smoke. If you approach the issue inattentively, you can not only reduce the efficiency during functional operation, but also put your own life in danger. Carbon monoxide, if it spreads indoors even in small quantities, can cause serious poisoning of the body. Correct installation and installation of a chimney pipe with your own hands is a task today accessible not only to professionals, but also to amateurs who have studied the technical side of the issue in detail.
How to make a chimney with your own hands?
The construction of a chimney is not the most difficult engineering task, compared, for example, with the construction of a brick oven itself. In order for the pipe to effectively cope with its main tasks - smoke removal and provision of draft - you must carefully calculate its height, cross-sectional area and other parameters, as well as be able to choose the right building material and know the rules for its installation.
Calculation of pipe parameters
In the industrial production of heating devices, the height of the outlet channel is calculated using a complex formula that takes into account the amount of static draft, the average combustion temperature and the outside air temperature (readings are taken for the summer period).
In everyday life, you can determine the height of the chimney with good accuracy using the following rule:
- If the distance between the chimney outlet and the roof ridge is less than 150 cm, the chimney should rise approximately 50 cm above the ridge.
- When removed from the ridge by 150-300 cm, the chimney pipe is installed flush with the level of the ridge, or slightly higher.
- At a distance of more than 300 cm, the chimney is mounted flush with the ridge, or above a conventional line drawn down from the ridge with a slope of 10 degrees.
Note! According to building codes, the total height of the chimney (the distance from the grate to the top point of the pipe is taken as it) must be at least 5 meters.
The dimensions of the chimney cross-section are determined depending on the power of the heating element:
- Less than 3.5 kW – 14 x 14 cm.
- 3.5-5.2 kW – 14 x 20 cm.
- 5.2-7.2 kW – 14 x 27 cm.
We recommend that you familiarize yourself with: Features of the installation and use of chimneys made from a metal pipe with your own hands
If there is a significant discrepancy between these parameters, the draft and efficiency of the furnace as a whole can greatly deteriorate.
To prevent turbulence in air flows in the chimney, leading to reverse draft, its walls must be as smooth and even as possible. It is quite difficult to make brickwork perfectly level, so many owners place a round metal or ceramic pipe of the appropriate cross-section inside the brick channel.
How to choose a brick for a stove chimney?
Brick is considered the most popular material for the construction of stove chimneys. Moreover, not every variety is suitable. The material must withstand frequent temperature changes and direct prolonged exposure to fire. Sand-lime and ceramic bricks are vulnerable to high-temperature influences, but fire-resistant, solid, fired varieties will be the best option.
For the construction of a chimney, first grade brick, factory marked M 150-200, is perfect. The products are easy to distinguish by their bright red color with a yellowish tint, smooth edges without chips or cracks. This brick has good density, and when tapped it makes a ringing sound.
Of the obvious advantages of brick chimneys, we note good heat accumulation and an optimal (for solid fuels) draft level. The disadvantages include the relatively complex installation procedure.
It is important! Some craftsmen prefer to soak the bricks in water before the laying process. This trick gives good adhesion to the solution and makes the chimney more durable. But such a design will take much longer to dry.
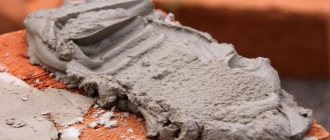
Making a mortar for masonry
To build a reliable and functional brick chimney, it is important not only to choose the right type of brick, but also to use the correct masonry mortar. The strength and tightness of the pipe will depend on the quality of this mixture.
The brick chimney is laid using a sand-clay mixture. Clay requires preliminary preparation, for which it is cleaned, soaked and thoroughly mixed until a homogeneous viscous mass is obtained. At least 12 hours pass until this component is completely ready, after which sand is added to the mixture.
It is important! The amount of sand is directly dependent on the fat content of the clay.
The resulting solution is tested, for which ropes or balls are rolled out of it, which after drying should retain their shape. Also, the solution must be plastic and easily slide off the surface of the iron spatula. This solution is applied to the masonry layer in an even layer of 8-9 mm.
We recommend that you read: Is it possible to use metal-plastic pipes of the system for heating?
In general, the solution recipe may differ for different sections of the chimney:
- The base of the main pipe must be built with an increased margin of safety, so it is laid out on a sand-cement mixture (solution proportions 3:1 or 4:1). Some craftsmen add 0.5 parts of slaked lime to give the mixture elasticity.
- The area from the stove to the roof is laid out on a sand-clay mortar. To protect flammable floor materials from possible overheating, the brick walls of the pipe in this part are made thicker.
- The pipe neck and head - the area facing the open space above the roof - is constantly exposed to external factors (temperature changes, gusts of wind, moisture or ultraviolet radiation). This section of the chimney is laid out using a sand-cement mixture.
Chimney laying
The main chimney for the stove begins to be laid out from the foundation, while the mounted chimney begins from the ceiling. The laying technology itself for a chimney is much simpler than for a stove, so laying out a chimney with your own hands will not be difficult.
Note! Masonry must be carried out with bandaging rows.
After finishing the chimney laying, the space between it and the roof must be protected with waterproofing material. If this is not done, moisture from precipitation will penetrate under the roof, causing mold, mildew and other unpleasant consequences.
Making a chimney with your own hands is not difficult, but if you do not have the necessary experience to carry out such work, it is better to turn to professionals.
Arrangement rules
Carbon monoxide is almost impossible to detect; it has no taste or smell, and is invisible visually. Moreover, it is heavier than air, so it settles and remains in the room. In this regard, it is necessary to follow the basic rules when installing the heat generator and chimney:
- When installing a stove or fireplace with a large mass, prepare a foundation for it in advance: a small platform that will not budge if the base of the building sag.
- Wall and ceiling ceilings, if they are made of flammable materials, should be located at a considerable distance from the flame source (about 40 cm). When passing through wall and ceiling ceilings: 500 mm - to combustible, 380 mm - to non-combustible.
- Maintain a minimum number of bends in the smoke duct. At the same time, do not allow right angles in the system; it is better to split such a bend into two sections or use elements with a smaller and larger angle.
There are standards put forward during installation work depending on the type of fuel used. These are SNiP 41-01-2003, NPB 252-98 and VDPO. Ignoring them can cause many violations that affect the quality of the heat generator. Incorrect selection of the device can lead to overheating of the floors, insufficient draft leads to soot settling, and a leaky assembly leads to smoke in the room.
Rules for installing a chimney in a private house
Each type of fuel has its own rules and regulations for smoke removal and installation and repair of heating equipment. They are set out in official documents:
- SNiP 41-01-2003;
- NPB 252-98;
- VDPO.
It is necessary to strictly follow these standards in order to protect the building from fire and the lives of household members from poisoning. During combustion, hot gases, ash and soot are formed, which must be removed through the pipe immediately. If the chimney in a private house is installed improperly, overheating of the walls or ceiling is possible.
The second danger is the entry of carbon monoxide into the room. Carbon monoxide is odorless and colorless. It is heavier than air, so it concentrates closer to the floor. If inhaled, leads to poisoning and death. Formed from a lack of oxygen in the furnace (poor draft). The common name is “the silent killer.”
Basic rules for installing a chimney:
- The stove must stand on a platform independent of the structure. This is necessary so that if the foundation of the house subsides, the heating equipment does not “lead” or be destroyed.
- Combustible materials of walls, ceilings or roofing must be at a distance of no closer than 38 cm from the wall of the sandwich pipe. The space is filled with a heat insulator. Additionally, wooden structures are insulated with an asbestos or galvanized screen.
- The fewer turns, the better the traction.
- A rotation of 90 degrees is replaced by 2 by 45 degrees.
- The height of the pipe depends on the proximity of the roof ridge when exiting. Near the ridge, the pipe is brought up 50 cm. With a distance to the ridge of 1.5 to 3 m, the pipe is sufficient to reach the ridge. When the distance of the pipe outlet from the ridge is more than 3 m, the calculation of the height of the pipe is based on the ratio of the angle between the horizon of the ridge and the top of the pipe. It should be 10 degrees.
We recommend that you read: Features of the use of polyethylene pipes in gas pipelines
Note! When calculating the height of the chimney, one should proceed from fire safety standards for the nearest objects - attic or dormer doors, windows. During combustion, hot sparks fly from the chimney, which can cause a fire if the instructions are neglected.
Installing a chimney in a private house as close as possible to the ridge is more structurally complex than venting through a wall. However, this option allows you to install an ideal chimney, without turns and horizontal sections, with the shortest pipe.
Main technical characteristics of the chimney
Diameter
As a rule, manufacturers of heat-generating devices prescribe the recommended chimney diameter in their instructions. This parameter directly depends on the traction force. And it is already determined by height, the dependence is directly proportional. The main requirement: the diameter cannot be narrower than the diameter of the furnace pipe; this is prohibited.
Height
Calculation of the height of the chimney relative to the ridge is based on the requirements of SNiP 41-01-2003 and SP (building rules) 7.13130.2009, as well as on the recommendations of the heating device manufacturer.
If the roof has a flat structure, then the height above the roof is at least 50 cm. On pitched roofs, if the chimney is located at a distance from the ridge of up to 1.5 m, its height must be at least 50 cm relative to the last or enclosing parapet. If it is located within 1.5–3 meters, the height cannot be lower than the ridge or parapet. When the structure is located more than 3 meters from the ridge line, its minimum height is determined by drawing a line at an angle of 10 degrees relative to the horizon.
Material
Today, consumers have many options when choosing a smoke exhaust system:
- classic version of pipes made of brick;
- ceramic analogues;
- modular chimneys made of stainless steel, which have become popular relatively recently, but have already established themselves as a simple and at the same time reliable device.
Sandwich pipe for chimney Metalotherm AT / Metaloterm AT
The world's first modular sandwich chimney pipes with a 30-year manufacturer's warranty even after repeated soot fires in the chimney (t>1000º C)!
Scope of application for METALOTERM® AT / METALOTERM AT sandwich chimneys: chimneys for fireplaces (open and closed types) and solid fuel stoves (firewood, wood pellets, coal), chimneys for baths, chimneys for saunas.
These stainless steel chimneys are not just resistant to a single soot fire (which is what European standards require for stainless steel chimneys that are resistant to soot fire). They can be used without repair or replacement after repeated soot fires in the chimney.
Buying a METALOTERM chimney is cheaper than not buying!
Witness the test of the METALotherm AT pipe for the 20th soot fire , which we personally attended!
- View the full collection of videos on METALOTERM chimneys
Chimney horror stories. With Metalotherm pipes you won't see this!
Insulated sandwich pipes for chimneys made of stainless steel METALOTERM® AT / METALOTERM AT have a patented three-layer design, thanks to which all the consumer properties of the smoke channel are preserved even after repeated soot fires.
Catalog of chimney elements Metalotherm AT ( ).
AT sandwich chimney design :
1. The inner pipe can not only elongate under the influence of temperature by 18 mm or more, it evenly
expands in both directions along the entire length of the smoke channel and is guaranteed
to return to its original position
due to a special device for compensating for thermal expansion between pipe sections.
2. Mineral insulation AMGISO®/AMGISO provides reliable insulation over the entire temperature range, including above 1000º C. Why not basalt wool? Unlike basalt wool, AMGISO®/AMGISO mineral insulation does not sinter and retains its volume even after soot fires . The insulation packing density is very high - 150 kg/m3. During the first use of the smoke duct, the insulation fills all joints, eliminating the occurrence of thermal bridges in the voids between pipe sections.
These advantages provide the Metalotherm AT chimney with resistance to repeated soot fires .
The clip connection of pipe sections provides special mechanical strength to the entire chimney structure, and the clamps serve mainly a decorative function. There is a special system for draining water from the docking unit to prevent it from getting wet from precipitation, as well as freezing and destruction at low temperatures.
Plus the usual advantages of double-circuit metal sandwich pipes for chimneys: quick and easy installation, low weight.
Chimney Metaloterm® AT / Metalotherm AT is a smoke duct of increased reliability and safety. This is the most appropriate chimney for wooden houses , which have increased fire safety requirements.
And, if you need a good chimney for a bathhouse or sauna , then the METALOTERM AT chimney pipe as a chimney for a sauna stove is the best solution, because it is the safest.
The famous Dutch design applied to a stainless steel chimney means a choice of pipe appearance : paintable stainless steel, polished stainless steel, brushed stainless steel, painted stainless steel, copper-plated stainless steel. Basic option : matte stainless steel, which you can paint yourself in the desired color. The part of the chimney that runs indoors and remains open (not covered by a box) can be made in the “ Metalotherm AT Design ” version with practically invisible pipe connection points (while maintaining all the technical and consumer characteristics of the pipes). METALOTERM AT and METALOTERM AT DESIGN pipes are easily joined together using special adapters.
METALOTERM AT's large element base includes over 80 standard elements. any non-standard components to order .
Pipes have been produced since 1982. Since that time, they have proven themselves to be excellent in cold climates in Scandinavian countries.
Once you make the right investment in choosing a chimney , you can guarantee your safety for many years . Of course, observing fire safety rules when installing and operating pipes. We remind you that in Russia, pipe and furnace work must be performed only by specialized organizations (or specialists) with a license from the Ministry of Emergency Situations for this type of activity.
Due to the presence of isoblocks in the element base, which ensure tightness in places where the sandwich chimney passes through the roof and ceilings, the pipes are ideal for use in energy-efficient houses, passive houses / air force houses .
Correspondence table for pipe diameters, insulation thickness, cross-sectional area and weight of the Metalotherm AT /
Metaloterm AT chimney (for internal diameters up to 200 mm) :
| Int. diameter, mm | 130 | 150 | 180 | 200 |
| External diameter, mm | 205 | 225 | 255 | 275 |
| Insulation, mm | 37,5 | 37,5 | 37,5 | 37,5 |
| Cross-sectional area, cm2 | 133 | 177 | 254 | 314 |
| Weight, kg/m | 6,5 | 7,5 | 9,0 | 9,5 |
| Internal thickness pipes, mm | 0,4 | 0,4 | 0,4 | 0,4 |
| Outer pipe thickness, mm | 0,4 | 0,4 | 0,4 | 0,4 |
Table of correspondence between pipe diameters, insulation thickness, cross-sectional area and weight of Metalotherm AT / Metaloterm AT chimneys (for internal diameters greater than 200 mm) :
| Int. diameter, mm | 250 | 300 | 350 | 400 |
| External diameter, mm | 325 | 375 | 425 | 475 |
| Insulation, mm | 37,5 | 37,5 | 37,5 | 37,5 |
| Cross-sectional area, cm2 | 491 | 707 | 962 | 1257 |
| Weight, kg/m | 12,0 | 14,5 | 17,5 | 20,0 |
| Internal thickness pipes, mm | 0,4 | 0,5 | 0,5 | 0,5 |
| Outer pipe thickness, mm | 0,4 | 0,5 | 0,5 | 0,5 |
- Complete collection of videos on METALOTERM chimneys
- Our recommendations
- Delivery and installation services
The use of this pipe can guarantee safety when installing chimneys in wooden houses, or installing a chimney pipe for a bathhouse or sauna. You can buy a fireproof sandwich pipe for a chimney both in the FLAMBIS Fireplaces and Stoves and remotely (by contacting us by phone or email).
Forms of payment: cash, bank cards, bank transfer. Learn more about payment methods and delivery of goods.
How to install a chimney correctly - choose the type of outlet
There are two options for the passage of the chimney:
- Through the wall. The advantages of this solution are improved fire safety, minimization of smoke, the ability to simply increase draft depending on the height of the pipe, as well as installation in a finished building. But there are also disadvantages: more complex and expensive installation.
- Through the roof. The advantages of this solution are high structural stability and the absence of overcooling of flue gases. But at the same time, the probability of “missing” the occurrence of a fire is higher, since smoke occurs in the ceilings that are located in the attic and on the roof, and they are simply not visible until the fire appears.
Installation
It is imperative to adhere to the requirements of SPiP 41-01-2003 “Heating, ventilation and air conditioning”:
- The cross-sectional area of the smoke duct must be no less than the cross-sectional area of the boiler pipe. Smoke channels should be installed vertically, without ledges.
- An inlet vacuum of at least 5 Pa must be ensured. The recommended duct height is at least 5 m from the boiler air intake.
- It is mandatory to use polyurethane foam when crossing a roof or wall.
- Lack of horizontal channels for cleaning in the attic.
- Connections of parts cannot be installed in interfloor and attic floors.
- The smoke duct should not come into contact with any communications.
- Heating of nearby building elements should not exceed 50 degrees.
- It is not recommended to use a sandwich pipe as the first element installed directly on the outlet pipe of the heat-generating apparatus. The first item should be the adapter.
- Installation proceeds from the bottom up, each subsequent element is included in the previous one.
How to assemble a sandwich: using smoke or condensation
An important point is the choice of method for assembling the chimney. The question is especially relevant when it comes to the installation of industrial chimneys.
So, there are two basic types - condensate or smoke assembly. We definitely recommend condensate assembly: each subsequent pipe is inserted inside the previous one. Do not forget that the installation of the chimney goes from the bottom up to the heat generator.
When collecting by condensate, moisture flows down the inner wall and does not settle on the pipe, accumulating soot and corroding the walls. Another important point when assembling by condensation is that moisture does not enter the thermal insulation layer of the sandwich chimney, thereby not destroying it. This increases the service life of stainless steel pipes.
| Type of furnace or boiler | Average combustion temperature in ℃ | Sandwich pipe thickness in mm |
| Gas | 60 | 25 |
| Gas condensing | 110-180 | 25 |
| Diesel | 150-250 | 25 |
| Gas piston | 450-600 | 50 |
| Solid fuel | 400-700 | 50-100 |
| Wood burning | 300-600 | 50-100 |
Installation instructions for specific types
Ceramic chimneys are characterized by high resistance to high temperatures, durability and excellent performance. The smooth surface reduces the chance of soot or ash accumulation.
Divided by material:
- They are found from high-quality types of clay (this in itself is a very expensive material), the main feature of which is fine dispersion and uniformity.
- In the production of fireclay, inexpensive types of clay that have coarse particles are used.
The service life of these models also varies.
According to the type of assembly, ceramic chimneys are:
- ceramic-expanded clay - the pipe is “edged” with expanded clay blocks and looks like a brick one;
- ceramic-stainless - the shell is made of mirror stainless steel 0.8 mm thick (external effect - the pipe seems to be metal);
- expanded clay-stainless steel.
Assembling a ceramic chimney
A prefabricated structure consists of several elements:
- Inner layer. The base is made of ceramic. It is thanks to it that no harmful substances or residues accumulate inside.
- Intermediate layer. Its main purpose is heat insulation. Naturally, it is made from various non-flammable materials (mineral wool).
- External covering. Typically made from expanded clay blocks or a stainless steel casing.
Assembly order
So, in order to understand how to properly install a chimney pipe, you need to keep in mind that a ceramic chimney has several key features.
First, you need to build a foundation. A flat surface without the slightest shifts or roughness is required.
Secondly, we connect the tee using a special module. It has a pipe, and all joints are covered with a solution when connecting.
The part protruding above the roof can be covered with bricks or blocks to create a pleasant appearance and protect the thermal insulation from external influences.
Nuances
Remember that you are dealing with a modular system. And all fastenings should be as tight as possible, without any gaps.
Ceramics are a fragile structure; care should be taken; a strong mechanical shock can crack the product.
If the elements have chips or cracks, replace them immediately; they are no longer suitable for use.
Working with glue
A special acid-resistant glue is used. It is purchased in powder form and diluted with water in a ratio of approximately seven to one. Cooking time is only ten minutes.
Remember that before applying the surface must be thoroughly wetted with a sponge. And it is better to use glue with a reserve so as not to accidentally miss the gap
Furnace chimney device
Depending on the material for making the chimney, you will need to prepare and make various individual parts. The common ones are an air damper to regulate the amount of draft in the chimney and a protective canopy at the top of the pipe.
It is necessary to protect the internal channel from water or snow. The remaining details of different types of chimneys are radically different. Let's look at the main ones in more detail.
Brick chimney
Such chimneys are installed only for laying indoors, through the roof and floor slabs. It is not recommended to lay brick structures in multi-storey buildings.
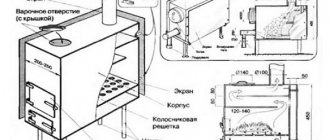
Diagram of a brick chimney for a stove
Partitions on different floors can be shifted, and horizontal layers will have to be made, which is almost impossible to do on such structures. A brick chimney consists of several main parts:
- furnace neck. This square or rectangular structure extends from the furnace body and runs throughout the building. Several grooves are made in the lower part to clear the channels from debris and soot. A thin cavity is laid out above the furnace body for installing an air damper. With its help, the draft force (upward air flow) necessary for the normal operation of furnaces and boilers is regulated;
- at a certain distance from the floor slab, the mason begins to lay out the fluff of the pipe. The internal size remains unchanged, but the bricks begin to be pushed out from the outside by a third of the length of the brick. The outer size, at the widest point of the fluff, exceeds the inner minimum by 600-700 mm. On the 9th row, the neck of the pipe is laid out. This part allows you to lower the temperature of the exhaust gases and serves as a kind of compensator for the entire structure. The fluff is laid out in front of each floor slab;
- “Otter” - this part of the chimney is laid out before the pipe passes through the roof surface. To lay it you will need 7 rows. At 6, the outer size gradually increases while maintaining the internal one; at 7, the size is reduced to the main one and a pipe neck is placed;
- The head is the last 2 rows of bricks, which are exposed outside, increasing the outer size by 60-70 mm. This design prevents precipitation from entering the chimney, but to completely block the channel, the installation of a protective visor or cap will be required.
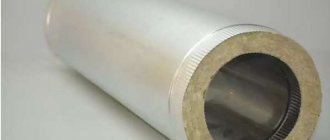
Chimney made of sandwich pipes
For such a chimney several parts are used:
- The pipes themselves are made of stainless steel or galvanized metal with an internal layer of insulation. Mineral or basalt wool is used for it;
- All kinds of fittings are used to connect other sections of the pipeline. These can be tees, bends at different angles, crosses and other parts;
- mounting couplings or boxes for passage through floor slabs or roofs. Couplings are made according to the principle of sandwich pipes. The only difference is that they can be made of rubber. Thin galvanization is used to make protective boxes. The box is made without a lid. It is placed on the pipe, fixed on the floor slab and all voids are filled with mineral wool or other heat-insulating material. The main thing is that there are no slightest gaps left;
- For fastening, special clamps and dowels with self-tapping screws are used;
- A special cap is installed on top to protect the internal cavities from precipitation.
Diagram of a metal chimney
Instructions for laying bricks
Perhaps the most traditional chimney option. This option is used as an external casing, but we recommend that such pipes be lined with a stainless steel pipe.
- Resistant to extremely high temperatures. Modern fireclay bricks can easily withstand even 1000 degrees Celsius.
- The material perfectly absorbs and releases heat and accumulates it.
Features of a brick pipe: main disadvantages
This is the difficulty of assembling such a heavy structure if you do the assembly yourself. High cost – this is one of the most expensive options. And:
- The presence of vortex flows. Unfortunately, without professional intervention there is no way to avoid sharp corners in the final version. And this will not affect the output of combustion products one way or another, it will be slowed down. Some of them will accumulate inside.
- A brick chimney that is not lined with stainless steel pipes will absorb condensation, which will cause the internal walls of the chimney to peel off, ultimately leading to a pile of sludge at the bottom. Gradually, condensation will reach the outside, which will manifest itself as streaks.
- This is a very heavy and dimensional system that will require not just a platform, but a full-fledged separate foundation, designed at the stage of developing the house project.
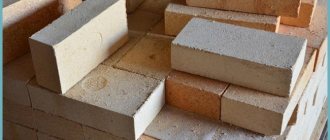
Selection of material and preparation of solution
There are currently several types of bricks on the market. Red is the most average option. Burnt, as it is commonly called, is suitable as a material for a chimney, but it cannot be said that it is the best choice. It is better to choose a dark sample, which is also called burnt. It is the most fireproof and durable, designed for just such tasks.
But the pink color of the brick indicates that no strong heat treatment was used during its production.
A mixture of clay and river sand is suitable for the solution. You can add cement. It is important to choose a pure mixture, without impurities and small debris. When choosing clay, focus on the one that was mined at a significant depth of more than two meters.
The proportions are two to one, more sand accordingly. And remember that before work the mixture is soaked for two days. Only in this case will the correct consistency be achieved.
The order of laying the main parts
The first step is to lay out the nozzle pipe. This is a small element located immediately above the heating or furnace system. The height is small, 5-6 bricks will be enough. A regular rectangular shape is used.
Next, the fluff, the thickened part, is installed. It is laid out in gradual increments of diameter in half-brick increments. Its usual dimensions are 600 by 450 mm. And immediately behind it the main pipe begins, right up to the neck; a cap or umbrella is installed at the finish.