Thanks to the correctly selected connection scheme for heating radiators, water is supplied more efficiently with minimal losses in their power. For this reason, your own connection diagram must be selected for each specific situation. For example, the bottom connection of heating radiators provides for hidden pipe routing, and therefore such a system will harmoniously combine with the interior of the room.
Bottom connection of heating radiators
About battery connection methods
Let's start with the fact that the connection diagram is:
- one-sided;
- cross;
- bottom.
Connection diagrams for heating radiators
According to the one-way option, the connection is made, as a rule, in city apartments where central heating is used. Here the pipes are connected only on one side of the battery. The advantage of the scheme is that the system can operate at maximum rated power, but how efficient the heat transfer is depends on the number of battery sections. In this case, water cannot reach areas remote from the connection point, which negatively affects the efficiency of the entire heating system. This effect is especially noticeable when using a battery consisting of 15 sections, therefore, when connecting multi-section radiators, it is better to give preference to a different circuit.
Adapter for bottom one-sided radiator connection
In recent years, bimetallic radiators have become increasingly popular; they can be connected in a diagonal (also called cross) pattern. The essence of this scheme is that the liner is connected from above, and the branch is connected from below, but on the other side. With this installation, the liquid is more evenly distributed throughout the battery, which means the loss of its power is minimized.
Diagonal connection of heating radiators
On a note! When using a diagonal scheme, it is necessary to take into account how the outlet/supply pipes are located. After all, if the inlet is made from below and the outlet from above, then the radiator can lose over 50% of its power.
Diagonal diagram for connecting heating radiators with a two-pipe and one-pipe system
Sometimes the diagrams described above are not used indoors for one reason or another. Then only the bottom connection , which creates a through passage of the coolant; It is obvious that in this case the liquid does not reach the upper sections of the radiator, which is why heat transfer can decrease by 15%. However, this scheme is often used in private houses with individual heating. And heat transfer can be replenished through distribution pipes.
Heating radiator design
Connection diagrams for radiators with bottom connections
In single-pipe heating systems with bottom connection, we recommend using a circulation pump to ensure good circulation of the coolant.
As we have already said, heating systems can be single-pipe or double-pipe. In single-pipe systems, the coolant sequentially passes through all the radiators installed in the house, gradually giving them its heat. In order to compensate for heat loss, the inlet and outlet pipes are connected to each other by jumpers (Leningradka scheme). Additionally, circulation pumps are installed in the heating system, ensuring more intense flow of coolant through the radiators.
In single-pipe heating systems, it is necessary to reduce the hydraulic resistance. This is achieved through the use of pipes of increased diameter, as well as through the use of radiators with bottom connections. As a result, the coolant flows through the batteries almost in a straight line without losing its pressure. Also, this connection scheme allows you to save a little on pipes and other materials.
A lower connection to a two-pipe system makes it possible to achieve more efficient heat release. The two-pipe system itself can significantly reduce heat losses, promoting uniform distribution of coolant throughout all radiators . As for radiators, they are connected to each other in parallel and not in series. In two-pipe systems, it is customary to use a diagonal or bottom line, but if the goal is to hide the pipes in the floor, it is permissible to use a more hidden bottom line.
Using a bottom connection in a two-pipe heating system is only justified if you want to hide the heating pipes.
What do we get by using radiators with bottom connections in a two-pipe system?
- Uniform heating of all rooms (in single-pipe systems, distant rooms will be a little cooler).
- No visible heating pipes - they will be hidden in the walls or floors.
- Possibility of quick dismantling of radiators for their repair.
Thus, the use of radiators with bottom connections as part of a two-pipe heating system will increase the heating efficiency and make the heating system as invisible as possible.
To disguise radiators, you should use special decorative screens or take care of purchasing designer radiators with bottom connections.
Key Points of Bottom Connection
So, we found out that this scheme allows you to hide pipes from prominent places and is used mainly in private homes. The pipes connected to the radiator go to the floor, which frees up some space, and the room itself looks more neat and noble. Today you can buy 2 types of batteries with this connection - these are panel and steel devices.
Bottom radiator connection
They can have either 1 or 3 heating panels. The more of them, the warmer the room will be, and therefore when choosing devices it is necessary to take into account the area that needs heating.
Important! Steel radiators, when compared with analogues, are easy to install and take up little space. Ideal for any room. Panel models have already installed thermostatic fittings, as well as a connection point.
Bottom connection node
Heating radiator fittings
In order to start and block the coolant, special shut-off and control valves are used, which are worth dwelling on separately. Similar functions can be performed by a balancing valve, a ball valve (the most common case), a thermostatic valve element; in the case of lower pipe supply - a special headset. A nuance: when installing heating radiators, taps with American fittings (straight, angular) are used, since the joint with a union nut makes it possible to instantly dismantle the device without emptying the heating network.
Installing fittings for radiators is a fairly delicate procedure. Nuances:
- When connecting a heating device to a central heating system, install two ball valves (a balancing valve is not required). An alternative option is to install a valve with a thermal head in the supply line, which allows you to automatically adjust the heating level.
- When it comes to connecting heating radiators in a private house, a ball valve is usually installed at the inlet, and a balancing valve at the outlet. To regulate the flow automatically, install a thermal head instead of the inlet valve.
- If we are talking about the bottom connection, you will need a special headset that has a built-in balancing valve. There are separate models that require the installation of a thermal regulator.
- When installing radiators in a multi-story residential building, it is important to provide a bypass that will ensure the flow of water through the riser.
- The last radiator in the heating network of a country house is equipped with two shut-off valves (there is no need for balancing).
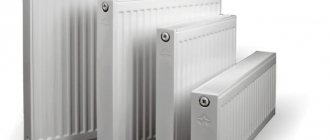
Types of panel radiators
Such batteries are:
- hygienic;
- smooth;
- profile.
Dimensions of steel panel radiators of various types.
The first two types are intended for hospitals, schools and kindergartens. The most popular manufacturers of such models are Purmo and Kermi.
Steel panel radiators PURMO COMPACT
As for profile batteries, they are made of sheet steel and coated on the outside with a special powder coating. They are also coated with neutral anti-corrosion varnish, and therefore can last for many years. Note that such radiators can be of any color.
Bimetallic heating radiators
Tubular steel batteries are better than panel ones, because they can be turned over on either side (in this case, panel models are purchased with a specific connection). The coolant in tubular models is supplied directly to the outer section, which is very good if you need to replace old batteries with new ones.
Steel tubular radiator
Advantages of this connection scheme
This type of connection allows for easy concealment of pipes, and the loss of efficiency will be insignificant. The radiator will heat up faster and stronger from below than from above, which is explained by the rapid flow of coolant through it.
Bottom connection
Sometimes efficiency may be reduced due to air accumulation or blockages. Warming up with the lower connection, as noted earlier, is uneven, but it is still no worse than the upper one.
Note! When installing batteries - regardless of the circuit used - you must comply with all installation requirements. First of all, this refers to the proportions between the width of the battery and the window.
Video - What are the benefits of batteries with bottom connections?
Nuances of installing radiators
The most important thing during installation is to do everything in the original packaging so as not to damage the external coating of the radiators. In addition, it is important not to confuse the supply and return. If the entrance and exit are located at different ends, then you cannot make a mistake - to do this, just study the markings. But if they are on one side, you need to act carefully and carefully! An error may result in an incorrect connection, which could result in a power reduction of up to 60% (the exact value will vary depending on the model selected).
Bottom connection unit with bypass
On a note! Each model with a bottom connection has a thermostatic insert that allows you to easily regulate the temperature of the device. This feature affected the cost - it is, on average, 10% higher than other batteries.
Calculator for calculating the number of heating radiator sections
Go to calculations
Not everyone will like this “web of pipes” created for the most efficient connection of the battery
Bottom liner options
There are only two of these, let’s get acquainted with the features of each of them.
Table. Bottom pipe options.
| Name, photo | Short description |
| One-sided | In this case, both pipes are connected on one side. The hot coolant enters through the top plug, and the cooled coolant is discharged through the bottom. |
| Versatile | The entrance and exit, as you might guess from the name, are on different sides. This connection option is ideal for individual heating systems. The good thing about this option is that hot water can flow in any direction, plus the length of supply and return is shorter here. |
Bottom connection methods
Next, we will consider exactly how radiators can be connected to the heating system.
Bottom connection in a two-pipe system
Method No1. With side outlets
The connection is easy to make; the pipes in this case are located below - in the floor or under it. The radiator can be removed without stopping the entire heating process, but for this, shut-off valves are mounted on both sides. And an air vent is placed on top (on either side).
Double-sided bottom connection
Method No2. Using an adapter
If it is not possible to connect pipes to the radiator on both sides, then the problem can be solved by using an adapter. It is screwed into the lower hole, and a stainless steel tube is passed to the upper hole. The heating pipes are connected to the adapter itself from below.
Installation of the radiator bottom connection unit
On a note! You can learn more about this method from the video below.
Video - How to connect a sectional radiator from below
Method No3. With flow extender
The extension cord must be screwed into the lower hole without any bends to the upper one. The coolant circulates due to the fact that, passing through the middle of the device, it comes out at its end and rises, thereby squeezing out the cold liquid through the outlet located in the device.
Radiator guide or duct extension
Important! This connection option is not suitable for a gravity heating system.
Operating principle of a flow extender for a heating radiator
Features of the use of bottom connection units
Connecting to heating systems below is effective if supply pipes pass under the floor; sometimes, for convenience and aesthetics, they are inserted into the walls at a small height - corner fittings allow you to connect the pipes to the radiator housing.
In addition to shut-off and control valves, to improve operating efficiency, internal and external bypasses are often built into valve connecting units, and thermostats are used to set the temperature regime.
The main material for making devices is brass; when purchasing, you should pay attention to the wall thickness and thread length - manufacturers who produce budget products make them thin-walled with a short thread.
The main material for making devices is brass; when purchasing, you should pay attention to the wall thickness and thread length - manufacturers who produce budget products make them thin-walled with a short thread.
Fig.3 Bottom line - installation examples
Types of bottom connection nodes
In individual residential buildings, one-pipe and two-pipe heating systems are used; to connect a separate heat exchanger, a combined method is used, in which, in a distribution with two pipes, it is included only in the supply line according to the Leningradka scheme.
Using radiators with bottom connections
This method is not only the most effective, but also the most aesthetically acceptable. The advantages of this connection include:
- possibility of installing a flow direction adapter;
Flow direction adapter
- no need to purchase a suitable thermostat - it is already on the radiator;
- the fact that both pipes from the battery go into the wall or floor.
Piping in the wall
However, there are also disadvantages, including:
- the need to install an air vent on each radiator;
- the need for constant use of a circulation pump;
- less uniform heating, lower efficiency;
- impossibility of use for gravity heating systems.
You need to bleed the air from the battery
Purpose of radiators with bottom connections
Risers and side connection pipes are hardly capable of decorating a home. Of course, just recently the buyer had no choice, and he had to be content with what was available on the market. But the interior of many country houses was strangely transformed after they found a solution to hide unsightly pipes in the floor.
Important! Note that in this case you can connect either directly or using a special device - a lower connection block. The operating principle of this device is that radiators can be disconnected from the main line without resorting to draining the liquid. In other words, there is no longer any need to turn off the entire heating system.
Nowadays, this is inherent not only to panel radiators, but also to tubular radiators made of steel (aluminum or cast iron devices cannot provide this opportunity). And if everything is very clear with tubular batteries, since we have been familiar with them for quite a long time, then panel devices differ in thermostatic fittings, and also in that they are divided into several groups.
Battery Location Requirements
Regardless of which connection method is chosen, the radiator should be located:
- 5 cm from the wall;
- 10 cm from the window sill (a distance of at least 5 cm can be allowed);
- 10 cm from the floor surface (a slight deviation is possible - maximum 2 cm).
How to install heating radiators correctly
On a note! When purchasing fasteners, consider the thickness of the foil thermal insulation (if provided). In this case, the length of the locking hooks should be slightly longer.
Radiator location standards are observed
About special radiators designed for the lower connection scheme
As noted earlier, special batteries with bottom connections are sold today. Their design is such that optimal heat transfer is ensured. Radiators consist of a pair of steel plates connected to each other by welding, thereby forming technological channels for the movement of working fluid. The plates are varnished in two layers for high-quality protection against corrosion.
Bimetallic radiators Titan (Marek) 500/96 with bottom connection
To connect the radiator with your own hands, you need to prepare:
- L- or T-shaped tubes;
- building level;
- multiflex nodes;
- FUM tape;
- thermal insulation;
- pipe cutter;
- nuts in the required quantity.
It is advisable that the bottom connection of the batteries be made in the early stages of renovation of the apartment/house, because the pipes in this case are laid inside the floor (or wall). Keep this in mind when planning the installation of a concrete floor screed.
It is better to connect the radiator in the early stages of repair
Note! Each battery model with a bottom connection can have its own mounting kit or its own unit, thanks to which you can mount the device on the wall.
If for one reason or another the pipes cannot be laid into the floor, then in the future they can be covered with a plinth or plasterboard box.
Skirting for radiator pipes
Bottom connection of the radiator where is the supply and where is the return
Many users of our site are looking for information about how Kermi radiators are connected, and what kind of jumper or so-called bypass they have inside, which is a tube originating below the supply connection itself (as Kermi knows, it is from below). From this lower connection pipe, the tube inside the radiator rises and is adjacent to the tap, with the help of which the supply of coolant is regulated.
Well, due to this tube, proper thermosiphon circulation of the coolant inside the radiator occurs. This was also done to conveniently adjust the temperature in the coolant supply radiator. Due to this, from such radiators it is possible to build a radiator branch up to fifty meters in length on the principle of natural circulation (without pumping) natural - gravitational or thermosiphon circulation of the coolant will pump itself. This distinguishes regular radiators with a bottom connection from a conventional radiator connected at the bottom – bottom in the picture below.
In the figure we see a regular - sectional radiator that does not have a tube inside it, a tube that would lift the coolant up from where it would be pressed into them as it cools, so a regular sectional radiator for its natural circulation must be connected top - bottom diagonally - this is mandatory and very reliable connection that should be used for natural circulation. And in the case when a conventional sectional radiator is connected to the bottom, it needs to be pumped using forced hydraulics and it will always become airy.
But this is a fixable problem, and if you really want, you can depict the bottom and bottom of a regular panel radiator.. To do this, you need to buy a flow distributor - do not confuse it with an extension cord. A flow distributor is just such a thing.
It is needed in order to use a gasket supported by a spring to plug the intersectional flow inside the battery between the first and second sections, then the heat flow will have to rise upward and this is the same as the tube for radiators with a bottom connection, or it’s the same as a diagonal connection when the inlet is at the top and the outlet from below on the opposite side. But let’s return to the Kermi radiators, their bottom connection and bypass connector.
Connectors for Kermi radiators with a standard axial distance of 50 mm - which corresponds to the standard interaxial size of most radiators with bottom connections, unlike Rifar Monolith, but not about that now.. That means - connectors for fucking batteries with bottom connections are straight and at an angle of 90 degrees so that the liner goes into the wall. And with straight connectors, the liner will be hidden in the floor.
This is a direct connector for laying pipes of the heating branch under the floor.
And this is a corner connector for laying a heating main inside the wall.
The standard bypasses for all radiators with bottom connections look something like this, only “Rifar Monolit” has its own standard, which is wider than usual and the distance along the axes is not 50 mm but 80 mm.
Are all these expensive bypasses really necessary? In principle, they are not needed and can be completely dispensed with. For example, connect the radiator like this - directly.
If there are special requirements for aesthetics and even if the pipes will be laid inside the walls, then it is recommended to install corner connectors.
Features of installing radiators with bottom connections
The installation process is determined by which scheme is chosen. So, the pipeline can be laid:
- in the wall;
- in the floor;
- between the radiator and the floor.
On a note! The efficiency of the heating system does not depend on the location of the pipes - they are hidden for aesthetic reasons.
The connection is made using special fittings.
First, radiators are installed, having previously calculated their number for each room, after which pipes are supplied to them.
If you follow the advice from this article, you will not encounter any difficulties.
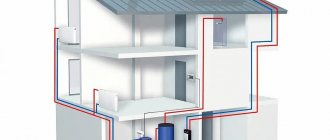
Installation of a heating system with bottom supply
The connection is made using special fittings
Depending on the chosen scheme, the pipeline is installed. It can be laid:
- On the floor.
- In the wall.
- Between the floor and the battery.
The efficiency of the heating system is not affected by the location of the pipes - they are hidden for aesthetic reasons.
It is important to first install the batteries, calculating their number for each room, and then connect the pipes to them.
If you follow the recommendations described in this article, then you should not have any difficulties installing a heating system with a bottom connection.
You can share your work by leaving a comment at the end of the article - it is very important for us that the material in the article is as complete as possible and understandable to anyone who is accustomed to doing any work with their own hands.
Master Class. We connect the radiator from the floor using L-shaped tubes
L-shaped tube
Step 1. Installation begins with the installation of the nipple.
Nipple installation
Step 2. Then the block of ball valves is installed.
Installation of ball valve block
Step 3. Place the threaded clamp onto the L-shaped tube.
Threaded clamp connection is put on
Step 4: Now the L-shaped tube is flared using a tool.
The L-shaped tube is flared using a tool
As a result, the rubber seal no longer slips off the tube into the Eurocone.
Now the seal does not slip off the tube
Step 5. The tubes are installed in the fixing angle.
Installation of tubes in the fixing angle
Step 6. Next, the tubes are inserted into the block of ball valves and baited.
Baiting tubes
Step 7. A hole is marked for attaching the fixing angle, after which the tubes are dismantled.
The future hole is marked
Removing tubes
Step 8. A hole is drilled in the floor according to the markings.
A hole is drilled in the floor
The kit with a fixing angle includes a dowel and a self-tapping screw. The dowel is driven into the hole made.
Dowel and self-tapping screw
The dowel is driven into the hole
Step 9. The L-shaped connecting tubes are installed back and fixed to the ceiling.
Fixing L-shaped tubes
Step 10. Take the pipe and connect it to the L-shaped connecting tubes. The thermal insulation on the pipe is moved back at least 2 lengths of the sliding sleeve. Then the sleeve is fixed.
Pipe for heating system
Thermal insulation is moved back by 2 sleeve lengths
Fixing the sleeve
Step 11: The connection is made. The end of the pipe is flared.
Note! In this example, a metal-polymer pipe is used, which is why the nozzle on the tool is green.
Green nozzle is used
Pipe flaring
The pipes are connected
Step 12. The pipes are attached to the ceiling using dowel hooks in increments of 50 cm. Thanks to this, the pipes will not float up when pouring the screed.
The pipes are attached to the floor with dowel hooks
Master Class. We connect the radiator from the floor using T-shaped tubes
Also, T-shaped connecting tubes can be used to connect the battery from the floor. They are necessary if the line goes under the heating device. Let's look at this process step by step.
T-tube
Step 1. A threaded clamp connection is put on the tube.
Threaded clamp connection is put on
Step 2. After this, the tube is flared.
T-Tube Flaring
Step 3. Next, you can proceed directly to installing the tubes.
Installation of tubes
On a note! In the photo you see that the connecting tubes are installed in different directions.
The tubes are installed in different directions
Step 4. A connection is made using a sliding sleeve. The radiator is connected using T-tubes, and the line goes further to the next heating device.
The heating device is connected using T-tubes
Step 5. The exit of the pipes from the floor can be decorated using overlays in accordance with the finishing floor covering. Overlays can be made for different coatings.
Decorative overlay
Example of using decorative overlays
If there are no high aesthetic requirements for the interior of the room, then you can use a budget connection option using a connecting set. This set is used for cross-linked polyethylene pipes without an aluminum layer.
Connection set
Inside this set there are guides and rings for fixing the pipe. This set is necessary to prevent threaded connections from loosening and to compensate for thermal expansion.
Guides
Ring for fixing the pipe
First, the ring is put on the pipe. Then the clamp is removed from the guide, the pipe is inserted into it and secured with a ring. The latch is inserted.
The ring is put on the pipe
The pipe is fixed with a ring
The latch is inserted
The pipe is cut to the required length, after which a connection is put on it and installation is carried out to the heating device.
Pipe cutting
Threaded clamp connection is put on
Installation to a heating radiator
Decorative overlays are installed, pre-cut to size.
The location of the cut is marked
Installation of decorative overlays
Using this element, the two parts are connected to each other.
This element is necessary to connect two parts
Connection of two parts
The connection kit is attached to the ceiling. That's it, the installation can be considered complete.
The kit is attached to the ceiling
Installation work completed
The importance of a competent approach to choosing a connection diagram
First of all, always pay attention to the radiator installation diagram. As a rule, it affects the functionality of the heating device and its efficiency. In addition, if the installation is performed incorrectly, thermoregulation will be disrupted and the pressure in the battery will increase, which will inevitably lead to operational problems. If you do the installation yourself, without the appropriate skills, you will encounter many problems and, most likely, ruin the interior of the room.
Radiator bottom connection unit
By giving preference to the lower connection, prepare for a slight decrease in the efficiency of the entire heating system. Although this is a small thing when compared with convenience and hiding the pipes. If you connect radiators correctly, they will save heating costs in the future and will serve you for many years!
Connection diagrams for installing heating radiators.
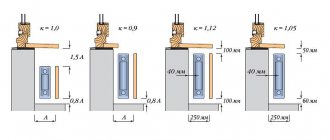
Well, also regarding the connection itself, if you look at the radiator connection diagrams shown below, recommended by the manufacturer (which one is not important, they are identical for any type of bimetallic radiator)
then it will become clear that it is very important where exactly the supply should go to the radiator, and where the cooled coolant should come out - the return.
However, the most popular manufacturer of heating radiators in Russia, Rifar, added to its instructions a diagram in which the cooled coolant comes out of the upper collector, providing it with a comment that casts doubt on the advisability of its use.
There are only 3 types of connection for a one-pipe system: side, bottom and diagonal, but since the coolant does not always move along the riser from top to bottom, and in old houses more often from bottom to top, another connection option is added - diagonal top-bottom (or bottom-to-bottom). bottom) for bottom feed on a single-pipe system. In detail and clearly, through photographs of our work, I will try to show all possible cases encountered in our apartment buildings, and having learned about the conditions in your house (direction of supply), anyone can simply print out the photo and, according to this diagram, offer to install the radiator to invited installers or Before installation, check it and the diagram that your installers offer. I can guarantee from myself that all the given circuits are 100% working, that is, the radiators shown in the photo are completely warmed up.