Is it possible to glue tiles to polystyrene foam or polystyrene foam?
When installing insulation boards with glue, make sure that they are glued without gaps. You can glue the insulation yourself, without the help of specialists. Apply slab adhesive first around the perimeter, then in the center. Apply tile adhesive to the slab, then place the material against the surface and press for a few minutes until it adheres to the wall.
Polystyrene foam can be a good insulation material and a base for ceramics on walls. But the material does not tolerate temperature changes and the influence of water, which freezes on the tiles and in the seams.
Laying foam boards with glue
Polystyrene foam has the following properties:
- slight linear expansion;
- heat-resistant material;
- Due to its elasticity, the insulation compensates for deformations.
Since every insulation material has its drawbacks, polystyrene foam for walls is no exception. Vulnerable to sunlight and rodents. If exposed to UV radiation for a long time, it becomes brittle. The surface changes color to yellow, which subsequently leads to erosion.
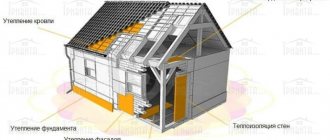
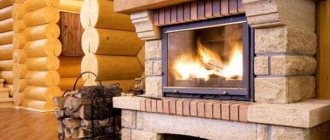
Insulation of walls with penoplex
Defenseless foam plastic is a temptation for mice - during the cold season they make holes in it. To prevent this from happening, experienced builders protect the insulation with ceramic tiles.
Methods for fixing penoplex
When installing insulation boards, various fixation methods are used to ensure a gap-free coating. Most often this is glue intended for this type of work or “Liquid nails”.
The gluing steps look like this:
- Apply adhesive to the prepared fragment of the slab, first along its perimeter, and then in the center.
- Place the material against the surface and hold it under slight pressure for several minutes until the plate is secured to the wall.
- After this, proceed to gluing the next fragment.
Polystyrene foam can be a good insulation material and a base for ceramics on walls. But it does not tolerate temperature changes and the influence of water, which freezes on the tiles and in the joints.
Penoplex
Application of penoplex
To keep the house warm without extra costs, consumers are interested in whether it is possible to glue tiles in the house to polystyrene foam? The question is not easy even for specialists, so opinions differ. In any case, it is forbidden to finish directly on top of the insulation. If you are gluing porcelain stoneware or clinker tiles to the facade, then you need to cover the penoplex with plaster with a reinforcing mesh. The foam board holds the 30 × 30 cm tile.
Walls insulated from the inside with foam boards
If it is necessary to stick the material indoors on polystyrene foam, additional surface coating will not be required. But if you plan to insulate the floor, then put a layer of cement screed on the insulation, then lay the tiles.
To choose an adhesive that is suitable for penoplex, consider the following points:
- base composition;
- environment: moisture and temperature;
- how quickly the mixture dries.
Important! To ensure that the insulation lasts a long time, treat the installation responsibly and first familiarize yourself with all the details and nuances.
Insulation on the surface of the walls
Facade thermal panels with clinker tiles on Penoplex insulation
If you want to get a reliable, warm, beautiful house in a classic European style and at the same time insulate the house, then thermal panels with clinker tiles are your material.
Thermal panels with clinker tiles are a very popular material for finishing and insulating facades both in our country and in Europe https://www.isoklinker.de/ru/. Those who travel around Europe have noticed that facade decoration in Europe is clinker bricks or clinker tiles.
Brick-like clinker tiles are essentially thin-walled bricks or the front part of European clinker.
For relatively little money you can get a warm house with a presentable appearance of a European clinker facade.
Facade panels in Belgorod with clinker tiles are made using insulation with different thicknesses to increase the energy efficiency of any wall. Clinker tiles of European and Russian production are securely attached to the insulation using polyurethane components; the tile can only be torn off together with part of the insulation.
The facade thermal panel has standard places for additional mechanical fastening of the facade panel.
Installation of facade panels is not difficult. The panels can be easily mounted to any surface. The seams are filled and grouted with a special frost-resistant grout for wide joints (fugue). The end result is a monolithic brick wall.
The service life of thermal panels with clinker tiles is not inferior to the service life of a brick wall.
Due to the fact that clinker tiles are made from refractory clinker clay, they have the following characteristics:
— low water absorption, less than 5%;
— high frost resistance, more than 300 cycles;
— high strength, more than M350;
— does not change color throughout the entire service life;
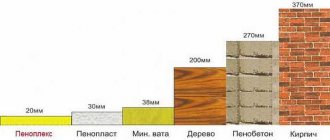
The cost of facade thermal panels with clinker tiles depends on the clinker tile itself (manufacturer, format, effect, texture), on the insulation material (facade foam, Penoplex, polyurethane) and on the thickness of the insulation (20mm, 30mm, 40mm, 50mm, 60mm, 70mm, 80mm , 100mm).You can buy façade thermal panels with clinker from a direct supplier at factory prices for tiles in our company 1001 Façade.
Our specialists will make competent measurements, calculations and complete materials free of charge. Discounts on material depend on the volume of products purchased and are negotiated individually with the sales department. Our company has a wide range at reasonable prices.
Foam tiles? Easily!
Foam plastic is a very interesting and unique material, which daily increases its popularity among the general list of building materials. Recently, it is very often used as insulation for better energy saving, but it should be understood that laying tiles on polystyrene foam is quite difficult. The surface of the foam is quite porous and does not look reliable enough, and the tiles are very heavy.
Is it even possible to lay tiles on foam? If so, what is the best way to secure it? These are the questions most often answered by experts in this field. This, in general, is not a very good idea, but if you properly prepare the surface of the foam, then in principle it is possible and realistic.
For proper installation, you need good adhesion of the tiles directly to the foam. The traditional option of preparing a regular wall is not suitable, since the material is very fragile. But still, the wall needs to be made perfectly flat.
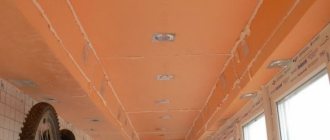
The tiles themselves are laid in a slightly specific way. Since foam plastic cannot be processed mechanically, it will still remain porous, a special construction mesh is taken and attached directly to the foam sheet before laying the tiles. For reliability, the mesh is anchored directly to the wall itself, since foam plastic is not able to withstand a load of this kind.
Once the mesh is securely fastened, you can proceed to plastering the wall. First you need to level the surface. This can be done with elastic glue. Instead, you can also use a cement-sand mixture. The material does not matter here, the main thing is to achieve a smooth surface. Only after leveling can the wall be primed. It is advisable to use a regular primer; the main thing is to carefully treat the entire surface (several layers are possible).
After preparing the surface of the foam, you can begin laying the tiles. The process under consideration occurs in exactly the same way as on any other wall surface. The place from where to start laying tiles is chosen according to the situation. You may decide to lay out a specific pattern or combine different colors or sizes of tiles. In the work you need to use a special glue for foam plastic, which has better adhesion of the wall to the tiles compared to conventional adhesive mixtures. Well, of course, you need to choose the tile as lightly as possible. Even though the mesh is reinforced with anchors, it may not be able to withstand the weight of some types of tiles. Today, finding lightweight material for our case is not difficult.
Painting ceiling tiles
Grayish colored tiles can be repainted. It is recommended to paint ceiling tiles immediately after they are attached. Also, painting is an option for restoring a foam ceiling when the cladding loses its appearance, gets dirty, is not cleaned, needs to restore its waterproof properties and the ability to even out the overall appearance of the ceiling when replacing old slabs with new ones. More often this applies to kitchens and bathrooms: refresh, extend service life, enhance fire safety, water resistance, thermal properties, resistance to fungi, and fading of ceiling panels.
Primary painting of foam boards does not affect adhesion, but secondary painting can significantly worsen it. There will be stains, stains, and unpainted areas if you paint mirrored, laminated and plastic boards. Painting will never help hide cracks and creases in panels. But the cost of restoring the appearance of ceiling tiles by painting consists of the cost of materials (tools, primer, paint), and this is significantly more economical than work (dismantling - installation) with a new coating.
Direction for layer-by-layer painting of a ceiling made of foam tiles with a paint roller Source postroi-sam.info
Types of paint for painting polystyrene foam ceiling tiles
Expanded polystyrene ceiling tiles are painted. You should use the instructions for using foam boards and the following paints:
Water-based - quickly becomes dirty, loses freshness, is not used in a humid environment, but dries quickly, is fireproof, environmentally friendly and easy to apply with a regular brush or roller. The layer is applied evenly when using a spray gun. Painting is carried out on a cleaned and dried ceiling surface, preferably in several layers with drying.
Acrylic - dries quickly, without a pungent odor, hypoallergenic, with a long service life. Combines with acrylic primer. Suitable for painting foam panels in the bathroom. But there is a possibility of paint swelling.
Latex - does not peel off when applied to a dry or wet surface. Dries quickly, is resistant to exposure to the sun, temperature changes, and is suitable for use in different rooms.
It is recommended: close the room until the paint is completely dry, follow the instructions for using paints, and safety precautions when working.
To paint foam tiles in children's rooms and bedrooms, it is necessary to select highly environmentally friendly dyes Source nashaotdelka.ru
What determines the choice of adhesive composition?
The store will offer the buyer a large selection of glue for penoplex. The differences will not only be in the manufacturer. On the shelves you will definitely find:
- dry and ready-made mixtures;
- formulations with different flow rates;
- mixtures for work on various substrates;
- polyurethane, polymer and other compounds;
- adhesives with varying degrees of adhesion.
There is only one piece of advice for beginners - take enough foam glue, because if you have no experience, you can significantly exceed the consumption indicated by the manufacturer on the packaging. Beginners should also not glue penoplex to fast-curing compounds. They need to be applied from a spray can and have time to level the slabs; without the proper experience, there is a risk of ruining part of the insulation. Such compositions include Titan glue.
For work on each type of surface there are specially developed adhesives for penoplex. You can easily find compounds that can be used to attach insulation:
- to concrete and other mineral bases: plaster, gypsum blocks, brickwork, asbestos-cement sheets (for example, dry mix “Atlas Stopter K 20”);
- for bases that require waterproofing treatment, that is, for external work, you can choose the polymer mixture “T-Avangard K” for these purposes;
- to reinforced concrete slabs (for example, polyurethane adhesive “Titan”).
Universal formulations also exist; popular brands include Moment.
How to properly glue insulation boards?
A properly selected adhesive composition will not save you if you use it ineptly. Dry mixtures must be prepared and diluted with water strictly in the proportions specified by the manufacturer.
Before starting any work, both external and internal, the surface must be properly prepared.
- Noticeable irregularities and bumps need to be smoothed out.
- Clean from dust, visible dirt and old finishing materials.
- Allow the insulated surface to dry.
Installation on walls begins from the bottom up; on horizontal surfaces you need to glue from the edge. Expanded polystyrene boards should be tried to fit together as closely as possible. It is important that the glue does not come to the surface at the joints.
Any, even minimal, gaps between sheets of material are cold bridges through which unheated air will rush into the house. Subsequently, the joints are filled using sealant or polyurethane foam.
The applied layer of glue may vary in thickness. Even if the penoplex is covered with panels, drywall, or tiles are laid on it, the evenness of the fit should be checked with a level.
There are several ways to apply glue to the surface of extruded polystyrene:
- Stripes with a small interval from each other. At the same time, the glue line should not be interrupted at the corners. Be sure to apply adhesive in the center. The strips located around the perimeter should not reach the edge of the slab by 1-2 cm.
- You can use a continuous method of applying the composition. The beginning and end of each strip deviate from the edge of the penoplex by 1 or 2 cm.
- The beacon method involves applying glue pointwise with an even distribution over the entire surface of the slab. The interval between points should be 30 cm.
It is not even forbidden to combine methods of applying glue. Many craftsmen advise spreading the compound around the perimeter and applying glue in a spot in the center of the slab.
Using the chosen method, the mixture is applied to the first slab, it is pressed against the surface and held in place for some time. If the penoplex does not fall when your hands are removed from it, then you can begin installing the next element.
Laying tiles on foam plastic - KlademPlitky.ru - all about laying tiles
Polystyrene foam is of particular interest, especially recently in connection with the constant desire to save energy, as insulation, but laying tiles on polystyrene foam is often very problematic. And the reason for this is the surface of the foam itself, as you imagine, it is quite porous and this does not look impressive, but the tiles have considerable weight.
Attaching foam to glue
Is it even possible to lay tiles on foam plastic and, if so, how to do it correctly - such questions are often asked to specialists. Let's be honest, this is not the best option, but laying tiles on foam sheets is still possible. The main thing is to properly approach the preparation of the foam surface.
Checking surface flatness
In order to install correctly, it is necessary to ensure sufficient adhesion between the tiles and the foam. The traditional option, as in the case of a concrete or brick surface, is excluded here, as you already understand. Serious measures must be taken. As you know, the surface to be treated must be perfectly flat.
Attaching foam to the wall
Laying tiles on foam plastic has its own solutions to this issue. Polystyrene foam cannot be processed mechanically by leveling the surface of the material itself. Most likely, you will have to take care of constructing a special construction mesh. It must be attached directly to the foam. Before laying tiles on a sheet of foam plastic, you should do this carefully. In order to strengthen the mesh, you can use different methods; it is best to use anchors that are attached directly to the wall.
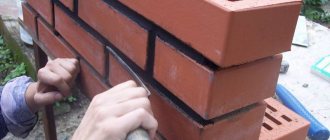
Plastering reinforcing mesh
Next, the surface needs to be plastered. You can level the surface with a special elastic glue, you can use a traditional cement-sand mixture and then pay close attention to priming the surface.
Choose the right glue
The laying of the tiles itself, after the surface of the foam has been prepared for this, is done in the traditional way. At the same time, the direction and start of work depends on the specific situation. The main thing is to use a special glue for the work, which is used for foam plastic and polymers and has greater adhesion, and, nevertheless, you need to choose a lighter tile.
Apply glue to the surface
Laying tiles on polystyrene foam traditionally begins with applying adhesive. It is applied to the wall surface with a notched trowel to avoid wasting it. Then we apply glue to the tile itself. Here, in order to save money, you can safely use ordinary tile adhesive, which is applied directly to the tile with a taller notched trowel.
Apply glue
Laying tiles on foam plastic, as you have seen, cannot be called a simple job, in contrast to how easily the foam itself is attached to the wall surface. However, by approaching the issue creatively, this problem can be solved. As a result, your room will not only be warm, but also beautiful, because all the positive qualities of tiles will be added to the insulating properties of polystyrene foam.
klademplitky.ru
Do they glue wallpaper and tiles over penoplex?
Questions about the finishing of polystyrene foam boards are no less common: is it allowed to put wallpaper or tiles on top of them?
With all the abundance of finishing materials used inside the house, wallpaper remains the most affordable and popular of all. They cannot be glued directly to the penoplex itself, but it is easy to glue them to a specially prepared base.
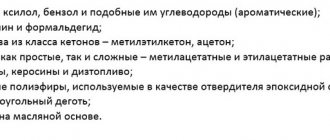
First you need to choose wallpaper and glue that matches it. It should not contain components that destroy foamed polystyrene (resins and solvents, formaldehyde, benzene).
- The easiest way to prepare the base for wallpaper is to first paste the walls with other paper material, for example, newspapers. However, even the simplicity and accessibility of this method no longer attracts modern home dwellers. There are more modern options that allow you to hang wallpaper and additionally protect foam boards.
- Plasterboard sheets mounted on top of foamed polystyrene boards provide a good base for wallpaper. The use of gypsum fiber sheets (gypsum fiber sheets) is also supported by the fact that according to insulation standards, penoplex slabs must be covered with a vapor barrier material. But gluing wallpaper onto film is an impossible process.
You can plaster the slabs using reinforcing mesh, and only then cover the wall with wallpaper. But the option with drywall is still considered the best.
As for tiles, the opinions of professionals on this issue are diametrically opposed. In any case, finishing directly on the insulation is not possible. If we are talking about porcelain stoneware or clinker tiles for finishing the facade, then the penoplex will first have to be hidden under a layer of Ceresit ST 85 plaster, using a reinforcing mesh. Such a base will withstand tiles of 30 × 30 cm format and will not lag behind polystyrene foam.
If you need to stick tiles onto extruded polystyrene foam indoors, then no additional processing will be required for the walls. But on the floor it is recommended to make a cement screed on top of the insulation boards and only create the finishing coating on it.
You can talk about which glue will be better for penoplex after all the points have been correlated:
- base material;
- environmental conditions: air humidity, temperature;
- drying speed of the mixture.
Once the answers to these questions are known, choosing the right mounting composition for foam boards will not be difficult.
How are tiles glued to polystyrene foam and what can be used to fix the material?
Synthetic materials have positive aspects: sound insulation, thermal insulation, light weight, affordable price and easy installation. Penoplex is produced by extrusion from polystyrene foam. Although it arose recently, it has become a popular insulation material. Most often, polystyrene foam is replaced with penoplex.
Tiles glued to insulation
Is it possible to glue tiles to polystyrene foam or polystyrene foam?
When installing insulation boards with glue, make sure that they are glued without gaps. You can glue the insulation yourself, without the help of specialists. Apply slab adhesive first around the perimeter, then in the center. Apply tile adhesive to the slab, then place the material against the surface and press for a few minutes until it adheres to the wall.
Polystyrene foam can be a good insulation material and a base for ceramics on walls. But the material does not tolerate temperature changes and the influence of water, which freezes on the tiles and in the seams.
Laying foam boards with glue
Polystyrene foam has the following properties:
- slight linear expansion;
- heat-resistant material;
- Due to its elasticity, the insulation compensates for deformations.
Since every insulation material has its drawbacks, polystyrene foam for walls is no exception. Vulnerable to sunlight and rodents. If exposed to UV radiation for a long time, it becomes brittle. The surface changes color to yellow, which subsequently leads to erosion.
Insulation of walls with penoplex
Defenseless foam plastic is a temptation for mice - during the cold season they make holes in it. To prevent this from happening, experienced builders protect the insulation with ceramic tiles.
Application of penoplex
To keep the house warm without extra costs, consumers are interested in whether it is possible to glue tiles in the house to polystyrene foam? The question is not easy even for specialists, so opinions differ. In any case, it is forbidden to finish directly on top of the insulation. If you are gluing porcelain stoneware or clinker tiles to the facade, then you need to cover the penoplex with plaster with a reinforcing mesh. The foam board holds the 30 × 30 cm tile.
Walls insulated from the inside with foam boards
If it is necessary to stick the material indoors on polystyrene foam, additional surface coating will not be required. But if you plan to insulate the floor, then put a layer of cement screed on the insulation, then lay the tiles.
To choose an adhesive that is suitable for penoplex, consider the following points:
- base composition;
- environment: moisture and temperature;
- how quickly the mixture dries.
Important! To ensure that the insulation lasts a long time, treat the installation responsibly and first familiarize yourself with all the details and nuances.
Insulation on the surface of the walls Average rating of ratings more than 0
laminatepol.ru
Advantages of using penoplex
In terms of its performance characteristics, penoplex ranks first among similar floor insulation materials. At a fairly reasonable price per square insulation, the manufacturer provides a long warranty on its use (up to 40 years). There are several advantages:
- High stability of the coating under intense mechanical loads.
- High moisture resistance.
- Heat resistance (the stove does not ignite).
- The absence of formaldehyde in the production of insulating sheets, which ensures a high environmental class of the material.
- Increased sound insulation properties.
- Laying penoplex does not require additional costs.
Combining the properties of plastic and foam, the material is produced in the form of slabs, with a length of 120 cm, with a standard width of 60 cm. Thanks to the inclusions of air cells formed during pressing of the material, the slab is light, with high surface rigidity. Depending on the assortment, it is used to cover floors (grade 35 “Foundation”), walls, ceilings (grade 31 C “Comfort”). To insulate the floor, the material is most often laid on the following bases:
- priming;
- floor coverings;
- under the system heated floor;
- concrete floor.
Benefits of penoplex
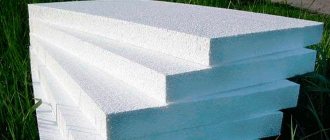
This insulation is available in the form of slabs of various thicknesses. The standard slab width is 600 mm, length – 1200 mm and 2400 mm. The minimum sheet thickness is 20 mm, the maximum is 100 mm. Depending on the thickness, the package can contain from 4 to 20 sheets of penoplex.
PENOPLEXCOMFORT is a unique brand of thermal insulation boards, which is ideal for thermal insulation of country houses or city apartments
The main advantages of this insulation include:
- zero water absorption;
- low thermal conductivity and vapor permeability;
- absence of harmful fumes;
- resistance to microorganisms;
- high strength.
Properly installed insulation will reliably protect the room from cold, noise, moisture penetration, and will create comfortable conditions even in the most severe frosts. Unfortunately, penoplex is not resistant to solvents and high temperatures, and also has a fairly high cost. But, despite this, it is used very widely for floor insulation, gradually replacing mineral wool and foam plastic.
Calculation table of thermal insulation in different regions
Table of penoplex parameters
Penoplex. Installation instructions from the manufacturer
Basic rules for installing penoplex
Before laying penoplex, the required performance characteristics and features of the floor are determined. But there are general rules when laying insulation, compliance with which will allow you to avoid wasting time and money.
Correct calculation of the square footage of the insulated floor and selection of the appropriate slab thickness. Penoplex is produced in widths from 2 to 10 cm, with a standard width (60 cm), sheet length from 120 to 240 cm. The material is sold in blocks of four to 20 sheets.
The slab must be laid on a flat surface, regardless of the floor (rough, dirt, concrete).
How to insulate a floor using penoplex
Modern floor insulation with penoplex is the optimal solution to this problem. You can install penoplex yourself. You won't need to spend a lot of money.
Reliable penoplex insulation is produced in sheets with a thickness of 2 to 10 cm. The sheet width is standard, 60 cm. The sheet length can be 1200 or 2400 mm. Such dimensions significantly facilitate the process of insulating the floor with penoplex. Each package contains from 4 to 20 sheets, depending on their thickness. The required amount of material can be calculated in advance, taking into account a small increase.
Penoplex insulation sheets
Penoplex has the following advantages:
- moisture resistance;
- low thermal conductivity;
- vapor tightness;
- soundproofing;
- inaccessibility to microorganisms;
- good thermal insulation performance;
- long term.
All of these advantages fully compensate for the instability of this material to high temperatures and various solvents.
Insulation on the ground base
It is recommended to lay penoplex on a ground base, without main foundation slabs, using the following technology.
The standard insulation scheme assumes the presence of a vapor barrier layer under the foam sheet; in some cases this operation is skipped. The insulation layers are arranged as follows:
- priming;
- crushed stone (or gravel);
- sand;
- foam boards;
- waterproofing;
- reinforcing mesh;
- cement strainer;
- finished floor (laminate, parquet, linoleum, etc.).
The soil base is leveled, compacted and dried. A layer of crushed stone, about 40 cm high, is tightly laid and compacted. Sand is poured onto the crushed stone cushion in a layer of about 10 cm.
Some craftsmen use a modified technology in alternating laying layers:
Granite chips, crushed stone or gravel are poured onto the ground. Then everything is watered generously and compacted. After this, the soil is dried.
It is recommended to use these rules during construction only in the warm season, so that the soil has the opportunity to dry out sufficiently. Then dry sand is poured.
Penoplex is placed on the resulting base; the seams can be glued with tape (or use an adhesive solution). Layers of waterproofing are applied to sheets laid in a checkerboard pattern, onto which a reinforcing mesh is mounted.
For subsequent cement screed, metal cellular reinforcing mesh is used. The height of the mesh should not exceed 25 cm. Fill the floor with cement mortar, checking the level.
If you do the insulation of the floor on the ground floor of a private house yourself, you should pay attention to the fact that it may be necessary to cut holes in the foam slabs for communication pipes. This stage of work should be carried out after laying the sand, during the first measurements.
Floor insulation on the base - floor slab
When laying building materials on concrete floor slabs, it is recommended to additionally insulate the surface. You should put penoplex on a layer of thermal insulation, using for this:
- cork sawdust;
- expanded polystyrene;
- foil-based insulation;
- liquid insulation.
For high-quality and fast flooring, a certain technology is used.
- Preparatory work. The floor slabs are puttied, all irregularities are sanded, and checked with a level.
- The surface of the base is primed; two layers of primer can be used if no additional insulation has been carried out.
- In high-rise buildings, for thermal protection, sheets of material can be laid on a concrete base without additional coating primer.
- Penoplex sheets are laid.
- The sheets are laid on the floor, the seams can be treated with polyurethane foam or using tape.
- Installation of the thermal insulation layer.
- A cement screed is poured onto the reinforcing mesh. The order of work often changes; the reinforcing mesh may not be installed.
- The finished floor covering is being laid.
If penoplex is used for thermal protection of a balcony floor, it is recommended to additionally lay the concrete floor using foam plastic or mineral wool as insulation.
The technology of laying the finished floor directly onto the material, bypassing layers of reinforcing mesh and cement screed, is also widely used. This method is used if it is necessary to reduce the weight of the floor (when insulating the interfloor floors of a private house). And also if there is a risk that the load-bearing floors are not designed for the additional weight of the concrete screed or if additional insulation is not required.
How to insulate a floor under tiles yourself?
With the onset of cold weather, the most pressing question arises about the need for warm floors in the apartment. This is especially true for those rooms with tiled flooring. The fact is that tiles and ceramics have high thermal conductivity and almost always remain cool, making walking on such surfaces uncomfortable.
Warm floor scheme for tiles.
In this case, there is nothing else left to do but to insulate the floor under the tiles. Today, the building materials market offers a large selection of insulation materials, which differ from each other not only in cost and quality, but also in the method of production, installation, durability, etc.
Materials used for insulating floors under tiles
Scheme of floor insulation with expanded clay.
- Mineral wool. Materials such as glass wool, slag wool, stone and basalt wool are used as insulation. They all have a fibrous structure and have similar thermal insulation properties. Mineral wool is most often produced in rolls in the form of mats, which can have different thicknesses. The disadvantage of this insulation is its high hygroscopicity - it loses its properties when wet. Therefore, mineral wool is used for floor insulation only in rooms with low humidity.
- Penofol. Penofol is a roll of thermal insulation material covered with foil on one or both sides. Foil has excellent heat-reflecting properties, thanks to which penofol not only retains heat, but also prevents the penetration of cold air. The material is produced in rolls and may have a self-adhesive layer.
- Styrofoam. This insulation is the most popular and is often used for laying under tiles. Sheets of foam plastic can be made in thicknesses of 10, 5, 3, 2 and 2.5 cm and, as a rule, have dimensions of 1x1 or 1x2 m. The thermal insulation properties of the material directly depend on its density, therefore, for insulating the floor under the tiles, you should choose solid foam plastic, having high density.
- Bulk insulation. The most common materials in this group are expanded clay, vermiculite, ecowool and granulated polystyrene foam. Bulk insulation is easy to use, environmentally friendly and resistant to temperature fluctuations. However, when laying, it is worth considering that they shrink, so they must be compacted carefully.
Insulation of concrete floor
Since tiles are usually laid on cement mortar, the floor in the room must be concrete.
Concrete, like tiles, does not retain heat well and cools quickly, so such floors require additional thermal insulation.
Concrete floor insulation scheme.
This problem is especially acute in houses and cottages with concrete foundations, as well as in apartments located on the first floors.
The technology for insulating a concrete floor includes the following main stages:
- Preparing the base. At this stage, the top covering, most often wooden, is dismantled and the concrete floor surface is cleared of debris.
- Floor markings. Using a building level, horizontal markings are made along the walls of the room, which will indicate the height of the future floor.
- Floor insulation. First of all, it is necessary to lay a layer of waterproofing. The most popular waterproofing material is roofing felt, but today they are increasingly resorting to a simpler and more modern method - covering the surface of the base with bitumen mastic. Then insulation (mineral wool, expanded clay, etc.) is laid in the space between the joists, and a vapor barrier material is laid on top of it. If the floors are insulated with foam plastic, then there is no need to carry out a vapor barrier.
- Floor screed. For the screed, a concrete solution is used, which is prepared from a mixture of cement and sand in a ratio of 1 to 3. A reinforcing mesh with rods with a cross-section of at least 5 mm is laid over the entire floor area. The concrete solution is poured in several layers, guided by the marking lines, and each subsequent layer is applied only after the previous one has hardened. For the topmost layer, the mixture is made more liquid to ensure maximum leveling of the surface. The thickness of the screed should be approximately 3-5 cm, depending on the height differences (a greater thickness will increase the load on the subfloor).
- Laying tiles. This stage of work should begin after the concrete coating has completely dried.
Warm floor with water heating
This method of floor insulation is very popular, despite its fairly high cost. Therefore, in order to save on installation costs and not involve specialists, you can install the system yourself. Installation of heated floors under tiles is carried out in the following sequence:
Scheme of underfloor heating with water heating.
- Preparing the base. The old coating is removed, and all debris is removed from the spaces between the joists.
- Laying waterproofing and insulation. It is better to use penofol, foam or polyurethane boards as insulation. You can also purchase insulation on the market specifically designed for underfloor heating systems. Its special feature is the presence of recesses for pipes, which greatly facilitate installation. It should be noted that a space of at least 5 mm must be left between the wall and the foam, since when the pipes are heated, the material may be slightly deformed.
- Pipe laying. It is recommended to use polypropylene or metal-plastic pipes, as they are strong, durable and have good flexibility. There are two methods of installation: spiral and snake. When the pipe is arranged in a spiral, the entire floor area is heated more evenly, since the supply and outflow of water occur in parallel. When laying with a snake, the floor above the beginning of the pipe heats up more, but this method is indispensable when you need to bypass any obstacles or areas. For uniform heat distribution (for any installation method), the distance between the pipes should be approximately 30 cm. The pipes are attached to the insulation using U-shaped brackets, plastic brackets, clips or other special devices.
- Connecting a warm floor. After installation, the supply and return ends of the pipe are removed and connected to the manifold. The entire system is then connected to the water supply.
- Pouring screed and laying tiles. After checking that the system is installed correctly, you can begin the final screed. It is not necessary to fill the pipes with water before pouring, since they are quite rigid and should not deform under the pressure of the concrete solution. It is not recommended to turn on the heating at full power for some time after pouring to avoid the formation of cracks. After the screed has dried, the tiles are laid.
Infrared heated floors
This is the most modern and effective, but at the same time the most expensive method of floor insulation.
The convenience of the method is that before insulating the floor with infrared mats (heating elements), there is no need to dismantle the old coating and fill in the screed. The mats are laid directly under the tiles, which significantly saves time and effort.
Andrey Grigorievich Safronov
dekorspalni.ru
Penoplex insulation under a “warm floor” system
When installing a hydraulic or electric heated floor system, the system pipes are laid out on a reinforced mesh (thermal insulation) under a cement screed.
In this case, the material can be used using standard technology, similar to when laying slabs on a concrete floor.
If electric sheet floor heating systems are used, they can be laid either in a cement screed on penoplex, or directly on penoplex slabs, using a thin layer of thermal insulation as a gasket.
For a hydraulic heated floor system, a sand-cement screed is used; the solution is prepared from equal shares of sand and cement, and it is also recommended to add a construction adhesive base to the solution.
Penoplex trimming
If you need to lay insulation in non-standard rooms, or cut communication holes in sheets, use several methods of cutting the material.
Use any sharp knife. This trimming ensures relatively even edges of the sheet.
Trimming using a jigsaw. The cutting edge is very uneven; construction foam is used to tie sheets cut in this way.
Using hot wire. In this way, you can quickly cut a thick slab; for cutting, a nichrome string is heated with electric current and communication holes are easily cut out.
Being a universal insulation material, the material can also be used as thermal protection on wooden floors and on joists. The technology of laying sheets on a wooden base technically has few differences from covering a concrete base.
As an additional insulation element, mineral wool (as an additional thermal layer), construction foam (to fill possible gaps and for sealing), and mounting nails are used.