Warm floor options
Currently, there are many types of heated floors on the market.
The cost of these systems has decreased significantly over the past 10 years; today it averages 2–3 thousand rubles. per square meter. We offer both the cable itself in sections or coils, and products in the form of ready-made kits, which, in addition to heating elements, include a temperature sensor and a heating regulator (thermostat for heated floors). Floors based on cable mats and sections. In them, the cable is fixed to a polymer substrate. The width of the mats is 80–90 cm, the most popular is 50 cm.
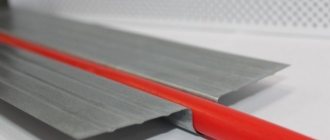
Floors based on self-regulating thermal film. Kits are available in widths of 0.5, 0.8 and 1 m. The conductive elements in the film are made in the form of flat conductors, which is why the thickness of the product is only 0.5 mm and does not affect the height of the floor. This film is designed for dry installation without screed; it can be placed under the laminate.
Floors based on carbon rods. This is a new development from Caleo. Instead of a cable, they use a series of parallel carbon rods connected by a conductive wire. This design, according to manufacturers, is more reliable (carbon rods are more resistant to loads than a conventional cable or film) and cost-effective (compared to a resistive cable - by 60%).
An important characteristic of any type of heated floor is its specific power, reduced to 1 m². For household systems it can vary from 70–80 to 250 W/m²
Systems with a power of less than 100 W/m² are used, as a rule, for additional heating when installed directly under. Systems with a power of 100–170 W/m² are usually used for additional or main heating (the thicker the screed, the more powerful the system). Systems of higher power density are used in particularly difficult cases, for example, for the main heating of insulated loggias, rooms on the first floors, etc.
Which type of heated floor to choose depends on the configuration of the room, the tasks set, the chosen coating and the installation method. If laying in screed or tile adhesive is intended, choose between cable systems, mats or carbon rods. And when laying laminate flooring on a solid base, the only option is a heated film floor.
5 advantages of electric heated floors
- Easy to install. This applies to ready-made kits with heating mats or film. In some cases, they do not even require the production of a concrete screed, and installation can be done even by a non-specialist.
- Heating speed. Electric heated floors, even under a thick (5 cm) screed, warm up to the desired temperature in a few minutes.
- Frost resistance. Electric heated floors are not afraid of low temperatures.
- Safety. Unlike a water floor, an electric heated floor, if damaged, will not cause flooding of the underlying rooms.
- Maintainability. Modern equipment allows you to accurately determine the location of damage to the cable or film.
Types of heated floors
Today, the three most well-known types of heated floors are:
- warm water floors;
- cable floor heating;
- film infrared heating.
Warm water floors
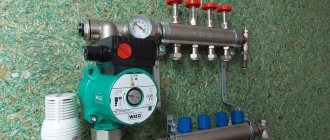
Water floors are a pipeline system connected to a gas boiler through a manifold block. By supplying hot water, the boiler “forces” the floor coverings to heat up.
Pipes for the water system are used from cross-linked polyethylene, polyurethane, metal-plastic and copper. The most popular pipes are made of cross-linked polyethylene. Polyurethane products require special welding equipment for installation.
Warm water floors are hidden with a cement screed. How long the floor coverings will take to warm up largely depends on the thickness of the cement screed. Pipes for underfloor heating are usually used with a diameter of 16 mm. This size, confirmed by accumulated operating experience, was determined on the basis of thermal engineering calculations.
Through the collector unit, a certain number of heating circuits located in several rooms are heated with hot water.
Heating engineers recommend making the length of the 1st circuit about 70 m with a pipe diameter of 16 mm. The height of the screed is recommended to be no more than 50 mm. In this case, the thickness of the screed over the laid pipes will be about 30 mm.
How long does the heated floor warm up when first turned on under such conditions?
Practice shows that the heating time of a heated floor when first turned on can last from 12 hours to a day and a half.
To do this, the water leaving the boiler is brought to a temperature of 90°C.
After the floor has warmed up, the initial temperature of the coolant is reduced to 70°C.
Cable floor heating
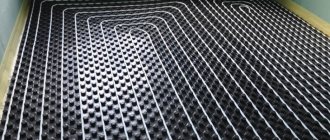
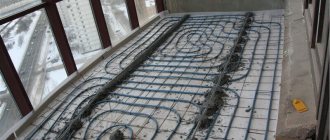
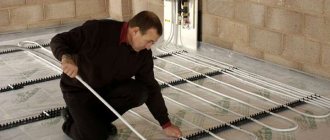
The cable is laid in the form of a spiral and a snake. The spiral shape is used in small areas (up to 20 m2). On larger bases the cable is secured in the shape of a snake.
The electric heating element will quickly heat up and begin to release heat into the body of the floor. A screed thickness of 70 mm or more will significantly increase the inertness of concrete. In this case, the longer it takes for the floor to heat up, the slower it will cool down. At the same time, energy consumption will increase significantly.
How much warm floors warm up when the cable is first turned on largely depends on the power of the wire.
With proper installation of electric heating and compliance with building codes when laying the screed, the time for the first heating of the base of the room can be from 6 to 8 hours.
Film infrared heating
Film infrared heated floors are attracting increasing attention from consumers. An electrode grid is soldered into the polymer layer of the film, which, under the influence of electric current, emits heat rays in the infrared range.
Many people are interested in how quickly the floor covering heats up from IR film. This question cannot be answered unambiguously. It all depends on the coverage area, the technical parameters of the IR film, and the method of laying out the connection diagram to the electrical network. But one thing can be stated that where the floor was heated under the IR coating, the first heating time was 2 - 3 hours.
Due to their design features, IR coatings can be easily and quickly installed under any floor covering, except ceramic tiles. An exception is the IR heating device under the tile. For more information about connecting and heating the floor, watch this video:
Electric-water heated floors
How to make a warm floor from heating Warm water floor.
Installation of heated floors In addition to the well-known and widespread electric and water floors, their symbiosis has recently appeared: electric water floors. So far these are only two systems: XL Pipe and UNIMAT AQUA. Moreover, the principle of operation and the device itself are different, but what they have in common is installation in a screed.
In the XL Pipe floors (also called XL Pipe) from the Korean Daewoo Enertec campaign, seven heating threads were placed in a polyethylene pipe, filled with antifreeze, and the ends were hermetically sealed. As a result, such an element and the liquid in it heat up almost instantly; the heat, unlike water heating, is distributed evenly. So far, heating pipe-cables are produced in two capacities, but by changing the laying step, you can achieve any heat transfer, that is, XL Pipe can be used both as main and additional heating.
Warm floor XL Pipe (XL Pipe) from the Korean campaign Daewoo Enertec - electric-water heating (click on the picture to enlarge the size)
UNIMAT AQUA is another system with a different operating principle from the fairly well-known company Caleo. This system is also called capillary heated flooring: the tubes that are laid in the screed have a very small diameter. Apart from the sizes, nothing changes: you place them in a screed (a double “snake” is recommended). But you connect it to a special control unit, which immediately heats, “pushes”, and controls the temperature of the coolant. By definition, this system cannot provide a large amount of heat (heating power varies on the control unit from 0.1 kW to 2.4 kW), but there is no electricity in the floor, easy installation and plugging in. Therefore, the UNIMAT AQUA capillary floor is suitable for installation in wet rooms: in a bathroom or in a washing room in a bathhouse.
Established standards for the surface temperature of underfloor heating
The reference book of Construction Norms and Rules (SNiP) establishes strict regulations on what the floor temperature should be. According to paragraph 44-01-2003, the maximum and minimum temperature of the heated floor should be in the range of 26 and 35 °C.
The minimum point of 26 °C should only be set if there are always people in the room. If visitors rarely enter the room, then the optimal temperature should be at 31 °C. This value is usually set for bathrooms, swimming pools and toilets, where a comfortable temperature for the feet is most necessary. The main limitation is that the temperature along the heating axes should not exceed the permissible 35 ° C; a higher temperature will cause unwanted overheating of the system and floor covering.
Comfortable temperature of heated floors for different coatings
For a parquet surface, the maximum value is 27 °C. This is caused by the characteristics of the material and its thermal properties; overheating of such a floor covering can lead to its deformation.
For a comfortable stay in the room, 22-24 °C is enough. This temperature is pleasant for the feet and evenly heats the air in the room. Unlike classic batteries, the air temperature will be maximum over the entire height of the area. In practice, a coolant value of 30 °C is rarely achieved.
As a rule, all parameters are calculated at the design stage of the heated surface. Before installing water and electric heating systems, their tasks and room heat loss indicators should be taken into account.
Average energy consumption
How much does a warm electric floor cost?
Below are the main parameters according to which energy consumption can be calculated:
- if the heating is basic, it will average 200 watts per square meter;
- and if heating is only auxiliary, then this figure will fluctuate between 100 and 160 watts per square meter.
According to studies conducted to determine the functionality of “warm floors,” these systems spend most of their energy exclusively at the initial stage of operation, that is, during preheating.
Note! Upon reaching the target set by the owner, the system’s energy consumption is reduced, and the parameters are subsequently maintained. For this reason, the floor periodically turns on/off
In fact, for every hour the floor works for about 15 minutes, therefore, for 24 hours of work this figure will be only 6 hours. Now - straight to the calculations!
The heated floor does not heat well, we eliminate the reasons
How much electricity does a heated floor consume?
Few users encounter incorrect operation of heated floors, since the system is simple and reliable. However, when this happens, experts identify only a few reasons, described below.
In general, the problem can be divided into two main types:
- The heating system does not work well initially, that is, immediately after installation.
- The warm floor worked well after installation, but over time it began to heat poorly.
First of all, it is worth noting that if the floor does not heat, then the reason may be a damaged cable. It could have been damaged when laying tiles or pouring screed, that is, as a result of careless installation. In such cases, the heating element is checked by specialists by measuring resistance.
If heating is still felt, then the reason does not lie in the heating element, since in this case the cable is working. Why does a warm floor heat poorly?
Incorrectly selected equipment
This reason, according to experts, is considered the most common. In order to choose the right “electric heated floor for tiles”, you must initially decide what task will be assigned to it. If you only need comfortable heating, then installing the economical Thermomat TVK-130 will be enough, which will heat the floor covering up to 30°. If the system will be the only source of heat in the room, then the choice should be made on the powerful Thermomat TVK-180, the maximum of which is already within 40°.
In addition, natural heat loss must be taken into account. For example, if we install Thermomat TVK-180 in a cold room, then we cannot expect the same 40° from it.
In the case of the Thermocable SVK-20 heating cable, the cause of a poorly heated floor may be a large distance between the turns or a lack of thermal insulation
You should also pay attention to the equipment purchased and the task assigned, taking into account the characteristics of the room.
Incorrect installation
When installation of equipment is not carried out by specialists, a poorly heated floor can result from the following errors:
— Incorrect installation of the temperature sensor. If it is installed too close to the heating element, this leads to premature operation of the thermostat. The consequence of this will be that the heating element turns off before the floor covering is heated to the set temperature.
— If, for example, a heating mat was installed in a large layer of tile adhesive or even in a screed, the effect will be either insignificant or not at all, since all the power will be spent on heating the thick coating
Failure of the thermostat or temperature sensor
The temperature sensor is the weakest link in the “warm floor” system. Over time, it may need to be diagnosed and replaced. The thermostat is a precise electronic device, so its failure is also possible. If one of these elements fails, repair is reduced to their diagnosis and replacement without dismantling the floor covering.
Low voltage in the power supply
If there is a voltage drop in the electrical network, the system will not work correctly. For example, if the voltage decreases by only 10%, then the power of the heating equipment will decrease by 20%.
One “warm floor” installed for two rooms
If the same system is installed in two rooms with different temperature conditions, then heating in one of the rooms may differ. This happens because the floor temperature sensor is installed in only one room. As a result, the thermostat can turn off the heating element when the required temperature in the room with the sensor (for example, a kitchen) has already been reached, but in the adjacent room (for example, a corridor) the floor has not yet warmed up.
When the first signs of a poorly heated floor appear, contact a specialist. We can quickly diagnose and replace or repair failed equipment, including local repair of the heating cable.
Regulating the temperature of heated floors
To create comfortable conditions, as well as to control the consumption of electricity and other resources, users resort to adjusting the temperature of heated floors.
Adjusting water floors
On water systems, a thermostatic valve or pumping and mixing groups with automation are usually installed.
They prevent overheating of the system and the floor covering, respond to changes in room temperature and open or close valves, maintaining specified modes.
The advantage of such regulators is the simplicity and ease of assembly of the structure.
Regulation of electric and infrared floors
For electric floors, electromechanical, digital and programmable thermostats are used. They are connected in parallel to the circuit and use special sensors that analyze changes in surface heating modes. When the maximum set heating thresholds are reached, they turn off the coolants. When the temperature drops a couple of degrees, they re-energize the electric heaters. Such thermostats allow you to save from 30 to 60% of electricity, significantly reducing the cost of utility bills.
Recently, heated floors have become very popular among the population. Floor heating is carried out by three types of heating of the base of the room.
These are systems of water heated floors, electrical cables and infrared film coatings.
Such devices can create comfortable conditions for a person to stay indoors at any time of the year. An important property of heating systems is the heating time of the floor covering. Many people are interested in the question of how much the heated floor heats up. Let's consider the factors influencing the heating time of the floor.
Basics of microclimate regulation
After we have found out what temperature of the heated floor is considered optimal, it makes sense to understand the methods of regulating it. Currently, this process is usually carried out using automatic control systems. Such a system includes a complex of sensors and automatic valves controlled using a remote control.
A big advantage of using automation for heated floors is the fact that once you have set the microclimate values you need in your room, you can not return to them for several days, as they will be maintained automatically. The manual control method involves constant manual adjustment of all necessary parameters, which is inconvenient and time-consuming.
As for the classification of such automatic systems, depending on the location of their installation, the main tasks performed by them, as well as the method of direct control, automatic heating water floors are divided into:
- zonal or individual;
- group;
- complex.
Group control of floor heating indicators refers to the general control of room temperature indicators created by the heating system. Today, there are several ways to set the same temperature in several points of the room:
Thermostat for electric heated floors
- regulating it directly at the heat source using built-in control and monitoring elements;
- regulation at group-type mixing units;
- regulation at individual mixing units;
- application of the “constants” principle using a thermal head equipped with a thermal sensor, which is mounted on the mixer directional valve;
- the use of “climate control”, implemented using programmable heat supply controllers.
From a technical point of view, the temperature here is regulated by setting the desired value on the thermostat. Upon reaching it, the sensors transmit a signal to the control panel and valves with servo drives start or, conversely, remove the coolant from the system, thereby regulating its temperature.
Installing a temperature sensor for a heated floor
Features of floor heating when first turned on
When the required temperature is reached, heated floors maintain the required minimum heating to maintain it
Why is the emphasis placed on the expression “first turn on”? The answer to this question is simple. When the underfloor heating system has heated up to the required temperature level, the heating of the base of the room is not turned off completely as needed, but is maintained at a minimum heating level.
This is done in order to achieve the maximum level of floor heating at any time in a short period of time.
Turning on the heated floor for the first time requires significantly more energy than during operation. Therefore, this will take a lot of time. Additional energy and time are needed to overcome the inertia of the screed.
It should be noted that for infrared heating there are no problems with overcoming the inertia of the floor structure.
The best posts
- Homemade devices and machines for cold forging
- How to make a rack? Several options for making a rack
- Cork underlay: laminate and reviews, bitumen cork and installation, how to attach the underlay to the floor, coating
- If the balcony is leaking from above - what to do and who to contact
- DIY compositions of vegetables and fruits: photos of autumn gifts
- Snowman made from cotton pads step by step with photos and videos
- Jacket - crocheted bolero with pineapple pattern trim
- New Year's costume "Rainbow Dash"
How quickly a heated floor heats up - a detailed review
The heating rate of a heated floor - what does it depend on?
To answer the question of how quickly a heated floor heats up, you need to consider not only different types of floor heating systems, but also different options for their implementation within one type. Below we will discuss in detail all types of “warm floor” systems that exist today.
Heating speed of water heated floor
Only one thing can be said with certainty: of all systems, water heated floors heat up the slowest. This is primarily due to the inertia of water as a coolant. In addition, such a system, as a rule, is installed in a fairly thick concrete screed, which also requires some time to heat up. Don’t forget about the area of the room with water-heated floors - the larger it is, the longer it takes for the temperature to rise to a given level. You can increase the heating rate by connecting an electric pump, which will quickly pump the coolant throughout the system.
Practice shows that the average heating rates for a heated water floor with a 5 cm concrete screed and ceramic tiles as the finishing surface are as follows: 24 hours to heat the floor from 0 to 5 degrees Celsius and at least another day to warm the room to a comfortable temperature of 20 degrees.
However, slow heating of the water system also has its advantages - it also takes a long time to cool down, releasing previously accumulated heat into the room. If the lights are turned off, which is not uncommon, the room with electric heated floors will cool down in just a few hours. The water floor will cool down for several days (it is difficult to imagine such long interruptions in the gas supply).
Heating speed of electric floor heating systems
The electric heated floor itself (regardless of the type of system) heats up quickly - in just a few minutes. Further time is spent on bringing the screed and finishing floor covering to the specified temperature. If we are talking about 2-3 centimeters of an adhesive or concrete layer and ceramic tiles as a surface, then heating the floor from 0 degrees to the parameters set by the thermostat will take place in 15-18 hours.
The exception is film flooring, which almost immediately, due to infrared radiation, begins to heat furniture and other objects in the room. In addition, according to technology, there should not be too thick a layer of screed and finishing coating above it. The ideal option is an infrared heated floor laid under linoleum. In this case, heating of the room will begin within 10 minutes (this is exactly how long the film needs to reach full power).
By the way, many novice users begin to panic when they put their hand on an infrared heated floor a few hours after it starts working - no noticeable heat is observed. The first impulse is to set the thermostat to maximum. However, the situation does not change - there is no noticeable heat from the floor.
There are two explanations for this mystery. Firstly, the temperature of the heating elements of a film floor cannot be higher than 30 degrees (otherwise they will fail), and the human body, as we know, is 36.6 degrees. Secondly, such a warm floor releases energy in the infrared way, that is, surrounding objects are heated not through the air by convection, but directly by radiation.
Recommended temperature
Favorable temperature distribution in rooms reduces energy consumption and radically solves the problem of how long it takes for a heated floor under a tile to heat up. The heating temperature is higher at the feet and lower at the top, giving a feeling of comfort even when the room is colder than in a room heated by conventional radiators. At the same time, you can maintain the temperature lower by 2 C without feeling any inconvenience. This helps save about 5-10% of energy resources.
When the temperature in a room with a heating system increases by 2 C, the amount of heat transferred through the pipes under the screed will decrease by more than 40%. Simple room automation that controls the equipment will shut it down without the need for expensive controllers connecting that heat source to the heating system.
After installation and switching on, many people wonder how quickly the heated floor under the tiles heats up, with a fairly thick screed. In this case, the time will drag on a little, it will take about 2.5 hours. It also affects how much the heated floor under the tiles heats up when first turned on:
- cable power (with increased values this will happen faster);
- thermal insulation under the screed (it will prevent heat from escaping downwards).
supply of coolant to the system, test run, first warm-up
Installing a warm water floor as a main or additional heating system requires maximum attention and knowledge of the sequence of actions.
If something goes wrong, it will be too difficult and expensive to make changes, especially after the finish has been installed. To avoid this, you need to know how to turn on a water heated floor.
Supplying coolant to the system
The method of pouring water into the system depends on how it is designed. Most often, a tap is installed for this purpose, supplying coolant from the water supply to the pipes of the warm water floor.
The water floor system does not require annual drainage of water after the heating season, but a special tap for this must be on the outlet manifold.
Before filling the system with water, it must be thoroughly rinsed, because when laying the pipes, small construction debris could get into them. To get rid of it, you need to fill and drain water until it becomes clean.
Manufacturers recommend updating the coolant with each new season, and if you follow their advice, then this flushing should be done every time. But, as practice shows, it is enough to carry out such work once every 3-4 years, although some consumers do not drain the water for decades, and the system works perfectly.
The next stage of work is the tested launch of the water heated floor after the coolant has been poured into it.
Test run
Pressure testing is a pressure test of the entire system for possible leaks in the pipes and at their connections.
Without this step, pouring the solution and laying the finishing coating is simply pointless. It is carried out when all pipes are connected to the distribution manifold.
Each heating circuit must be individually filled with liquid until all the air is removed from it. To do this, valves, both control and thermostat, must be opened and closed.
Each type of underfloor heating pipe requires its own type of crimping:
- If metal-plastic is used, then cold water supplied to the system under a pressure of 6 bar is used for starting. If it does not fall within 24 hours, then the structure has passed the test and you can begin further work - pour the screed over the water-filled pipes that are under pressure. During the entire testing stage at this pressure, the air vents must be closed, otherwise water will flow through them.
- For cross-linked polyethylene pipes, inspection requires other steps:
- firstly, the pressure for crimping must be twice the working pressure, but not lower than 6 Bar;
- secondly, you need to watch when it starts to fall (about 30 minutes) and raise it again;
- thirdly, such actions should be carried out three times and only after that the pressure should be doubled again and the system should be left for a day;
If during this time the pressure has dropped by no more than 1.5 Bar and no leakage is visible, then the system has passed the test.
As an additional check, experienced technicians recommend using a maximum system heating test. This first heating of the water heated floor will show how high-quality the pipes are. To do this, you need to heat them to +80-85 degrees and leave for half an hour. If no leaks or steam are visible anywhere, then the structure is ready for grouting.
After all checks, the screed should be poured only onto full pipes so that it “takes into account” their changed shape.
How to start a warm water floor correctly?
The first launch of a warm water floor is carried out by heating the coolant to +20-25 degrees. You need to let the system settle for a couple of days, after which every day increase this indicator by 10 degrees if water is used and by 5 if the coolant is antifreeze.
The entire process of gradual heating of the structure directly depends on the size of the room. If it is small, then you can do it in just a couple of days, but since the launch of a warm water floor is arranged after all the checks, pouring concrete and laying the floor covering, it is better not to rush with a sharp rise in temperature. This may cause cracks to appear in the screed.
Warm floor: how long does it take to heat up?
To take advantage of all the benefits of such systems, it is necessary to carry out the installation correctly and carry out the first start-up exactly according to the instructions:
- Before starting, you need to carefully blow out and adjust the installation. The air in the heating circuits can slow down significantly and even block heating.
- In turn, failure to regulate valves or flow meters will result in uneven heating, slowing down time.
Typically, a thin coating under a small screed heats up in 15 minutes with a cable power of 150 W/m2. Very often, in order to speed up the solution to the problem of how long it takes for a heated floor to heat up, the temperature of the supplied water is increased to 55 C. Meanwhile, such an action can produce a completely opposite effect from the intended solution to the question of how long it takes for a heated floor to heat up.
Sensors, whose role is to protect against overheating, can turn off pumps and heat supply. Thus, instead of speeding up the start and quickly resolving the issue of how long it takes for the heated floor to heat up, a delay occurs. If the system is overheated, the coating may be damaged within a few hours. Heating temperatures above 60 C will lead to damage to the surface layer and cracking of the screed.
Installing a warm water floor as a main or additional heating system requires maximum attention and knowledge of the sequence of actions.
If something goes wrong, it will be too difficult and expensive to make changes, especially after the finish has been installed. To avoid this, you need to know how to turn on a water heated floor.
Installation. Cable laying order
- Concrete base. Thermal insulation is laid on the prepared base.
- Thermal insulation. Thermal insulation is a technical pressed cork 2 mm thick and reflective foil 100 microns thick. In the absence of thermal insulation, the radiated heat from the heating cable will “go” down, which will lead to heat loss and a decrease in the efficiency of the system. Laying order: cork (measured in sq.m.) on top - reflective foil (measured in linear meters, width 1 linear meter - 0.5 m)
- The bottom concrete screed (1-2 cm) is placed on top of the thermal insulation (not required, but recommended)
- The top concrete screed (3-5 cm) is the most important “layer” of the system, because the heating cable is directly immersed into it, must be homogeneous and completely cover the cable and the connecting and end couplings. If conditions do not allow making a screed 3–5 cm high, a groove (recess) is made in the place where the coupling will lie, which allows you to reduce the thickness of the screed.
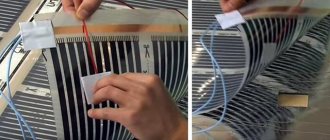
- Heating cable. It is laid in the form of a sinusoid, taking into account the area and pitch of installation using the “tongues” of the mounting tape. The surface on which the cable is laid should not contain any sharp protrusions that could damage the cable insulation. Attach the mounting tape to raw concrete or reinforcement using nails or screws. The heating cable is laid on a fixed mounting tape in even turns over the surface of the entire floor, bypassing areas intended for placing furniture, bathrooms, washing machines, water pipes, etc. The cable tension during installation should not exceed 5 kg. The heating cable and couplings must be filled with concrete. When the heating cable is pressed into the thermal insulation or air pockets are formed around the cable, the temperature on the surface of the cable may rise above the permissible temperature, which in worst cases can damage the cable. The connection of electrical wires is made in separate junction boxes or a thermostat.
When pouring concrete, you need to be extremely careful not to damage the cable.
Before and after pouring concrete, it is recommended to measure the resistance in the cable and the insulation resistance.
We analyze the types of heated floors
Installation of heated floors under tiles begins with the selection of heating equipment. Some experts and consumers say that it is much more profitable to lay water floors, but this is not always possible. In addition, they have certain disadvantages:
- To lay water pipes, you will need a powerful concrete screed - it is poured on top of the laid pipes, its thickness reaches 70-80 mm;
- Concrete screed creates pressure on subfloors - this is important in multi-story buildings where floor slabs are not designed for such loads;
- The water pipe is at risk of failure - this can lead to flooding of neighbors and unnecessary repair costs.
They are more applicable in private households, where it is possible to equip them during the construction or renovation stage.
Please note that if the water heated floors break, you will have to repair not only your own apartment, but also someone else’s.
Electric heated floors for tiles come in three main varieties:
- Heating cable is the best option;
- Heating mats are somewhat expensive, but effective;
- Infrared film is not the smartest option.
Let's consider the possibility of using them in conjunction with tiles.
Infrared film
When choosing electric heated floors under tiles, consumers will certainly become familiar with infrared film. This film provides heating of floor coverings using infrared radiation, under the influence of which they become warm. But it is not suitable for laying under tiles or porcelain stoneware - the smooth film will not be able to bond properly with tile adhesive or mortar, which is why the tile simply falls off, albeit not immediately, but over time.
Also, the electric infrared film will not be able to provide a connection between the tile adhesive and the main floor, despite the presence of special technological holes. The finished structure turns out to be unreliable and short-lived; it threatens to fall apart in parts. We conclude that some other heating equipment is needed under the tiled floor; infrared film is not suitable here.
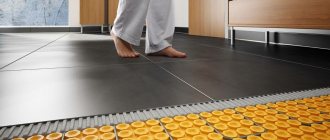
Heating mats
The ability to install an electric heated floor without a screed under the tiles is provided by the above-mentioned heating mats. They are modular structures, ready for installation work - these are small sections of durable mesh on which sections of the heating cable are fixed. We roll it out on a flat surface, apply glue, lay the tiles, let it dry - now everything is ready, you can safely walk on it and place furniture.
Electric heated floors under tiles, created on the basis of heating mats, are easy to install. They do not require a bulky and heavy cement screed, but are distinguished by their high cost - this is a small disadvantage that you will have to put up with. But we can safely mount them on rough surfaces and immediately begin laying tiles or porcelain tiles.
Heating cable
Warm cable flooring under tiles is a more standard and cheaper solution compared to the above-mentioned mats. It will delight you with warmth and long service life, as well as a low probability of breakdown. Electric heated floors of this type are mounted using three types of cable:
- Single-core is not the most worthy solution. The thing is that this cable format requires connecting wires to two ends at once, and not to one. This is not very convenient and leads to significant labor costs;
- Two-core - a more advanced cable for installing electric heated floors under tiles. It is easy to install as it does not require a ring connection;
- Self-regulating cable - it can be easily cut to almost any length; thanks to its special internal structure, it can automatically regulate the heating temperature.
Using a self-regulating cable to install an electric heated floor under a tile, you get the opportunity to save on electricity. Also, experts and consumers note more uniform heating, which is difficult to achieve when using other types of heating elements.
Final conclusions
We can implement electric floor heating under tiles in two ways - using a heating mat or a heating cable. Infrared film is not suitable for our purposes; it is better to use it with laminate. More precisely, you can use it, but only at your own peril and risk - if you lay the tiles directly on the film, then no one can guarantee the long service life of such a structure. There is a high probability of its failure in the very near future.
Why doesn't water heating work?
So, if water heating has brought you disappointment, do not rush to scold it, it is quite possible that everything can be fixed.
The system doesn't heat up at all
This problem may occur due to the following reasons:
- The taps are closed. The distribution panel has ball valves for each circuit. It is necessary to ensure that all handles are located along the pipes, i.e. open.
- The circulation pump is not working. Its operation should be accompanied by slight vibration and little noise. If this is not the case, then you should check the power supply; you may need to completely replace the pump.
- Air has entered the system. This is an unpleasant story, but a fixable one. To eliminate it, you should seek help from specialists, since it is unlikely that you will be able to solve the problem yourself.
Advice! For correct operation of the system, the length of each circuit should be no more than 80 meters.
Correct layout of water heating
Heating is ineffective
If the heated floor does not heat well, there may be several reasons:
- The boiler power is insufficient. In this case, it is necessary to lower the temperature in other rooms where possible. It is possible that the situation will be corrected by preventive repairs and revision of temperature sensors.
- Perhaps the warm floor does not heat well because additional furniture is installed on it or a carpet is laid on it. The more open the surface is, the better.
- The pipe is partially blocked (clogged) with air. This can be solved by removing the air plug.
- During installation, the insulation was laid with violations of the technology, as a result of which the heat goes down. In this case, it is necessary to record how long the heated floor warms up and to what temperature; a deviation from the norm most often indicates exactly this. There are two options for solving the problem - either dismantle the coating and re-insulate it, or use additional heating sources.
- An extremely unpleasant case when the coating heats up unevenly, i.e. "spots". If releasing air from the system does not bring a positive result, then the vapor barrier is poorly done. In this case, the system works for dehumidification, and not for heating the room.
It is very simple to check this - you need to lay a square meter of film on the coating and tape it around the perimeter with tape. If after a day or even earlier, perspiration appears on the film, and the joints of the tiles darken, it means that the system needs to be redone according to the technology. If this problem is not eliminated, mold and mildew will form on the surface, which will lead to an unpleasant odor.
Electric heated floor diagram
How does heating occur?
Heating elements can be divided into designs with a heating cable and other types of heating elements (film, rod), which are made of carbon fiber-based composite material. The cable can, in turn, be divided into two types: resistive and self-regulating cable.
In a resistive type, heat is generated when an electric current passes through the core. Such a cable heats up evenly along the entire length of the section connected to the network.
A self-regulating cable is capable of changing the intensity of heat transfer depending on the degree of heating of a particular area. This is beneficial in terms of savings (energy consumption is reduced by an average of 20–30%) and is very convenient. If some part of the cable has cooled, then the cooled section begins to heat up more intensely. On the contrary, a heated section of the cable reduces heat production. This “responsiveness” is achieved due to the very complex structure of the cable. In it, two parallel conductive wires are separated by a thin layer of polymer semiconductor, capable of changing electrical resistance depending on changes in the temperature of the polymer. Thanks to this, the self-regulating cable cannot overheat if heat transfer is difficult in any of its sections (this situation can arise if some heat-insulating item is left on the floor, for example, a towel in the bathroom).