Installation and connection of an expansion tank in open and closed versions of heating systems
To provide the coolant with the opportunity to expand when heated, it is necessary to install an expansion tank in the heating system.
This is a very important event. It will protect pipes and radiators from unnecessary loads and significantly increase the service life of the functional elements of the autonomous heating system. We will talk about how the expansion tank works in open and closed circuits. We'll show you how to install it correctly in both versions of the system. In our article you will find a description of the technology for connecting this backup capacity and useful recommendations.
Connecting the expansion tank to the supply
What does “installing the tank for supply” mean? It’s very simple - this is a type of installation of an expansion tank in which a circulation pump pumps pressure out of the expansion tank. That is, the tank is installed on the suction side of the pump. Let's consider below how this will affect the performance of the home heating system as a whole.
After assembling such a heating circuit, in which the pump pumps from the expansion tank, we fill it with water. Let, for example, water be pumped at 1 bar of static pressure. When the pump is turned on, it will begin to create dynamic pressure. This can be easily seen by looking at the readings of the pressure gauges installed in different corners of the system.
And so, the pump is turned on. It creates a pressure of 1.5 atmospheric pressure. The pressure gauge closest to it displays a pressure reading of 1.4 bar. While the liquid in the system reaches subsequent measuring instruments, the pressure drops lower and lower.
When the liquid makes an almost complete circle of circulation through the system and reaches the installed expansion tank, you can see that the dynamic pressure of the heating system will be equal to the static one. And in the area between the pump and the tank, the pressure will drop even lower, reducing the load on the system.
Types and functions of heating expanders
An expansion tank is needed to compensate for the effect that an increase in the volume of coolant during heating has on the heating system. An additional container connected to the circuit becomes a storage place for the resulting excess water. When the temperature drops, part of the coolant leaves the tank and returns to the pipes.
The process is repeated with each heating and cooling cycle. If there was no such reservoir in the system, then when the water inside the pipes was heated, the pressure would increase and then decrease.
Such differences negatively affect the state of the system. They lead to leaks at the junctions of devices and pipes and can even cause equipment failure.
The expansion tank is selected depending on the characteristics of the heating system. For closed circuits, you need a special closed capsule with a membrane, and for open circuits, an unsealed container of a convenient configuration and the required size is suitable.
You should choose a membrane tank that is designed for contact with hot water. Typically, the body of such devices is painted red. You can make a container for installation in an open circuit yourself, for example, weld it from sheet metal. But it is important not only to choose the right device, but also to install it correctly.
Installation of membrane device
A hydraulic accumulator of this type is installed where there is a minimum probability of coolant turbulence, since a pump is used for normal circulation of water flow along the circuit.
Correct container position
When connecting the expansion tank to a closed heating system, be sure to take into account the location of the air chamber of the device.
The rubber membrane periodically stretches and then contracts. Due to this impact, microcracks appear on it over time, which gradually increase. After this, the membrane has to be replaced with a new one.
If the air chamber of such a tank remains at the bottom during installation, the pressure on the membrane will increase due to gravitational influence. Cracks will appear faster and repairs will be needed sooner.
It makes more sense to install the expansion tank in such a way that the compartment filled with air remains on top. This will extend the life of the device.
Features of choosing an installation location
There are a number of requirements that must be taken into account when installing a membrane expansion tank:
For a membrane device, the most suitable connection point is the return section of the line between the circulation pump and the boiler. Theoretically, it is possible to install an expansion tank on the supply pipe, but high water temperatures will negatively affect the integrity of the membrane and its service life.
READ Wireless headphones tricolor TV how to connect to a computer
When using solid fuel equipment, such placement is also dangerous because steam can enter the container due to overheating. This will seriously disrupt the operation of the membrane and may even damage it.
In addition to the shut-off valve and the “American” connection, it is recommended to install an additional tee and tap when connecting, which will allow you to empty the expansion tank before disconnecting.
Setting up the device before use
Before installation or immediately after it, it is necessary to correctly configure the expansion tank, otherwise called an expansion tank. This is not difficult to do, but first you need to find out what pressure should be in the heating system. Let's say an acceptable value is 1.5 bar.
Now you need to measure the pressure inside the air part of the membrane tank. It should be less by about 0.2-0.3 bar. Measurements are carried out with a pressure gauge with a suitable gradation through the nipple connection, which is located on the tank body. If necessary, air is pumped into the compartment or excess air is vented.
The technical documentation usually indicates the operating pressure, which is set by the manufacturer at the factory. But practice shows that this is not always true. During storage and transportation, some air may escape from the compartment. You must take your own measurements.
If the pressure in the tank is not set correctly, this can lead to air leakage through the air removal device. This phenomenon causes a gradual cooling of the coolant in the tank. There is no need to pre-fill the membrane tank with coolant; simply fill the system.
Tank as additional capacity
Modern models of heating boilers are often already equipped with a built-in expansion tank. However, its characteristics do not always correspond to the requirements of a specific heating system. If the built-in tank is too small, you need to install an additional tank.
It will ensure normal coolant pressure in the system. This addition will also be relevant if the heating circuit configuration changes. For example, when a gravity system is converted into a circulation pump and the old pipes are left behind.
This is true for any systems with a significant volume of coolant, for example, in a two- or three-story cottage or where, in addition to radiators, there is a heated floor. If a boiler with a small built-in membrane tank is used, installing another tank is almost inevitable.
An expansion tank will also be appropriate when using an indirect heating boiler. A relief valve, similar to that installed on electric boilers, will not be effective here; an expansomat is an adequate way out of the situation.
Device and principle of operation
With an increase in the temperature inside the heating boiler for every 10°C, an increase in the volume of heated liquid is observed by approximately 0.3%.
Such indicators are very significant and can seriously affect the performance of the entire system.
To prevent any negative consequences , a special compensating device is used, represented by an expansion tank, which performs the following functions:
- removes excess water into the drainage system at a strictly defined filling level;
- replenishes coolant volumes when it leaks or temperature drops;
- maintains the required level of hydrostatic pressure at stable values by removing or adding coolant;
- collects air and water vapor released as a result of a significant increase in coolant temperature.
As a rule, in heating systems the coolant is represented by ordinary water, in which a certain amount of dissolved air is stably present.
Do you know about a camping, membrane, ceramic water filter? Read this helpful article about which purifier is best to take with you on a trip.
The stages of building a pond at your dacha with your own hands are described on this page.
Despite a number of positive aspects, expansion tanks installed in heating systems have some disadvantages that must be taken into account when selecting and installing equipment:
- its significant size makes it difficult to locate the expansion machine in a small room;
- to corrosion changes decreases
- the walls of such equipment consume a certain amount of thermal energy.
The design features of expansion tanks allow us to distinguish a couple of groups of such equipment, which can be represented by open and closed models.
Open accumulator
The simplest type, used in systems where there is no circulation pump and the coolant moves by gravity, under conditions of the correct pipeline slope.
The design of such an expansion tank is represented by a container without a lid, installed at the highest point of the heating system.
The device includes a fitting and a float mechanism installed in an open container, which automates the addition of water to the heating system.
The coolant is discharged into the sewer by means of overflow.
Operating principle:
- excess water that expands during operation of the heating system enters the capacity of the expansion tank;
- during the cooling process, the volume of water decreases and the level in the expansion tank, accordingly, decreases;
- boiling of the coolant is accompanied by the release of steam, which helps protect against water hammer in the heating system, destruction and depressurization (read how to make a chain pipe cutter with your own hands here).
The disadvantages of such expansion tanks are:
- rapid evaporation of the liquid with which the system is filled;
- corrosion of metal structures.
What do you know about the Biotank septic tank? Read positive and negative reviews about offline sewage treatment plants in this useful article.
How to connect a compressor for a pond with your own hands, read here.
On the page: it is written about a pump for pumping sludge out of a pond.
To avoid corrosive changes , it is advisable to install modern plastic models.
It should also be remembered that in systems filled with antifreeze, open type expansion tanks are not used.
Closed expander
The basis of such a device is a replaceable or fixed diaphragm.
Basic membrane tanks have a rather complex design, represented by:
- steel body;
- a membrane dividing the expanzomate into a pair of parts;
- fitting for injection of air under pressure;
- flange for connection to the hydrophore body.
installed in the heating circuit compensates for the thermal expansion of water and is also capable of performing the following main functions:
- protects the circuit from hydraulic shocks;
- prevents leaks of radiators, pipelines and connections that can occur during pressure surges within the system;
- ensures longevity of heating devices;
- regulates the coolant pressure in the heating accumulator;
- dumps air;
- ensures uninterrupted and reliable operation of the boiler (see photos of polypropylene piping diagrams for a heating boiler on this page).
The main functional part can be made of different types of rubber.
based on elastic rubber, which is not subject to high loads and temperature changes, are of high quality
Connecting the expansion tank
The location for installing such a tank is chosen where the intake of excess coolant will be as efficient as possible.
When figuring out how to properly install an expansion tank in an open heating system, you need to pay attention to three important points:
The requirements are explained by the peculiarities of the functioning of gravity heating systems. The hot coolant moves from the boiler through the pipes and reaches the expansion tank, losing a significant part of the thermal energy.
The cooled water naturally flows through the pipes into the heat exchanger for new heating. The location of the tank at the highest point allows air bubbles trapped in the system to be removed from the coolant.
Calculating the tank capacity for an open system is easy. The total volume of coolant in the circuit is measured, 10% of this indicator will be the required figure. Most often, the expansion tank is installed in the attic.
READ How to connect additional power to the riser
This is especially convenient if you need a large capacity, because a significant amount of coolant may be required for normal operation of a gravity system. A small expansion tank can even be placed in the kitchen under the ceiling, if this allows it to be connected correctly to the heating boiler.
If the device had to be placed in the attic, you need to take care of its insulation. This is especially important if the attic is not heated. Although the coolant enters the tank already cooled, you should not neglect the opportunity to save some of the thermal energy. In the future, heating will require less time and fuel, which will significantly reduce heating costs.
To connect the expansion tank and overflow, you need to run two pipes into the boiler room. The overflow is usually connected to the sewer, but sometimes home owners decide to simply take the pipe outside, and an emergency discharge is made outside.
After the location for installing the expansion tank has been selected and its volume has been calculated, you need to find and install a suitable container. Small tanks are mounted on the wall using brackets or clamps.
Large containers must be placed on the floor. There is no need to seal this tank hermetically, but you will still need a lid. It is necessary to protect the coolant from debris.
Some of the water from an open system evaporates, the lost volume must be replenished. The coolant is usually added to the open circuit through the expansion tank.
This point must be taken into account when choosing a place to install the device. It is not always convenient to carry water into the attic with a bucket. It is easier to provide in advance for the installation of a supply pipe that leads to the expansion tank.
How to connect an expansion tank
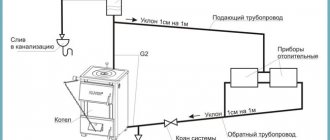
After the container is securely attached to the wall or fixed to the floor, it is necessary to correctly connect the expansion tank to the heating pipelines. To do this, you need to outline a route for the pipe that runs the shortest route to the connection point. It is believed that the best connection point for closed membrane tanks is on the return pipeline. Just not just before the entrance to the boiler, but before the circulation pump (if it is not installed on the supply) and the accompanying shut-off valves. The expansion tank installation diagram is shown below:
There are several justifications for this sidebar:
- in the return, the coolant temperature is much lower, which will extend the service life of the membrane;
- if the installation and tapping location is on the return pipeline, then the circulation pump operates in comfortable mode;
In the supply pipeline of a solid fuel boiler, critical pressure and a steam-water mixture may occur due to overheating for various reasons. If this mixture gets into the rubber “bulb” of the container, it will stop performing its functions.
In fact, practice shows that there is no big difference in connection between supply and return. It is simply customary to connect the expansion tank to the heating system via a return pipeline, it is more reliable. But what definitely won’t hurt is a shut-off ball valve on the inlet, or even better, a fitting for emptying and a second tap. Then at any time the tank can be cut off from the system, the water drained from it and removed for repair or replacement.
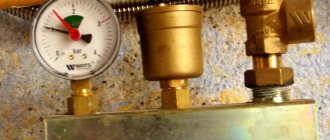
Advice. For those whose gas boiler is not equipped with a pressure gauge or a safety group, it would be useful to integrate it into the circuit of the expansion tank using the following installation diagram:
Conclusions and useful video on the topic
Step-by-step demonstration of installing and connecting a membrane tank to a heating system:
Interesting tips for installing an expansion tank in an open system:
A regular expansion tank, like a membrane accumulator, is not too difficult to install. This does not require special skills or tools. But it is necessary to strictly comply with the requirements related to the characteristics of the heating system for which such installation is being carried out.
Would you like to talk about how you installed the expansion tank with your own hands? Do you have useful information that can help website visitors with self-installation? Please write comments, ask questions and post photos related to the topic of the article in the block below.
Source
Installing the expansion tank on natural circulation
Work on modernizing heating, or rather, switching from an open heating system to a closed one, begins with the dismantling of the open expansion tank, and then the installation of an expansion tank - a membrane expansion tank.
If the tank was welded to the system with a rigid connection, that is, without a dismountable connection, then, after disconnecting it, you should cut a thread on the supply pipe or weld it by welding.
Since the open tank was connected at the highest point of the pipelines, either under the ceiling or in the attic, after dismantling it, we install air release devices in this place. It is advisable to install not only an automatic air vent, but also a manual one, for example from a radiator, through an installation tap.
READ How to connect a digital television receiver with the bbk HD media player function
We pack and screw onto the steel thread a polypropylene American 25x3/4", solder the bends, a tee, and to the tee an end coupling with a 20x1/2" external thread.
Then, onto the 1/2" thread we screw the mounting tap, metal tee and air vents:
There are two options for connecting the expansion tank to the heating system: to the supply pipe and to the return pipe. Connecting to the supply pipe is simpler, since there is no need to make additional bends from the pipeline and connect to the top point where the air vent is installed. We connect the faucet on the expansion machine with a tee, near the air vents, with a pipe with a diameter of 25 mm:
After installing the expansion tank, you need to install a safety valve on the supply, next to the boiler. If it is possible to perform welding work, then simply weld the threaded pipe into the supply. If this is not possible, then we will replace the section of steel pipe from the boiler to the nearest threaded connection using polypropylene pipes and fittings.
Typically, autonomous boilers have threaded outlets from the heat exchanger made of a pipe with a diameter of 2", therefore, to connect to the boiler, we use a 63X2" quick-release connection and a polypropylene pipe with a diameter of 63mm. There are boilers with outlets with a diameter of 1 ½", then an American one needs to be taken 50X1 ½" and a pipe with a diameter of 50mm.
Having packed the connection on the boiler, you need to pack the American one on the threaded connection of the pipe. Here you can use one trick: if a quick-release connection is required on the boiler (for its installation and dismantling), then it is not necessary on the pipes - they are installed for ease of installation.
Therefore, if there is a fitting thread on the pipe (at least 5-7 cm in length), then you can use a 2" locknut and a conventional polypropylene end coupling with a 63X2" internal thread, which will significantly reduce the cost of purchasing components.
We screw the locknut onto the steel thread, lay flax impregnated with silicone, screw on the coupling and drive the locknut back to the coupling, having previously wound the joint between the nut and the coupling with flax. The joint turns out to be very reliable.
Having prepared both joints, we connect them with a polypropylene pipe through a 63X20X63 tee, which is needed to connect the safety valve:
If the boiler room does not have a sewer outlet to connect the discharge from the safety valve there, then you can lead the discharge pipe from the valve to the floor:
If the boiler is equipped with a standard pressure gauge, then an additional pressure gauge is not required. But, if there is no pressure gauge on the boiler, then it should be installed next to the safety valve.