The inner walls of the electric water heating tank are made of stainless steel, which has the ability to resist corrosion. But this is only the first one and a half to two years of operation. Over time, salts present in the water as impurities are deposited on the walls, which leads to their gradual destruction. In order to increase the service life of the equipment, manufacturers equip boilers with a special rod. But there is one important point: replacing the old magnesium anode in a water heater should be done once a year, otherwise the benefit from it will be minimal.
What is a magnesium anode and how does it work?
New magnesium anode
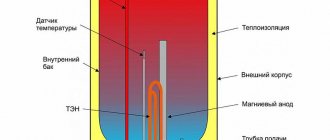
The anode is a grayish rod with a smooth surface. Typically made in the form of a thin cylindrical element with a threaded metal pin at one end. The length of such a magnesium-coated rod, depending on the boiler model, can range from 14 to 25 millimeters.
The operating principle of the component is as follows. The anode is screwed with a pin into the threaded hole of the heating element flange (heater), after which this pair is placed inside the boiler body. After some time of operation, the surface of the magnesium anode ceases to be smooth. It takes on the appearance of being battered by corrosion. This is how it protects the walls of the boiler from destruction. If you change the part in time, the inside of the water heating tank will remain intact for many years.
Thus, the anode is a consumable component. Scientifically speaking, all oxidative processes that occur during multiple heating cycles of water inside the device, in the presence of a magnesium rod, affect it, but not the walls of the tank. This occurs due to the fact that the rod has a lower electrochemical potential.
Anode design and types
In storage type water heating equipment, characterized by tanks made of ordinary metals, the installation of magnesium or so-called “sacrificial” anodes is strictly mandatory. The appearance of these items may vary.
For example, conventional suspended water heaters are most often equipped with anodes that have the appearance of a regular rod, with a threaded rod installed in the inside. Depending on the design features of the boiler, the stud may differ not only in diameter, but also in length.
Magnesium anode and heating element assembly
In floor-standing gas or electric water heating equipment with a large storage tank volume, large-sized “sacrificial” anodes are installed, which can make it somewhat difficult to replace them yourself. For example, in boilers two meters high, meter-long multi-sectional protective magnesium anodes are most often installed.
A new product is flexible plastic anodes, which are a plastic tube with special microscopic pores. The internal part of the structure is filled with special magnesium granules.
New anode – from below and anodes after operation
The main advantage of flexible anodes is the complete absence of sediment represented by oxidized magnesium. Among other things, as it is used, magnesium powder is added, which reduces the cost of purchasing a new protective element and replacing it.
Protective magnesium anodes installed inside any storage-type water heating equipment are most often represented by a steel rod, very richly coated with a layer based on a magnesium alloy.
How to determine if a part needs to be replaced
Magnesium anode requiring replacement
Visually and audibly while using the boiler, you can determine whether it is time to change the magnesium anode installed inside by the following signs:
- the boiler took much longer to heat up;
- the device often turns off and turns on again;
- the hot water flowing from the tap has become cloudy and has an unpleasant odor;
- Noises are heard during operation of the water heating tank.
If at least one of the above signs is present, you should think about replacing the magnesium anode - an inexpensive consumable element that can act as a “victim”.
What is the purpose of installing a magnesium anode for a water heater in a house?
What functions does the magnesium rod in a water heater have?
First of all, it is worth noting that it is needed for:
- In order to extend the life of the boiler;
- Obtaining water purified from salts;
- To ensure that the water heater does not become clogged or broken.
It is worth noting that the magnesium anode is inexpensive, and this is a huge plus, since it is generally available. The purpose of the product is quite simple, because it does not kill salt compounds, but attracts them to itself.
It looks like a pin on which is made of magnesium alloy, 15 mm thick, which prevents the boiler from rusting.
The magnesium (non-magnetic) anode and boiler last a long time, but if you pay attention to a number of recommendations presented below, you can significantly extend the life of the water heater.
Magnesium anode is used to purify water from salts
Recommendations:
- The condition of the boiler must be constantly monitored, no matter how long ago it was purchased. In particular, if a kind of hissing occurs, this indicates the presence of scale on the anode.
- In any case, the occurrence of salt deposits cannot be ruled out. The rate of plaque formation depends, first of all, on the hardness of the water, and secondly, with a large quantity of them, even the highest quality anodes will not be able to withstand the resistance.
- It is strictly forbidden to use a water heater if it does not have an anode installed, even if it is made of super-alloys that do not corrode. A very big mistake is to remove the anode at the end of its service life and start the device without it. A boiler without such a part will last a relatively short time, and after a breakdown you will have to buy new equipment, which is much more expensive than one part.
That is why it is necessary to periodically inspect the product and inspect the magnesium anode for wear. The first time you need to inspect it approximately six months after the start of operation and, if necessary, replace it.
The process of dismantling the old and installing a new rod
The process of replacing the magnesium anode in a boiler from Drazitsa and other manufacturers is quite simple. Anyone can remove the old anode from a water heating device and install a new one in its place, even without special skills. But when carrying out this procedure, it should be taken into account that each manufacturer has its own modification, therefore, you should only buy original components. Therefore, in this regard, it is better to give preference to visiting a service center or a specialized retail outlet.
The procedure consists of several intermediate stages. The first step is to disconnect the boiler from the electrical network and drain all the liquid from it. A check valve will help speed up this procedure, but it would be wise to connect the hose first so as not to splash everything around.
Draining water from the boiler
In the next step, unscrew the casing, which is located at the bottom of the tank. After this, the thermal sensor and flange will be visible. The last two are also subject to dismantling.
Further actions: by slightly swaying, the heating element is pulled out. Due to the fact that the heating element is covered with salt deposits, some difficulties may arise at this stage, so you must act carefully to avoid damage to the part.
The next step is to dismantle the worn-out anode, which is located next to the heating element. Often only an empty pin is found, a clear demonstration of magnesium degradation. In any case, the part must be removed from the socket.
Where to buy?
Magnesium anodes are included in storage-type water heating equipment and are most often installed on the inside of the flange, near the heating element.
In some boiler models, the protective element may be located on the top of the inside of the storage tank.
As a rule, if it is necessary to make a replacement, a magnesium anode for a water heater is ordered on fairly favorable terms in specialized online stores. However, in this case it is necessary to know all the basic parameters of the ordered device.
When purchasing a boiler anode in a retail network, the consumer has the opportunity not only to receive expert advice, but also to verify the quality of the products being sold by checking all the accompanying documentation.
Do you want to connect the instantaneous water heater to the electrical network yourself? Then use the instructions provided.
You can read all about the pros and cons of instantaneous electric water heaters here.
Detailed instructions on how to drain water from a water heater are presented in this publication.
How to increase the service life of the device
By following simple rules, you can significantly extend the service life of the electric heating tank.
- The presence of noise during operation of the product indicates the formation of a large amount of scale inside the device body; accordingly, it is necessary to clean it.
- The presence of a filter in the cold water supply system to the boiler significantly reduces the concentration of impurities deposited on surfaces.
- If upon visual inspection of the anode it is discovered that it has worn out by at least 50%, the time is approaching to replace it.
- You should not start the boiler after removing the old rod, but before installing the new one, since all impurities in the absence of a magnesium anode will settle on the heating element and the inner walls of the container.
- The boiler cleaning procedure should be carried out at least once a year.
Regarding the last point, in case of intensive use of water heating equipment, experts recommend changing the magnesium anode more often than once a year. At the same time, you should also carefully inspect all internal surfaces of the boiler for the presence of harmful bacteria. The latter does not largely affect the operation of the equipment: the accumulated pathogenic organisms can cause serious harm to everyone who uses water from the heating tank.
Taking into account the above information, you can easily draw the following conclusion: timely replacement of the anode is the key to long-term uninterrupted operation of the device and saving money that can be spent on expensive repairs of the product.
Comments:
Yuri
Yeah, Thermex. What installation, what service - one song with swearing. Their fastenings on some models are unreliable, and disassembling/assembling is a pleasure.
Oleg
Conventional round Termex water heaters are no different from Ariston or Gorenje, except for the price. I chose this one for myself and don’t regret it. I've been using it fine for 3 years.
Yuri
Oleg, well, they’re round. And 3 years is not an indicator. Just soon you will start replacing heating elements and you will understand the difference between Ariston and Termex
Oleg
It is unlikely. I’d better call a specialist for this who will sort it all out.
Yuri
Oleg, well, if so, then yes. Then you can take the cheapest options and use it without any problems, and if it breaks, call a specialist. Or even place such a specialist at home, so as not to call every day. And then today the cheap boiler broke down, tomorrow the stove, then the Chinese TV stopped working, and then, you see, you’ll have to reflash a cheap Chinese smartphone
Alexander
I have a problem with the gasket, I noticed when I was changing the “original” heating element that the pressure washer “lays” somehow crookedly./one side is pressed tighter than the other/ I bought a heating element, a gasket, and began to change it - the same story. I have a horizontal Thermex. Maybe you know the installation trick so that the gasket fits “evenly” into the HV heating chamber.
Sergey
I have a 50L flat Thermex. disassembled today 12/08/16. The RCD knocked out, a 1.3 kW heating element burned out, the second 0.7 kW was intact. I have used the water heater for 4 years. On the burnt one there was no anode at all, but on the second one it was “eaten up”. I replaced it without any problems in 20 minutes (I installed a new one with an anode and bought it for 730 rubles, and for the second one only a magnesium anode for 183 rubles, supposedly all made in Italy), except for a trip to the store and I did it for the first time, intuitively. The problem is different: it has a tank in the form of 2 pipes (and not, as usual, one container), connected by two overflows, each with a heating element inserted into it, respectively 1.3 kW and 0.7 kW. Washing them is one problem, your hand can’t fit into the holes, you pour in water and shake... in short, there’s one problem with washing the tank(s)
Sergey
Thermex water heater is a complete crap! A bunch of nuts, useless electrodes, a bunch of wires, etc. and so on. Purely in Russian: reinvent the wheel and finish something of your own! I recommend that buyers pay attention to the Real water heater. I have a VM 390. It has been working properly for 7 years now and there are no problems with disassembly: getting the ten takes about 5 minutes at most. I took off the cover, unscrewed 3 wires, pulled out the thermostat and unscrewed the heater. True, for this I had to buy a 55 head. And no anodes-cathodes!
Sergey
I don’t know, 12 years of using Termex and no complaints. I replaced the heating elements once.
Larisa
I’ve had a “Real” since 2000, I’ve never washed it or changed the heating elements. Two years ago the tank leaked and had to be replaced. I bought Termex for 80 liters for 22,000 rubles, it was flat and hot water flowed through all the connections, naturally flooding the neighbors. The temperature was 57 and the flow was still 90. Now, having read how to change the heating element, isn’t it better to buy a new one? It’s a pity that they stopped producing our Real.
Oleg
Hello I have a question. I replaced the heaters with Thermex 50 l, when turned on the ouzo is triggered, there are no leaks anywhere, tell me what the reason is
Sergey
Termex. 14 years of operation. Knocks out the RCD. Today I took it apart. There were no special problems. Both shadows burned out. Tomorrow I'll go look for them. Overall I'm happy with the water heater.
Stas
You had a heating element with two contacts, and the new one with three. How did you connect it?
Michael
Thermex 80L, I’ve been using it since 2006, I changed the heaters once, I wash it every two years, no electronics of any kind, the circuit is simple, a thermal relay and that’s it. I use it without any problems.
Stas
turn on 2 heating elements at once and they will last 2 times longer, it has been tested - one pushes twice as long and burns out 4 times faster, and then turn on the double paua to heat the second one, as a result, it heats up for a long time and, accordingly, fails just as quickly, and if always If 2 heating elements are turned on, they quickly heat up and turn off without unnecessary overheating. I personally first turned on one at a time, but then I realized that it was stupid, in general, in 9 months both of them came out one at a time, and the 2 included ones worked for 3 years and 1 month, I just replaced it a second time today and decided to look at what they write, I need to take into account the fact that this Termex works for me without any interruptions at all, only it naturally turns off when it heats up, but is always online. For those who are looking for advice, I recommend not to believe everyone, such as Vasya Pupkin, for example, writes =,, I have been using my thing from such and such a company for 12 years and have never changed the heating elements - I recommend, - but he does not write that it includes 2 once a year on holidays. So it won’t break down for a hundred years, unless it becomes rotten from the water standing in it. I think that 3 years of constant work is good enough. There are no miracles. Something that gets very hot, rubs and beats cannot last forever. After all, heating element boils in water, not in oil.
Seigei
Termex 100l works for 15 years. First replacement of heating elements after 6 years.
Leave a comment Cancel reply
Related Posts
Why should you choose a water heater with a dry heating element?
A heated garden washbasin is a budget solution for your comfort.
Non-pressure instantaneous water heater - as a solution to temporary problems with hot water.
Which water heater to choose for an apartment. Expert advice.
Why do you need an anode?
Everyone knows that a magnesium anode is built into the boiler, but few people know why it is needed. The anode neutralizes water, absorbing salts from low-quality water. Plus, the anode converts hard deposits into soft scale. If the boiler were without an anode, the boiler tank would become a corrosion center. After all, nothing lasts. The tank, which is made in most cases from stainless steel, undergoes changes under conditions of long-term use in hard water conditions. In addition, the butt joints of the tank at elevated temperatures change their structure and are destroyed. Chemical reactions occur continuously as the boiler is used.
The built-in anode makes it possible to use the boiler much longer and reduce energy costs.
Principle of operation
The first company to use a magnesium anode was Ariston. It has always been distinguished by the production of high-quality household equipment.
Magnesium is a metal that is more reactive than steel. By placing a magnesium anode in a boiler, the water is saturated with cations of this element. They bind the oxygen produced when water is heated, which protects the boiler from corrosion.
However, an excess of this split element entails the formation of loose scale due to binding with carbon anions. But it is easy to remove from the boiler. Scale forms as an insoluble precipitate and settles on the anode itself.
Replacing the magnesium anode
The magnesium anode is a metal pin coated with a magnesium alloy with an approximate thickness of 15mm. At the end of the cylindrical rod there is a metal threaded rod. The length of the pin is 140-660 mm, and the length of the rod is 14-25 mm.
The technical serviceability of the magnesium anode must be taken under visual control. A worn anode can have a negative impact on the performance of the boiler.
All manufacturers have different anode designs. This fact condemns consumers to purchase only the anode that matches the boiler model. When the boiler has been in use for more than 15 months, the anode should be removed and checked for wear. After this period of use, the anode will most likely be worn out and should be replaced. The anode is unscrewed with a pin from the threaded hole of the heating element flange.
The process of replacing the magnesium anode, as well as cleaning the heater, is shown in the following videos.
There are several criteria that indicate that it is time to replace the anode or try to clean the device:
- When the heating device is turned on, the protection is activated. This occurs due to a thick layer of scale on the heating element;
- there is no water heating when the boiler is running;
- The boiler body is electrocuted.
Timely replacement of the magnesium anode in the water heater will protect your unit from body corrosion. By changing the anode as it wears out, you will extend the service life of the boiler for decades. And in this article we will tell you how this is done.
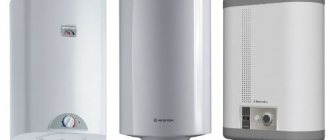
Boiler ARISTON ABS PRO ECO 100 H
How does a magnesium anode work?
The body of the storage tank (tank) of the boiler is made of black or stainless steel. Moreover, both materials oxidize (rust). Although at different speeds - black steel is faster, and stainless steel is very slow.
The oxidation process of the housing can only be stopped using an electrochemical process by installing elements of a galvanic couple inside the container, consisting of a cathode tank and an anode pin inserted into the container.
In this case, all the “attention” of oxygen - the catalyst for the rust formation process - switches from the cathode (tank) to the anode (electrode inserted into the tank). Simply put, in the “tank + anode” pair, only the pin inserted into the container rusts. Moreover, taking into account the electrochemical potential of a tank made of an iron-carbon alloy (steel), the best material option for the anode is magnesium - an environmentally friendly and easily processed metal.
Where is the magnesium anode located?
By diverting oxygen from the tank, the magnesium anode loses its volume due to the outflow of electrons, gradually “melting” to the very base. Therefore, replacing the anode in the boiler is a mandatory and fairly common procedure. Otherwise, the galvanic couple will stop working, causing rusting of the housing.
As a result, the anode seat - a special pipe into which a pin made of magnesium is screwed in - is located in an easily accessible place, from the bottom of the tank. Moreover, in most boilers, the magnesium electrode is built into the flanged “stand” of the heating element. Therefore, to replace the anode you will have to remove the boiler heating element.
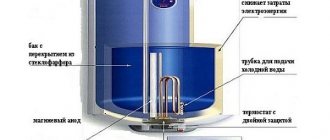
Design and principle of operation of a water heater
How to replace a magnesium anode in a boiler?
- First of all, unplug the boiler.
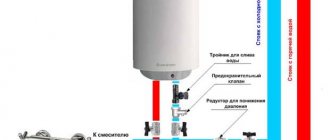
- Next, open the hot water tap and close the valve on the cold water supply line to the boiler.
- When the stream of hot water dries up, disconnect the cold water supply from the boiler and put a rubber hose on the free fitting.
- Run the hose to the sink or bathtub/shower drain.
- Disconnect the hot water supply pipe from the boiler. After this, the remaining water will go through the hose into the sewer.
- Remove the protective cover by unfastening the latches and unscrewing the locking screws.
- Take a photograph of the position of the wires at the terminals of the heating element. This will help you avoid confusion during assembly.
- Place a basin of maximum diameter under the heating element flange.
- Carefully unscrew the fixing screws/nuts of the flange base of the heating element. Moreover, you only need to unscrew the fasteners sequentially - three to four turns for each nut/screw, in a circle.
- Remove the heating element from the mounting hole in the housing by pulling the flange. In this case, the remaining water will be blown out through the gap between the base of the heating element and the body. If the heater gets stuck in the housing, use a screwdriver to knock out the scale that is blocking it. Remove the O-ring from the flange.
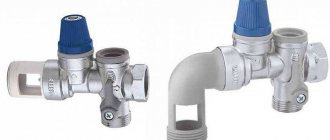
Changing the protective anode of an electric boiler
In suspended vertical boilers of this type, the cathodic protection rod is installed on a common platform with a heating element attached to the bottom of the steel vessel. In horizontal models of water heaters, the heating element block is attached to the wall of the tank facing down.
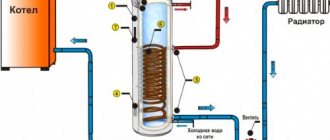
Reference. The Thermex brand produces universal devices of the Optima series, equally suitable for vertical and horizontal installation. There, a flange with a heater and anode is mounted at the end of the tank. Universal boilers from Gorenje are made differently: the heating element is located at one end, the rod is at the other (see diagram).
To replace the anode element of the boiler with your own hands, prepare the following tool:
- a set of wrenches for nuts measuring 8…19 mm;
- magnetic screwdriver for Phillips slot;
- pliers;
- flashlight - illuminate from below and inside the container;
- sandpaper (to clean the heating element);
- hose for emptying the water heater;
- rags;
- wide plastic basin.
You will probably only need 1 key from the entire set, but its size will become known after removing the cover. The basin is necessary for cleaning - you don’t want to shovel dirt directly onto the floor or into the bathroom (if the boiler hangs above it).
Preparatory stage
What to do before disassembling the device:
- Turn off the power to the water heater in any available way - turn off the circuit breaker, remove the plug from the socket.
- Shut off the cold water supply to the inlet pipe of the storage tank.
- If the boiler is connected according to the above diagram, open the “hot” valve on the nearest mixer. About a liter of water will flow out from there, then open the drain valve and empty the tank into a bucket or directly into the bathtub.
When connecting the heater directly to the pipes, repeat the above steps, but drain the water through the standard safety valve, as the technician suggests in the video:
If the valve is clogged and there are no taps at the entrance to the boiler, you will have to use a radical method - unscrew the flexible hoses from the fittings of the device with a gas wrench. To drain water in portions, for example, using a bucket, periodically close the “cold” pipe with your hand - the flow will be interrupted under the influence of vacuum. Just remember to cool the drive to a comfortable temperature.
Disassembling and cleaning the tank
Now let's look at how to remove the heating element block from the water heater and replace the protective anode:
- Using a magnetic screwdriver, unscrew the screws securing the cover, remove it and move it to the side.
- If there is enough free length of wires, immediately remove the thermostat and sensor from the tube (held by the contacts). Otherwise, disconnect the power cable, then remove the fuser.
- Using a wrench, unscrew the block flange. The size and number of bolts depends on the modification of the boiler. For example, on Aristons there is a fastening with 5 10 mm wrench nuts or a spacer bar with one 14 mm nut.
- Place the basin and carefully remove the block. First, apply a little force - the rubber seal will probably stick to the landing pad. Up to 0.5 liters of water remains in the container, which will immediately flow out along with the dirt accumulated at the bottom.
- Using pliers, grab the old anode (or the thin rod that remains from it) and unscrew the part from the socket.
- After removal, proceed to clean the heating element mechanically - remove scale with a screwdriver and sand it with sandpaper.
Advice. To avoid mixing up the wires during the assembly process, before disconnecting, sketch out the circuit, or better yet, take a photo with your smartphone camera.
After disassembly is complete, you should take a moment and thoroughly wash the inside of the tank using kitchen products. To rinse, briefly open the cold water supply - the stream will wash away dirt from the walls and flow into the basin.
The new element is simply screwed into the socket on the platform
All that remains is to screw the new anode for the boiler into the socket of the cleaned block, tighten the rod by hand and reassemble the device in the reverse order. Before turning it on, be sure to fill the container - open the water supply and wait until water runs out of the mixer (remember, we opened the “hot” valve earlier?).
How to replace the magnesium rod of an Ariston 50 liter water heater with your own hands, watch the video:
The anode installation procedure differs little on models of different brands. The algorithm is the same everywhere - you need to empty the vessel, disconnect the boiler from the power supply and remove the heating element unit. The exception is devices with a separate rod arrangement, which we will consider further.