Water heating convectors are increasingly being installed in modern houses and apartments. High heating efficiency, simple and reliable design and a wide variety of shapes and sizes allow water convectors to fit into any interior.
Water heating convectors: selection, principle of operation, installation
Design and principle of operation of a water convector
A water convector is a compact heating device connected to a central or autonomous heating system in an apartment building. The operation of this heating device is based on the principle of convection - the movement of air currents.
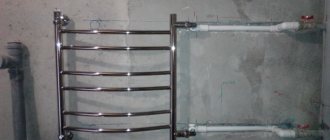
Water heating convector
A heater consisting of a copper pipe on which aluminum fins are attached to increase heat transfer is used as a heat exchanger in a water convector. Fittings are provided for connection to the heating system pipes at the end of the convector. An air valve is provided to bleed air from the system.
Air valve on water convector
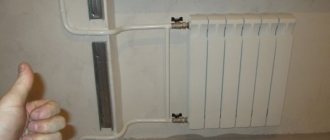
The working part of the convector is enclosed in a metal body coated with powder paint. The housing is equipped with grilles or openings for air intake and exhaust. Some models are equipped with a thermostat that allows you to set the desired air temperature.
Water convector device
Convection can be either natural or forced. During natural convection, layers of air located in the heat exchanger zone heat up, become lighter and rise upward, replacing heavier cold air. He, in turn, goes down and the process repeats. For forced convection, some models have a built-in fan.
Convector with forced ventilation
Operating principle of a water convector:
- the coolant - water or antifreeze - passes through pipes with aluminum fins and heats them;
- cold air enters through the intake grille and, passing through the heater, is heated, after which the air flows rise upward;
- new portions of cold air arrive in their place.
Operating principle of a water convector
Water (electric) convectors differ from conventional radiators in that they heat the air in the room faster and are able to create an effective thermal curtain. For this reason, water convectors are often located along panoramic windows, significantly reducing heat losses, and are also built into the floor along external cold walls.
Water convectors under the panoramic window
Note! Unlike heating radiators, water convectors heat up quickly and cool down just as quickly. During interruptions in the supply of coolant, the temperature in the room with water convectors quickly decreases.
Advantages and disadvantages of water convectors
The advantages of water heating convectors include:
- quick and efficient heating of the room;
- the ability to create a thermal curtain in front of windows or doors;
- light weight and small volume of coolant, water convectors can be hung on light plasterboard partitions;
- large selection of standard sizes and types of execution;
- the ability to embed the convector into the floor, walls or baseboards;
- aesthetics, convectors fit well into any design;
- the walls of water convectors do not heat up above +45 degrees, so they can be installed in a nursery without fear;
- water convectors have absolute fire safety.
Water heating convectors - design features and advantages
Disadvantages of convector water heating:
- the price of water convectors is higher than that of radiators of the same thermal power;
- the dimensions of wall-mounted water convectors are often larger than radiators;
- In rooms with high ceiling heights, water convectors may be ineffective, since warm air will accumulate under the ceiling.
Convector type in-floor heater
Note! Convection currents raise dust into the breathing zone, so in rooms with convectors it is necessary to do wet cleaning more often to ensure clean air.
Wet cleaning needs to be done more often
Convector heating, its features and operating principle
The operating principle of convector heating is based on the properties of air masses. Heated air is lighter than cold air, so it always rises. After cooling, the air masses descend to the lower part of the room and are heated again when passing through the convector.
The main advantage of convector heating is the rapid heating of the room and maintaining the desired temperature throughout the entire operating time of the device. Convectors are suitable for heating residential and commercial premises.
The operating principle of convector heating is as follows:
- Inside the heating device there are heating elements with a significant surface area. They heat up when using certain energy resources.
- When air comes into contact with the heater area, it warms up and becomes lighter.
- The heated air exits through the convection holes at the top of the radiator and rises.
- After cooling, the air masses descend to the lower part of the room and again enter the heating device through the slots in its lower part. This circulation continues while the device is operating.
Types of water convectors
According to the type of design, water convectors are very diverse, which allows you to install them in any room, as well as hide them in finishing elements, for example, convectors are:
- wall;
- floor;
- in-field;
- baseboards;
- basement
The principle of operation of different types of convectors is practically the same; the difference lies only in the location of the grilles for air intake and outlet.
Types of water convectors
Wall-mounted water convectors
You may be interested in information: electric convectors
In appearance, wall-mounted models are not much different from conventional radiators. They are attached to the wall using brackets, usually installed under a window sill or on the outer, coldest wall. In this case, it is important to observe the distances to the floor and window sill specified in the passport to ensure the free movement of air flows.
Wall-mounted water convector
Wall-mounted models of water convectors differ in thermal power and geometric dimensions, the number of heat exchangers and the material from which they are made. Additionally, wall convectors are equipped with a Mayevsky tap, control valves and a thermostat.
You may be interested in information - stove heating with a water circuit
Floor water convectors
The convenience of floor convectors is that they can be installed anywhere without being tied to the walls. Floor-standing models are often used to heat studio apartments without internal walls. The heating pipes are located in the floor. Air intake in floor convectors is from below, so it is important not to block them with pieces of furniture.
Floor convector
An original solution is a convector bench; it is equipped with a comfortable wooden seat that does not interfere with the movement of warm air. Such convectors are installed in shopping centers and other public places, as well as in greenhouses and winter gardens. You can also install floor convectors in ordinary apartments, placing them on the floor under the windows or at the front door - where they create a thermal curtain.
You may be interested in information about the Leningrad heating scheme
Trench water convectors
Models built into the floor are often used to heat rooms with panoramic windows or for rooms made in a minimalist design. Trench convectors do not take up extra space; they can be located in any convenient place. The convector body is built into a special niche in the floor, the pipes are also laid hidden. The laying of pipes and the niche is carried out at the stage of pouring the floor screed.
Trench convector
The top of the convector heater is covered with a grill made of wood, plastic or metal; the choice of material depends on the finish of the floor. The grate is installed flush with the finished floor, which makes it easier to move along it. Air intake is carried out through the same grille as its outlet. In-floor convectors can be used as an independent source of heating or as an additional source to create a thermal curtain in front of windows and doors.
Air circulation in a trench convector
Prices for trench convectors
Water convectors
Skirting water convectors
Another way to successfully hide heating appliances is to install baseboard water convectors around the perimeter of all cold walls. Skirting convectors consist of heat exchangers connected in parallel or in series and connected to heating pipes. The heat exchangers are covered with aluminum or steel casings with an air outlet grille.
You may be interested in information about what a convector type heater should be like
Water heating (cottage) allows you to maximally equalize the temperature in the room and normalize humidity. The closed circuit significantly reduces heat loss. Skirting models are compact and fit well into the design of the room; in addition, they allow you to hide heating pipes under the body.
Convector baseboard heater
Basement water convectors
Base models are also built-in, but the possibilities for their application are much wider. Basement convectors are installed in wall niches, partitions, steps or interior items, which makes it possible to make the heating system almost invisible and supply heat to those areas of the room where it is most needed. You can read how to install a stove with a water circuit for heating a house in our article.
The placement of base convectors is planned at the rough finishing stage: niches are prepared, hidden pipelines are laid, wiring and shut-off equipment are installed. In this case, inspection hatches must be made at the location of the shut-off valves.
Base convector built into the staircase
Note! Built-in models take up less usable space and fit better into the design of the room, but their installation is planned at the design stage. Floor and wall models are installed after finishing.
Installation of heating convectors, taking into account power calculations
Speaking about installation methods, you can find floor and wall models, and the use of one or another coolant divides these devices into mechanisms that operate using water, electricity and gas. It is important to remember that installation of gas-type heating convectors can only be carried out on walls in a vertical position, while water and electrical systems can be installed both on the wall and on the floor (read: “Household convector: principle of operation and installation”) .
Construction of a water domestic convector
The installation of heating convectors, operating with water used as an energy source, is distinguished by the fact that the basis of the design is a heating battery. In this case, special attention should be paid to such a procedure as calculating heating convectors of this type, and in particular, correctly calculating the number of battery sections required for high-quality heating of the air in the room.
Another factor that should be considered when choosing this equipment is the material from which the convector is made.
- alloy of copper and aluminum;
- bimetal panels;
- aluminum;
- steel elements.
Copper-aluminum models are the most expensive. The connection diagram for heating convectors made of this material involves the installation of copper connecting parts, which have a very high price.
The use of such devices will be relevant if there is a need to make the design of the heating system lighter. Most often, consumers prefer samples made of aluminum or bimetal, but their installation requires the purchase of special fasteners and kits of installation systems.
It will be much more profitable to install batteries made of steel.
- by means of side fastening;
- using lower fixation to the system.
To install a water-type convector, you first need to fix the radiator on the wall, for which special holes are drilled in it and special hooks are fixed, which act as brackets. You can connect the water mechanism to the general heating system using pipes made of plastic or steel (read also: “What are the types of water heating convectors - types, advantages”). It is best to entrust such work to professional craftsmen, since incorrectly installed equipment can cause serious problems in the entire heating system. In addition, specialists can provide photos of convector options and help you correctly calculate the power of a heating convector for a specific room.
Installation of electric convectors
Another option for such equipment is electric convectors. These models can be installed and connected by hand, but it is very important to correctly calculate the power of this type of convector.
- the device must be removed from its packaging;
- then the protective film must be removed from the convector;
- Next, you need to decide where the mechanism will be installed.
When calculating the power of a heating convector operating using electricity, as well as connecting it, it is extremely important to follow a large number of recommendations, which, nevertheless, will allow for high-quality installation of the equipment.
- the minimum distance from the floor to the convector is 20 – 25 cm;
- the device must be located at least 25 cm from nearby objects, from above and in front - at least 24 - 55 cm;
- the convector should be installed at a distance of 25 cm from the wall, and it should be located at least 35 cm from the ceiling;
- It is strictly not recommended to install the device behind curtains and doors, as well as under openings intended for ventilation.
The installation process for an electric convector is as follows:
- Having unscrewed the fastening bolts, you need to pull out the bracket;
- using a drill, you need to make pre-marked holes intended for fastening the mechanism;
- Next you need to fix the bracket;
- then you need to insert the electric convector into the clamp with its lower part;
- Guys should be placed on the equipment;
- it is necessary to place the upper part of the device into the mounted guy wires;
- after this, all the clamps must be tightly secured, and the fixing bolts must be screwed in;
- The convector operation regulator should be set to off mode and power should be supplied to the device;
- After the LED on the device lights up, the equipment can be switched to operating mode.
Choosing a water convector
To select a water convector, you need to decide on the installation location and type of construction, after which you can begin thermal calculations and selection of parameters. When choosing a model, it is important to consider the following characteristics.
You may be interested in information on installation of heating radiators
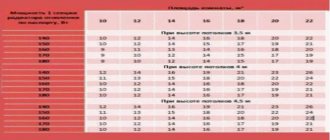
The thermal power of a convector is a parameter showing how much area the device can heat. For 1 m2 of area of an apartment or house with a standard ceiling height, 100 W of thermal power is required. Heat loss through windows is higher than through walls, so an additional 200 W must be added to each window.
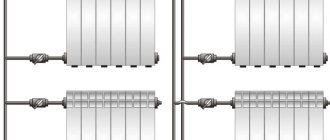
Calculation example: for a room of 20 m2 with two windows, 20·100+2·200=2400 W, or 2.4 kW, is required. It is better to distribute this value evenly across several convectors, connecting them in parallel or in series. In this case, the temperature in the room will be more stable and uniform.
What you need to know about heating convectors
Overall dimensions are another important characteristic. The possibility of installing the convector in the chosen location depends on it. In this case, it is important to take into account not only the dimensions of the device itself, but also the required distances to the floor, walls and other structures (indicated in the passport for a specific convector model). For wall-mounted convectors, the distance from the floor must be at least 80 mm, and from the window sill - 100 mm.
Moisture protection is an important parameter when choosing convectors for installation in a bathroom, swimming pool, sauna washing area or greenhouse. Convectors can be designed for dry rooms with an average annual humidity of up to 85% or for wet rooms with a humidity above 85%. In the second case, corrosion-resistant materials and coatings are used, and in the case of in-floor convectors, drainage systems are used.
The type of circulation (natural (KBE marking) or forced (KVP)) is important to create the necessary microclimate. Convectors with a fan can create an effective thermal curtain near doors and windows, but at the same time they actively raise dust and cause drafts. The noise level of convectors with forced circulation is also higher. The fan in convectors runs on 12 V DC, for which you need to provide a power supply.
Floor convector with tangential fan
Working pressure is a characteristic that needs to be clarified when installing water convectors; in centralized heating systems according to SNiP 2.04.05-91 it is in the range of 8-9.5 bar, in autonomous systems it usually does not exceed 3 bar. Most models of water convectors are designed for an operating pressure of 1 MPa and a pressure test of 1.6-2.0 MPa, which is equal to 10 and 16-20 bar, respectively. If this condition is met, convectors can be installed in autonomous heating in an apartment building without restrictions.
SNiP 2.04.05-91. Heating, ventilation and air conditioning. Downloadable file (click the link to open the PDF in a new window).
SNiP 2.04.05-91
The internal volume of the heat exchanger is the most important parameter for autonomous heating systems when calculating the volume of coolant. On average, it is 0.7-2 liters and depends on the number of pipes and the length of the device.
Convector circuit
The maximum temperature for water convectors is usually +120-130 degrees Celsius, which is much higher than the permissible temperature in heating systems. At the same time, for safety of use, the maximum temperature of the device body should not exceed +60 degrees according to the passport.
The weight of the convector is important when installing wall-mounted models on walls and partitions made of plasterboard or other material with low strength. Taking into account the coolant, the weight of water convectors usually does not exceed 14-24 kg.
The degree of automation is a characteristic that takes into account the possibility of precise temperature control. Regulation is carried out by means of a thermostat and a valve; with their help, the amount of coolant necessary to maintain a given microclimate is supplied to the heat exchanger.
Thermostat
Note! When installing models with forced convection, it is necessary to ensure that the fan power supply is connected to a 220 V network.
Electric heating convector - installation and types (wall-mounted, with fan, liquid)
An electric convector is one of the most popular modern devices for heating an apartment, private house or industrial premises. It does not require special conditions for operation; it is simply installed and effectively heats the premises. [contents]
Operating principle and main characteristics of electric convectors
These heating devices owe their name to the physical phenomenon of the same name on which their action is based. When passing through the hot heat exchanger of the convector, cold air heats up, becomes lighter and rises higher. New layers of cold air take its place, forming a constant directed flow of heat.
With electric convectors, the heat exchanger is heated due to the consumed electricity. To do this, a special element (heating element) is installed inside the housing.
Electric convector device
In most models, the heat from the electric heater is immediately transferred to the surrounding air, but not so long ago a new interesting modification appeared - a liquid convector. It contains an additional container with coolant, which serves as an intermediate link between the air and the heater coil. This solution allows you to increase heating efficiency - a liquid convector consumes noticeably less electricity when heating the same area.
In addition to the energy source, the technical characteristics of convectors include:
- installation method: wall, floor, built-in;
- power consumption;
- effective heating area;
- thermostat type;
- presence of a fan.
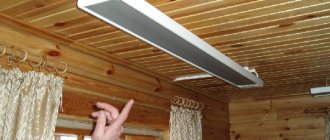
Wall and floor convectors
Wall-mounted electric convectors are a classic option for a private country house. Particularly convenient are models that can be combined with each other to heat several rooms.
Installing an electric convector under a window is the most correct way to place it, since it is in this place that it can best protect the room from the penetration of cold air and optimally warm up the entire working volume.
Heating large areas with floor-mounted convectors is not very effective - you will need to run an electric wire across the entire room, and the device will get in the way and can be accidentally dropped or scratched. Therefore, floor installations are usually used for local heating, for example, in an office workplace.
Wall and floor convectors
An interesting type of electric convector is the built-in heater. It is installed in special niches in the floor, furniture or finishing elements, for example, in decorative skirting boards.
Wall-mounted plinth convectors are one of the latest developments that provide high heating efficiency and protect walls from dampness and mold. The price of such systems has now dropped quite significantly due to the fact that domestic manufacturers have begun to produce them.
Forced air convectors
In order to improve heating characteristics, many convector models are equipped with a built-in fan. It performs several important functions:
- cold air is more efficiently supplied to the heat exchanger of the electric convector, and when heated, it exits faster. Accordingly, the heating speed and overall efficiency of the device increases;
- installing a fan allows you to cool the heat exchanger housing with a flow of cold air. Therefore, the service life of the convector is increased.
It should be noted that the price of a convector with a fan is noticeably higher than usual, and it consumes slightly more electricity. Therefore, such devices are slightly more expensive to operate.
Energy saving convectors
Heating a house with electricity is quite expensive. At least, electric heating devices are noticeably more expensive in terms of the unit cost of 1 kW of energy produced than gas or water ones. Therefore, any savings in utility bills are met with great enthusiasm by consumers. How can it be achieved and how much can you save?
Energy-saving electric convector with electronic program control system
- Microprocessor control. Programmable thermostats allow you to set the degree of heating depending on the time of day and day of the week. So, while the owners are not at home, the temperature of the convectors is maintained at the minimum required level, and in the evening and at night the wall-mounted device starts up at full power;
- New energy saving technologies. It is quite difficult to seriously improve the technical parameters of a classic convector, but it is quite possible to improve the heat transfer process. This is what distinguishes the electric liquid heating device, which we have already discussed above. So, for example, if a conventional convector consumes approximately 1 kW of electricity, then a liquid convector consumes 700 - 800 W.
In order to calculate how much a convector actually consumes, you need to multiply its power by the operating time.
With the heating constantly on, heating even a small apartment can require up to a thousand kilowatts per month. Installing “smart” convectors can reduce this figure by 30-40%.
Installation of wall convector
All the fasteners required to mount the convector on the wall are included with the device. The passport must indicate the overall and installation dimensions, as well as the distances from the floor and other surfaces required for a particular model.
Compact wall-mounted water convector
Tools you will need:
- drill or hammer drill depending on the type of walls;
- screwdriver;
- bubble level, tape measure and pencil;
- tool for cutting and connecting pipes;
- in case of installation of a device with forced convection - a power tool for connecting electrical wiring.
Before installation, remove the device from its original packaging and check that the device is complete. Determine the installation location, taking into account the dimensions of the convector and the required distances to structures and objects.
Table 1. Installation of wall-mounted water convectors.
Attention: The internal data of table “134” is corrupted!
Note! Work on connecting the electrical cable to the device is carried out with the circuit breaker in the input panel turned off.
Installation of electric convectors
This type of convector, such as an electric one, is also excellent for heating rooms. Installation of heating convectors of this type can be done independently. To do this, you will need to perform the following steps in a certain sequence:
- First of all, you need to remove it from the packaging.
- It is necessary to remove the protective film from the convector panel.
- Next, you need to choose a place to install the convector.
Electric convector
When installing a heating convector with your own hands, you must consider the following recommendations:
Technical characteristics of water heating convectors
- The distance from the floor to the bottom of the convector must be no less than 20 cm.
- The distance from the walls should be no more than 25 cm, and from the ceiling no less than 55 cm.
- The distance from sockets must be at least 35 cm.
The electric convector must be installed as follows:
- The convector is turned over and support legs with wheels are fixed on it. In order to screw them on, you will need standard bolts.
- The convector turns on, and then the necessary modes and other parameters are set.
Installation of an in-floor convector
The installation of an in-floor convector begins with preparing a niche or box in the floor. It is more convenient to perform this work when pouring the screed. To create a niche, formwork is installed, which is removed after the concrete has hardened.
The size of the niche must be selected according to the size of the convector body:
- the depth of the niche is equal to the height of the body plus 20 mm;
- the width of the niche is equal to the width of the body plus 60 mm;
- the length of the niche is equal to the length of the body plus 60 mm;
- distance to window or wall – 250-300 mm.
Niche for in-floor convector
Installation in front of the window is carried out depending on the purpose of the device: when using a convector as the main heating, the heat exchanger is turned towards the room, to create a thermal curtain - towards the window.
Installation of an in-floor convector
Required materials and tools:
- drill or hammer drill;
- screwdriver;
- a set of keys;
- level and tape measure;
- pipe cutter;
- power tools;
- mounting polyurethane foam;
- cement mortar.
Step 1. Prepare a niche for installing a convector. Heating pipes and cables for connecting the fan heater are brought out from the connection side of the device.
Supplying cables and pipes to the convector installation site
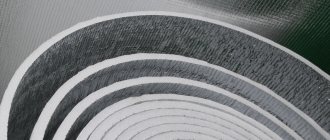
A layer of heat and vibration insulation is placed at the bottom of the niche; it is important to ensure that the thickness of the material does not interfere with installing the device flush with the finished floor.
Thermal insulation of a niche for a convector
Step 2. Install the device body into the niche. There should be mounting gaps on all sides of the housing to allow the convector to be leveled.
Box installation
Fans are placed closer to the window so that the warm air coming out creates an effective thermal curtain and prevents condensation from forming on the windows. Models without a fan are turned with the heat exchanger towards the window.
Preliminary alignment of the box
Step 3. To level the device in height, there are nut screws located in the corners of the case. With their help, the installation of the convector in a niche is adjusted using a level.
Aligning the box height
Step 4. Drill holes for attaching spacer dowels near the head screws. To do this, use a drill or hammer drill.
Preparing holes for expansion dowels
Before fixing the box, check the installation using a tape measure and level. The body must be flush with the finished floor, so when checking, you need to place pieces of tiles or laminate used for finishing under the level.
Final alignment of the box
After final alignment, the spacer dowels are secured in the prepared holes using a screwdriver.
Fastening expansion dowels
Step 5. Mark and cut the pipes for connection to the heat exchanger. A pipe cutter is used to cut pipes.
Pipe preparation
A control valve and threaded fittings for connection to the pipes are attached to the heat exchanger. Install the heat exchanger in place.
Heat exchanger installation
Attach the heat exchanger to the pipes using fittings and tighten them.
Fastening fittings
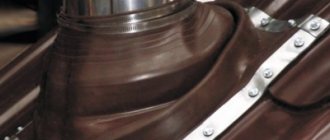
Install the Mayevsky valve and bleed air from the system. To prevent drops of water from getting inside the housing, you can temporarily put a tube on the outlet of the air valve and lead it into any container. After de-airing is completed, the tube is removed and the Mayevsky valve is tightened.
Mounting the Mayevsky crane
Step 6. Connect the cables to the control unit, having first removed the cover from it. All connections are made in strict accordance with the diagram supplied with the device.
Preparing the control unit and cables
The electrothermal actuator is installed on the thermostatic valve, and the wires coming from it are connected to the control unit.
Thermostatic valve mounting
The ends of the wires are stripped to 8-10 mm and connected to the terminal blocks. The mounting screws must be tightened to ensure good contact.
Attaching wires to the control unit
The fan rotation speed is set at the factory; it is regulated using a block of potentiometers installed on the board in the control unit. If necessary, the rotation speed can be adjusted independently.
Fan speed adjustment
After connecting, close the control unit with a lid and tighten the mounting screws.
Installing the cover
Step 7. Install the control controller in a convenient place on the wall. The installation location must be chosen so that the controller is not exposed to warm or cold air flows, direct sunlight, or anything that can affect the sensor readings. Installation height – 1.5 m above the floor.
Installing the controller
Step 8. Before the final pouring of the convector, it is necessary to install spacers in the housing, otherwise, when the mounting foam and mortar harden, deformation of the box may occur. Spacers are made from scraps of board or plywood.
Installation of spacers
Fill the space around the box and under it with polyurethane foam. It helps dampen vibrations and provide better thermal insulation. Wait the time necessary for the polyurethane foam to completely harden.
Foaming the free space around the box
Before you start pouring cement mortar, protect the edges of the box with masking tape.
Insulating the box with tape
Fill the space between the floor screed and the box with cement mortar using a spatula or trowel and level it flush with the subfloor. After the solution has hardened, a finishing coating is laid.
Filling the space between the box and the screed with cement mortar
Step 9. Place the decorative lattice on the box. The material from which the grille is made can be different (wood, aluminum or plastic) and depends on the finish of the floor. If all operations are done correctly, the grate should lie flush with the finished floor.
Laying the grating
Installing convector heaters on the wall
Here you will learn:
Convectors are becoming increasingly popular heating equipment. They are extremely compact and highly efficient, quickly heating rooms without the help of electric boilers and batteries. Heaters are mounted under windows and on blank walls, where they successively pass almost all the air in the rooms through themselves, heating it. Let's see how to install a convector on a wall. Moreover, we will touch upon not only electric, but also gas appliances.
Installation process
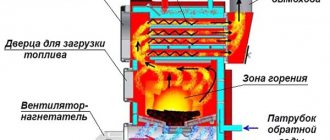
The most widely used are convectors with closed combustion chambers, built on the principle of similar heating boilers. Only instead of water heat exchangers, air diffusers are used here to transfer heat to the rooms. Combustion products are removed through the wall to the outside using a coaxial chimney. Therefore, the installation process is divided into the following steps:
The presence of a coaxial pipe allows you to effectively remove combustion products from the combustion chamber directly to the street without creating smoke in the heated room.
Let's go through these points in more detail.
Installation of heating convectors begins with choosing a suitable location. These can be spaces under windows or blank walls. In any case, there must be a street behind the selected wall, since this is where combustion products will be removed. We begin work with the outlet of the chimney pipe - we take a crown of a suitable diameter and begin drilling the hole.
When installing the convector on the wall, it is necessary to provide a slight slope of the chimney - this is necessary to prevent condensation and precipitation from entering the heating device. The protrusion of the chimney should be small - read the recommendations in the instructions for the installed device.
The next stage of installing the convector is attaching it to the wall. This is done using dowels of suitable length. Remember that gas appliances are quite heavy, so they require reliable fastening. Thermal insulation is laid between the wall of the household and the back wall of the device (its dimensions should be 30-40 mm larger than the dimensions of the convector). After this, we pass another hole nearby - for a gas pipe with a tap. The tap itself is located indoors. The whole thing is connected to a cylinder installed outside.
At the last stage of installing the convector on the wall, we test it - connect it to the electrical network, open the gas supply (or a specialist will do this), after which we set a certain temperature and wait for it to be reached. Please note that all tests must be carried out with the protective cover installed (it is also the top cover of the device).
READ How to install a grohe baucurve hygienic shower built into the wall
Source
Gas convector
Peculiarities
This is a device that resembles a regular heating radiator, but runs on gas. It does not heat water (as in the previous version), but burns gas, the heat is transferred to the combustion chamber body and heat exchanger, and then into the air. To ensure that combustion products do not accumulate indoors, but go outside, the gas convector is equipped with a chimney.
Such a heater can be connected in two ways - to a gas main or using liquefied gas in cylinders.
The device heats the room quickly enough, but when installing it, a number of features of the device must be taken into account.
Installation
Installing this device yourself is difficult and even dangerous, so you need to contact a specialist. When installing, you must follow certain rules. First of all, you need to make a hole in the wall for the air duct, and take care of the insulation of the gas convector pipe. After which the device itself is fixed on the wall in a vertical position and connected to the gas main.
READ How to install resources in MTA server
During the installation process, special care must be taken, and you must also have permission to work with gas equipment.