Advantages and disadvantages
It is most convenient to place communications in the wall at the construction stage in a private house according to a previously created drawing. You can hide pipes in the wall in an apartment building if you are planning a major renovation of the premises or the entire building.
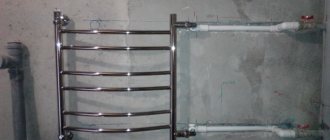
By placing the heating in the wall, the room certainly looks more prestigious, and the freed-up space can be decorated.
Pros:
- heat transfer increases, since building materials have an increased level of heat transfer, unlike air;
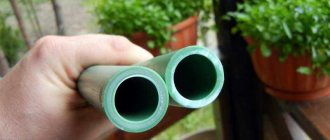
- the service life of the polypropylene from which the pipes are made reaches up to 50 years, ensuring the reliability of the design while observing technical standards during their installation;
- the space increases by several centimeters.
However, difficulties must be overcome in obtaining the right to permit changes in the position of communications in the premises or their so-called redevelopment.
Minuses:
- low-quality propylene increases in volume when heated;
- ordering a project to change the location of communications;
- coordination of the project with supervisory authorities. Alteration of engineering systems in an apartment building will require a special permit;
- joints may lose their sealing, which can only be determined using a device that measures water pressure;
- risks associated with preparedness for wall destruction in the event of a possible leak.
A break in the heating system pipes in the wall in the event of a leak will cause water to enter the adjacent lower apartment, since it will not be possible to quickly eliminate the leak.
Difficulties in installing heating pipes
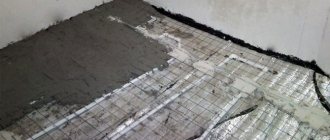
The work process can sometimes cause problems. Pipes expand when exposed to heat. But they are not the only ones increasing in volume. The wall finishing is also exposed to it, which leads to the formation of cracks.
To avoid this, you should use a low temperature type of heating system. That is, it should not be higher than 40°. You can compare it with installing heated floors. The plaster must contain special plasticizers. This will prevent future cracks.
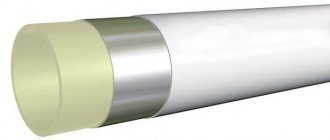
To avoid heat loss, thermal insulation is laid between the pipe and the wall. This can be mineral wool or polystyrene foam. But this should be done if the installation takes place in an external wall. There is also no need to lay thermal insulation materials if the façade of the house has undergone high-quality insulation.
How to brick up heating pipes in a wall
To disguise the pipes of the heating system in the wall, you need to find out what material the wall is made of, and select the method and sequence of work, as well as the necessary materials.
Work on installing pipes in the wall must be carried out by a qualified craftsman or specialist.
Before laying heating pipes, it is necessary to test them for strength and visually carefully check for possible damage.
Concrete
In an apartment in a panel apartment building, there are two ways to lay heating system pipes: using grooves - specially created channels for laying heating pipes in them, or creating a false wall.
How to remove heating in a wall in a panel house step by step using grooves:
- You need to start by de-energizing the common building heating riser. You should make sure that the desired riser is turned off;
- The grooves should not be located end to end. The contour should not be infringed. The recess is calculated based on the parameters of the fasteners, their quantity and the layer of prepared insulation;
- directly covering heating pipes with an insulating layer. Insulation is used to prevent condensation;
- Next, they calculate the places for fastening and mark the locations of the fasteners.
The work is carried out with a grinder. It allows you to perform high-quality actions in automatic mode and facilitates wall slitting.
When erecting a false wall, it should be taken into account that the space of the room will decrease.
Brick
Strobes are made in a brick wall in the same way as in a panel wall.
The procedure for laying part of the heating system into a brick wall:
- the depth or width of the channel is determined taking into account the amount of insulation wound on the surface of the pipe;
- after which they are placed in the marked places and secured with clamps pre-fixed with self-tapping screws.
It is necessary to test the system by running water at excess pressure for several days. After making sure that there are no leaks, the wall with communications is covered with mortar and putty.
Tree
In wooden houses, one of the ways to beautifully hide pipes is to cover them with a plinth, and mount a wooden panel for the radiator, which can also serve as a decorative element. At the same time, it is better if the horizontal has a lattice structure to increase heat transfer and overheat the wooden surface inside the box.
You can cover the heating system with a false plasterboard wall, but such an overlap on any surface will reduce the space.
Monolith
If a polypropylene pipe has compression fittings, then it cannot be walled up.
To work with the monolith, it is recommended to use a hammer drill and an angle grinder.
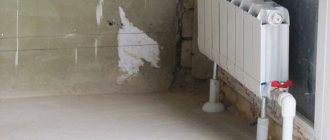
Relocating a heating system from steel to a wall
To do this, you need to punch a hole in the wall and, using welding, the system is moved into the hole and then all that remains is to plaster it. What consequences of such an action await you in the future? Unfortunately, nothing good. So in two or three years such a wall will crack with almost a hundred percent probability. The temperature difference in a relatively small area will be within sixty degrees, as well as thermal expansion, therefore, oxidation will occur faster. As a rule, the riser begins to rot at the joints between floors. And in this case, the entire riser will be located in the wall. And if the riser leaks at the connection points, then you will lose a lot of time before you find out why the neighbors below are dripping from the ceiling. Then, after the cause is discovered, the heating system will need to be completely changed; first, of course, you need to get it out of the wall.
When a hidden heating system is unacceptable for safety reasons
Safety regulations contain provisions that access to communications must be ensured without interference. It follows from this that pipe joints cannot be tightly walled up; therefore, it is only permissible to close the area in which the probability of leakage is zero.
Do not use metal pipes for laying in the wall, as they are susceptible to corrosion
The competence of regulatory authorities includes assessing the thickness of the wall. So, if it is not enough, the permit will be denied.
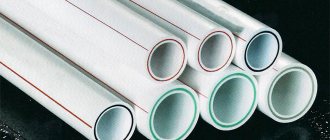
Installation of plastic water supply
To install the system from scratch, in addition to the pipes themselves, you will need:
- fitting;
- plugs;
- tees or crosses if branching is planned;
- clips for fixation.
Scissors for cutting, a shaver for stripping edges and a welding machine are required.
If the question of how to properly wall polypropylene pipes into a wall arises after the entire system has been assembled, the list is reduced to thermal insulation materials, fastening brackets and means for constructing false walls.
Requirements for laying plastic water pipes
Fittings, tees and connecting elements are selected in accordance with the diameter of the pipes used. Most often, like the main elbow, they are made of polypropylene. However, they are used only for branching, fastening measuring instruments and redirecting flow: filling fittings and collapsible units with material is prohibited. In the thickness of the wall there can only be a soldered, permanent connection, made with special welding equipment and tested for the tightness of this welding.
In any case, a shock-absorbing “cushion” must be created around the thickly laid wall, allowing the pipe to “walk.”
Technique for masking a polypropylene pipe in a wall
- Marking the direction of the pipeline taking into account the placement of functional exits.
- Calculation of possible deformation coefficient. For a significant length of the system, a formula is used that provides for lengthening the pipe by 1 cm for every meter. The calculation was made for a liquid with a temperature of 70 degrees Celsius. The technique of creating a compensation unit, that is, laying out a small area in the letter P, will correct significant elongation and serve as accident prevention.
When wondering whether it is possible to embed polypropylene pipes into a wall, with a finished structure, craftsmen advise not to risk it and instead of a blank monolithic wall, organize a small “cabinet with access to the pipe.” Firstly, this design is guaranteed not to be destroyed by vibrations of the plastic. Secondly, in the event of an accident there will be access to the pipes. The free space in the cabinet can be used to store household items.
This option is the most common. It is quite convenient to make a box while finishing the walls with plasterboard, then you can immediately create a frame for it that will be included in the overall structure. Sheathing with plasterboard is done using the same technology as the main walls.
Plaster corners are glued to the corners of the niche. And the slopes are puttied and finished with decorative materials.
- Use pipes with a minimum number of connections, which is ensured by proper wiring and correct placement of equipment;
- Use connections made from the same material as the pipes. At the same time, the safety margin should also be identical, or better yet, it would be higher.
- In order to have quick and convenient access to taps, valves and other elements of equipment during inspection or urgent repairs, special hatches should be provided.
- Blanks of the required size are prepared. To speed up the process, this work can be done in advance;
- Fixing sheets with self-tapping screws, the type of which is determined by the materials used. Their caps should not be too deep;
- All excess sheets must be removed with a saw or jigsaw. If its length is insufficient, the joint should not coincide with the crossbars.
- Cut holes for pipes and an inspection hatch;
So that you know how to stretch a wire with your own hands if the gypsum board sheets stick to the glue, we will briefly explain the essence of electrical installation work. First, you need to make the grooves yourself for the wiring, then secure the wire in the prepared grooves and plaster all the grooves. When the solution has dried, you can begin attaching the sheets without a frame.
Even after briefly familiarizing yourself with this installation option, you can see that in this case it will be much more difficult to install electrical wiring under the drywall. In our case, if we are laying a cable along the ceiling or wall, which we will cover with plasterboard, then we will highlight the following from this paragraph: “... laid inside the structural elements of buildings and structures... and “... voids of building structures...”. From this we conclude that such wiring is hidden. Transferring heating pipes into the wall involves the use of insulation.
Many people ask a completely justified question: “Why is this insulation needed when transferring pipes under plaster?” The answer is simple, otherwise the heat will go into the walls to warm up. Likewise, it is not allowed to install polypropylene and metal-plastic heating pipes with compression fittings into the wall.
The reason for this ban is such a disadvantage of these structures as their tendency to leak.
How to maintain pipes in the wall
It is enough to follow the technology and sequence of work when placing the heating system pipes in the wall. It is important to choose high-quality materials and fastening elements.
Before applying a plaster layer or installing a false wall, it is necessary to test the high-pressure heating system in operating mode for at least 1 week.
If the requirements are met, the structure can function for up to 50 years, depending on the guarantees that the manufacturer gives for its materials.
You can decorate the section of the wall where the hidden pipes are located using expensive materials.
The method of masking the heating system is quite popular, but requires increased safety measures during installation. Also, obtaining permission to disguise the heating system in an apartment building is quite difficult, since according to technical regulations, all communications must be open for free access in case of an emergency.
Features of polymer pipes
Heating substances increases their volume, says a school physics course. This fully applies to plastics, since temperature also makes them plastic. If when laying a pipeline for cold environments the expansion coefficient can be practically ignored, then when installing a heating system this aspect must always be kept in mind.
Related article: How to remove paint from bathroom walls
It is this fact that raises doubts about whether it is possible to wall up polypropylene pipes into the wall, which will expand and lengthen when hot water is turned on. Will such a reaction damage the material in which the pipes are embedded and the decorative finish of the walls?
Craftsmen warn: indeed, metal communications that do not expand significantly can simply be walled up in a layer of material, but for plastic pipes you will have to fully comply with the laying technology. Otherwise, the wall will crack, and the tiles laid on top will most likely fall off.
Is it possible to receive compensation for dismantling the wall covering the riser?
Most likely, this issue will be resolved by citing Article 1064 of the Civil Code of the Russian Federation
3. Damage caused by lawful actions is subject to compensation in cases provided for by law. Compensation for harm may be refused if the harm was caused at the request or with the consent of the victim, and the actions of the harm-doer do not violate the moral principles of society.
The victim’s consent is obvious, because he knew that the wall was being dismantled for inspection, which means there was no talk of compensation.
As it becomes clear, there are many problems with installing heating pipes in the wall. However, this method of arrangement also has its advantages, which distinguish it favorably from other options for traditional heating of residential premises. If it is necessary to enclose ordinary household pipes in a box in the kitchen or toilet, or the question is how to cover the pipes in the bathroom with plasterboard, then the presence of such holes is not required. Redevelopment of residential premises may include: moving and dismantling partitions, moving and installing doorways, disaggregating or enlarging multi-room apartments, installing additional kitchens and bathrooms, expanding living space through auxiliary premises, eliminating dark kitchens and entrances to kitchens through apartments or residential premises, installation or re-equipment of existing vestibules... other equipment serving more than one residential and (or) non-residential premises in an apartment building (including boiler rooms, boiler rooms, elevator units and other engineering equipment);
- The profiles are attached to each other using fleas - small metal screws.
- Now you can cover the pipes with plasterboard. Self-tapping screws are used for this, but make sure that their heads are not recessed into the drywall by more than 1 millimeter.
When making a box from a plasterboard profile, the first priority is marking for the future frame. Make marks on the ceiling (if the pipe rises upward), and then use a plumb line to outline the contours on the floor. You need to make markings on the walls using a level. It is important to maintain a distance from the partition to the pipe of at least 5 centimeters. If we are talking about heating pipes, then the distance can be made larger so that the material does not overheat and the appearance of the decorative finish does not deteriorate.
When making such a wall, it must be equipped with an inspection hatch or a door with hinged doors. The wall surface is lined with materials that predominate in the design of the entire sanitary facility. Often the frame for a wall-hung toilet is hidden behind such a wall.
The installation of such a device is done in accordance with the technical instructions attached to the product. An important point: in order to prevent deformation of the frame installation during seismic shifts, a special shock-absorbing tape is used. It is applied to the areas where the working surfaces come into contact with the racks.
The use of such a tape will help level out vibrations, preventing them from reaching the profile. This creates protection against destruction of the frame structure.
How to hide pipes in the bathroom: a review of the best ways to disguise a pipeline
Drywall is a practical and easy-to-use material that can be used to easily solve many interior design and room redevelopment tasks. This material is also useful for closing pipes in the toilet and bathroom as aesthetically as possible. The main advantage of such structures is that they do not “eat up the space of the bathroom, and therefore are suitable for rooms of any size. If the width of the opening to be closed is less than 52 cm, use the simplest version of systems with a cord mechanism. For wider openings - systems equipped with spring mechanisms.
An important point: regardless of the type of lining material, before closing the pipes, you should make sure they are reliable. By closing a pipeline that has defects, there is a high risk that in the near future the structure will have to be urgently dismantled. The basis for the plasterboard box is a frame assembled from rack profiles measuring 27 x 60 mm and guides measuring 26 x 27 mm.
To increase the strength of the corners of the box before applying putty, it is better to equip them with perforated corners. And in order for the composition to fit better at the joints of the sheets, it is recommended to remove a small chamfer from their edges before starting work.
How to hide pipes: installation in walls, under drywall, decoration
After this, using special cutters (wall cutters) and a hammer drill, make recesses in the wall for pipes. In this case, it is important to take into account the diameter of the pipe, etc. Please note that not every material allows such operations. If the walls are made of shell rock, foam concrete or any other pliable material, preparing the groove does not take much time.
But in the case of brick and concrete walls, the process can take a lot of time and effort. After the box of profiles is formed, it is necessary to check the perpendicularity to the floor, as well as parallelism to other racks. Special insulation should be put on the pipes, after which the pipe is hidden in groove (deepening). It is important that the pipe is well fixed to the wall. The next step is to seal the ditch in the wall with mortar.
Similarly, pipes are laid through the floor. It is very important that before sealing the groove, it is necessary to conduct a test to identify possible leaks in the pipes. Otherwise, if a pipe walled up in the floor or wall breaks, the concrete will have to be opened for repairs.
The box is made from a rack-mount metal profile (as a basis, metal sheet is used in production). Such profiles are maximally resistant to rust, corrosion and other negative factors that can be encountered when working with metal. In addition, they are lightweight, which is a significant advantage over other materials.
There is enough strength to form a decorative profile for pipes. To clear your conscience, I’d better give you a table that shows the depth of insertion of the pipe into the fitting and the holding time. Compliance with these rules ensures good maneuverability and one hundred percent (!) reliability of docking.
- firstly, odors from the sewer will spread not only in this apartment, but throughout the neighbors;
- and, secondly, it takes time for the metal to cool, which is at least 20 minutes.