Brick oven
The brick kiln is still in demand by people. Some populated areas are not gasified and a stove in a residential building is necessary. Sometimes it is an additional source of heat in order to save gas or electric heating.
In a country house you can not only spend the summer, but also celebrate New Year, Christmas and other holidays - romantic, unusual and healthy. A simple stove or fireplace will create comfort in the house; you will want to be at the dacha on weekends, sitting comfortably in the warmth.
When installing the stove, a number of conditions must be observed. In addition to choosing the correct design, installation location, components and materials, you need to understand what stoves are coated with so that they do not crack or crumble. A responsible attitude to the work at the construction stage of the building itself and the use of appropriate quality materials does not lead to cracks in bricks and finishing materials.
Composition of solutions for plastering ovens
For every stove owner, the question of how to apply plaster so that cracks do not appear on the surface of the structure is always relevant. This problem applies to those who have recently installed a stove indoors, and of course to those who are simply planning to update this element of the building.
Experienced craftsmen assure that cracking of the plastered surface is observed in several cases:
- In case of violation of the technological process.
- If the surface is not prepared correctly.
- Due to incorrect proportions when preparing the solution.
Plastering a brick wall is carried out with traditional solutions of sand and clay or professional plaster mixtures, which are sold by construction stores and special specialized organizations.
Regardless of the type of plaster, the material must meet certain requirements. Among them, resistance to strong heat, good adhesion to the working surface and the ability to respond to the expansion of wall material as the temperature rises are of primary importance.
The answer to the question of when and why it is necessary to plaster a stove is very important. Having understood it, you can accurately decide whether this process is really necessary or whether decorative finishing from ceramic or fireclay tiles is sufficient.
There are several reasons that necessarily require plastering of surfaces:
- The stove was built a long time ago, and the old plaster was partially cracked and began to peel off. As a result, bare areas look unattractive.
- There is a risk of carbon monoxide leaking into the cracking masonry joints of an old stove.
- During the renovation process, it is necessary to change the style of the overall interior, as a result of which the stove needs to be given a more neat appearance or completely transformed.
- There was a need to treat the seams between the rows of bricks, in which settlements of various insects were found. This happens when solutions based on natural materials are used for laying the stove. Plastering the stove prevents the appearance and reproduction of insects.
- The masonry of the stove is not done carefully, which spoils the appearance of both the structure and the entire room. With the help of plaster you can completely solve a problem of this kind.
If we compare plaster with other types of finishing materials, we can note several advantageous points:
- Plastering is the simplest and most affordable way to put the stove in order.
- The mixture for plastering the surface is much cheaper compared to ceramic tiles or stove tiles. This allows you to significantly save material resources.
- The plaster mixture can be used to finish a newly built stove or to reconstruct an old building element.
- The applied layer of plaster makes the walls of the furnace thicker, therefore, the heat capacity coefficient of the structure increases. As a result, the furnace takes longer to cool down, resulting in reduced fuel costs.
- A plastered stove becomes less fire hazardous, and the risk of carbon monoxide entering the room is also reduced.
- After the plaster mixture has dried, you can use various materials to finish the oven. This can be water-based paint, lime mortar or decorative plaster.
The service life of a plastered surface largely depends on the adhesion of materials, and for this it is necessary to correctly apply the plaster and distribute it evenly on the surface of the stove.
You can solve the question of how to plaster a stove without cracking using special tools, which include the following:
- Putty knife. Several types of spatulas are used; with the help of some tools the solution is collected from a container, while with others it is applied to the surface.
- Plastering hammer. This tool is used to drive plaster nails.
- Trowel. Using this tool, the solution is evenly distributed on the stove wall.
- A hammer-cam is necessary for working with a chisel or a trojan.
- Scissors are ordinary and for cutting metal. If you use fiberglass mesh in the process, you will need ordinary scissors; you need to cut the chain-link mesh with metal scissors.
- A grater is necessary for leveling and smoothing a plastered stove wall.
- Using a smoother, the surface is brought to perfect smoothness.
- A chisel is used to make notches on the surface of the stove, this promotes better adhesion of the plaster and the working surface.
- Brushes. It is necessary to purchase several types of this tool, since some are used to apply primer, while others can be used to apply textured plaster.
- Using a building level, check the vertical and horizontal level of the working surface.
- Using a plumb line, the evenness of the walls and the applied plaster solution is controlled.
- As a rule, the mixture is distributed between beacons, which are installed on the walls for even plastering of the surface.
We invite you to familiarize yourself with the Roof pipe for the stove
The stove is one of the building elements that regularly heats up and cools down, so the chosen plaster composition must be resistant to this phenomenon.
Mixtures for preparing plaster mortar are divided into two types:
- Simple compositions that include only two components, sand and clay.
- Complex formulations contain more than two ingredients.
Plastering a stove with clay and sand requires preliminary preparation and cleaning of the materials from various impurities. In particular, sand must be sifted through a fine sieve, clay should be rubbed through a fine mesh to remove roots and small stones.
It is recommended to make the plaster mixture using fatty types of clay, this promotes better adhesion of the solution to the surface. If the clay is too oily, the amount of sand used can be increased.
You need to know how to dilute clay for plastering a stove. To begin with, it should be soaked in a small amount of water and left for several hours, adding liquid in small portions if necessary. The process is repeated until a 10-15 cm layer of water remains above the clay. After mixing the finished clay mixture, the consistency of thick sour cream should be obtained.
In some cases, asbestos, finely chopped straw or fiberglass are added to the mixture for plastering the stove. These reinforcing components make it possible to obtain more durable materials.
When preparing plaster mixtures, special attention must be paid to the environmental side. During the heating process, the materials used should not emit substances that pose a danger to human health and life.
In fact, salt increases the hygroscopicity of clay, making it more flexible and resistant to cracking.
Also, a plastering solution, to which a certain amount of salt is added, prevents the proliferation of various insects in masonry joints. For owners of private houses, this fact is of great importance.
Adding lime along with gypsum makes the solution more durable and able to dry in a short time. But when choosing such mixtures, you should remember the properties of gypsum, so it is better to prepare a small portion immediately before plastering the stove. It is very important to understand that it is impossible to dilute the gypsum mixture with water.
You can finish the stove using plaster mortar yourself; you need to know how to properly plaster the stove and follow the sequence of actions.
To prepare a clay solution, the clay must be soaked the day before work begins so that it absorbs water. The sand is pre-sifted. A mixture consisting of soaked clay, sand and water is stirred with a hammer drill with a mixing attachment until a homogeneous mass is obtained.
When choosing refractory clay, you should pay attention to the packaging labeling. It has a special digital combination showing the fire resistance of the material. You should know that large values indicate high fire resistance of the clay. In addition, by the markings you can find out about the area of use of the material and for laying which bricks clay of this type is used.
A solution of refractory clay is used in cases where it is necessary to obtain a perfectly flat surface. In the process of work, corners and a special profile are necessarily used. Several profiles installed on one wall help to achieve absolutely even plaster. During the installation process, it is recommended to use a plumb line or building level. Corners are used to obtain smooth edges; they are glued directly to the plane.
To obtain a perfectly flat surface, you should use the rule. It is fixed across the vertical profiles so as to achieve simultaneous contact of all beacons horizontally.
When installing beacons, you should also pay attention to the level of extension of the furnace door and the blower. The level of the profiles and doors must match so that the surface is smooth, without protrusions and depressions.
Exterior finishing of stoves
You can increase heat transfer, hide minor deformations and give the stove a more aesthetic appearance by plastering or tiling.
Plastering is the most common; it is possible after settling and complete drying of the masonry.
Important! The walls of the oven intended for plastering should not be dirty and smooth; the solution will not have the necessary adhesion to them. The plastered surface will have defects after drying.
Tiling gives an elegant look and protects the room from the penetration of flue gases when small cracks appear in the masonry.
Mortar for plastering the stove: quality characteristics
Finding a good stove maker is not an easy task. But when he finished the work, the next problem arose in full force, because now the stove needs to be lined. Seams in masonry and surface irregularities tend to accumulate dust and dirt. As a result, not only cleanliness suffers, since when heated, contaminants tend to burn, filling the room with an unpleasant odor. In addition, over time, the masonry will lose its tightness, and smoke will be drawn into the room.
photo from the site www.rmnt.ru
The simplest and most affordable way to finish a stove is plastering. When choosing which solution is needed for plastering the stove, it is necessary to take into account the characteristics that the coating should have after hardening, namely:
- Heat resistance. The ability to withstand heating to sufficiently high temperatures without consequences is a basic requirement, without which all other qualities are meaningless. The outer surface of the oven, based on sanitary standards, heats up to 95⁰C. In practice, thin-walled stoves or stoves made with improper masonry techniques can be heated to 120⁰C at certain points.
- Thermal conductivity. Do not forget that the main function is heating, which means the conduction of heat from the walls into the room must be preserved, and mixtures with thermal insulation abilities are absolutely not suitable.
- Plastic. After drying, the coating should have the property of slightly stretching, repeating the change in volume of the masonry when heated. Non-plastic plasters will crack, requiring systematic restoration of the finish.
- Environmentally friendly. If the solution contains toxic components, then when the temperature rises they will be released into the air, which is undesirable for both residential and non-residential premises.
Thus, you need to choose the composition of the solution for plastering the stove responsibly, because the efficiency of heating, the durability of the coating and the health of the people living in the house depend on it.
photo from the site https://www.liveinternet.ru
What causes cracks
When malfunctions of the furnace equipment are discovered during use, the first thought that arises is: the furnace is cracking, what should I do? To begin with, it doesn’t hurt to figure out what led to this.
The following factors may be the reasons:
- donkey foundation or structure itself;
- unscrupulous craftsmen and unprofessional work;
- low quality material or unsuitable mortar for masonry or plastering was used;
- the drying process of the masonry is disrupted;
- long heating breaks, sudden temperature changes;
- the technology was not followed when applying each layer during plastering;
- The ventilation system is faulty, condensation.
Note!
Chipboard: what is it? Types, application features, photos, sizes, thickness, explanation, manufacturers
DIY houses made from shipping containers step by step: instructions, diagrams, pros and cons, photos, design
Working pressure in the heating system in a private house: what it should be, how to create it, instructions for adjusting it yourself
Is it possible to use a stove with cracks?
There is only one answer to this question: it is prohibited. Do not use a stove with cracks and endanger people’s lives. If there are no structural defects, it is necessary to begin troubleshooting as soon as possible.
Important! Fires in most cases result in death due to carbon monoxide released, not fire.
Diagnosis of problems
The diagnostics of all surfaces will answer the question why a brick stove is cracking. The worst option would be widening through brick cracks. You can’t do this without the help of a specialist; you may need to re-lay the furnace.
Small cracks in bricks caused by high heat allow you to carry out the work yourself. The cracks need to be filled and the surface re-plastered.
Oven adhesive
In building materials retail outlets there is a dry adhesive special mixture, as well as a ready-made solution of fireclay clay and cement. This glue is durable and fire-resistant. It is convenient to fill the voids of bricks with ready-made plastic material.
The dry composition is not difficult to dilute in accordance with the instructions. It is recommended to work with a small amount of material, as it dries quite quickly. Along with the advantages, ready-made glue has the disadvantage of being quite expensive.
Clay-sand mixture
Affordable economy class material. To prepare the proper quality solution, only high-quality clay and river sand are used. The clay is poured with water in a convenient container and diluted to the state of milk, then rubbed through a fine sieve.
When the clay and water settle, the liquid top layer is drained. Sand, sifted twice, is added to the clay mixture, ratio 1:2. The liquid composition is diluted from the clay mixture to a creamy consistency and mixed thoroughly.
Note!
Three-way valve in a heating system: instructions on how to choose and install correctly in a private home
Why the bottom of the battery is cold and the top is hot - let's look at the reasons. Review of recommendations on what to do and how to fix it
How to insulate a dog house for the winter with your own hands and inexpensively - step-by-step instructions with photos and descriptions of all stages
It’s easy to check whether the solution is ready. If small pieces of the mixture remain stuck to the stirrer, then the solution is ready, and if large enough pieces remain, then by diluting with water the mixture is brought to the required condition.
A solution containing clay is more likely to lead to defects. There are no exact instructions for preparing the solution; it is prepared based on the experience of the master. There are not many professional craftsmen, so such a solution is not often in demand.
How to prepare clay mixtures for stove masonry
The mixture is used for construction inside the building. It cannot be used for chimneys on the roof. The optimal proportions are considered to be: the ratio of the shares of clay and sand as 1:1 or 1:2, and the volume of water as 1:4. In practice, everything is determined by the fat content of the clay.
One of the tests is used to check raw materials. For example: a kind of dough is kneaded from 500 g of clay and balls with a radius of 20–25 mm are rolled. The ball is placed between two dies and squeezed until cracks appear on the lump of clay. A ball of thin clay falls apart even with slight pressure. From poor - when the volume is reduced by ¼ or 1/5. Normal cracks appear when reduced to 1/3 of the diameter, and oily – when reduced to ½.
The best is normal clay. When using it there is no need to add sand. If it is oily, then carefully sifted river sand is added in a proportion of 0.5 to 5 volume fractions. The result will be checked using the test described above. If it’s poor, they wash it out: fill it with water and wash out the excess sand.
To obtain the solution with your own hands, take the following steps.
- The clay is laid on a flooring made of boards measuring 1.5 * 1.5 m. It must be applied in layers and moistened with water.
- If you need to add sand, it is laid in a layer on top of the moistened clay.
- As soon as the clay gets wet, it is mixed and raked into a ridge about 30 cm high. Then the ridge is chopped with the edge of a shovel into plates, the edges and lumps are crushed. Then they are collected again into a ridge.
- Stirring is repeated 3–5 times until there are no clots left in the resulting mixture. The finished solution slides off the iron shovel, but does not spread. A sample can be seen in the presented photo.
Fireclay clay
One of the best materials to cover the stove so it doesn’t fall off. Affordable, sold in stores, packaged in 20 kilograms. Resistant to moisture and temperature. Also intended for plastering surfaces.
The finished solution is obtained as follows: fireclay clay is mixed with cement and sand, the ratio of the components is 2: 1: 7, respectively, water is added. For better pliability of the material, you can initially fill the clay with water, then wipe out the lumps, add cement and sand. The thickness of the mixture depends on what type of work is being carried out, and skill experience also plays a role.
Manufacturers and brands
| Brand of solution | Description | average price |
| Heat-resistant plaster for “Terracotta” stoves. Package weight 5 kg. |
Made from fireclay and kaolin clay, with the addition of binders and heat-resistant additives. The material is environmentally friendly and does not contain harmful substances. It is easy to apply and hardens quickly and has a high level of adhesion to surfaces. The solution retains its properties for 1 hour after mixing with water. Work is carried out from 5 0 to 35 0. The thickness of one layer is up to 10 mm.
From 140
Fireproof plaster from. Packaging 10 kg. Can be used for laying stoves. Made from refractory clays. Mineral and heat-resistant additives are added to the solution. The mixture hardens quickly and does not shrink the layer much. Easy to apply and remove from surfaces for possible repairs. Withstands high heating temperatures. Can be applied to old and new stoves. The plasticity of the mixture allows it to be smoothed and not destroyed during shrinkage of the seams and the foundation of the furnace. Fire resistance level – 600 0.
White thermal plaster "Plitonit SuperKamin Thermo". Packaging 25 kg.
Can be applied to fireclay or ceramic blocks. Thanks to its properties and easy application of an even layer, it can add attractiveness to the stove. Subsequent painting and finishing with all kinds of finishing elements, including tiles and ceramic tiles, is possible. Reinforcing elements have been added to the composition; they can be used for preliminary sealing of wide cracks and leveling of surfaces. The thickness of 1 layer is up to 30 mm while maintaining all properties. When sealing cracks, the layer can be made up to 50 mm.
Clay mortar for plastering the Kalina Master stove. Package weight 25 kg.
Portland cement has been added to the composition. This mixture has high strength, ductility and is able to withstand high temperatures when leveling surfaces in fireplaces. A layer of plaster increases heat transfer by 15%. Good adhesion makes the plaster resistant to mechanical stress.
265
Mixture for plastering fireplaces and stoves from. Bag weight – 20 kg. Made from red refractory clay with the addition of fire-resistant fillers and reinforcing heat-resistant glass fibers. This composition guarantees a high level of resistance to high temperatures while maintaining physical properties and adds strength to the composition layer. Produced in St. Petersburg. Can be used in the construction of fireplaces and exhaust pipes. It will last a long time if you follow the operating rules of the stoves and their protective layer.
Dry plaster for “Parad” stoves Made in Belarus. The base is cement with the addition of thermal insulation materials and fiberglass reinforcement. Such additives increase the heating temperature while maintaining the qualities and characteristics of strength, ductility and protects against cracking. Can be used for laying stoves and fireplaces.
Dry mixture for stoves and fireplaces "Real". 5 kg bag.
Can be used for laying ceramic facing bricks and constructing chimneys. The maximum heating level for the plaster layer is up to 1200 0 . Operating temperature – 500 0 with a layer thickness of up to 5 mm.
Ready-made mixtures for plastering RusGips stove No. 15. This mixture can be applied in slightly frosty conditions. It consists of a mineral mixture, which is obtained by intensive mixing of screened sand of a certain fraction with Portland cement and a complex of mineral additives that enhance the properties.
256
Fire-resistant plaster "ByProc TFS-170". Packaging 3 kg. Used for application to the internal and external surfaces of stoves and chimneys. Serves to level out uneven surfaces and subsequently apply an even protective layer of mortar. Operating temperature 500 0, while maintaining strength and elasticity.
Mixtures "ByProc" MMW-070. Package weight 3 kg. All data is the same as for the previous mixture. The only difference is the maximum temperature while maintaining high performance qualities. For this solution, it is 1100 0.
Oven grout
To eliminate defects that occur in the oven, ready-made heat-resistant grout is sold. Because of its high cost, home craftsmen prefer to make such a solution themselves.
The clay is prepared as for a clay-sand mixture. The soaked clay slurry is combined with sifted sand and while mixing, chopped straw is added, the component ratio is 1:4:5. 1 kg of coarse salt is added to the finished solution, which makes the composition more plastic and resistant to cracking.
Grout perfectly fills voids. You can also use it to plaster the stove surface with the first rough layer.
Overhaul of a brick kiln. Soot removal, associated improvements
Photo 1.
Brick stoves do not last forever, although with proper design, careful operation and proper care they can last for a very long time. Every autumn, before the start of the heating season, cosmetic repairs are desirable. Renew the masonry - open up cracked seams and seal with masonry mortar, possibly replace broken bricks, etc. But at least - inspection of the stove with a chimney and cleaning them of accumulated soot.
Here, we consider a more thorough repair of the accumulated damage in a bell-type home heating and cooking stove. And this is the destruction of the refractory lining of the firebox, a burst cast-iron stove, the need to replace a temporary homemade chimney, little things. At the same time, some modifications were made to the furnace - removing unnecessary electrical elements. heaters, finalizing the furnace door seal, manufacturing and installing a water heat exchanger into the furnace, manufacturing and using an external hot water tank.
So.
What was used for work
Tools, materials and containers for preparing masonry mortar.
Tools and containers for marking, cutting and preparing (soaking) bricks. A set of metalworking tools, including those for welding pieces of iron. Good email extension cord, portable lamp, protective equipment. To the point.
Removing unnecessary heating elements.
The bell-type stove allows you to conveniently install electric heaters, which was done in times when you had to leave for the weekend (Photo 2). I intended, with their electrical help, to maintain at least somewhat acceptable temperature in the house in my absence. In fact, it turned out to be more convenient to leave the factory oil heater. And the heating elements inside collected ash and soot, reducing the heating of the corner of the furnace (Photo 5).
Photo 2.
Photo 3.
Photo 4.
Email findings of a group of heating elements (Photo 4). A neon light is visible from inside the casing to indicate that it is on.
Photo 5.
Photo 6.
Removing a broken slab.
Not so simple in relatively compact combination ovens - you have to remove several layers of bricks above it and only then can the piece of iron be pulled out of its socket. I removed the bricks from the middle of the masonry very carefully so as not to collapse the upper part of the stove.
Photo 7
Photo 8.
The metal threshold, which protects the edges of the brick part of the slab from accidental damage, does not have to be fixed with a pin inside the masonry (Photo 8); practice has shown that it holds very well when simply pressed by the upper bricks.
Photo 9.
Damage to cast iron decking slabs is not the same - a long crack (Photo 9, pos. 1) arose due to a casting defect, a burnt-out area (Photo 9, pos. 2) is due to poor heat removal and the significant weight of the hot water tank placed on it. . Thick cast iron will not go to waste - it can be usefully disposed of in a sauna heater.
The removed damaged slab provided access to the broken refractory lining of the firebox.
Here, a few words need to be said. The lining of the firebox is made of fireclay refractory bricks and most often (to save space) “on edge”. The fireclay layer is separated from ordinary bricks by a soft refractory pad (to compensate for greater expansion when heated). Those. The lining itself is not very strong; in this furnace the so-called "dry seam". This element is not used in the new lining.
After removing the slab and gaining convenient access to the damaged lining, I disassembled it to the level of the grate. I took out the bricks, cleaned out the old masonry mortar (for fireclay it is not the same as for red brick, it is mortar or special mastics). I selected some lining bricks for further work. The damper layer (basalt cardboard) turned out to be in good condition, it was left behind by the old one (Photo 10-12).
Photo 10.
Photo 11.
Photo 12.
Refinement of the combustion door seal.
This oven has an unusual, experimental seal - a standard narrow door frame is sandwiched in a wide outer stainless steel frame. The structure is held in place by two wide L-shaped plates on the sides (Photo 11). The seal is very reliable, but has a weak point - the ends of the door ceiling bricks are severely damaged (Photo 13).
Photo 13.
Photo 14.
To protect the vulnerable spot, the metal part of the seal has been modified. From the available scraps of stainless steel, a unit similar to the horizontal ones was welded and installed (Photo 14).
New lining
I bought and brought a dozen fireclay bricks for her. I used a few pieces from old lining. I found and prepared mortar (keep the mixture mixed for several days). He cut out and adjusted the bricks. The diamond blade of the grinder works better when the fireclay is periodically wetted with water (by immersion). I numbered the assembled lining with a simple pencil, disassembled it and wet it with water. Folded on mortar (Photo 15). The seams between fireclay bricks should be no thicker than 3 mm. A soft damper layer of basalt cardboard on the sides of the lining (between the fireclay and the red brick) prevents it from expanding and pushing the brickwork apart when heated (the fireclay expands more than the red brick). You should also remember about the vertical expansion of the lining - we do not bring it to the cast iron plate by 10-15 mm. We also fill these places with strips of basalt cardboard.
Photo 15.
Fuel door cover.
An important point, often performed with errors. As elsewhere, here you need to remember that the thermal expansion of the iron is greater than that of brick. They need to be provided with a special place for this, and they will not break the masonry. Such damper gaps are sealed with soft sheet or roll refractories and asbestos cord.
When covering the fire door, this means that the floor bricks cannot be supported on metal elements. On the contrary, a gap of ~10 mm is needed between the brickwork and the iron. The floor bricks actually hang, resting only on the edges of the masonry, like an arch (Photo 16-20).
Photo 16.
Photo 17.
Photo 18.
Photo 19.
Photo 20.
Installation of cast iron cooking floor - slabs, restoration of masonry
Inspect the new cast iron, remove the remains of the sprues and sharp edges (grinder, thick abrasive wheel). For the slab, a nest is cut out at the edges of the bricks to its thickness, but wider on each side by ~10 mm for its expansion when heated (Photo 21). During laying, care must be taken to ensure that this gap remains free or filled with soft refractory. The horizontality of the slab is checked, it is installed in its nest on a thin layer of masonry mortar (it fills the voids). The mortar from the expansion joint is thoroughly cleaned (Photo 22) and filled with basalt wool (to prevent debris and mortar from leaving the upper bricks).
Photo 21.
Photo 22.
I restored the rest of the brickwork, washed off the remaining mortar on the bricks, and dried the new brickwork with frequent fires using a small amount of fuel (small sticks).
Photo 23.
A short video about this part of the renovation.
Cleaning the furnace from soot
This was done partially and locally during all previous work. Now I have opened the remaining “cleanings” and removed the remaining soot and ash. I did not use standard cast-iron cleaning doors in my furnaces - I replaced them with special openings filled with half a brick “on edge”. This is cheaper, more aesthetically pleasing and greatly reduces the suction of cold air into the furnace (reduces efficiency). Such a “cleaning” can be easily opened. When opening, it is worth moistening the masonry mortar in the seams with water from a spray bottle. The wet clay-sand mixture is scraped out, and half of the brick is removed (Photo 24). Soot removal begins from the upper floors of the furnace, gradually moving down. He worked with a flat piece of iron and a simple scraper on a long handle (Photo 24, indicated).
Upon completion of cleaning, the removed half and its seat are cleaned of the old solution and moistened. The opening for cleaning is sealed, the fresh masonry is washed (Photo 25).
Photo 24
Photo 25.
A short video of soot removal.
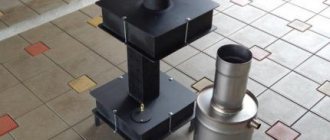
Chimney replacement.
The existing homemade tin chimney was replaced with a factory prefabricated sandwich constructor. The old chimney was riveted from sheet roofing steel and insulated with basalt (the first layer) and on top of it with ordinary glass wool (Photo 26). The connecting platform of the prefabricated chimney was installed on a brick stove through a basalt cardboard gasket (Photo 27).
Photo 26
Photo 27
The chimney was passed through the ceiling using a homemade part filled with basalt wool and closed from the penetration of mice (Photo 28, 29).
Photo 28
Photo 29
The upper end of the assembled chimney is fixed from the inside of the roof to the sheathing (Photo 30). The tightness of the roof is ensured by a special rubber seal (Photo 31).
Photo 30
Photo 31
Installation of a water heat exchanger for hot water supply in the furnace
A homemade rectangular stainless steel tank, previously on the stove, was moved to the stove roof (Photo 33). The water in it is now heated in a small heat exchanger built into the masonry. The heat exchanger is located in one of the hoods of the first floor of the furnace (Photo 32). This allowed the stove plate to be freed up for cooking. In addition, the heavy tank on the hot plate was probably one of the reasons for its destruction (Photo 9).
The heat exchanger and the tank are connected by metal-plastic pipes, at the lowest point there is a drain valve (Photo 33). To fill the cold water tank, I used a small electric pump with a simple circuit breaker.
Photo 32.
Photo 33.
Photo 34.
Photo 35.
Babay Mazay, December 2021
The question/topic is automatically published on social media. site network - keep an eye on the answers there:
Become the author of the site, publish your own articles, descriptions of homemade products and pay for the text. Read more here.
Covering stove cracks
The material for the upcoming work has been selected, and another question arises: how to properly seal the stove?
You can start working only after cleaning the brick from decorative finishing and plaster. Using a suitable tool, the gaps between the masonry with cracks are widened to fill an area of about 10 mm with adhesive.
When using ready-made adhesive solutions, it is advisable to adhere to some rules:
- prepare the working solution in a limited volume due to the drying speed;
- Wet all cracks with water;
- tightly fill the gaps with adhesive;
- Lubricate the top of the oven with the prepared solid mixture;
- wait for it to dry completely and start plastering.
An unheated stove is a bad option for carrying out repair work with materials containing clay. It is recommended to heat it slightly; this will help you see imperfections and eliminate defects before the putty dries.
The sequence of work will be slightly different:
- Before sealing the cracks, stir the mixture again until smooth (the contents have different densities);
- make sure the material is of high quality. To do this, you can manually make a spherical object, and if cracks appear on it, add a little water;
- wet all the cracks with water and fill tightly with glue (it’s safer to use your hands);
- Plaster also after final drying. Next you can use whitewash.
How to plaster a stove - step by step diagram
Step 1: Heat the stove
Before preparing the solution for plastering the stove, heat it thoroughly so that it crackles where it should and warms up the walls. This rule cannot be broken even in the summer, despite the heat.
Step 2: Prepare the surface
Carefully go over the surface of the oven with a broom and brush to remove accumulated dust and remaining installation solution. To improve adhesion, it is better to clean and slightly deepen the cracks in the brickwork, but not more than half a centimeter.
Step 3: First Layer of Clay
Wet the surface of the stove with water and apply a thin layer of liquid clay with a wash brush. Let it dry a little.
Step 4: Reinforcement
If you decide to use burlap for reinforcement, this step is for you! The fabric, pre-cut into the required pieces, should be soaked in a liquid clay-sand solution and glued to the stove from top to bottom, just like wallpaper is glued. You can combine the pieces end-to-end, but it is better to overlap by at least 5 cm.
Step 5: Apply plaster
Remember that the thickness of each layer of plaster should be no more than 5 mm, and the total thickness of the facing layer should not be more than 1 cm. The solution must be applied from top to bottom, in an even layer, so that the facing dries evenly.
As soon as the plaster has set well, it should be rubbed with a wooden float using circular movements. If the composition has hardened too much, moisten it with water. At the end of applying the plaster, people used to smooth it out with a rag soaked in a liquid solution of the same composition. After completing the process, do not rush to heat the stove; let the layer of plaster dry completely. If cracks form during drying, they should be slightly widened with an ordinary knife, moistened with water and rubbed with the same solution. If over time you notice new cracks on the surface of the stove, analyze your actions - the stove may peel off and crack due to shrinkage, excessive layer thickness, or improper ligation of rows of bricks. In addition, cracks can also appear due to overheating.
Oven overheating
Having installed a new stove, or repaired damage to the old one, you should not test its strength by heating it to its fullest.
The first fire must be carried out with a small amount of firewood, increasing the amount each time. And then there will be no need to get rid of the next problems again.