How to choose
Before we talk about using clay, let's look at how to choose it. Clay is a natural substance that has no contraindications for use, so it is suitable for any skin type.
To choose the right facial clay for your skin with its characteristics and problems, you need to experiment and empirically determine which type of clay is best for you.
General recommendations are:
- white and green clay are the best cleansers; in their pure form they are good for oily skin. The composition of the soft paste-like texture has a sebum-regulating, antibacterial and light whitening effect.
- black and blue - excellent lifting effect, smoothing, fighting cellulite;
- red - treats inflammation and acne;
- pink - smoothes, relieves inflammation, has an astringent effect;
- yellow - toning, gentle cleansing.
However, everything is very individual, and the same clay on different skin can act differently. To find a facial clay that is perfect for your skin, try different recipes: pure clay, with different bases and additives. With experience, you will understand which recipe is right for you.
How to use
If you buy ready-made clay masks, use them strictly according to the instructions, since such products may contain additional ingredients, and if you do not follow the recommendations, you will not get the expected effect.
If you prefer pure clay without any additives, then using this clay for the face is very simple: you need to dilute it, optionally add the components necessary for your skin, and apply a mask to the skin.
We will talk about how to dilute clay for the face and what additives are needed later.
The composition must be diluted in a glass or plastic container, stirred with a wooden or plastic spoon.
It is advisable not to brew the clay with boiling water, but to dilute it with warm water or water at room temperature. If you use clay for deep cleansing or as compresses, then warm water is preferable.
Clay research.
Take a lump of clay in half a fist. Wet it, knead it until it becomes soft, and slowly squeeze it between two perfectly even planes. If the lump quickly cracks, then the clay is of poor quality. Cracks appeared after the lump was compressed by one third, then such clay is taken home for further work in a volume of at least 5 kilograms.
Research on the properties of clay at home.
Water hardness matters. Use only soft or, in extreme cases, medium-hard water.
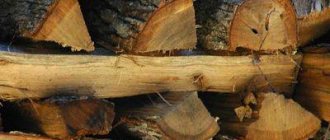
The sand used for the firebox is quartz; for the rest we use regular construction yellow sand. First, the sand mixture is sown through a fine wire sieve. Then they are thoroughly washed with water to remove organic matter - various organisms that like to live in the sand. Their presence in masonry mortar is undesirable, as this deteriorates its quality.
The next step is to find out the proportions of the components of the mixture.
We divide the entire volume of clay brought into two parts. We set aside part and divide the second into 5 parts. It is better to label the dishes. Distribute the clay evenly into a marked container and ferment it with water, adding a quarter of the amount of clay. It becomes limp within 24 hours, after which we mix it, press it through a mesh material with 3 mm cells, and let it sit for 1 day. Then drain the top layer of water and add sand, starting with the second cup - a quarter of the sand, 3 cup ˗ half the sand, 4 cup ˗ three quarters, 5 cup ˗ one to the full of the volume of clay. The first cup contains only clay. You need to stir thoroughly until the mixture is homogeneous.
We make samples from the resulting solution:
- Sausages or flagella 30 centimeters long, no thicker than a finger ˗ 2 pieces.
- Roll into a ball with a diameter of 5 centimeters.
- We make a clay cake of medium diameter as thick as a finger.
We label the samples. Clay sausages are dried for three days, balls and cakes for up to twenty days. The samples are dried in the shade.
When stretching or wrapping flagella around a stick:
- normal clay - only the crust cracks and the mass is damp;
- greasy ˗ the crust will crack or not crack;
- skinny clay ˗ flagellum breaks immediately.
The results of this experiment are not reliable. You must wait until the balls and cakes dry. We inspect dry samples for cracks, then drop them to the floor from a height of 1 meter and see which ones are cracked. Those samples that withstood the impact are dropped again, but from a greater height. We select those samples that have passed the tests. This is the formula of the solution.
Using this formula, a test batch is made from the remaining clay and the adhesiveness of the solution is checked. If the solution is very liquid, the masonry will not be strong enough. If it is too thick, the seam will be too thick. Too liquid settles, drain the upper sludge (settled water) and measure the quantity. This volume is subtracted from the original volume of water for dilution.
A slightly greasy solution has adhesion. If you lower a trowel into it, then as it drains you will see a thin solution with streaks. If a continuous layer remains, then the clay is oily.
How long to keep clay on your face
Like other masks, clay is applied for 15-20 minutes. There is no point in holding it any longer, since the skin stops absorbing anything. Remember one of the most important rules for using clay: you should not leave it on your face!
The clay mask should not dry out, since dry clay no longer brings any benefit. Moreover, it begins to draw moisture from the skin, and after such a mask you will get the opposite effect: the skin will be dry, tight, and rough. Also, dry clay is very difficult to wash off from the skin, and this way it can be stretched.
If you have any skin problems, then you need to use facial clay regularly. Ideally - 2-3 times a week.
In particularly advanced cases (for example, skin with very clogged pores, severe oiliness), you can start with a course of masks: every other day for ten days. Then maintain the result 2-3 times a week.
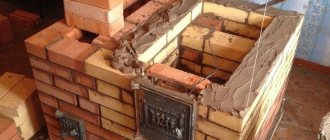
Clay mortar for laying a furnace
When constructing a stove, a cement mixture, which is prone to cracking under strong heat, is used only when laying its base (foundation) and the chimney head.
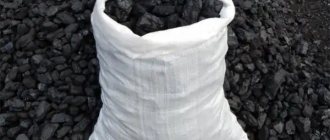
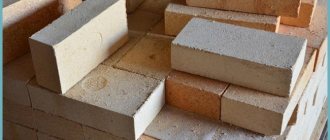
For masonry of the firebox, chimney and for plastering, only clay-based solutions are used. To lay the base of the furnace, it is allowed to use ordinary red clay, which can be found in any quarry. In the firebox and chimney, the bricks are held together with heat-resistant fireclay clay, a high-density white kaolin sedimentary rock that is fired in kilns to increase its strength characteristics. Under the influence of high temperatures, it acquires a cream or gray-brown tint, and after firing it is not inferior in strength even to stone.
The classic composition for laying a stove consists only of clay and sand. If necessary, other ingredients are added to improve the composition.
Manufacturers offer the following fireproof fireclay mixtures:
- “Terracotta”: made using classic furnace technology.
- “Plitonit”: with reinforcing heat-resistant fibers.
- "Pechnik": in the form of ground fireclay powder.
- “Makarovs’ stove house”: fireclay mortar (unmolded mass), the composition includes clay and ground refractory brick.
- "SPO": based on chamotte and sand.
In addition to masonry and plaster mixtures for stoves and fireplaces, construction stores also sell reinforced clay compositions used for fireclay fireboxes. There are also special compositions on sale for laying sauna stoves operated in conditions of high humidity.
Expert opinion
Sergei Shablovsky
Plasterer
If you want to master the stove business professionally or build a stove in your home yourself, I recommend that you watch video courses from Alexander Zalutsky:
- DIY brick ovens;
- Laying fireplaces;
- 3D design of hearths in SketchUp.
A stove maker with twenty years of experience explains in detail how to do everything yourself step by step.
Ingredients: clay, sand, additives
Masonry mortar
To perform furnace work, the following types of solutions are used:
- Based on red clay: able to withstand an average temperature of 1100°C, used for laying the body of the furnace.
- Fireclay fireclay: for fastening bricks in a firebox or chimney.
- Limestone: fire resistance is below average, can withstand temperatures of only 450-500 °; used for laying the base of the furnace and pipes located above the roof level.
- Sand-cement and cement-lime: used only for the upper part of the chimney and foundation laying. Cement-lime is stronger than ordinary lime, but can withstand temperatures only up to 200-250°C.
- Clay-lime: used for plastering.
Advice! Adding salt to the masonry mortar will increase its strength. Add 1.5-2 kg of salt to one bucket of ready-made clay solution. The mixture then takes longer to dry, but after firing it becomes monolithic and very durable.
Proportions and preparation of masonry mortar
Since the clay hardens for quite a long time, the entire volume for masonry can be prepared for work at once.
To bind 50 bricks you will need about 20 liters. For a Russian stove, the solution will need 15-20% more. The material must be pre-crushed and soaked for at least a day. You can soak it immediately in the container in which the solution will be prepared. After this, the required amount of sifted sand is added to it, and everything is thoroughly mixed. This can be done with a construction mixer, drill or wooden spatula.
The proportions of clay and sand may vary depending on the fat content of the former. For 1 part of clay, 2 to 5 parts of sand can be added.
Expert opinion
Alexander Guryanov
Plasterer and decorator
To find the correct ratio, prepare several samples of mortar with different amounts of sand. Roll balls with a diameter of 5 cm from each and throw them from a height of 1 m onto a hard surface. After falling, a ball made from the “correct” clay solution should not change shape or crack. If it flattens, the mixture is too fatty. Add sand. If it is cracked, add more clay.
How to prepare the mixture for masonry is shown in the video.
How to apply clay to your face
Before applying a clay mask, you need to thoroughly cleanse your skin. This could be foam or another facial cleanser. Also, to better prepare the skin for the action of kaolin, you can make a scrub before the mask.
Clay is applied in a thick layer. To prevent the composition from getting on your hair (which will be difficult to clean later), put a special bandage on your forehead that will cover it.
You can apply clay to your face either with a mask brush or with your fingers. Under no circumstances should we apply clay under the eyes and on the lips: this is too rough a mask for such delicate and thin skin.
Another important thing to remember is that your face should remain motionless during the procedure, so avoid talking, smiling, or moving your eyebrows. Ideally, you should lie down, close your eyes and relax. Never make a mask hastily or casually, otherwise you will not be able to completely relax!
Give your eyes a rest during the procedure: to do this, cover your eyelids with fresh cucumber slices or cold, damp tea bags.
Methods for selecting clay and sand ratios
The mixture will contain three components:
- Clay.
- Water.
- Sand.
Many people are interested in the proportions of clay and sand for laying a furnace. No one can say in what proportions to mix these components in your case, since the quality of clay in different places is completely different.
The finished composition should be plastic, but not too greasy, and not too dry (skinny, with too much sand). The greasy solution, when dried, decreases in volume and cracks. Skinny can crumble, it is not strong enough.
The properties of clay are determined by its proportional composition (sand, SiO2, Al2O3 and other impurities).
The fat content of the clay and how much sand will need to be added are determined experimentally.
Clay fat test
The test is very simple.
Take a lump smaller than your fist, knead it with wet hands and roll it into a ball.
The ball is placed between two smooth boards (metal or planed boards) and begins to be slowly compressed.
This is done until cracks appear.
Ideally, cracking should appear when the ball is compressed by no less than 1/3 of its diameter. After a couple more tests, which also show a positive result, you can lay bricks on such clay! However, such luck does not happen often.
If the clay ball cracks almost immediately, it contains a lot of sand. If it smoothly shrinks by more than half, the clay is too oily.
At what depth should I take clay for the stove mortar? The upper layers usually contain loam. Skinny raw materials with a large proportion of sand. Clay, as a rule, is located lower and the deeper it is, the more its fat content increases.
Flagella
The thickness of the bundle is 15-20 mm thick and 200-250 mm long. A freshly rolled rope is wrapped around a stick 40 - 50 mm in diameter. The normal result is that small cracks will appear on the surface. It won’t crack at all – it’s oily. And it will crack with deep cracks - skinny.
Other checks: ball and cake
A ball is rolled and a small flat cake (4–5 cm in diameter) is made. Both samples are completely dried, this will take 2 – 3 days.
If during this time the edges of the cake become very cracked, the clay is oily (add a little sand and repeat). A sign of a thin composition will also be the fact that the cake crumbles when pressed.
Methods for testing clay mortars
The ball is dropped to the floor from a height of 1 m. If it completely falls apart, there is a lot of sand in the raw material (skinny). The best samples do not break at all (an acceptable result is if the sample breaks into 2-3 large pieces).
Skinny clay is the most inconvenient material to work with. Making it fat is quite difficult. To do this, the raw materials need to be tortured. The procedure involves stirring in water repeatedly and draining after the solids have settled. Sometimes stove makers mix several clays. By mixing clay with normal or high fat content to a lean sample, you can obtain a satisfactory composition.
There is an opinion that it is difficult to build a brick oven. This is true, but it’s quite possible to build a small stove yourself. Do-it-yourself brick stove for a sauna - the necessary tools and instructions for laying.
How to make a hood in a private house, see this topic.
Installing a sauna stove is an important stage, because the safety of its operation depends on the correct installation. Here https://microklimat.pro/otopitelnoe-oborudovanie/pechi/ustanovka-v-bane-svoimi-rukami.html the rules and installation procedure are described in detail.
How to prevent the mask from drying out on your face
Since it is very important not to let the clay dry out, try to follow these rules:
- Do not leave the clay on your face too long. 15 minutes for a mask is quite enough, especially if it is an astringent, drying or tightening mask.
- Apply clay in a thick layer. Where it is applied thinly, you may see red spots and peeling. Try to avoid this.
- Apply the mask in the bathroom, where humidity is higher.
- During the procedure, spray the composition from a spray bottle, or cover the mask with a damp gauze cloth.
- Add base oils to the mixture, so the composition will dry out more slowly.
How to dilute clay for the face
Typically, clay is diluted with water (preferably mineral) to a thick sour cream. This is the basic version of the mask. Stir it thoroughly so that there are no lumps of clay.
Then you can add additional ingredients depending on your skin type and the expected result. You can dilute facial clay not only with water, but also:
- Rose water
- Milk, cream or sour cream
- Base oils (avocado, jojoba, sesame, sasanqua, tamanu, etc.)
- Green tea
- Lavender water
- Various hydrolates
- Aloe juice
- Herbal decoctions
Depending on the purpose of the mask, the following is added to it:
- White and yolk
- Vegetable and essential oils
- Honey, propolis
- Cream, sour cream
- Cereals
- Cottage cheese
- Glycerol
- Vitamins in oils
- Herbs
- Cocoa powder
- Berries, fruits
How to prepare a solution on clay for laying a stove and fireplace
Masonry mortar, which can withstand high heat without destruction, without significant expansion and cracking, has a very simple composition - clay and sand. Such a solution is capable of sealing the smallest cracks and chips in bricks, so the masonry is airtight. At the same time, the stove masonry is not very strong, the clay mortar does not adhere to minerals like cement, so the stove can be disassembled by separating entire bricks in the future.
But preparing high-quality masonry mortar for a stove that does not crack and lasts indefinitely is not so easy. You only need the right ingredients, and they need to be mixed correctly, in the right proportions. How it's done…
Clay
Clay for laying a stove should have the least amount of impurities. But all clays are not pure; they will contain various inclusions. In addition, the clay itself may contain a different ratio of tiny clay and dust particles and large sand particles.
Depending on this ratio, clays are conventionally divided into three categories:
- skinny - sand particles clearly predominate, therefore the material has less stickiness and viscosity;
- normal - its properties are better suited for furnace work, the most ductile and durable;
- greasy - there is not enough sand, the material is too sticky and viscous and cracks when dried.
Extraction and preparation of clay for the kiln
Getting good clay for laying a stove is not always easy. Usually local artisans know similar places in their area. More often these are quarry works, wells, or folds of the relief - cliffs, gullies, steep rivers. Clay must be collected from the lower layers, there will be fewer inclusions of organic matter, which most spoils the masonry mixture.
The clay is soaked - filled with water for at least two days, mixed, allowed to settle, the water with impurities is drained, new water is poured in... The most important process in preparing clay and separating the lightest impurities.
Then the stones are separated. Using a mixer, pulp is made and it is filtered through a sieve with a cell no larger than 3 mm.
Sand
It is unacceptable to use quarry sand, even sifted sand - it contains many different minerals and impurities in the form of grains. You need to take river sand, which in nature has undergone purification by washing, similar to what is given above.
For the stove solution, medium and fine (not coarse) river sand sifted through a 1 mm sieve is used.
Selection of sand and clay ratios
As indicated, the clay itself may contain different amounts of sand, which can only be determined in the laboratory, but rarely anyone does this. Mortar for laying a fireplace or stove, i.e. The ratio of clay and sand is determined by indirect signs - by eye.
- Make 5 small batches - pure clay, add 25% sand by volume, in the next batch - 50%, then 75%, and 100%. A small cake is made from each, signed on a piece of paper, and dried for 2 days. Then the cakes are examined; the one that does not crack when crushed and dried, does not break when dropped, does not collapse when compressed, is considered normal. Then this ratio of ingredients is repeated during the working batch.
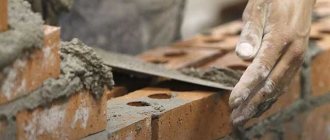
- The solution is taken on a trowel, the tool is first turned over 180 degrees, then placed at 90 degrees. When completely turned over, a normal solution should not come off the trowel, but if placed vertically, it should slide off. If it comes off when turned over, it’s too skinny; if it doesn’t slide off at 90 degrees, it’s too fat.
- Two bricks are soaked for 3 minutes, the mortar is applied to the brick, another is pressed on top so that the mortar is slightly squeezed out. Then they take the top brick with their hand and lift it - with a normal kiln mortar, with the correct ratio of sand and clay, the bottom brick should also rise without falling off.
Adding water to the solution
When making clay mortar for laying stoves and fireplaces, you need to add water correctly - the composition should not be too dry and not too liquid. When rubbing or moving with a trowel:
- the dry solution breaks;
- wet - it floats, water appears above the clay;
- normal - quite plastic, but without water.
Mixing the solution is carried out in modern conditions with a mixer on a powerful drill. It is recommended to take water without chlorine, drinking quality, and leave it for a couple of days.
A similar oven solution can also be purchased ready-made. But with a significant amount of work, this will be a completely ruinous and unprofitable undertaking. Therefore, to this day, the laying of stoves and fireplaces is often carried out using homemade clay compositions, which, with certain experience and skills, are not difficult to make...
Red face after clay
Sometimes after clay you get a red face. What is this connected with? Most likely, not with the clay itself, but with the way it is used. Clay is a neutral product and usually does not cause any allergic reactions.
Most likely, you overexposed the clay to your face; in this case, you need to moisturize your skin well (apply a moisturizing mask or cream).
Another possible cause of a red face is the composition of the mask. This reaction can occur to kefir, high concentrations of essential oils, and honey. Review the composition of your mask and remove additives that could cause redness.
How to use for dry skin
Despite prejudices, you can use clay for the face and dry skin. To do this, the clay is diluted with heavy cream or hydrosols, base oils are added, you can also mix in honey, aloe juice, and pollen.
Before applying the clay, lubricate the area around the eyes and lips with a rich base oil. For example, wheat germ works very well.
For dry skin, clay is diluted as follows: first with water to a dry paste, then oil is added to the composition: usually a teaspoon per mask is enough. Instead of butter, you can use cream.
If you add essential oils, be sure to dilute them in an emulsifier: this could be honey, base oils, cream, sour cream.
Recommended mixtures for laying a stove
The list does not include compositions with cement and gypsum. Now you understand that this is the worst option.
Table. Types of masonry mixtures for brick ovens
| Type of mixture | Brief description of physical and operational characteristics |
| Ready-made formulations | Modern mixtures include fireclay clay powder, sand and plasticizers. They are sold in bags, are easy to prepare, and perform their tasks very effectively. The only drawback is the relatively high cost. But stoves do not require a lot of mixture; the price of the solution does not have a noticeable impact on the cost of the facility. |
| They do it themselves. The master must have extensive practical experience to correctly select clay and sand, determine the optimal formulation, etc. This is a traditional solution, if the recommendations are followed, it fully meets the existing requirements of government regulations. As for the performance characteristics, they satisfy users in all respects. |
As an example, we will consider the process of preparing a mixture from ordinary clay.
Types of ready-made mixtures for laying stoves
Prices for fireproof mortar for stoves and fireplaces
Fireproof mortar for stoves and fireplaces
How to wash clay off your face
Wash off the clay from the face with plenty of water at room temperature. The most convenient way to do this is to use a damp facial sponge. Any masks are removed along massage lines. You can see the diagram in the article “How to apply masks.”
Please pay attention to one important nuance: the clay particles are very small, so even with thorough rinsing they can remain on the skin.
To prevent them from clogging the pores, it is recommended to make a light scrub after washing off the mask: you can massage your face with a clean, damp sponge, or make a delicate scrub from ground oatmeal (add a little water to it and massage the skin for a few seconds), oatmeal with kefir or green tea, or scrub the skin with steamed herbs.
Methods for testing clay
Before directly laying the furnace, you need to find out how the fat content of the clay can affect the solution and how, if necessary, you can change its characteristics. First of all, the fat content of clay depends on the presence of sand in it. Oily clay contains a small amount of sand. In turn, if it contains a large amount of sand, it will be skinny. It is these qualities that affect the plasticity of mortar for stoves.
I would like to note that upon contact with water, clay absorbs it like a sponge, while becoming plastic and significantly increasing in volume. In turn, under the influence of high temperature it quickly loses liquid and, if the water completely evaporates, its structure will become porous. With further heating, the clay will begin to melt and simply bake, turning into a solid material resembling stone. These properties of such a useful substance are very important when building a stove.
Checking the quality of clay by drying
Our ancestors also used various clay products and solutions when building furnaces. Moreover, as it became known from history, when building a clay stove, a person independently made not only mortar, but also bricks, which were a solid basis for laying the chimney. But in our time, such a binding component is used only as a building mixture for fastening various materials together.
- Take half a liter of clay and add a small amount of water to it, after which everything is thoroughly kneaded with your hands until the mixture stops absorbing moisture.
- After preparing the stiff dough, a ball with a diameter of up to 5 cm is rolled, from which a flat cake is subsequently made twice as large.
- Under natural conditions, it dries for 3 days. If cracks form on the cake, the clay has a high fat content and in order to prepare a high-quality mortar for laying the stove, it must be diluted with sand.
- If during the drying process no cracks appeared on the cake and it did not disintegrate when dropped from a height of 1 meter onto a hard surface, then such a binding material is completely ready for preparing a solution.
I would like to note that skinny clay will not crack, but it will not have the required strength. It is necessary to add fattier analogues to it. Clay or sand, depending on what is missing in the mortar, is added in several stages, while controlling the consistency of the mortar.
Testing clay with a paddle
As it has become known from practice, a stove device built with your own hands from clay is in no way inferior to its brick counterparts. Recently, clay has been used as a binder to hold masonry elements together. Nobody builds a stove entirely from clay mortar anymore. At the same time, the quality of the binder material is still checked for fat content.
- 3 liters of clay are placed in a convenient container and filled with water. The lumps are kneaded with your hands, and the resulting composition is stirred with a paddle. If the solution begins to stick strongly to the paddle, it means that the clay has a high fat content and therefore you need to add sand to it.
- If the funnel is covered with separate clots, then the binding material for the solution is normal and there is no need to add sand to it.
- In the case when the veselka is evenly covered with a thin clay composition, the clay is considered thin and must be diluted with a fattier analogue.
I would also like to note that there is no need to rush into adding certain components to the solution, so as not to achieve the opposite effect. Make a fat solution from a lean solution or vice versa.
Checking the consistency of the solution using planks
This method can be called the most accurate for determining the quality of clay, and it consists of a number of simple manipulations.
- Half a liter of clay is mixed with water to a consistency reminiscent of tight dough and kneaded with your hands until the lumps are completely dissolved. A ball with a diameter of 5 cm is rolled from the resulting solution.
- The resulting ball is placed between two smooth boards, on which slow pressure is applied, gradually squeezing the clay.
- Compression occurs until cracks form on the ball. With this method of testing, the fat content of the clay is determined by the nature of the cracks formed and the degree of compression of the ball.
If a thin clay composition was used to make the ball, then at the slightest impact on it, it breaks into pieces. A ball of clay with a fatty consistency, when exposed to external influences, begins to crack when it decreases by 1/5 from the initial volume. Normal clay, rolled into a ball, begins to crack when squeezed to 1/3 of the initial diameter. But a clay ball that is too fat cracks slightly when it loses more than half of its original volume.
Clay is an earthy, soft rock that, when water gets into it, becomes plastic and homogeneous and can take on any shape. And when fired, such material becomes hard like stone.
Other ways to test clay for fat content and plasticity
If you roll a flagellum from clay with a high fat content, when it is smoothly stretched, it will become thinner, and after breaking, pointed ends will form in its place, and when bent, cracks will not form.
Normal clay, when rolled into a flagellum and stretched, begins to gradually stretch and, at the moment of losing 20% of its thickness, breaks off abruptly. At the same time, when bent, the flagellum becomes covered with minor cracks.
In turn, if skinny clay is used for the flagellum, it breaks off at the initial stage of stretching. Moreover, if you start to bend such a flagellum, it immediately cracks or breaks.
If you repeat the procedure of squeezing the ball or stretching the flagellum repeatedly, you can determine with sufficient accuracy the quality of the clay, on which the service life of the furnace will depend. During testing, you need to experiment with different types of clay, diluting it with sand. Only the selection method can correctly determine the consistency of the clay mortar for laying the stove.
I would like to note that, according to experts in the kiln industry, if the mortar for laying bricks is thicker, then this will not greatly affect the quality of the final building. If the solution, on the contrary, is oversaturated with sand, then everything is much more serious. If the solution is too thin, the stove laid on it will simply fall apart during operation.