Construction of a furnace always requires care and compliance with all technological requirements. This is especially true for the design of a bathhouse, since the stove is considered its most important part.
The main tasks of a homemade metal stove are to heat water and air. The stove heater can be:
- closed;
- open.
Of course, in a closed structure heat is retained much longer. However, to achieve the desired temperature in the steam room, more fuel and time will be required. For infrequent visits, professionals advise installing a closed heater in the bathhouse.
The steam room heats up much faster in an open type heater. However, if you splash water on the stones, it begins to cool quickly.
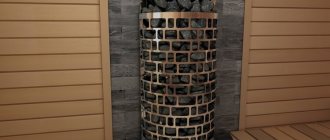
The steam room always contains solid stones with rounded sides.
What is the difference between a metal stove for a bath and a stove in a sauna?
The main difference can be called the vaping temperature. In a sauna it can reach 85 degrees, and sometimes much more. This temperature does not allow high humidity. A person may get severely burned.
Therefore, the humidity in the sauna is always maintained at no more than 5–15%.
In an ordinary Russian steam room, the temperature is in the range of 55–65 degrees. Very rarely it can reach 70 degrees. For this temperature, the humidity value is specially raised. It is in the range of 50–60%.
To solve such problems, you need an appropriate approach to the construction of the furnace. For installation in a sauna, it is necessary that the stove body be in contact with the surrounding atmosphere as much as possible. Air flows must move at high speed along the walls.
The main task is to quickly heat the steam room to the desired temperature. The sauna itself usually has a small open-type heater mounted above the firebox.
Heating of stones in such a furnace reaches only 200–250 degrees. The surrounding air picks up a lot of heat. This type of heater can only create a small amount of steam. This is quite enough for a sauna. One ladle of water will give 15% humidity. A person will not be able to tolerate its greater significance.
The task of an ordinary Russian steam room is completely different. The main thing is that there is a lot of steam. It is very important to achieve its certain state. It should look like small drops. This type of steam is called “dry”. It has a high temperature, approximately 130–150 degrees. A person, finding himself in such conditions, feels a powerful surge of strength. To get such steam you need to heat the stones above 500 degrees. To do this, they are lowered deep inside the firebox, with a closed heater installed. All the differences described above must be taken into account when building a furnace.
Brick sauna stove
Before building the furnace, you will need accessories - a combustion door, a blower door, an ash grate, a valve. If you are making a stove for a Russian bath, you need a door for the heater. In principle, there is no particular difference in the construction of stoves between these types of baths.
A sauna stove can be used as a sauna stove if you heat the stones very hot and do not add steam. This is achieved by longer heating.
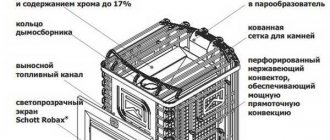
The water tank for heating water in the design of the sauna stove in the figure above is placed separately, which reduces the dimensions of the stove itself in plan (63x102 cm) and allows you to select the volume of the tank depending on the need for hot water. The height of the tank must be installed in such a way that hot water from it flows by gravity into the taps for filling the bath basins and showers.
To obtain additional steam, a steel pipe is built into the oven. It is located in the lower part of the furnace, which allows steam to be supplied near the floor of the steam room, warming up the coldest lower layers of air.
In the oven, immediately behind the firebox, there is a convective zone in the form of a short smoke circulation, thanks to which hot flue gases heat the bottom of the oven. Then, rushing up the chimney, they heat the water in the steel pipe, and therefore in the tank, and only when relatively cooled down, they escape into the atmosphere through the chimney.
Cobblestones are heated by direct exposure to fire. They are placed in a cast iron pan.
The oven has a simple design.
- In the lower part there is a firebox, under it there is a blower hole.
- Above there is an outlet for smoke and a widening - the beginning of the heater. The heater acts as a smoke circulation system. Thanks to the large number of stones, the number of them, and the many passages between them, she copes well with this.
- Usually the volume of the heater is at least 0.1 cubic meters, of which half is filled with stones. Stones can be mixed with metal - pieces of rails, railway shoes. This will only increase the heat capacity of the heater. If the volume is smaller, you should think about one smoke circulation in the stove design. You shouldn’t get carried away - one turn after the heater is enough.
- The heater must be closed with a door with a convenient handle.
- Then comes the chimney.
- A water heating tank is often located on the side of the stove; it is desirable that it has a capacity of at least 100 liters.
Changes can be made to the design. For example, direct smoke either through a heater into a chimney, or through smoke vents or a hog to quickly heat a large amount of water with a minimum of firewood. Thus, the heater will be both a sauna stove and a laundry stove alternately, depending on the type of firebox.
The easiest way to quickly heat water for washing is to take stones from the heater with tongs and throw them into a barrel of water. The stones should only be granite and not too heavy. You can even boil water this way.
Having drawn up a rough plan of the furnace and completed the sequential layout on checkered paper, they begin to build the foundation.
The foundation is necessary for heavy furnaces. Usually a slab foundation is made.
- At the site of the future furnace, the entire plant layer is removed. Dig a hole 30 cm deep.
- Crushed stone is poured down in a layer of 10 cm. After this, a layer of sand is added 10–15 cm, the sand is compacted and leveled.
- A concrete slab is poured onto the sand below the floor of the bathhouse by 7–8 cm, the size of the future stove. The pouring is carried out using wooden formwork; after three days, the formwork can be removed and masonry can begin.
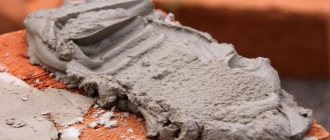
Laying begins with laying an asbestos-cement sheet - flat slate. It is laid on a mortar screed and leveled. The first row of the heater is laid on top of it - already on a clay mortar. The most convenient way is to buy a ready-made dry mixture for laying stoves in the store and simply dilute it with water. If you want to prepare the solution yourself, here is the recipe:
- Look for good clay first. Loam will not work. It is best to dig up the clay and freeze it for the winter. Once it melts, it will become more pliable. The clay needs to be soaked for two days with an equal volume of water. Then it is wiped through a 3 mm mesh. This is done on a mesh frame. Wet clay quickly seeps through the frame when lightly pressed with a trowel. Small pebbles remain at the top. They are always present in clay; this is a serious problem in stove masonry.
- After this, the pureed clay is mixed with fine sand. They do this in a ratio of approximately 1:1. The finished solution should be squeezed in your hand until it forms a tight lump, and your fingers should be reflected on it. When dry, it should not crack or fall apart. If it is cracked, add a little sand; if it crumbles, you need more clay. The solution is stirred to such a state that it can be spread with a trowel on the brick, like on bread, in a layer of approximately 5–8 mm.
The laying is carried out in accordance with the sequential layout. Each row is checked by level, the verticality of the corners is checked by level and plumb. It is necessary to fill the seams very well, tap each brick with a small rubber mallet weighing 100 g on all sides.
There is no need to chop bricks - it is better to use a grinder with a diamond wheel. According to the standard, the thickness of seams when laying stoves should be 5–10 mm, the average thickness of a seam is 8 mm.
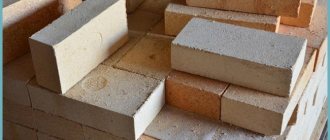
The brick must be of the highest quality. To lay the firebox and bottom of the heater, refractory bricks and refractory mortar are used. The brick is slightly different in size from the usual one, the mortar is made from fire-resistant blue clay and fire-resistant sand. But it’s easier to buy the appropriate mixture.
Since the refractory brick is slightly larger than usual, the seams need to be made a little thinner. Without this, you will not be able to get straight corners and ligation of seams.
The chimney is laid out from high-quality bricks. When crossing the floors, fluffs are made. They make an otter on the roof. You can lay it on ordinary brick mortar, but for a sauna stove I would lay it on clay before the first fluffing - the temperature in the steam room may be too high.
At the top it is necessary to make a deflector and protection from precipitation. This can be done from both brick and tin.
After the chimney is ready and 2 weeks have passed, you can proceed to the first firebox, as described earlier. But before this, it is necessary to line the bottom of the stove with iron so that it does not blow from the basement. Sometimes this is done at the beginning of the laying - they lay galvanized sheet metal, bent at a corner with a bend, in the first row of bricks, and nail it to the floor.
The tin must be adjacent to the stove at a distance of at least 5 cm below the firebox.
Do-it-yourself heater, video:
Dimensions of the heater
If the insulation of the bath was done in accordance with the technological process, then the volume of the steam room will affect the number of stones. There are several sources that recommend using a certain number of stones. On average per 1 cubic. meter there are 20–40 stones. In fact, the more stones you use, the faster you can get the desired volume of steam. However, one condition must be met. The oven power must be sufficient to heat them.
The main problem that has to be solved is the density of the stones. Each breed has its own. Therefore, the same mass may differ in different volumes. An average steam room, with a volume of 12–14 cubic meters, is well heated by a heater with dimensions of 30x40x30 millimeters. Depending on the design of the furnace, these values may vary.
To make such a thermal calculation, you need special knowledge and experience. It is much easier to use ready-made drawings in which certain proportions have already been calculated. In principle, at a minimum, the volume of the firebox in which the heater is not installed should not be less. Ideally, it should be even 30-50% more.
Cleanliness is the key to a healthy microclimate!
First, regardless of the stove you choose for the bath, you need to clean up the room where it is located. Actually, after each procedure, the floors are washed and the remaining leaves are swept away. You need to clean up especially carefully around the stove itself. Immediately before the procedures, the room is ventilated for half an hour.
Any stove in a bathhouse is an individual mechanism. Even despite the external similarity and the same functionality. This is characterized by the fact that each stove maker approaches work in his own way. According to this, almost all of them are heated differently, but the principle of operation is the same.
There are certain rules for kindling, compliance with which will allow you to avoid unpleasant situations, such as:
- carbon monoxide poisoning;
- getting heatstroke;
- possibility of fire.
Preparatory stage
Before starting the bath ritual of lighting the stove, let's prepare it for this. Using a special scoop, empty the ash chamber (in common parlance - the ash pan), as well as the grate part. Remains of combustion products are removed from the premises. Then we prepare firewood (preferably birch) and store it at a safe distance from the stove.
Examine the heater. If it is open, rinse with water. But only if this was not done before during 5-6 bath rinses. We check the water supply in the boiler and, if necessary, replenish the missing part.
It is imperative to determine the presence of traction. We completely open the ash pan, the combustion door and the damper on the chimney. We light a match and bring it to the door. Everyone knows how to determine the presence of traction from school lessons and personal experience in lighting street fires. If everything is in order, we proceed to the following procedures. If there is no draft, you need to check the chimney. The reason for the absence may be clogging of the pipe with ash, bird nests (and they love to huddle in such places) or a malfunction of the deflector on the chimney .
For ignition you will need paper or you can use special flammable mixtures, but not gasoline. If for some reason you forgot to purchase them, follow the old “old-fashioned” method - split off the birch bark from the logs - it burns well, no worse than newspaper sheets.
Next, you need to select 4-5 dry, small logs and chop them into small wood chips. If there are none, use an ax to split the wood blanks. Now we’ll make a “seed” on the grate to ignite the fire faster. To do this, follow these steps:
- We place two logs on the grate parallel to each other, with a gap of 10 cm, immediately behind the first ash holes;
- between them we pour kindling: paper or birch bark;
- pour a small mound of wood chips on top of them;
- We press it all down on top with two more logs, placing them in the opposite direction relative to the first two pieces.
Let's make a fire
This procedure was also performed by every man. In this case, it is necessary to observe safety precautions. It’s easier if there are tiles on the floor in the bathhouse; they don’t burn; on wooden floors, you need to be careful and prepare water just in case.
Use matches to light paper or whatever you use for ignition. We wait 2-3 minutes until the fire “takes up” thoroughly and close the stove door. After 4-5 minutes, when the wood burns, you will hear the characteristic hum of the flame. We cover the vent, but not completely, but leaving a small gap, and open the valve to the water boiler.
That's it - the wood has caught fire, now you need to turn up the heat to heat the bathhouse.
You need to start adding firewood after 10 minutes, when the logs laid first begin to burn. Open the door, use a poker to slightly level the heads of the grate, and throw in 5-6 logs. Don't try to push them deep into the oven. The ends should be located immediately beyond the outermost border of the grate. Depending on the type of stove and its dimensions, you will need a different amount of firewood. But in any case, put enough to fill the space by two-thirds.
The job is done - all that remains is to wait for the temperature to rise to the required level. Again, depending on what the bathhouse is built from, its dimensions and the correct insulation, the time intervals for this will need different.
You can repeat the procedure for adding firewood, depending on how long you will be washing. Check the combustion of the stove periodically. When the firewood “settles”, level the coals over the internal space, and again throw in a few logs.
After complete warming up, you need to constantly maintain the temperature. Close the valve on the pipe slightly. When the bathhouse is thoroughly heated, there is no point in constantly adding firewood. Just level the coals on the grate and enjoy the procedures.
In winter, when the temperature drops, throw in a few pieces of wood to keep the fire burning. 3-4 logs are enough for the coals to engulf them in flames. Don't overdo it with firewood. Coals from birch logs give no less heat to the stove than an open flame.
How do you know when the sauna has warmed up?
This question is asked by all those who first encountered lighting a stove. Having correctly completed the above steps, you need to wait about two hours. Then we go into the steam room, open the door and ventilation, fill a ladle with warm water and splash it on the heater. When the oven is heated, the water will immediately evaporate, producing a sharp hissing sound. In this case, it is better to turn away, because with the first supply of water, a layer of ash will fly off the stones, falling on them during kindling.
Now we close all the windows and ventilation, splash another ladle of water on the heater and set off to prepare for the “sacred procedures”. While you are collecting bath accessories, the steam room will warm up thoroughly. When starting to steam, open the ventilation, but not all the way, so that the cold air does not “drown out” the still fragile streams of hot steam. After about an hour, you can open the vent a little more.
Where should the stone container be installed?
It has long been known that the temperature reaches its maximum in the upper region, near the back wall. This is where it is best to install such a container. The furnace roof will experience less thermal stress, and the stones will heat up well. The heater requires constant maintenance. Water must penetrate inside. The hatch intended for servicing must be located in a place where the furthest edge can be reached.
Water must be supplied deep into the heater without causing a burn. One or more tubes are inserted into the heater, which completely cover the entire container. A funnel is inserted into each tube lined with stones. When water is supplied to the tube, it begins to quickly cover the surface of the stones, and its rapid evaporation occurs.
Firebox
The firebox is made first. Dimensions are determined individually. Experienced craftsmen recommend that if the width reaches 50 cm, create a similar height. A homemade sauna stove should include the use of ready-made metal parts such as grates and doors.
It must be said that it is better to use steel parts, since cast iron products are distinguished by their fixation.
In a standard design of a metal furnace, a firebox has two sections. The first is intended for burning fuel. The second will collect ash. Therefore, they are separated by a grille and separate doors are installed.
Very often, the window of the section in which the ash is collected is used to increase the draft required to create normal combustion.
If the design of a metal sauna stove shows the installation of a heater, the upper section of the firebox should also be made of a grate.
Important! To build a stove, it is better to take thick sheet metal. The structure will be stable and will not be damaged by strong heat. It will generate a lot more heat.
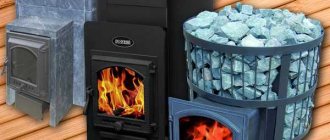
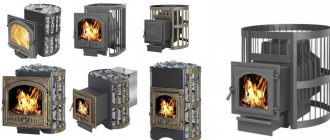
Metal sauna stoves
Metal sauna stoves are usually divided into two types - cast iron and welded steel .
Cast iron stoves for baths
Cast iron sauna stoves can only be purchased. However, you can make many additional elements for them yourself. For example, sauna stoves with a water tank are not always available for sale. You can make the tank yourself and lean it against the wall of the oven.
The main thing is that it is not the wall of a firebox or heater - in this case the stones will not heat up well. The water will heat up quickly and will have a temperature of 60 to 90 degrees. Quite enough for comfortable washing. More information about the tank for a cast iron stove will be discussed later.
Most often, metal stoves are solid fuel. They use coal or firewood to create heat, or less often peat briquettes.
Wood-burning sauna stoves do not require any special devices in the firebox if they are not used very often. But a metal firebox is not suitable for coal - it needs to be lined with refractory bricks.
It will be better if, in any case, the iron sauna stove has a lined firebox. This will extend its service life.
Steel stoves for baths
Do-it-yourself sauna stoves from metal can only be made welded. This means that you will need at least a welding machine, and better yet, the ability to perform welding work. If you do not have these skills, you can invite a welder.
You will also need material. The best option for furnaces would be boiler iron with a thickness of 5 to 10 mm. It is not recommended to use thinner iron - the stove will quickly become unusable, first the firebox, then the turns and the chimney.
Mediocre welding quality is the main defect that metal furnaces can have. It is rare that anyone can carry out welding normally with their own hands; it is advisable to contact a suitably qualified specialist.
If you succeed in welding the stove, try welding the tank. It should not have leaks. The tank must be equipped with a hole with a lid at the top for filling water and a tap at the bottom. The hole should be convenient to clean the tank through. The lid should fit tightly.
The faucet should be positioned so as to drain as much water as possible from the tank, that is, the input should be as low as possible. It is also advisable to make the faucet removable for cleaning. That is, only a fitting is inserted into the tank, to which the faucet is screwed. It is most convenient to use a ball valve.
Metal sauna stoves may have a hot outer surface. Touching such a stove will result in burns. It is imperative to install a protective screen made of brick , which will protect people in the bathhouse from touching the stove. Or simply position the stove so that only the heater goes into the steam room - but in this case, heating will suffer, the stove will not give off heat to the room if its surfaces do not go into it.
A chimney for a metal sauna stove is also usually metal. It can be made from pipes, welded. But when starting the fire, especially in a cold bath, the stove will smoke poorly and flare up. It makes the most sense to make a chimney from a sandwich pipe system. Such systems are commercially available. If you can’t buy them, first warm up the chimney by burning the splinters in the stove for at least half an hour, and only then start heating the stove properly.
Homemade metal sauna stove project
This design was developed for a steam room, with dimensions of 2x3x2.3 m. 3 mm sheet metal was used for welding.
To improve combustion, the connection of another air duct coming from the outside was specially designed. Another technological solution was stiffening ribs. These corners are welded on the sides, to the upper section of the firebox. When strong heating occurs, the metal will not begin to bend.
Another diagram shows a metal furnace where air is supplied to the upper section of the firebox. These structures are called “afterburners”.
A metal plate is welded to the back wall. A gap forms between the welded plate and the wall. Tubes are inserted into it, through which air is supplied under the grate.
This simple device helps solve two problems. First of all, the rear wall is intensively cooled and protected from burning.
The second positive point is the supply of already heated air. This area contains very hot flue gases. Approximately 80% of them are considered flammable. When these gases combine with hot air, flammable substances ignite.
The temperature of the upper section of the firebox increases significantly. The stones are heated to a very high temperature. Moreover, if you use dry firewood for this, you will need much less of it.
Most long-burning stoves operate on this principle. This method began to be used for sauna stoves several years ago.
Exactly the same model, without afterburning, has a slightly different format. There are no dimensions in the drawing, but it is much easier to understand what proportions are needed and how the various parts are located.
Do-it-yourself sauna stove, drawings
Before you start making a sauna stove with your own hands, it doesn’t matter from metal or brick, you need to take care of fire safety measures. According to the rules, the distance between the stove and combustible structures must be at least 25 cm. A space must be allocated for the stove in accordance with these requirements.
Often the stove is installed in a bathhouse with an external firebox . The firebox is discharged into the dressing room. There should be at least 25 cm from the walls of the dressing room to the stove; this gap is usually laid with bricks and asbestos tape or two cords are placed between the wall and the brick, then plastered.
This installation has a number of advantages.
- You can light the stove without opening the door to the steam room. Then it will be much hotter, especially if Finnish sauna stoves are used.
- The second factor is that there must be a metal sheet in front of the firebox . If you put it in a steam room and place the firebox there, the metal sheet will be heated by the steam room air. When you step on it, you will feel intense heat, which is quite unpleasant. This reduces the area of the small steam room, since you have to go around the sheet. Therefore, taking the firebox to the dressing room or washing area is the right decision.
If it is a light brick or metal stove, you can mount it directly on the floor. This is how stoves are installed that create a specific pressure on the floor of less than 150 kg per square meter. If the stove is too heavy, you need to make a foundation.
The foundation should be laid at a depth below the freezing level. Since the basement of the bathhouse is usually warm, the place is protected from the winds and periodically warms up, the ground underneath does not freeze. Therefore, you can place the stove on a shallow slab foundation.
The area of the slab is determined so that a pressure of no more than 200 kg per square meter is exerted on the ground. It is determined based on the weight of the stove, foundation and chimney.
More details about a kiln with a foundation will be discussed in the section on building a brick kiln.
Before starting construction, you should finally decide which stove to choose for your bath. To do this you need:
- Make a drawing.
- Determine how much materials and stove fittings will be needed and purchase them.
- Fit the stove into the overall plan of the room.
- Find an artist.
If you plan to do everything yourself, the latter is not required. If you can only do part of the work, choose a specialist who can do the rest.
Metal stove equipped with a water tank
This design works great. The “spark arrestor” increases the path of movement of flue gases. They stay in the firebox much longer, and the heating of the walls improves. Instead of a tank, you can put stones.
The option looks quite interesting when the tank is installed in the rear area of the stove.
The chimney moves back. It goes straight through the tank. Since the height of the tank is quite large, the efficiency of heat removal increases. The design of the heater is also of interest. Its dimensions are not significant, but for a small steam room this is quite enough.
The process of closing the lid is inconvenient. It can only be done from a certain side. It is very difficult to close the lid when water has been supplied to the heater. A plus is ease of maintenance.
Types of sauna stoves
Sauna stoves are classified according to several criteria. The first priority is the material of manufacture. You can make 3 practical types yourself:
- Fired brick oven.
- Metal stove.
- Combined stove made of metal and brick.
Since ancient times, brick has been the main material for such structures. In addition to the fact that a brick sauna stove creates a unique cozy atmosphere, it retains heat longer than other varieties. When building it, you will have to face some difficulties: it is necessary to make a separate foundation that is not connected to the base of the bathhouse, and also take into account the size of the masonry - not all rooms are suitable for brickwork.
Making a stove yourself from metal is a little easier. Such designs in the bathhouse take up little space, are quickly installed, and do not require large expenses. Of all metals, steel is preferred. Cast iron retains heat longer, but is poorly resistant to sudden temperature changes.
By surrounding a steel stove with brickwork, it will be possible to increase heat accumulation, protect bathhouse visitors from infrared radiation and give the metal structure a more aesthetic appearance.
The ideal healing microclimate in the bathhouse will be created only by those stoves that are heated with wood. Sometimes they create models with energy sources such as gas, diesel fuel, electricity, etc. The steam room can contain the entire stove or just a heater with a tank for heating water. Which stove to make for a bath is better and more profitable - everyone decides for themselves.
We make a stove for the sauna
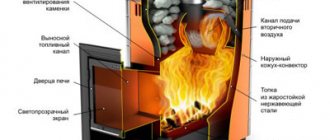
The main task of such heating devices is the speed of obtaining the required temperature, as well as the ability to constantly maintain it. The simplest solution is to install a fan. Due to the blowing of the walls, the temperature will increase.
The convector casing has a similar function. In other words, it is a body wrapped in a shell. A gap of approximately 1.5–2 cm appears between the firebox and the casing. Air is sucked into the gap from below.
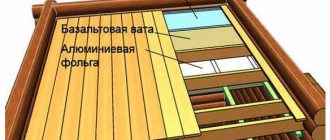
It moves along the walls and begins to heat up, simultaneously cooling the walls. Then he starts to rise. Soft warmth begins to spread throughout the entire area of the steam room. If thick metal was used for the furnace body, it is allowed to make the casing from a thinner sheet. It will not heat up very much, so burning of the walls is excluded. If the heater will be located at the top, directly above the firebox (see photo), a hole is made in the body so that the heater can be ventilated. Part of the air flow rising along the walls will begin to flow directly into the heater. The laid stones will receive additional airflow and heat up even more. This heater is called “ventilated”. It is very good to use in dry air saunas.
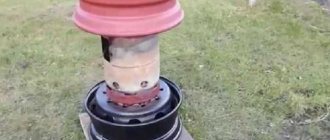
Metal pipe stove
A very good sauna stove can be made from a metal pipe.
Metal pipe stove
First step. Cut a meter-long piece of pipe to make a heater.
Second step. Cut a 70cm piece of pipe for the water tank.
Homemade stove made of metal pipe
We make a chamber for stones from a piece of pipe
Making a sauna stove from a pipe
Third step. Closer to the bottom of the heater pipe, cut a blower hole measuring 6x20 cm.
Fourth step. Weld a metal plate to the top edge of the blower hole.
Fifth step. Make holes in the welded plate to fix the grate.
Sixth step. Cut a hole in the center of the pipe for the firebox.
Pipe sauna stove
Seventh step. Weld curtains and door latches.
Pipe sauna stove
Eighth step. Fix a pipe with a diameter of 300 mm above the firebox by welding, perpendicular to the wall of the combustion chamber. This will be a heater.
Ninth step. Fill the stove's heater with stones.
Tenth step. Install a smoke exhaust pipe.
Almost finished stove from a pipe
Eleventh step. Approximately 15 cm above the heater, install a water tank with a tap and a removable lid.
Twelfth step. Remove weld marks using a grinding wheel.
To further increase heat transfer and safety, you can line the finished metal stove with bricks.
When determining the height of the chimney, keep in mind that on the street it should rise above the roof by at least 50 cm.