Proper construction of a chimney is a process as serious as the construction of the stove itself.
DIY brick chimneys
The extent to which this work is carried out correctly and accurately, the owner will protect his home and household members from fire or carbon monoxide poisoning. Therefore, the construction of this element must be taken very seriously and everything must be done as correctly as possible and according to the instructions. You can build brick chimneys with your own hands if you have experience in this work, but if it is unfamiliar, it is better to entrust it to a professional. If you are not confident in your abilities, it is better not to start.
Types of chimneys
Chimney pipes made of brick can be of two types: root and mounted. In each case, one of them is selected for construction, the one that is suitable for a particular furnace.
- Main chimneys differ from mounted chimneys in that they are not built as a continuation of the stove structure, but autonomously, next to the place where the stove will be installed, and then connected to it with a pipe.
Typical root chimney
This chimney structure is suitable for cast iron and brick heating devices, and even two or three stoves can be connected to one main chimney. Naturally, in this case, its internal cross-section must correspond to the necessary parameters for a certain number of heating devices connected to it.
If a main chimney is installed, to which a pipe from a cast-iron stove or gas-powered boiler will be connected, then it may be necessary to install a metal pipe inside the chimney duct.
The main chimney is installed on a foundation separate from the common building and stove. The depth of the foundation pit should be at least 30-50 centimeters, depending on the height and width of the chimney, and its perimeter should be 12-15 centimeters larger than the base of the chimney structure.
- The chimney pipe is a continuation of the stove design and is an integral part of it. Such a pipe is intended to remove combustion waste only for one furnace, of which it is a continuation.
Overhead type chimney
Chimney placement methods
There are two ways to place a fireplace chimney - internal and external. The first involves installing a pipe to remove smoke and fuel combustion products in the room or in the wall of the room (if it has a shaft provided for during construction).
The second method is to install a pipe outside along the wall of the house, when exhaust gases and smoke are removed from the fireplace through a standard chimney. It is connected by a transition elbow to a horizontal pipe running through the wall. The elbow is connected to a tee onto which a chimney pipe leading upward is installed.
We recommend that you read: How to make a manifold for polypropylene pipes?
Both methods of placing a chimney have their advantages and disadvantages. The internal arrangement protects the structure from temperature changes in winter and also reduces heat loss. The disadvantage of placing the pipe indoors is the loss of valuable square meters.
Outdoor placement is more rational in terms of space saving and fire safety, but with this arrangement, condensation often forms in the pipe due to temperature differences.
Components of a chimney
The principle of construction of both types of chimneys is the same, but if two or three stoves are connected to the main pipe, it may have several risers and several cuts, the number of which will depend on the number of floors of the house.
Parts and sections of the chimney
In this figure you can see all parts of the chimney structure, which consists of the following elements and sections:
- The stove neck is the part of the chimney that runs from the stove to the butcher. A smoke valve is located in it, which will regulate the draft necessary for the intensity of combustion or smoldering of the fuel.
- Pipe cutting or fluffing is arranged at the pipe passage of each floor, and is intended to protect flammable floors from high temperatures. It has thicker walls compared to other parts of the smoke exhaust duct. Its thickness should be at least 35-40 centimeters, thus creating an insulation of 20-25 centimeters along the entire perimeter.
- A pipe riser is a brick pillar with a smoke exhaust duct inside. It is located both before cutting and in the attic floor.
- Otter - this part is located immediately above the roof and protects the pipe from moisture - rain, snow, condensation, etc.
- The neck of the trumpet rises immediately above the otter.
- The otter having a platform, a neck and a protruding cap together make up the head of the pipe.
- A cap or umbrella is attached to the top of the cap to prevent various contaminants and moisture from entering the channel. This device is also capable of creating normal draft in the chimney channel.
Choosing material for constructing a chimney
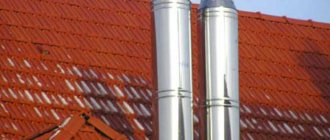
Currently, most chimneys are built on the basis of a metal pipe made of stainless or galvanized steel. Occasionally, structures based on brickwork are found, mainly in old houses.
In new residential buildings, brick chimneys are just an imitation of masonry: they are based on the same metal pipe, simply lined with brick on the outside.
If owners want to get an authentic brick chimney, they need to choose a special type of material.
It is important! For contact with hot air, smoke and exhaust gases, you need a special refractory brick that can withstand temperatures up to 700 degrees.
In addition to metal, ceramic and glass chimneys are also used. Ceramics have a long service life - from 30 years and above, but the cost of such a design is several times higher. Glass chimneys are also an expensive option, usually found in designer fireplaces.
We recommend that you read: Features of the use of fittings made of stainless steel
Most home or cottage owners prefer a stainless steel metal pipe when installing a fireplace. This material is more affordable, is resistant to corrosion and high temperatures, is lightweight and easy to install.
Chimney laying
Scheme
The first thing you need to do is to carefully read the chimney diagram and understand how each of its rows is laid. You can choose one of many diagrams - preferably the one on which everything will be extremely clear. When laying a regular brick stove, the order for a standard brick chimney is suitable.
One of the most common chimney arrangements
Construction of the superstructure
When installing the top pipe, the laying of the furnace structure itself ends 50-60 centimeters before the ceiling, and then the actual construction of the chimney duct begins. This diagram shows two options for laying a chimney: square and rectangular.
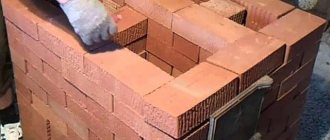
- According to the scheme of the first row, the neck of the chimney is erected before cutting. In each subsequent row, the bricks are laid in such a way that the middle of the brick overlaps the seam between the bricks of the previous row.
Having laid out three or four rows according to this pattern of the first row, the removal of the fluff of the pipe begins.
This is what the fluff looks like...
- The figure of the second row clearly shows that the bricks are laid with a shift to the outer side by one third of the brick. To perfectly fit the piece material, you will have to use the division of a solid brick into two or three parts lengthwise or crosswise.
... and this is her order
With all this, you need to remember that the chimney channel must maintain its original cross-section, since the point of thickening its walls is to increase the safety of the closure during operation. Moreover, the narrowing or expansion of the internal cavity can negatively affect draft during combustion.
- The third, fourth and fifth rows of fluff are also laid out with a shift to the outside, maintaining the lumen of the channel.
- The sixth row is the same size as the fifth row and is laid out flush with the outer and inner edges of the smoke channel wall.
- The seventh and eighth rows are laid out according to the pattern of the first row.
Having finished laying the fluff, you can move on to working on the otter, and here you need to try very hard, since each row forms another step and protrudes outward, by one third.
Otter order
- The first row is laid the same size as the last row of fluff.
- From the second row they begin to lay out the first step, and the chimney expands to the outside.
- Next, following the diagram, the remaining eight rows are laid out.
After completing the laying of the otter, the neck of the pipe is laid out, which is laid out according to the scheme of the first row to the top two rows of the cap, where the brick is also laid with a protrusion to the outside.
How to insulate a chimney for a fireplace
Unfortunately, there are situations when you get a ready-made house with a fireplace already built. Of course, I do not advocate breaking down the built chimney and moving the chimney for the fireplace inside the house. But in order to avoid future troubles, you can try to rectify the situation, or minimize the risk of the chimney cooling down and the occurrence of reverse draft.
What can be done? It is unlikely that anyone will decide to additionally line the outside of the fireplace pipe with brick in order to achieve the minimum required thickness of 64 centimeters and make it heat-intensive. Therefore, it is necessary to sheathe the outside of the chimney with insulation along its entire length.
It is better to leave the chimney for the fireplace brick and not line it. It happens that a liner is a necessity, for example, when the chimney is made of slotted bricks, there is a lack of density or the cross-section of the chimney is uneven - there are narrowings and expansions. In this case, when lining, do not use a “sandwich”; use only single-circuit pipes. The chimney for the fireplace must receive heat from the walls, and the “sandwich” will deprive it of this heat. If fireproof insulation of the chimney wall from the room side is necessary, then there is no need to wrap the entire chimney - limit yourself to just this wall.
Place the fireplace chimney as close to the roof ridge as possible
Rule two . The chimney for the fireplace is located as close as possible to the ridge of the roof. The less it sticks out of the roof, the shorter the section of pipe located on the street, the better. With the onset of cold weather, a “battle” of warm and cold air for the chimney will begin. The smaller the chimney is in the cold zone, the less likely it is that cold street air will “win” and reverse draft will occur.
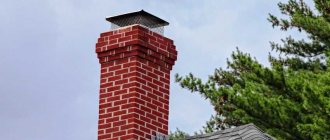
The best material for a chimney is brick
Rule three. The best material for a chimney is brick. If you want to protect yourself 90% from backdraft from the fireplace, make a chimney from solid red brick. Even if the fireplace insert manufacturer insists on pipes of a certain diameter along the entire length of the duct, it is better to make a brick chimney with the cross-section as close as possible. Such a chimney can already be connected with an iron pipe.
The main thing is not to sleeve it to the top. All statements by manufacturers of so-called “sandwiches” (a double-circuit pipe with insulation in the middle) that their pipes are “warm” are not so. Everything is exactly the opposite. The presence of insulation in the pipes is not enough to be considered “warm” pipes. This insulation is absolutely useless as protection for the chimney from the cold. Its main role is fire safety.
The sandwich does not heat, but only retains heat
To make it clear, we can take a fur coat as an example. As you know, a fur coat does not keep you warm. Its main purpose is to hold the body emitted by the human body. That is, you need a heat source, otherwise there will be nothing to keep. The same thing happens with sandwiches. They do not heat, but only retain heat, acting as thermal insulation for the outgoing internal warm air. The thing is that when the fireplace is burning, there are no problems with backdraft.
When a fireplace is lit, the temperature in the chimney is such that no frost can stop the draft. This means that at the time of combustion it does not matter what material the chimney pipe is made of. The main state of the fireplace is inactivity. It sits idle most of its life. Therefore, how “warm” a “sandwich” chimney is should be assessed precisely at the moment the fireplace is idle.
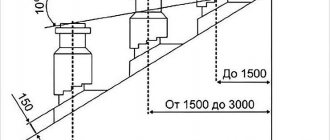
Height of pipe above ridge
The chimney pipe should rise above the roof ridge by half a meter if it is located one and a half meters from it horizontally.
The relative position of the pipe and the roof ridge
If it is located lower along the slope, it is raised level with the ridge or lower no more than 10 degrees at an angle to the ridge. These parameters must be strictly observed, as they ensure the safe operation of the heating structure and have been tested by many years of experience.
Another, somewhat simplified version of the chimney
Another option for laying a chimney could be a simple straight design. It is suitable for those who have no experience in performing this type of construction.
- The entire chimney, from the stove to the head, is laid out in an even column with a channel inside, and all the elements necessary for it are made using formwork, cement mortar and reinforcement with a metal rod with a thickness of four to seven millimeters.
- In the area where the fluff should begin, formwork of the required size and shape is arranged.
- A metal rod or mesh is secured to the pipe.
- The formwork is coated with a thin layer of clay mortar. It is needed so that the formwork boards can be easily removed from the hardened concrete solution.
- Then the concrete solution is placed into the formwork and left until it hardens completely.
- After the cement has hardened, the formwork is removed and all concrete parts, if necessary, are leveled to give them a neat appearance.
In this way, the complexities of masonry configurations can be circumvented. Of course, this work will take much longer, but it is impossible to make a mistake. The main thing is to arrange the formwork correctly, neatly and evenly.
Waterproofing the passage
After completing the laying of the cap, you can install the umbrella and begin waterproofing the pipe passage through the roof.
Approximate diagram of chimney waterproofing
Waterproofing is a very important point in the design of a chimney, and the durability and efficiency of its operation depend on it.
The distance created between the pipe and the roof must be covered with an apron. Most often, roofing material is used for these purposes, which is fixed to a sealant.
On top of this layer of waterproofing is an “apron”, which is made from a wall profile or from a special waterproofing tape. It is also attached to the roofing material using sealant, and fixed to the pipe with a strip designed for this purpose.
"Apron" for the chimney pipe
Chimney
Options for installing a chimney for a fireplace stove
The installation of a chimney is a prerequisite, since as a result of combustion, gases, smoke, and ash are released, which are completely undesirable to observe in the room. Therefore, this part of the design of a stove-fireplace for a summer residence must be equipped with special responsibility.
The most acceptable option is a vertical chimney, and its height should be more than five meters. This way, the necessary traction force will be provided. The chimney can be made of brick; this option is more outdated and less efficient, however, its use is justified if the stove itself is made of brick.
But you can modernize it - install a metal pipe inside, this significantly reduces the accumulation of condensate.
Today, stainless steel sandwich pipes are most often preferred. Their design consists of two pipes with different diameters, the smaller one is installed in the middle, and between them there is a layer of insulation - basalt wool. That's why they got the name sandwich. You can also use pipes made of single-layer stainless steel or corrugated options. The latter are often placed in an old brick chimney to improve its performance.
Advice from experienced professionals
In order for the chimney system to work efficiently, you need to follow some recommendations that professional stove makers always take into account.
- When laying brick rows, be sure to carefully select the excess mortar that will protrude into the chimney channel. These surfaces must be very smooth so that as little soot deposits settle on them as possible.
- The binding of bricks in the brickwork of a chimney requires special attention, since in such a design a large number of not whole bricks can be used, but their halves, plates, third or fourth parts. In order to evenly cut or chip off bricks, you can use a grinder (grinder). If you file the desired part with it, it will be easier to separate a fragment of the required size. The plates that are needed in some rows of masonry will have to be sawed off completely, since such thin parts can simply break.
- The seams in the chimney masonry should not be too thick - their thickness can be four to five millimeters. This must be observed because the mortar, even in a frozen state, is more susceptible to destruction when exposed to external factors than hardened brick.
- And, of course, a very important measure when servicing a chimney during its operation is its timely cleaning or periodic preventive maintenance to prevent clogging.