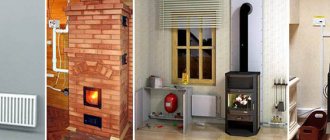
In non-gasified areas, stoves, solid fuel equipment or long-burning boilers are used for heating. The latter differ in design and operating principle. The main feature is that they provide long-term heating with a small supply of raw materials, because... generate heat not only from fire, but also from smoldering or combustion of pyrolysis gas. Using the diagrams and drawings, you can make a long-burning coal boiler with your own hands.
A do-it-yourself long-burning solid fuel boiler is often used to heat country houses.
Types of devices and their characteristics
Heaters are of the following types:
- Classic. Oxygen is pumped into the furnace using a fan. This allows you to regulate the intensity of heat production.
- Top burning. Characterized by lower efficiency. A special feature is the large firebox, in which the combustion of raw materials occurs from top to bottom. In this case, the heat load is distributed evenly, but the water heats up slowly.
- Pyrolysis. Characterized by high efficiency. Energy is generated not by burning fuel, but by smoldering gas. It continues to burn in another compartment, providing long-term heating.
- Mine. The combustion chamber is arranged vertically and occupies half the area. Combustion of raw materials starts from the bottom. The upper layers of coal gradually sink, mixing with ash, which ensures slow smoldering.
Equipment design and device
Inside a large-sized appliance, the main part is occupied by the combustion chamber. Its size affects the volume of the filling and the duration of burnout of the raw materials. The larger this compartment, the higher the performance. This should be taken into account when choosing a unit for heating a large area.
Each variety has features in its internal equipment. Among the people, the most popular devices are those of the Buleryan type, which have the following device:
- Cylindrical metal body. Inside the double walls there is a water cushion that serves as a heat exchanger.
- Fuel chamber. Located at the bottom.
- Pyrolysis zone for gas afterburning.
- Door for stowage. Mounted at the top of the firebox.
- Branch for connection to the chimney. Carbon monoxide escapes through it.
- Ash pit. Located at the very bottom. Serves to clean soot that spills through the grate.
For Buleryan to work properly, it is necessary to ensure complete tightness of the ash section. It does not serve, as is customary in ovens, as a blower. Air enters only through the upper chamber. To regulate its supply, a valve is installed there.
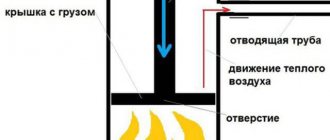
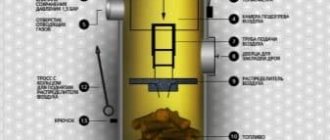
Construction of the Buleryan furnace.
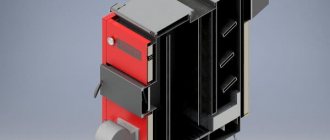
The classic version of the boiler has a rectangular shape, but has a similar structure.
A cast iron or steel heat exchanger is installed inside, heating the water, which then circulates through the pipes and is supplied to the hot water circuit. The control unit is installed on top to protect it from dust. A fan is also installed there, forcing air into the combustion chamber.
Build process
The process of creating a boiler includes several stages. When manufacturing each element, it is worth taking into account the special operating conditions of the product being manufactured.
Air supply device
We cut a section from a thick-walled pipe with a diameter of 100 mm, the length of which will be equal to the height of the firebox. We weld a bolt to the bottom. From a steel sheet we cut out a circle with the same diameter as the pipe or larger. We drill a hole in the circle large enough to pass the bolt welded to the pipe. We connect the circle and the air duct pipe by tightening the nut onto the bolt.
As a result, we will get an air supply pipe, the lower part of which can be closed by a freely moving metal circle. During operation, this will allow you to regulate the intensity of firewood combustion and, consequently, the temperature in the room.
Using a grinder and a metal disc, we make vertical slits approximately 10 mm thick in the pipe. Through them, air will flow into the combustion chamber.
Housing (firebox)
The body will require a cylinder with a sealed bottom with a diameter of 400 mm and a length of 1000 mm. The dimensions may be different, depending on the available free space, but sufficient for laying firewood. You can use a ready-made barrel or weld the bottom to a thick-walled steel cylinder.
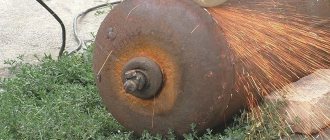
Sometimes heating boilers are made from gas cylinders for a longer service life.
Chimney
In the upper part of the body we form a hole for the removal of gases. Its diameter must be at least 100 mm. We weld a pipe to the hole through which the exhaust gases will be removed.
The length of the pipe is selected depending on design considerations.
Connecting the housing and the air supply device
We cut a hole in the bottom of the housing with a diameter equal to the diameter of the air supply pipe. We insert the pipe inside the body so that the air vent extends beyond the bottom.
Heat Dissipation Disc
We cut out a circle from a metal sheet 10 mm thick, the size of which is slightly smaller than the diameter of the body. We weld a handle made of reinforcement or steel wire to it.
This will greatly simplify the subsequent operation of the boiler.
Convection hood
We make a cylinder from sheet steel or cut a piece of pipe, the diameter of which is several centimeters larger than the outer diameter of the firebox (body). You can use a pipe with a diameter of 500 mm. We connect the convection casing and firebox together.
This can be done using metal jumpers welded to the inner surface of the casing and the outer surface of the firebox, if the gap is large enough. With a smaller gap, you can weld the casing to the firebox around the entire perimeter.
Lid
From a steel sheet we cut out a circle with the same diameter as the firebox or a little larger. We weld the handles to it using electrodes, wire or other available means.
Considering that the handles can become very hot during operation of the boiler, it is worth providing special protection made of material with low thermal conductivity.
Legs
To ensure long burning, we weld the legs to the bottom. Their height should be sufficient to raise the wood-burning boiler at least 25 cm above the floor level. To do this, you can use various rolled products (channels, angles).
Congratulations, you have made your own wood-burning boiler. You can start heating your home. To do this, just load the wood and light it by opening the lid and heat dissipation disk.
Principle of operation
After loading and igniting the fuel, the flap is tightly closed. The fan pumps in oxygen, which stimulates the combustion process. When the set temperature is reached, the air flow stops. A minimal amount of oxygen passes through the natural ventilation system, which supports the smoldering process and prevents coal or firewood from extinguishing.
The sensors react to a decrease in temperature during cooling and, if necessary, send a signal to the automation to start the fan. The process is repeated.
In a homemade heater, the oxygen supply is manually regulated using a damper.
Are there any negative reviews about the long-burning solid fuel boiler?
Sometimes consumers leave negative reviews about designs, but they are more likely related to the general disadvantages that are inherent in solid fuel devices in general.
Various types of fuel can be used
The following disadvantages can be identified:
- for fuel storage it is necessary to use special rooms or structures;
- In any case, fuel must be loaded manually, despite the reduced number of loads;
- when installing any models of solid fuel boilers, special safety measures must be taken;
- It is impossible to regulate the fuel combustion process in the combustion chamber with particular precision.
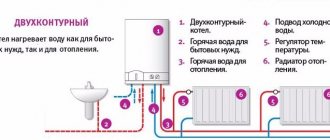
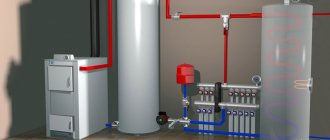
Boiler installation diagram in a water heating system
Note! There are quite a lot of disadvantages, but still solid fuel boilers are the only way out of a situation when gas and electricity main lines are unavailable.
Fuel loading cannot be automated
Selection criteria by type
Heating appliances can operate on coal, pellets, wood chips, wood, and peat.
Homemade boilers operate on any fuel, which simplifies their operation for owners.
Main selection criteria:
- power;
- volume of the combustion chamber;
- duration of work on one load;
- features of installation and connection to the system;
- control;
- operating and maintenance rules.
You can make a classic pyrolysis boiler yourself, with top or bottom combustion (mine). To install units that ensure autonomy, you need to have skills and experience.
It is easier to assemble a device like Buleryan, which does not use a control unit or automation.
Useful tips for creating a boiler
All homemade heating systems work on the same principle: fuel burns and releases energy to the coolant. Most often, ordinary water is used for these purposes. The appearance of the equipment and its design features should depend on the availability of building materials and a certain type of fuel in the region.
What affects the efficiency of a homemade heater
Before you start assembling the device, it is worth finding out what primarily affects its efficiency.
There are two main factors:
- The larger the surface area of the heat exchanger, the faster the coolant will heat up.
- The fuel must burn for a long time and be completely used by the boiler. If the design of the device is flawed, the boiler will require more wood and produce less heat.
To ensure that no problems arise during the operation of a homemade device, even at the stage of developing the circuit, you need to take into account all the subtleties of its manufacture.
Advantages and disadvantages of the device
Advantages of solid fuel equipment:
- high efficiency (90%);
- economical coal consumption;
- reliability;
- availability, interchangeability of fuel;
- unpretentiousness to the quality of raw materials;
- autonomous work.
In the future, the device can be further developed and improved to increase productivity and automate processes. And if you assemble it yourself, you can save money, because the cost of materials is much lower than the average market price of the finished structure.
A solid fuel boiler is an environmentally friendly option for heating a home.
Flaws:
- large dimensions;
- the need to comply with the requirements for the organization of the boiler room;
- complex device;
- regular maintenance.
Step-by-step production of a solid fuel boiler with your own hands
Of course, it will not be possible to make an industrial water boiler with your own hands with 100% efficiency, but even simple self-produced equipment will meet the requirements of the heating system if you follow all the rules and details of assembly and installation.
Tools and materials
For work, the master will need the following set:
- welding machine;
- grinder with cutting and grinding disc;
- electric drill and metal drills;
- gas key (No. 1-2);
- hammer;
- spanners or open-end wrenches, screwdrivers;
- pliers;
- 90 degree square;
- steel sheets with a thickness of 5 mm for the boiler and 7 mm for the grate;
- steel corners 50x50 for the boiler frame;
- sheets of steel for the storage tank (it is better to take stainless steel);
- thick-walled steel pipe or set of pipes with a diameter of 32-50 mm for the heat exchanger.
Features of manufacturing the housing and heat exchanger
The body of the steel unit will act as a combustion chamber, therefore, to reduce the risk of deformation of the walls when heated, the structures must be made of two layers. Clean, dry sand is poured between the sheets, which will maintain shape stability and eliminate possible risks of deformation.
Gas heating boiler for a private home and its structure
The shells of the housing inside and outside must be framed in order to increase the rigidity of the product, and to increase the strength of the walls of the combustion chamber, they are sheathed on the outside with a steel angle or profile pipe, exposing the elements as stiffeners. The front wall must be equipped with two openings - one for the ash pan, the second for the stowage hopper door.
Once all the blanks for the housing are made, the heat exchanger can be manufactured. It will require cut water pipes, connected by welding so as to form a sealed circuit. The main requirement is to make the circuit so that the flow section of the coil is as long as possible - this will increase the heating area of the pipe, and therefore increase the efficiency of the unit.
Step-by-step instructions for making it yourself
In units with a lower afterburning compartment, it is necessary to connect automation and install a fan for temperature regulation. This makes them more difficult to assemble yourself.
It is faster and easier to manufacture equipment with an upper chamber.
Step-by-step instruction:
- The body will require 2 pipes with a diameter of 130 and 150 cm. One must be inserted into the other and welded using a 25x25 mm angle. The internal space will serve as a heat exchanger and pipes will be connected to the heating system.
- Cut a circle with a diameter of 45 cm and weld it to the bottom.
- At the bottom of the resulting barrel, make a rectangle for the ash pan door measuring 15x10 cm.
- Attach the sash and bolt.
- Above, cut a hole for the firebox door. Install it.
- Attach the grate bars.
- Make a pipe at the top. It serves to remove carbon monoxide into the chimney.
- Equip the lid. Cut a circle out of metal and make a hole in the center. Insert a pipe into it and weld it on both sides. Attach the corners to the bottom of the workpiece. They will distribute the air. Weld a loop on top that will become a handle for this damper.
- Attach the distributor to the firebox body instead of the cap.
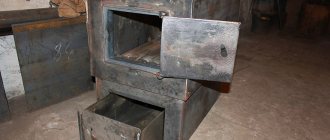
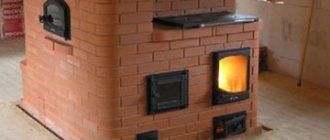
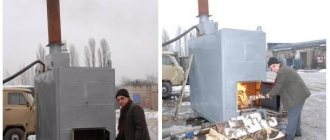
An example of step-by-step production of a homemade unit.
An empty gas cylinder is used to assemble the heater. It will become a body.
Operating principle of solid fuel boilers
The boilers have a modular design, consisting of several devices in one housing:
- heat exchanger;
- fireboxes with doors;
- grate;
- ash pan with a hatch for cleaning;
- thermostat.
The heating boiler works according to the following principle:
- Fuel is loaded into the chamber and set on fire. Firewood or alternative materials burn to form CO.
- The air temperature increases and gases rise higher into the chimney.
- Hot air currents, displacing cold ones, move through the heating network.
- As they move, the liquid in the heat exchanger heats up.
The inlet pipe is responsible for supplying water, and the return manifold is responsible for the flow of hot fluid into the radiators. It is recommended to equip both circuit connection points with temperature sensors.
Possible problems during construction and operation and their elimination
The heater must be installed on a concrete screed. Due to heavy load, another type of coating may sag and connections may be damaged. It is better to buy doors for the fuel and ash compartments. Homemade designs do not allow for tightness, which leads to incomplete combustion of raw materials, decreased productivity and a possible fire due to coal falling out through the cracks.
To ensure circulation of the coolant, you need to install a pump. To increase the service life of the equipment, it should be mounted on a return pipe.
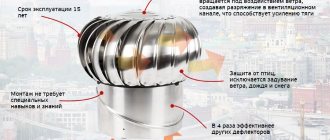
The chimney must be equipped with a damper. When closed, it prevents hot air from escaping, i.e., it reduces heat loss, slows down the smoldering process and increases heating time.
Boiler installation
You can install the device yourself. To use heating devices of this type, you do not need to obtain permission from utility services.
However, when performing piping and installation, it is important to consider the following points:
- The boiler cannot be placed on the floor; it is necessary to prepare a special foundation.
- It is recommended to protect wooden and frame walls located near the device with asbestos sheets or galvanized steel.
- The chimney must be located at a distance of at least 25 cm from the ceilings.
When installing the device, it is important to comply with all fire safety measures, because installation errors can lead to a fire during operation of the device.
Work order:
- Bring the device into the room, install it on the prepared foundation so that the pipes are flush with the chimney pipe.
- Secure the equipment to the foundation without distortion.
- Install the fan (if there is one) and connect the chimney.
Chimney connection
The easiest way is to make an external chimney of an attached type. In this case, the pipe is attached to the wall in a vertical position.
In a wooden house, it can be brought outside through the roof or wall using the following technology:
- Make a square opening in the roof (wall) 40 centimeters larger than the diameter of the chimney pipe.
- Install the passage unit, made in the form of a galvanized steel box.
- Pass a sandwich pipe through it and fill the remaining space with basalt wool.
- Secure the outer assembly cover.
How to check the unit before starting
Before installing the device, you need to test it. It's better to do it outside. During the inspection, loose connections and other defects will appear.
The boiler must be tested outdoors.
After connecting the unit, energize the pipe system by opening all shut-off valves. Then increase the water pressure to 1.3 atm and monitor the connections and taps throughout the day. If leaks are detected, you need to turn off the heater and eliminate the defects.
You can make a long-burning boiler yourself. To do this, you first need to study its internal equipment, understand the principle of heating, calculate and select materials based on the drawings. You also need to know how to operate a welding machine. It is better to mark and install parts according to the diagrams. When installing in a boiler room, starting and operating, it is necessary to observe safety measures.
About the cost of ready-made models for heating with solid fuel
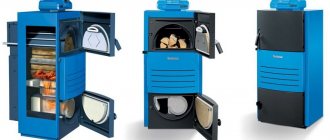
If it is not possible to make a long-burning boiler or there is simply no desire, then you can purchase a ready-made design. It must be recognized that models for heating large rooms will not be cheap. In the table you can see the prices for Stropuva boilers.
You can appreciate the stylish design of the Stropuva boiler
Table 1. Prices for Stropuva boilers
| Model | Power in kilowatts | Cost in rubles |
| S-8U | 8 | 70 000 |
| Stropuva S-8U | ||
| S-15U | 15 | 116 000 |
| Stropuva S-15U | ||
| S-20U | 20 | 123 000 |
| Stropuva S-20U | ||
| S-40U | 40 | 142 000 |
| Stropuva S-40U | ||
Stropuva S-40U
Related article:
Long-burning wood-fired boilers for the home. From this publication you will learn everything about wood-burning boilers, their types and nuances of use.
Although the price of the structures is quite high, with long-term use they are justified. The presented models have a fairly stylish design, so there are no problems with their integration into the overall design of the room.
The main advantages of Stropuva products