Home / Heating
Back
Published: 02/16/2020
Reading time: 6 min
0
1348
Wood-burning solid fuel boilers today are the best alternative to municipal heating systems.
Many people regard such units as something outdated and ineffective, although this is not at all the case. Modern wood-burning boilers are no longer those Russian stoves with low efficiency and high fuel consumption.
Their place has long been taken by long-burning furnaces operating on the principle of gas generation. Today, there are quite a lot of different modifications of long-burning boilers in the retail chain, but the important thing is that these simple units can be made at home, for example, a boiler from a gas cylinder.
- 1 Modern wood-fired heating boilers
- 2 Heat exchanger for wood-burning boiler
- 3 Fuel requirements
- 4 Features of the design and operation of the pyrolysis boiler
- 5 Long-burning boilers with a water circuit
- 6 Making a boiler from a propane cylinder with your own hands 6.1 Calculation of parameters: drawings and recommendations
- 6.2 Required materials and tools
- 6.3 Step-by-step instructions
Features of a long-burning stove
The first step is to understand what happens when wood burns. For a flame to appear, the temperature of the wood must be brought to approximately +150 degrees, using an external heating source. Usually, a piece of paper lit from an ordinary match is enough for this. After this, the process of slow charring of the material begins, which, after reaching +250 degrees, begins to decompose into simple chemical elements. The white smoke that appears when a flame is ignited includes gas and water vapor: they are emitted by heated wood. Ignition of the released gaseous components is observed when heating reaches +300 degrees: as a result of this, the thermochemical reaction is significantly accelerated.
The breakdown of organic matter into simple elements is called pyrolysis. Practice shows that during the combustion of wood, part of the energy potential inherent in it remains unused. This is reflected in a significant amount of waste remaining after the flame goes out. In pyrolysis furnaces, fuel is used much more efficiently, which is achieved by separate combustion of gases released during fuel combustion. At the same time, the rate of smoldering of the wood itself is very low, which helps to increase the operating time of the stove on one stack. The Bubafonya stove, which is a type of pyrolysis heater, guarantees almost complete combustion of all fuel.
A little history
The development of the Bubafonya stove is attributed to folk craftsman Afanasy Bubyakin from Kolyma. Subsequently, a new invention was named in his honor. During his experiments, Afanasy relied on the design of the Lithuanian-made Stropuva pyrolysis boiler.
The domestic inventor tried to simplify the design as much as possible so that it could be built with your own hands. This specificity of Bubafoni explains its high popularity. Considering that the material for the manufacture of this device is mainly improvised means, it cannot boast of external aesthetics. The strengths of the stove are its simplicity, efficiency and reliability.
Design
The Bubafonya long-burning stove includes the following components:
- Frame . The main element of the device, usually shaped like a cylinder. It is most often made from cylinders, barrels, large fire extinguishers, thick welded pipes, etc.
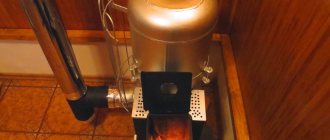
- Chimney through which combustion products are discharged. The material for its manufacture is usually a metal pipe with a diameter of 110-250 mm. It is fixed by welding to the upper part of the furnace.
- Piston . Ribs are welded onto the lower part of the metal circle: the air duct pipe is fixed in its central part. Due to the ribs, an additional layer of air is created that separates the fuel and the piston. This makes the smoldering process more efficient and stimulates the active release of pyrolysis gases.
- Regulator . Thanks to this valve, oxygen is supplied inside the firebox.
- Lid . It has holes for the air duct, forming, in combination with the piston, a secondary combustion chamber. Inside this compartment combustion of pyrolysis gases occurs.
How to make a gas boiler with your own hands
The manufacture of a gas boiler consists of several stages.
Project selection, drawings
Having decided to make a gas boiler yourself, find a suitable project with drawings . They should contain details about heating boilers, connections, cooling, chimney, deflector and other nuances.
Attention! Before you start manufacturing, have a good understanding of the drawings and find photos of finished circuits. Any inaccuracy or modification will adversely affect future operation.
During manufacturing, heat loss in each room where heating is planned is taken into account. Even in rooms with equal areas, heat transfer will be different.
Photo 2. Drawing of a wall-mounted gas boiler. The arrows indicate the components of the heating device.
Calculations are carried out with a margin of 10% , focusing on the actual sizes of objects.
Reference. The simplest way to calculate: for every 10 sq. meters of area requires 1 kW of energy. The calorific value of gas is 6.55 kW.
The amount of energy consumed by the boiler per day is divided by its calorific value and this is how the required volume of the boiler is obtained.
Thus, you need:
- calculate the entire hydraulic system;
- take into account the costs of the chimney, including the deflector;
- decide in advance on the diameter of the pipes;
- set the required pump power;
- calculate the system resistance.
Photo 3. Drawing of a gas heating boiler. The dimensions of the device and its components are indicated.
Materials
After choosing a project, the master calculates the amount of materials for the heating boiler. You cannot replace the mentioned metal with another to reduce the cost of installation: it may turn out to be softer, and this will render the structure unusable.
Materials for work:
- metal and gas pipes;
- steel sheet;
- doors for creating a firebox;
- brick;
- fittings;
- clay;
- moisture-proofing material (tar);
- cement;
- galvanized sheet.
Important! Some components, such as a thermostat or deflector, are easier to purchase from a specialty store rather than creating yourself.
What to look for when choosing purchased parts for gas boilers:
- It is better to choose programmable thermostats in order to control and regulate the boiler temperature with their help. Domestic analogues are not inferior to foreign models in quality.
Photo 4. Programmable thermostat for a gas boiler. Using it you can set the appropriate temperature.
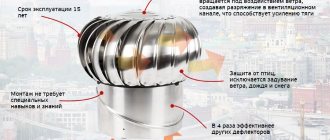
- The deflector is installed on top of the chimney pipe and provides exhaust . Suitable as a cone-shaped umbrella made of stainless steel.
- Automation includes: flame control module, overheat protection, draft controller, blast valve. For stable operation of the unit, all of the listed devices are needed.
Tools:
- welding machine;
- soldering iron;
- set of screwdrivers and keys;
- hammers;
- pliers;
- level;
- corner;
- roulette;
- welding tool;
- thermostat;
- automation;
- deflector.
Making a device, homemade heat exchanger
- The easiest way is to make a floor-standing gas boiler with your own hands, which is installed on the foundation. Therefore, first they dig a hole about 80 centimeters deep. Sand is poured onto its bottom, filled with water and allowed to soak. Then stones, broken bricks and gravel are laid out a little below ground level.
- The formwork with the frame is assembled and filled with concrete , and after a day it is removed. The place under the formwork is covered with gravel and sand and covered with moisture-proofing material.
- Lay out a wall of brick and cement composition , protecting the main wall from a heated gas boiler. The height and width of the brick wall are 10 cm larger than the dimensions of the boiler.
- Sheets are cut out according to the drawings , corners, tubes, and internal parts are prepared.
- The parts are assembled into a single system. Before this step, watch a video showing the process. Incorrect arrangement of components leads to inoperability of the structure. When performing welding work, we must not forget about safety: the master puts on protective gloves, a special mask and work clothes.
- A heat exchanger is made from a steel tank and a copper tube , thanks to which the water in the boiler is heated. Two holes are made at the top and bottom of the tank, corresponding to the diameter of the tube. The tube is bent into a spiral and inserted into the tank. Fittings are installed at the ends of the tube coming out of the tank.
- After assembly, the edges are cleaned and the unit is painted. The latter is done to prevent condensation from appearing during the cold season and the metal does not begin to rust.
- After installing the boiler, a chimney is welded to the side - a metal pipe of at least 20 cm , through which carbon dioxide will escape from the unit. A hole is cut in the roof and the pipe is raised 30-40 cm above the roof. The gaps between it and the roof are filled with mounting foam and mineral wool.
- An uninterruptible power supply is connected to the boiler . The stabilizer is attached nearby in a dry place where water will not get in. It should not be overheated or frozen.
Strengths and weaknesses of Bubafoni
The pyrolysis stove has a number of positive qualities:
- Simplicity of design . Having welding skills and experience working with metal, building a stove will not be difficult.
- Universalism . Bubafonya is very unpretentious in terms of fuel: you can throw firewood, coal, sawdust, chips and other types of wood waste into it. The stove also copes well with pellets – inexpensive, environmentally friendly granules.
- Duration of work . The time it takes for one stack of firewood to burn out is almost a day: during this time, the stove regularly generates heat. This indicator may vary depending on the modification of the device, the volume of its firebox, the oxygen circulation rate, etc.
It is also worth mentioning the main disadvantages of Bubafoni:
- Low efficiency . The reason for this is uneven heating of the device body with sufficiently low heat transfer. More “advanced” pyrolysis furnaces are much more efficient in this regard: their efficiency often exceeds 90%.
- Inconvenient to clean . There is no ash pan as such in the design, so the remaining combustion products are removed through the top. Some modifications of the stove are equipped with a door at the bottom, which facilitates the procedure for removing ash and ash.
- Low aesthetics . The appearance of Bubafoni can hardly be called beautiful, so it is mainly used for heating utility rooms.
Drawing up a drawing
The main proportion in the process of making a homemade Bubafonya stove from a gas cylinder is the mathematical ratio of the parameter of the internal diameter of the body and its height. It should be between three and five to one. The optimal diameter is from 30 to 80 cm.
Making the diameter of the stove body less than 30 cm is not effective, since oxygen will circulate too quickly through the combustion chamber without fully reacting with the wood. This leads to a noticeable decrease in the efficiency of the device. In chambers with a diameter of more than 80 cm, another problem arises - in it, the firewood on the edge burns very slowly, and in the center - faster. As the fuel burns out, a hole appears into which the piston descends. As a result, the flame gradually fades away. In the drawing, it is more convenient to denote the diameter by the letter D, and the height by H.
Bubafonya stove from a gas cylinder
There is also an option with industrial gas tanks of 40 liters: with approximately the same volume, they have a smaller diameter (25 cm), greater height and thicker walls. Operating a freon cylinder is much more difficult - it is both longer and heavier than a household 50-liter container. If you have the appropriate equipment, it can be shortened to 70 cm: a potbelly stove made in this way will have thicker walls. As a result, it will take more time and fuel to warm it up, but the stove will also take much longer to cool down.
Piston pressing block
The distance from the piston to the inner surface of the piston is calculated using the formula 0.5xD. To calculate the diameter of the pancake, accordingly, the formula d = D – 2xH is used. Calculating the height of the pressing ribs from a metal profile is more difficult, because The relationship between the parameter values is nonlinear. Theoretically, for a furnace body with a diameter of 60-80 cm, this parameter is taken as a number of 0.1xD. The Bubafonya stove from a smaller gas cylinder is calculated using a proportional equation, taking into account that with D0 = 30 cm h0 = 4 cm.
Options for increasing the room heating rate
In order to quickly raise the temperature in the room where a propane cylinder stove is installed, you can use the following devices:
- Regular fan . It is mounted in such a way that the forced air blows over the housing and the chimney. Craftsmen often go further, equipping the upper part of the cylinder body with through pipes, welding them into pre-designed holes. A heat-resistant fan is installed on one side of the improvised channels, capable of maintaining several speed modes: this makes it possible to regulate the temperature of the air leaving the pipes.
- Ventilation holes in the housing . In this case, additional activation of air flows is carried out without the use of a fan. To achieve this, a wood-burning gas cylinder stove is additionally “dressed” in a special casing, the surface of which has a series of holes in the upper and lower areas. Through the lower gaps, cold air is sucked in, which usually accumulates in the floor area. Blowing through the hot body, the air flows gradually heat up and exit through the upper slots into the surrounding space. Approximately the same operating principle is used in Buleryan stoves and sauna heaters.
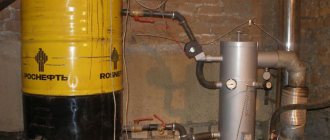
A simple water heating boiler can be made from a gas cylinder. To do this, a water jacket is installed around the finished pyrolysis furnace from a gas cylinder: from it, the heated coolant is supplied through pipes into the batteries. Such a system must have an expansion tank installed above the potbelly stove and radiators. Thanks to it, surges in internal pressure in the heating circuit due to the expansion of heating water are compensated. Since we are talking about a primitive boiler without any adjustment, cases of water boiling inside the system will occur quite often. The volume of the expansion tank is at least 10% of the total displacement.
Making a potbelly stove from a gas cylinder with your own hands is not a very complicated procedure. During operation of the finished device, one should take into account the fact that the temperature of its body can reach significant levels: this imposes additional requirements for the fire safety of the heated room.
Do-it-yourself potbelly stove - for the cottage and garage
The potbelly stove appeared more than a hundred years ago, and imitated the fireplaces used by the rich class. But it fulfilled its intended purpose flawlessly - there was always warmth in the house, and this warmth was cheap, since the stove could be heated with anything. To quickly warm up a garage, workshop or other utility room, such a stove is the most convenient and simple solution.
Pancake thickness
This value is in inverse proportion to the internal diameter D. It is necessary to achieve optimal piston pressure on the fuel filler. If the pressure is insufficient, this will lead to a decrease in the reverse action coefficient. As a result, the firebox may backfire with further smoke escaping through the chimney. If the piston is very heavy, this will significantly reduce the air gap necessary for high-quality combustion: as a result, the flame will die out.
The relationship between the internal diameter and thickness of the pancakes is approximately as follows:
- 30 cm – 6-10 mm.
- 40 cm – 6-8 mm.
- 60 cm – 4-6 mm.
- 80 cm – 2.5-4 mm.
Potbelly stove made of metal sheets
Let us present the features of making a stove from metal sheets that use different raw materials for heating: waste and firewood.
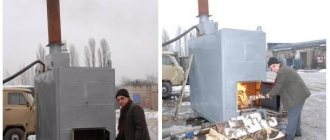
Furnace in production
To start working with your own hands, a metal sheet of about 5 mm is prepared (this is the width that allows the stove to quickly warm up and effectively heat the garage) and pipes (needed for the chimney and some other elements). For a more accurate understanding of the manufacturing principle, look at the drawing:
Drawing of a potbelly stove being processed
Let's get started:
- According to the given dimensions, you need to cut out the elements from the sheet from which the stove will be made. Try to clean up the cut edges as much as possible.
- The part for fastening the components of the potbelly stove is being prepared - a pipe with holes.
- Parts of the upper tank are prepared for installation of the chimney pipe. To do this, according to the data given in the drawing, you need to make a hole shifted to the left in relation to the cent. Also, another hole is made at the bottom of the tank (offset to the right) - it is intended for installing a connecting pipe.
- The component parts are welded together and a finished tank is obtained.
- The lower tank is welded in the same way. Only a hole is made to install the pipe in the center. You also need to make another hole with a slight offset - recycling will be poured into it. A special sliding lid is made over the filling hole.
- The lower tank is attached to the upper one (they are welded to the connecting pipe). Strengthen the structure using brackets.
- Don't forget to weld the legs to the lower tank.
- To increase service life, the stove is cleaned and painted.
You connect the potbelly stove to the chimney and try to heat the garage. To do this, pour fuel into the lower tank and set it on fire. When it flares up, you need to close the processing hole with a sliding lid.
Rectangular wood stove
Drawing of a rectangular potbelly stove
This option is suitable when you need to heat a garage or bathhouse rooms intended for relaxation.
The features of the model, the manufacture of which we will describe with our own hands further, are high heat transfer and the ability to adjust the traction force.
Our oven will have dimensions 45x45x80. These dimensions are enough to heat an average room. It will hold long pieces of wood and is easy to move.
In this case, we will not provide a specific drawing, and will try to explain it in words as much as possible. Before starting work, we buy:
- Steel 3-4 mm thick. A sheet of one and a half by two meters will be enough.
- A piece of pipe. Choose with a diameter from 90 to 100 mm. Length: 0.4 m.
- Reinforcement 16 mm. You need exactly 6.2 m.
- Five kilograms of electrodes.
- Four door hinges.
- A steel rod, half a meter long and about 10 mm in diameter.
- Seven meters of corner with a 40 mm shelf. The walls should have a thickness of 5 mm.
When everything necessary is prepared, we begin to work with our own hands in the following sequence:
- The future walls of the structure are cut out of the sheets.
- The corner is welded in such a way as to form a frame. When performing this and the first point, you need to remember the above dimensions of the stove (45x45x80).
- The reinforcement is cut and welded to the frame at intervals of 2 cm.
- The finished frame is scalded with tin.
- Along the diameter of the smooth rod in the section of the pipe that will be the chimney, you need to make 2 holes. The pipe is welded to the frame (before this you need to make a hole for it).
- A curved rod is inserted into the chimney holes. It should be shaped like a right angle. A piece of round tin, slightly smaller in size than the internal diameter of the chimney, is welded to it - it will be used for adjustment.
- The potbelly stove must have doors. They are cut directly from the body. Loops are welded onto the removed piece of metal, with the help of which they are attached to the stove.
- The doors are equipped with bolts and handles, which can be made of any convenient type. The main thing is that they guarantee maximum fixation of the door (if you don’t want to burn down the garage).
- When the work is finished, you can check the result of the work with your own hands and start heating the garage.
Calculation of the optimal chimney area
When determining the smallest permissible area S, the pipes are based on the maximum energy release per hour. S(cm2) = 1.75 x E (kW/hour). Here E = m x q where m is the weight of one portion of fuel: it is calculated by multiplying the maximum volume of the load V by its density. The coefficient q denotes the specific energy of combustion of a unit volume of fuel in 1 hour.
Preparatory activities
Since constructing a Bubafonya stove from a gas cylinder will require a welding machine, it is necessary to find a suitable room for the work in advance. It must be equipped with effective ventilation, uninterrupted power supply and reliable wiring (as a rule, the use of welding provokes power surges in the network). The workroom must be well protected from climatic influences and have sufficient space. It is also desirable to have good sound insulation, since the grinder and welding machine are quite noisy tools.
You also need to prepare the following materials:
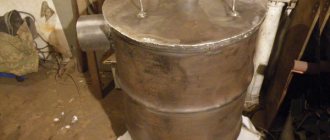
- Old gas cylinder. This is the basis for a pyrolysis oven. Also suitable for this role is a steel or cast iron barrel with a volume of approximately 200 liters, which has strong, rust-free walls. Often, large fire extinguishers or metal pipes with welded bottoms are used for this.
- Pieces of reinforcement. They will be needed to make handles, which are usually installed on the sides of the case and on top of the lid. This significantly simplifies the procedure for cleaning the stove from combustion residues and moving it from place to place.
- Steel sheet for piston.
- A pair of metal pipes. They are needed for the manufacture of a chimney and air duct. The optimal cross-section for the air pipe is 85-100 mm. Moreover, it is approximately 150 mm higher than the height of the cylinder. For the chimney you will need a wider pipe: its diameter must be at least 150 mm. The length of the smoke channel should not be less than the cross section of the cylinder.
- Channel.
- Material for laying the foundation for the stove.
List of tools required for work:
- Hammer.
- Vise.
- Shovel.
- Master OK.
- Portable welding machine with a set of electrodes.
- Grinder for cutting blanks.
- Tape measure, pencil, plumb line and level.
Selection and preparation of the cylinder
If we compare gas cylinders based on the volume/wall thickness/weight ratio, the best option is to make a stove from a 50-liter propane cylinder. Its height is 85 cm and its diameter is 30 cm. Thanks to the sufficient thickness of the metal, such a homemade stove will not burn out over several seasons of active use.
Choosing a cylinder for the stove
The manufacture of the furnace begins with the preparation of the cylinder. To eliminate the risk of gas residue exploding when cutting the cylinder, it should be properly prepared.
- unscrew the tank valve and leave overnight so that the gas evaporates;
- turn the cylinder upside down and drain the condensate into an unnecessary container;
- fill the container to the top with water;
- drain the water completely.
Read also: Copper ore largest basins
How to assemble a structure with a water jacket
The manufacture of the chimney is carried out in the following sequence of operations:
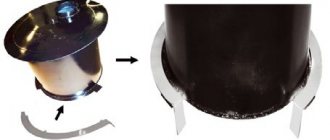
- Carefully cut the balloon at the top. The resulting cap is subsequently used to make a lid for the boiler.
- The bottom of the cylinder is equipped with homemade legs. Each of them must be exactly level before fixing.
The piston is constructed in three stages:
- A steel circle is cut out: in cross section it should be approximately 35-45 mm smaller than the internal diameter of the cylinder. Thanks to the side gaps, pyrolysis gases will leak into the secondary chamber without interference. A hole is made in the center of the circle for the air duct: this pipe should be inserted into it quite tightly.
- Next, the metal circle and pipe are welded to each other.
- A piece of channel is welded on top of the piston base.
To make a furnace lid, you can use the upper cut part of the cylinder. On its surface, markings are applied for the air duct pipe with a fixed supply piston. In this case, it is necessary to provide a certain margin for the free movement of the pipe. Cutting is done along the drawn lines. On the side, the homemade lid is decorated with handles, for which fittings bent in a vice are used. Now you can begin installing the chimney at the top of the improvised pyrolysis oven. Using a grinder, a cutout is made for the pipe blank: welding is also used to fasten the parts.
To increase the quality of chimney draft, it is recommended to make it from two elbows perpendicular to each other. To do this, a cut is made at the end of the pipe section leaving the furnace at an angle of 45 degrees, after which it is connected by welding to a piece of pipe of the same diameter. It would not be superfluous to take care of additional protection for the chimney from the ingress of debris and climatic precipitation - a reflective cap is usually made for these purposes.
At this point, the main part of the work on the construction of Bubafoni is considered completed: it can be put into operation. It is advisable to install the stove on a pre-arranged foundation.
We increase the efficiency of the furnace
A potbelly stove can heat a room in literally a matter of minutes.
Moreover, you can throw whatever comes to hand into the firebox: since it does not have an extensive network of chimneys, and the smoke in it comes out “directly,” you don’t have to worry about them getting clogged. But if a conventional heating stove installed in premises for permanent residence has an extensive network of chimneys that retain heat, in a potbelly stove it goes directly into the pipe, so its efficiency is not very high. That is why it is too “gluttonous” and requires a lot of fuel.
To reduce fuel consumption, you can use the following tips from experienced stove-makers:• firebox door and vent
in such an oven should be as airtight as possible;
otherwise, the air supply to the potbelly stove will increase, and the fuel will burn out too quickly;• to regulate the release of warm smoke in the chimney, it is advisable to provide a damper
;• next to the stove, you can provide
side metal screens
at a distance of 5-6 cm from the stove, in this in this case, it will heat the room not only through heat radiation, but also through convection (circulation of warm air); • a potbelly stove, “clad” in a metal casing, will help retain heat much longer;
Potbelly stove in casing
Round furnace with afterburner and casing with heat gun
• to retain heat in the room, elbows should be built up in the pipe; however, soot will be retained in them, so it is advisable to create a collapsible structure; • the pipe can also be given a stepped shape: arrange the elbows in stages, making a 30° turn with each step; in this case, each of the elbows must be securely attached to the wall with rods;
Stove with chimney elbows
• chimney capacity
should be less than the productivity of the furnace itself, in which case hot gases will not go into the pipe immediately;
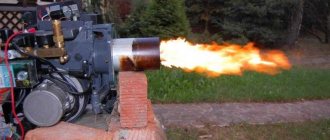
its diameter should be only 2.7 times larger than the volume of the firebox, for example, with a firebox volume of 40 liters, the diameter should be 110 mm; • you can increase the efficiency of the stove by blowing the chimney with a fan
- this will turn the stove into a kind of smoke cannon ;• to reduce air circulation,
firewood in the stove
should be stacked as tightly as possible;
if it is heated with coal, you need to stir up the resulting ash as little as possible; • to regulate the air flow, the door to the ash pit can be made adjustable by providing it with vertically located slots and a latch
.
strips of metal
can be welded onto its body perpendicular to the stove;• if you place a couple of
buckets or a metal box with sand
.
then they will accumulate heat and store it even after the stove goes out; sand backfill or a heat accumulator made of stones
can also be sewn inside the metal body of the furnace;
Scheme of a potbelly stove with sand backfill, the stove is made of a pipe with a diameter of 500 mm, its length is 650 mm
• oven lined with 1-2 layers of brick
. will retain heat much longer;
• the volume of the furnace also matters: the larger the area of its walls
.
the more heat they will release into the room;• bricks or metal sheet
. on which the stove is installed will help not only protect the room from fire, but also retain heat.
Related video: Do-it-yourself potbelly stove stove
8f772c3fed439782b7a382d3001fa981.jpe
Foundation construction
The foundation for the Bubafonya stove is laid in this way:
- The first step is to dig a square hole. Its approximate dimensions are 150x150 cm, with a depth of 20-30 cm.
- The bottom of the trench is covered with a cushion of crushed stone and filled with concrete solution. A trowel is useful to level its surface. When the filled area has set, it is necessary to check the horizontalness of its surface using a building level. If necessary, additional adjustments are made.
- Refractory bricks are laid in several rows on top of a completely dry concrete base. Usually 2-3 layers are enough.
Oven operation
Before igniting the Bubafoni, it is necessary to remove the welded air duct from inside the housing, first removing the top cap. Wood logs are placed inside the stove in a horizontal position, close to each other. When stacking vertically, some obstacles may arise in the path of the piston movement: this usually happens in cases where the logs are not completely burned. As a result, smoldering in the primary chamber will develop into full-fledged combustion, which seriously impairs the proper functioning of the stove. In this case, firewood is consumed much faster, and smoke begins to seep out of the air duct. When laying logs, it is prohibited to block the area where the chimney is welded.
A layer of chips, sawdust or chopped branches is poured onto the firewood. On top of them you need to put old cloth or paper soaked in kerosene. A piston is installed end-to-end on the fuel filler and a cap is put on. To light firewood, you need to light a piece of rags or paper and throw it inside through the air pipe. Matches are ineffective in this case, since they go out before they can reach the fuel. After lighting the firewood, pause for 15-20 minutes, allowing it to flare up well. When the flame gains strength, the valve on the air pipe should be closed: thus, Bubafonya is transferred to the main operating mode.