Unfortunately, we quite often see (simply paying attention to houses being built around us or as a result of examinations of problematic facades) that a fairly large number of building facades, especially in low-rise construction, are insulated with extruded polystyrene foam as the main insulation in the system of plaster facades.
This is facilitated by the aggressive advertising campaign of extrusion manufacturers, which claims the exceptional effectiveness of using Penoplex in “wet systems,” as well as the lack of technical and consumer information about insulation systems for potential buyers.
Why "Unfortunately"? Because extruded polystyrene foam is NOT INTENDED
for insulating walls in facade insulation systems with a thin plaster layer.
Description of material
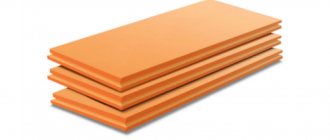
Before installing penoplex, you need to get acquainted with the main features of the material. It is important to know its characteristics and properties. Penoplex is extruded polystyrene foam. This material is produced using a certain technology. It is based on foam plastic. After heat treatment, the material becomes stronger and acquires high thermal insulation properties. They can significantly influence installation technology and determine the scope of application of the material.
These properties include:
- low degree of moisture absorption;
- smooth surface.
Due to the fact that penoplex has a smooth structure, the material can be used in adverse conditions. For example, penoplex is excellent for insulating facades. However, such material has low adhesion. This means that it is better not to use the material when performing “wet” work.
The biggest misconception among newcomers to the construction industry is the wrong choice of work technology. Many inexperienced builders work with penoplex in the same way as with simple polystyrene foam. However, this does not mean that you should not use wet technology at all when using new insulation. You can use a method that allows you to create a durable wall finish on top of modern insulation.
Beginners often want to know why not use simple polystyrene foam instead of penoplex? After all, it has a lower price, and its adhesion is much higher. First, you should pay attention to some advantages of penoplex:
- The material is highly durable, making the finishing layer more reliable.
- Penoplex is vapor permeable.
- It has low thermal conductivity.
Therefore, it is still worth using such material for “wet” work. For dry insulation of a house with penoplex from the outside, used to create a curtain wall, you don’t have to follow any special subtleties. Each of these methods is worth considering in more detail.
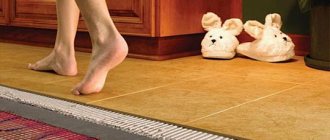
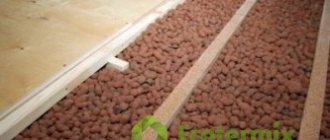
How to attach penoplex to the floor
For high-quality thermal insulation of the floor using penoplex, grade 35 sheets should be used. Insulation can be done quite quickly.
To work you will need:
- foam sheets;
- waterproofing material;
- cement mixture;
- level;
- mixture for screed.
The concrete floor is checked for defects. All irregularities should be eliminated. Cracks and potholes are sealed with cement. If the base of the floor is ordinary soil, then it is covered with crushed stone and sand, and then compacted and filled with concrete. When the surface has completely dried, insulation of the floor begins.
The floor is covered with a film for waterproofing. Adjacent pieces of film are overlapped and secured with tape.
Then the penoplex is attached to the floor. The sheets are stacked tightly. Work begins from the corner of the room.
In places where pipes or risers will come out, the penoplex is cut out. Then a special mixture for the screed is prepared. Penoplex is poured in a layer of 5 cm. Any floor covering can be laid on a dry screed.
Wet facade
First, you should figure out how you can insulate the walls of your house if you choose wet technology. It is this method that many people do not fully understand. The main advantage of this technology is the possibility of using it not only for thermal insulation of various buildings, but also for insulating apartments.
This solution allows you to make the appearance of the building more respectable. For several reasons, it is not worth using this technology to insulate wooden structures. Finishing of the facade using “wet” technology is carried out in several stages.
Preparation of materials
First you should prepare the materials necessary for finishing. At this stage of work, it is important to choose the right adhesive composition. It is better to use special foam for this purpose. In addition, you will need the following materials:
- glue with which plastering will be done;
- adhesive primer;
- corners;
- deep penetration primer;
- reinforced fiberglass mesh;
- dye;
- plaster.
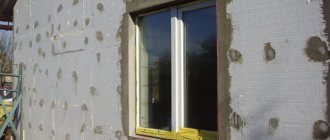
The facade should be insulated with penoplex with a minimum thickness of 50 mm. However, the slabs should be laid in two layers. After collecting the necessary materials, you can begin work. To properly insulate the outside of a house with penoplex, you must first carefully prepare the surface of the walls.
Preparing the walls
Before covering the walls with penoplex, you should carefully prepare them. This work should be performed in a certain sequence:
- First, the visors and antennas are removed.
- Then a solid foundation should be provided. However, if peeling areas of plaster are noticed, they must be removed.
- Now the walls should be primed. This work should be done with a paint roller. However, you can also use a brush for this.
The primer should be applied in a thin layer, evenly over the entire surface. When the walls are dry, the procedure should be repeated.
Penoplex installation
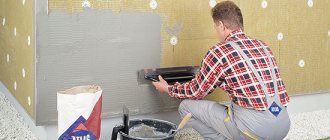
After completing the preparatory work, you should begin gluing the penoplex to the facade. The sequence of actions is as follows:
- First you need to install a startup profile. This way the bottom insulation boards are leveled. The profile is mounted on dowel-nails. During such work, it is important to place the profile correctly. For this reason, a building level is used during work.
- Then the foam adhesive is applied to the insulation sheet in the center and along the edges.
- Now the slab can be pressed against the wall.
- Thus, it is necessary to install the entire first row. It is better to try to place the plates more closely relative to each other. This will help avoid gaps.
- Now you can glue the next row. Its installation is carried out with an offset. The result is a kind of checkerboard pattern. The corners need to be bandaged.
- When all the walls are covered with penoplex, insulation should be installed on the slopes. For this purpose, the slabs are cut into panels of a certain size. Next, they should paste over all the openings.
- Then you need to secure the foam boards to the dowels. People usually call them umbrellas.
It is better to install dowels at joints. The hats should be buried in the material. The slopes are not fixed with dowels.
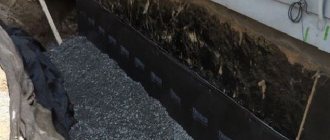
To ensure reliable insulation of a house, its foundation must be installed. In this case, it is necessary to follow a fairly simple technology. First, the foundation must be excavated. Next, it should be cleaned of dirt, and then covered with insulation. After such work, the foundation is buried.
Surface of the insulation material
Expanded polystyrene has a smooth surface. Therefore, it must be roughened for subsequent finishing. This work is performed in the following sequence:
- First, the surface of the insulation needs to be roughened. Sandpaper is used for this purpose. In addition, the surface should be used with a needle roller.
- An adhesive primer is applied.
- Next, the joints of the plates are filled with the previously mentioned foam glue.
- Perforated corners must be glued to all external corners. When installing corners, you must use a building level.
Now you can begin installing the reinforcing mesh.
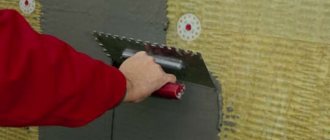
Reinforcement
External finishing of insulation begins with reinforcement. It is performed according to the following scheme:
- Reinforcement must begin from the slopes.
- Ceresit CT 83 glue is diluted in water.
- Then the resulting composition is applied to the slope.
- A mesh is applied to the slope.
- The reinforcement of the façade walls is carried out using the same scheme.
After reinforcement, finishing is performed.
Decorative finishing
Decorative finishing should be carried out in a certain sequence. It is important to follow certain rules. The operating algorithm is quite simple:
- First, the facade is treated with a primer. Then the surface of the walls is covered with a layer of plaster. The composition must be diluted in water according to the instructions.
- 5 minutes after the plaster has set, the surface must be rubbed with plaster powder.
- When the plaster is dry, use a paint roller. This finish should be two-layer. To ensure an accurate coating, all layers are applied evenly.
At this point, finishing the facade using the “wet” method can be considered complete. Knowledge of “dry” technology will help you figure out how to insulate a wooden house.
Procedure for insulating a facade with your own hands
Penoplex slabs have special recesses along the edges, allowing for reliable and strong connection of insulation fragments. In addition, this technique allows you to cut off cold bridges. Insulating walls using extruded polystyrene foam is as simple as insulating them using polystyrene foam. But the required amount of material will decrease noticeably.
To install a reliable and high-quality insulating coating for the facade of a building, you only need to strictly follow the facade insulation technology.
Preparing the wall surface
In order for the insulation of the façade of a building to be durable and have a significant service life, it is necessary to ensure maximum adhesion of the insulating material to the wall surface. This effect is achieved by proper preparation of the insulated surface. First you need to remove all types of existing contaminants, including dirt, dust and old facade coating. As a result of cleaning, only bare brick or concrete remains. Any vegetation - moss, mold, fungus - is also eliminated. For this purpose, specialized compounds with bactericidal properties are used.
After the walls have dried, all potholes and sagging found on the surface of the masonry are leveled. Cracks and seams are also treated with a primer solution, followed by sealing with cement.
The geometry of the walls is determined using a building level. If there are deviations greater than 20 millimeters, they are leveled by applying a layer of plaster. When it is completely dry (waiting period is up to 4 weeks), a primer layer is applied, which will promote better adhesion of the insulation to the wall. If there are metal elements on it that are planned to be hidden behind a layer of insulator, they are treated with an anti-corrosion agent. Once the primer has dried, you can begin the next stage of thermal insulation work.
Penoplex insulation
In the warm season, few owners think about the fact that it should be warm and cozy in winter.
Insulation of a house or apartment outside and inside is most important. Because it is not only warm, but also helps to enhance sound insulation and save money. Insulating walls with penoplex is the most common method for creating a cozy room.
This material has many positive aspects, but negative aspects are not excluded. Easy and quick installation, practically free of debris and dust - in a short time you can save money on payments and heat in the house.
Insulation of walls from the inside with penoplex
- Features of the work
- Advantages and disadvantages
- Insulation technology
- Preparatory work
- Preparation of penoplex
- Preparation of glue
- Installation instructions
- Decorative coating
Insulating walls from the inside with penoplex is the installation of an insulating layer on the partition from the side of the living area in order to conserve thermal energy. This type of thermal insulation is performed in exceptional cases when it is impossible to secure the material outside the building. We’ll talk about the rules for insulating internal walls in this article.
Peculiarities
Due to its advantages, penoplex insulates houses inside and outside. Feature of the material: does not rot, waterproof, has a long warranty period. Soundproofing can be considered an important point. Therefore, by insulating the walls, the house will become warm, quiet, which will bring coziness and comfort.
Can I replace it with foam?
Craftsmen recommend using extradiated polystyrene foam for insulation, because it has a denser structure. Due to this, cold air does not penetrate into the room. Compared to polystyrene foam, it does not collapse quickly.
Another feature of polystyrene foam insulation is its installation technology. You must do the work correctly, consistently, following the advice of the masters. Otherwise, cold air and extraneous sounds will penetrate into the room, and the insulation will be of no use.
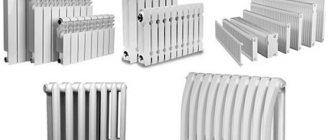
Penoplex is mounted on different surfaces:
- wooden base;
- brickwork (the material is not destroyed by the released alkali);
- concrete wall;
- aerated concrete, foam block.
Installation is carried out with your own hands only after reading the step-by-step instructions and nuances.
Outside
From the outside, most often, the façade of private housing construction is insulated with penoplex.
This keeps the house warm and there are no damp walls or traces of mold in the house. After all, when insulating walls, the dew point shifts only from the inside. Dampness and mold appear. The house becomes uncomfortable. In addition, due to constant dampness, the structure itself is destroyed. Installation of penoplex from the outside is carried out using two methods:
- On glue. The use of certain brands of glue preserves the durability and functionality of the insulation. For strength, the slabs are fixed with umbrella dowels.
- “Ventilated facade” - creating a sheathing from metal profiles or wooden slats. Insulation is placed in the resulting cells, and the facing material is mounted on the sheathing itself.
When decorating the façade of a building with polystyrene foam, it is possible to create modern decor and originality. Penoplex is covered with mosaic, decorative plaster, and other materials are used that create originality and difference from other houses.
Inside
If it is not possible to insulate the walls outside (the top floors of apartment buildings) or it is necessary to insulate the balcony, then penoplex is used indoors. There are both disadvantages and advantages here:
- If the insulation is installed incorrectly, condensation will appear, which will lead to negative consequences. Where the material touches the wall, mold will appear.
- When installing the material, the usable area of the room is reduced.
- All insulation work can be done with your own hands, without the involvement of a team of craftsmen.
- Properly fixed penoplex will keep the room warm and quiet.
- The material levels the walls.
- It is often laid under plasterboard structures.
For insulation, choose insulation with tongue-and-groove edges. This allows for end-to-end installation. PPS 25-RG-B slabs are mainly used.
There are different types of penoplex on the construction market. The name indicates where the material is used.
- "Roof". Waterproof appearance, density 28-33 kg/m3. This type is used to insulate a flat roof. They also insulate attics. Due to the lightness of the material, the structure does not bear additional load.
- "Wall". Used for external and internal insulation of buildings. Density 25-32 kg/m3. It is also used for insulation and soundproofing of partitions.
- "Foundation". 29-35 kg/m3. A special feature of this brand is its water resistance. They are used to insulate the foundations of houses and basements. They carry out thermal insulation of septic tanks that have a recess.
- "Comfort". 25-35 kg/m3. Insulation of balconies, loggias, walls inside the apartment. They install the material in baths and saunas.
- "The basis". The technical characteristics are the same as those of the Comfort brand, but it is more rigid and can withstand greater loads. A type of penoplex is used to insulate various load-bearing surfaces (floor insulation). It is also used in industrial construction.
- "GEO". Alternative to "Foundation". Used in industrial and civil construction work. Floor and foundation cladding.
- "Pitched roof". The thickness of the material is 10-15 cm. It is used for insulation of single-pitched roofs.
- "Facade". Thickness 2-10 cm. They are used to insulate building facades. It has a milled surface for better adhesion to the base.
- "Penoplex-45". 35-47 kg/m3. Used as a protective layer against low temperatures for various types of road surfaces (garden paths). And also for roofing.
Advantages and disadvantages of penoplex
Porous synthetic penoplex does not absorb moisture and insulates the room from sounds.
Choosing to lay penoplex on the floor under a screed has a number of significant advantages that have not gone unnoticed by professionals and private developers.
- Low thermal conductivity. This figure is several times higher than that of analogues, which makes it possible to lay slabs of minimal thickness on the floor and install a warm water or electric floor on them.
- Long service life. Various manufacturers provide a warranty of 40-60 years.
- Reasonable price. Petrochemical industry by-products are used as raw materials.
- Sufficient strength. The coating can withstand strong mechanical loads. You can lay laminate or parquet boards directly on it.
- Waterproof. The slabs do not absorb or allow moisture to pass through, creating a high-quality water barrier.
- Resistance to fungus and mold. Insects and rodents are not interested in the polymer.
- Environmental Safety. The insulation does not contain formaldehyde or other substances harmful to health.
- Excellent sound insulation properties. A layer of material of only 5 cm completely cuts off all noise produced at the lower level of the building.
- Low specific gravity. There is no additional pressure on the foundation, and installation of penoplex on the floor can be done without much effort alone.
Disadvantages include exposure to ultraviolet radiation, which must be taken into account when organizing the storage of slabs. Some brands do not have fireproof protection and ignite at high temperatures.