Most developers rent out houses with standard aluminum balcony glazing, which most often consists of cold glazing with an aluminum profile. This is due to the fact that the balcony is not a living space and, according to the standards, does not require additional insulation. This glazing option is considered cost-effective. If a tenant decides to arrange a living space on the balcony, equipped as a veranda, workshop or office, he needs to think first of all about insulating the aluminum profile.
Stages of insulating a profile with your own hands
Insulating cold glazing takes a lot of effort and time, but does not always give a positive result, since most often it is done incorrectly. The required stages of work are described below:
- preparation and cleaning of the profile,
- eliminating and sealing holes,
- window adjustment,
- replacing rubber seals,
- insulation.
Applying for permission to glaze a balcony
There is no clear legal regulatory framework on the issue of glazing balconies, so it is difficult to answer whether it is necessary to declare this and whether there is any point in the costly preparation of permits. Current legislation provides for a procedure for official registration of repair work in a number of authorities when redevelopment is carried out in apartments. Installation, dismantling, repainting and changing the configuration of balcony frames do not relate to reconstruction or redevelopment work, therefore the possibility of carrying them out and the legality of installation is determined by local officials or representatives of architectural services. Complaints to the owners may arise in cases where during the modernization the color of the entire profile frame or the shape of the window frames are changed.
Aluminum profile adjustment
The adjustment units are located under black PVC linings and at the ends of the sashes. A hex wrench is required for adjustments and settings.
Expert opinion
Konstantin Alexandrovich
Important! Using a hexagon, you need to turn it in one direction. This is enough to notice the result. After each rotation, it is necessary to close the window to understand whether an additional rotation is required or not. Only in this way will an inexperienced person understand whether a turn has been made in the right direction or not.
Problems and problems that even a beginner can cope with:
- To eliminate sagging, remove the decorative attachment from the hinges, tighten and lubricate the boots.
- If the handle breaks, you need to remove the panel at its base. Under this panel there are bolts, unscrewing which will allow you to remove the handle and replace it with a new one.
- Lubrication with industrial oil will extend the life of fasteners and ensure smooth operation of parts.
How to insulate correctly from the inside - step-by-step instructions
In a balcony room, three types of surfaces need to be treated at once. You should start with the floor, and then you can move on to the ceiling and walls. The procedure for each zone must be performed in a similar way, but there are some differences in the laying of layers.
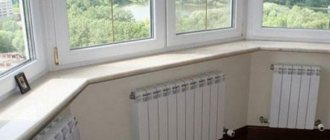
The heated floor consists of the following layers:
- Waterproofing - it is usually placed on a concrete floor, and polyethylene film is perfect for glazing a loggia.
- Logs are made of wood - I make them from timber, the size of which is 10*6 cm. The elements are aligned on a plane, and wedges and beams are placed under them.
- Thermal insulation material - a layer of insulation is laid in the space between the joists, and it is important that the layers fit tightly to each other, there is not a single gap.
- Vapor barrier film - a subfloor should be installed on it, for which you can even use ordinary plywood.
The final coating is laid on top of the last layer, but this should be done after all repair work has been completed. Otherwise, the floor may be scratched, stained, or even damaged.
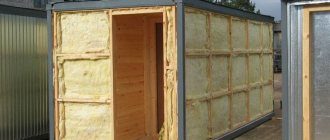
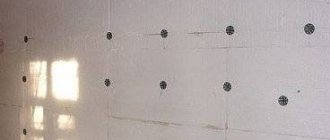
You begin insulating the surface of the walls by installing the sheathing. If the repairs are carried out in a panel house, then initially you need to make a continuous type of fencing, and only after that you can move on to repair work. The sheathing should be made of timber measuring 4*4 or 5*5 cm. First, you need to arrange the vertical elements and fix everything with dowels, and in the space between the sheathing, insulation is laid, and at the end we attach a vapor barrier film.
The last step will be treating the floor surface:
- The cleaned surface should be treated with an antiseptic.
- The sheathing beams should be nailed to the ceiling using dowels or self-tapping screws with locking screws.
- Lay the insulation using foam or wood glue.
- To create vapor insulation, a layer of foil or polyethylene film should be laid.
- If you need to install a ceiling light, run the electrical wires.
- The structure should be sewn up using wooden or plastic panels.
After insulating the balcony with your own hands, you can begin finishing work. At this stage, you can choose an original design based on the color of the furniture, the purpose of the room and the presence of decorative elements. It is at this stage that an atmosphere of comfort will be created, and therefore special attention should be paid to this moment. If necessary, you can seek help from professionals in order to make an original project.
Replacing rubber seals
Insufficient sealing can lead to aluminum windows causing drafts and condensation. Wear of rubber seals is one of the reasons for seal failure. There are several types of seals and each has its own advantages:
- Rubber is the most popular type of sealant. The material is flexible and durable, but sudden temperature changes have an adverse effect on it.
- Silicone inserts withstand temperature changes, UV rays and loads. This is a lightweight, durable material with a service life of up to 40 years.
- PVC and foam types. It is recommended to use PVC seals only in a warm room, as this material cracks in the cold. Foam rubber is quite light and has good thermal insulation properties, but has a short service life - up to 3 years.
- TEP seal, which contains polymers, resembles rubber and is suitable for moderate temperatures. After frost, cracks will appear on such a seal.
- Polymer linings will last up to 20 years. The advantage of the material is that it can withstand very low temperatures.
After choosing a seal, you can begin to dismantle the old rubber bands.
Having picked up the old seal with a straight screwdriver or knife, you need to forcefully pull it towards you. After this, you need to wash the profile with soapy water and remove excess moisture with a soft cloth or microfiber. To be safe, you can coat the resulting groove with construction glue, but this is not always necessary. The rubber bands will fit tightly and secure without the use of glue; it may only be needed at the junction of the seal. Having carried out the correct measurement and cutting, you can insert the seal into the groove without pulling or squeezing it. After checking the design and eliminating all protrusions, you can coat the silicone seal with grease, which will increase its service life.
Insulation materials
Now it’s worth taking a closer look at the middle layer – thermal insulation. A fairly large number of materials can act as insulation.
Now it’s worth taking a closer look at the middle layer – thermal insulation. As a rule, polystyrene foam is often used as an insulating material. This is the most common, however, not entirely accurate name for a white porous product, with which many are familiar first-hand. Its real name is expanded polystyrene. The construction market offers this product in the form of sheets of various sizes and thicknesses, usually meter by meter, but other dimensions can also be found.
Thermal insulation of a balcony using this material is easy to install, effective, reliable, and also has a low cost. However, it has one drawback - it is flammable, and during the combustion process it emits toxic fumes. This quality of this material cannot be called positive.
An alternative to polystyrene foam is polyurethane foam. It is not as well known as expanded polystyrene (although, of course, many have come across yellowish-brown slabs or, as PPU is also called, “shell” for thermal insulation of pipelines). However, polystyrene foam is most widely used as a material in spray cans. The method of its application is polyurethane foam spraying.
Polyurethane foam, unlike polystyrene foam, is not flammable, has good thermal conductivity, however, it is somewhat more expensive. But compared to fibrous insulation (for example, glass wool or mineral wool), polyurethane foam is more environmentally friendly and does not absorb moisture at all.
Replacing insulation
When insulating, the main thing is not to overdo it, since a large amount of insulation will expand the structure, deforming it in the process. Since the insulation process involves small objects, it is best to choose mineral wool for the job. It is easy to cut and fits even into small holes. You can purchase a roll rather than a sheet, which will save money, and seal all the cracks in the same way. The structure should be insulated evenly, penetrating into all cavities, which will achieve maximum results.
Important! Before purchasing, you should accurately calculate the volume of required materials so as not to purchase additional material or, conversely, not to overpay.
How can you insulate a balcony with cold glazing?
Developers of residential neighborhoods in large cities, regional centers and even small towns commission houses with standard glazing for balconies and loggias. The standard scheme for its implementation is the installation of a frame made of aluminum profile and installation of single sheet glass into window sashes. This is due to the fact that, according to existing standards and building codes, balconies and loggias are not residential premises, but perform auxiliary functions and therefore do not require insulation. This design, from a financial point of view, is the most economical for the developer and relieves him of responsibility for deficiencies that may arise during the installation of more expensive and quality-demanding warm glazing.
Recently, a fashionable trend is the insulation of balconies with cold glazing, which allows residents not only to save thermal energy, which is subject to accounting and appropriate payment, but also to expand the usable living area of the apartment. On a warm balcony you can set up a workshop, create a study, or create a flower or vegetable greenhouse.
At the same time, homeowners are faced with the question: how to insulate balconies with cold glazing. If the walls and parapet can be covered with effective modern insulation and topped with finishing from a number of common and popular materials, then solving the problem of cold glazing is much more difficult.
The situation is aggravated by the fact that any changes and alterations to standard glazing may lead to a change in the appearance of the building's facade, and the reconstruction may not be approved by the relevant services. As a result, replacing cold glazing with warm glazing may be prohibited. And if work is carried out without permission, penalties and litigation may follow, which usually results in a decision to dismantle the installed glazing.
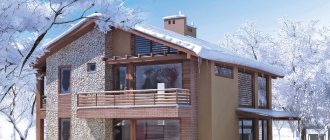
Insulation of the loggia with a combined wooden-aluminum profile
The wooden-aluminum profile, due to its thermal insulation characteristics, will make it possible to turn the balcony into the most suitable room for use in winter. There are two versions:
- Aluminum frames with decorative wooden trims on the inside of the window.
- Wooden frames decorated with aluminum overlays on the street side.
The first option is a cold glazing option and is used to decorate the room and give the balcony a natural, natural look.
The second option is more functional. Wooden frames give the window an eco-style, and aluminum linings protect the wood from the effects of precipitation. Such windows are wider than the aluminum profile in the first version. However, this option makes it possible to choose the closest possible color of powder enamel on the outside. Thanks to this, it will be possible to minimize the difference between the balcony and the general facade of the building and other balconies.
This insulation process will not require significant costs. If all points are performed correctly, you can get rid of drafts, get additional sound insulation and reduce heat loss.
Details
Preparatory work
So, in order to prepare to insulate a balcony with your own hands, you must first remove all dirt and debris from the balcony. If there is an old coating on the floor or wall surface, it should be removed in advance. In addition, during preparation it is necessary to divide the balcony into warm and cold zones. The second includes corners and walls that face the street or border on other non-insulated surfaces, and the remaining parts of the balcony can be called warm.
Based on these data, you can draw up a work plan in advance:
- Corners and walls that border the street must be insulated especially carefully.
- If the balcony borders on a loggia that is insulated, the partition need not be treated.
- The ceiling and floor should be insulated regardless of how the balcony is located and what kind of structure it has.
- Corners created by warm zones do not need to be insulated.
Before starting the process, it is recommended to cover the floor surface with a primer solution. This way you will be able to prevent the growth of mold and harmful microscopic organisms. Loggias that are not glazed often have holes, through holes and large gaps. They can be sealed using polyurethane foam or a special solution so that there is no heat loss and the service life of the insulating material is extended.
Glazing of the loggia
Glazing is an extremely important step in order to improve a balcony or loggia. This will make it possible to retain heat as best as possible, and will also protect the room from wind, rain and snow and can turn the loggia into a separate room. But you should immediately take into account that such a procedure will require a lot of effort than conventional insulation, and for implementation you need to contact professionals. But repairmen who are more confident and experienced in their own abilities can do everything on their own.
There are several ways to glaze a balcony:
The advantage of this method is the high quality of the materials you will use, strength, long service life and excellent external characteristics. Frames made of wood are excellent at suppressing street noise and keeping heat inside. Only sliding structures should be treated with caution. They are made in such a way that water can get into them and everything will start to freeze at subzero temperatures.
When using wooden frames.- Frameless glazing. Provides a guarantee of protection against precipitation and bad weather conditions. The design has a minimum number of elements, each of which is distinguished by a high degree of strength and quality. With this method, the frames are not visible, allowing the windows to appear solid and allowing plenty of light to enter. Among the disadvantages, it is worth highlighting the high cost and also the lack of the possibility of full insulation, which is why the loggia can be very blown out during strong gusts of wind.
- Using metal-plastic structures. The method has become popular due to the fact that these designs have excellent performance characteristics and a relatively low cost. The system will help maintain the temperature inside the room and will also provide excellent air circulation. Plastic structures are distinguished by the fact that they are more functional than wooden or other frames, and therefore you can ventilate the balcony even in the cold season.
All balcony insulation systems in winter have an excellent service life. A balcony glazed using this method will last at least 40 years. The design also has drainage holes that help reduce the risk of frame freezing to a minimum. In addition, plastic products are much easier to care for - they do not need to be painted and are easy to wash and clean.
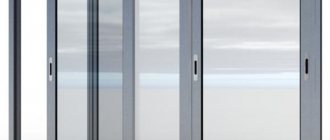
Aluminum glazing. This option is one of the cheapest, and the design is lightweight and the load on the floors is minimal. At the same time, the materials are strong, resistant to external mechanical influences, and durable. They are easy to care for, and they are not afraid of high temperatures and moisture. The installation can be completed in a short time, and even those who have no experience will be able to do it.
Next, we suggest you read the detailed instructions.
Is it worth changing the glazing?
Many users may wonder: why insulate a loggia with cold glazing? Insulation using the method described above will help to reliably protect the structure and improve its quality, however, such a balcony still cannot be called warm. Most of the heat will escape through aluminum frames or insufficiently thick double glazed windows in the case of plastic windows. Therefore, if you need a really warm balcony that can be heated and which can be made part of the living space, you will need to completely replace the cold façade glazing with a warm one.
Using an insulated balcony
As a rule, pipes are not installed on the balcony and heating is not connected. This is simply not necessary. It is enough to leave the balcony door open so that the air temperature on the balcony is the same as the temperature in the room. Very often, the balcony door is removed completely, and an arch is made in place of the doorway.
Photo: arch to the balcony
This new room can be used in different ways. Offices, rest rooms, even children's rooms are made on the balconies.
Photo: children's corner
But the most common option is some kind of small winter garden with a relaxation area. That is, with a small sofa or armchairs.
Photo: winter garden
As can be seen from the above description, insulating a balcony or loggia with your own hands is not difficult. This is easy to do even for a person who does not have construction skills.
Photo: mini-sofa on the balcony
To do this you will need the following materials and tools:
- insulation;
- wooden blocks;
- plasterboard or other facing material;
- glue, tape;
- polyurethane foam;
- foil polyethylene;
- wooden floor boards;
- cement and sand, if a cement screed will be made.
- drill, screwdriver, screws, hammer, dowels, building level.
No scarce materials will be required. No complicated tools are required.
Properly installed insulation lasts a long time and does not require any additional work in the future. You can only change the exterior decoration if there is a need to change the interior.
Insulation of walls and ceilings
To insulate walls, you can use the following components:
- Penofol.
- Bars made of wood.
- High density foam.
- Polyurethane foam.
To see how to strengthen the balcony, watch the video:
Walls that require insulation are sheathed with penofol. The lathing is usually made from a 50x50 mm bar. For convenience, the step between the bars can be made consistent with the width of the filler. Polystyrene foam is placed between the bars and attached to the wall using plastic. Glazing of balconies with aluminum profiles. Balcony or cold profile. The gaps formed during installation are also sealed with polyurethane foam. Eurolining or imitation timber can be used as cladding. Plastic panels are also suitable for wall cladding.