Types of heating radiators for an apartment or private house
The first thing you should decide on before installing a heating radiator in an apartment is the choice of the type of this device.
The following types of heating batteries and radiators are widely represented on the modern market:
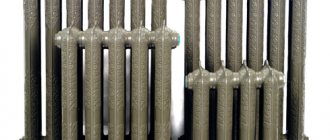
- cast iron;
- aluminum;
- bimetallic;
- steel;
- copper;
- plastic.
Each of these varieties has its own advantages and disadvantages that you need to know in order to make the right choice. For example, cast iron batteries, which were widely used back in Soviet times, are characterized by a long service life and undemanding quality of coolant - the water in them can even be rusty or contain a large number of impurities. At the same time, due to the low thermal conductivity of cast iron, the fuel costs for heating such devices are quite high. Another disadvantage is the unaesthetic appearance of cast iron batteries, so nowadays they are not used so often.
Aluminum, steel, bimetallic and copper radiators have excellent thermal conductivity and an impressive appearance. At the same time, they also have disadvantages. For example, the disadvantage of aluminum batteries is their high sensitivity to water purity and instability to high coolant pressure. Bimetallic devices are somewhat more durable in this regard. Copper radiators are the most durable and most efficient in terms of heating, but at the same time they are also the most expensive.
As for plastic radiators, this is the most economical option, they are light in weight and easy to install, but they cannot be heated above 80 °C.
Having studied the features of various types of batteries before installing a heating radiator with your own hands, you can make a choice in favor of one type or another. A lot here may also depend on the interior of the room, the budgetary capabilities of the homeowners and other factors.
Features of radiator installation instructions
You should first mark on the wall the place where the radiators will be hung. So, initially, using a pencil, a place for the brackets is outlined. In the future, when installing steel radiators, it should be taken into account that the brackets should be located at the joints between the radiator sections.
After the markings have been applied to the wall, holes of the appropriate diameter should be drilled in the wall. The size of the hole must correspond to the diameter of the dowel supplied with the radiator. After this, a dowel should be inserted into the hole, into which the bracket will later be screwed.
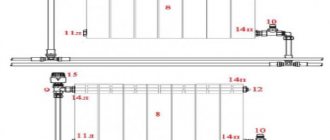
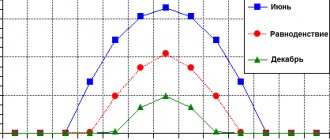
Diagram of the dependence of radiator power on the installation method.
The installation of bimetallic radiators must be carried out in accordance with certain requirements. The threaded part should be unscrewed from the tap and a winder should be wound onto the free thread. In this case, the winding can be a special paste that is resistant to high temperatures. This paste can provide high-quality tightness of threaded connections. Together with the paste, it is allowed to use tow with paint or fum tape.
When using tow, paint should be applied to the threaded area of the part and spread evenly over the entire area of the thread. Along the thread, you should wind the tow itself.
On the part with the tow, the next step is to install the union nut from the tap, which will then need to be screwed into the battery plug. The nut must be tightened tightly using a wrench. The Mayevsky key and plug are installed in the same way.
At the location of the radiator plugs, you can use standard or special gaskets instead of windings, but in this case the degree of tightness of steel heating devices will be lower.
The installation of battery cells must take into account that half of the plugs are equipped with a right-hand thread, and the other half - with a left-hand thread.
The union nut located in the radiator valve does not require additional winding, since it is equipped with a special ring seal. This seal can be chamfered and form a tight connection.
After the plugs are screwed in, the radiator valves should be installed. After the first part of the work - the installation of steel heating radiators - is completed, the final part of the work should begin. Branch pipes should be soldered to the tee on one side and to the radiator valve on the other.
When installing the taps, it is necessary to pay special attention to their length - it is necessary that a certain section of this tube goes into the inner diameter of the part with which the connection is made. When soldering branch pipes, the direction of the tee and the radiator valve must coincide; for this, you can first make marks with a pencil
It is advisable to carry out marking work on a flat, flat surface.
After the installation of the radiator taps is completed, specialists hang the batteries on the brackets and check their horizontal position using a level.
Similarly, all other radiators in the heating system are installed. After installation is completed, the radiators should be connected to each other using pipelines and, ultimately, to the boiler.
Necessary elements for DIY installation
Next, before installing heating radiators in a private house or apartment, you should prepare all the parts, tools and materials necessary for installation. Find out when your heating season will end, then you can start work.
In addition to the heating battery itself, when installing heating radiators with your own hands, the installation of the following important elements is provided:
- Mayevsky crane . This is a small device mounted on the free upper outlet (collector) of the battery. Its function is to automatically remove air that may form in the system. The presence of such a device is mandatory when installing aluminum or bimetallic radiators, but if we are talking about installing heating radiators made of cast iron, then the Mayevsky tap is not installed on the radiator - instead, a device for automatically removing air is mounted at a higher point in the system.
- Automatic air vent - can perform the same function as the Mayevsky valve. Rarely used for installation on radiators. Manufactured in a nickel-plated or brass body. It is often used to remove air to the outside in other parts of the heating system, as in the case described above with the installation of cast iron batteries.
- Stub . Radiator batteries with side connections have four outlets, three of which are occupied by inlet and outlet pipelines and a device for automatic air release. A plug is placed on the fourth outlet, which is usually painted with white enamel and matches the appearance of the heating device well.
- Ball or shut-off valves . There are two of them: at the inlet and at the outlet of the radiator. The main function of such taps is that if a problem occurs in the radiator, it can be cut off from the rest of the heating system, which can continue to function. Ball valves are cheaper in price, but less functional. It is preferable to use shut-off valves when installing a heating radiator yourself, since they additionally make it possible to regulate the flow of coolant, and therefore the degree of heating in the room.
- Hooks, brackets and plastic dowels . These are fastening devices used for hanging heating radiators and attaching them to walls. Details on how to properly hang a heating radiator and what points need to be taken into account are given below.
- Linen winding or fum tape, as well as plumbing paste . These materials are needed to ensure the tightness of the connected areas.
Features of radiator installation instructions
You should first mark on the wall the place where the radiators will be hung. So, initially, using a pencil, a place for the brackets is outlined. In the future, when installing steel radiators, it should be taken into account that the brackets should be located at the joints between.
After the markings have been applied to the wall, holes of the appropriate diameter should be drilled in the wall. The size of the hole must correspond to the diameter of the dowel supplied with the radiator. After this, a dowel should be inserted into the hole, into which the bracket will later be screwed.
Diagram of the dependence of radiator power on the installation method.
must be carried out in accordance with certain requirements. The threaded part should be unscrewed from the tap and a winder should be wound onto the free thread. In this case, the winding can be a special paste that is resistant to high temperatures. This paste can provide high-quality tightness of threaded connections. Together with the paste, it is allowed to use tow with paint or fum tape.
When using tow, paint should be applied to the threaded area of the part and spread evenly over the entire area of the thread. Along the thread, you should wind the tow itself.
On the part with the tow, the next step is to install the union nut from the tap, which will then need to be screwed into the battery plug. The nut must be tightened tightly using a wrench. The Mayevsky key and plug are installed in the same way.
At the location of the radiator plugs, you can use standard or special gaskets instead of windings, but in this case the degree of tightness of steel heating devices will be lower.
The installation of battery cells must take into account that half of the plugs are equipped with a right-hand thread, and the other half - with a left-hand thread.
The union nut located in the radiator valve does not require additional winding, since it is equipped with a special ring seal. This seal can be chamfered and form a tight connection.
After the plugs are screwed in, the radiator valves should be installed. After the first part of the work - the installation of steel heating radiators - is completed, the final part of the work should begin. Branch pipes should be soldered to the tee on one side and to the radiator valve on the other.
When installing the taps, it is necessary to pay special attention to their length - it is necessary that a certain section of this tube goes into the inner diameter of the part with which the connection is made. When soldering branch pipes, the direction of the tee and the radiator valve must coincide; for this, you can first make marks with a pencil
It is advisable to carry out marking work on a flat, flat surface.
After the installation of the radiator taps is completed, specialists hang the batteries on the brackets and check their horizontal position using a level.
Similarly, all other radiators in the heating system are installed. After installation is completed, the radiators should be connected to each other using pipelines and, ultimately, to the boiler.
Choosing a place to install heating radiators
Speaking about how to properly install a heating radiator in an apartment, it should be noted that the optimal place for installation is traditionally considered to be the space under the windows. This arrangement creates a warm barrier against cold air masses entering the room from the window.
It is advisable that the width of the thermal radiator be at least three quarters of the width of the window opening - this will prevent the glass from sweating when heating the home.
The optimal distance between the heating device and the floor is 8-12 centimeters, between the radiator and the window sill - 10-12 centimeters. The gap between the back surface of the battery and the wall should be 3-5 centimeters.
Compliance with these recommendations for installing heating radiators with your own hands ensures effective circulation of warm air masses in the room and its optimal heating.
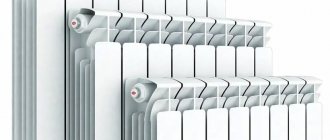
Aluminum heating radiator Standard Hidravlika Economic A 80
We advise consumers who have a small private house or cottage to buy Standard Hidravlika aluminum heating radiators of the Economic A 80 series. The Economic series is specially created for people who want to spend money economically on creating a heating system for their own home. The A 80 radiator has good heat transfer performance, beautiful appearance and low weight. At the same time, the price of the aluminum radiator Standard Hydraulics Economic A 80 is the most affordable.
As standard, the radiator consists of 10 interconnected sections, but, if desired, you can ask your installer to add or reduce the number of sections to change the heat transfer properties of the radiator and the heat flow power. Thanks to the sectional assembly system of aluminum radiators using connecting nipples and gaskets, the assembly process takes a few minutes.
The sectional design of Standard Hidravlika aluminum heating radiators allows you to find the ideal solution for any room.
Technical characteristics of the heating radiator Standard Hidravlika Economic A80.
| Model | A80 |
| Radiator type | aluminum |
| Number of sections in standard packaging | 10 |
| Section height (mm) | 563 |
| Center distance H (mm) | 500 |
| Nominal heat flux for Δt=70°C | 140 |
| Nominal heat flux for Δt=50°C | 90 |
| Weight, kg) | 0.73 |
| Water capacity (L) | 0,31 |
| Color | RAL9010 |
| Test Pressure (Bar) | 24 |
| pH range | 7-8 |
| Max coolant t (C) | 120 |
| Guarantee period | 5 years |
| Life time | 25 years |
Calculation of radiator power.
To correctly select the number of heating radiators, its type and manufacturer are not important. Only one characteristic is important - the power of the radiator section. This parameter can be found in the instructions, technical specifications or from the seller. It must be remembered that this parameter will be different for each manufacturer and each model.
In addition, it is necessary to determine at what coolant temperature your radiator will be operated. The higher the heating temperature of the radiator, the greater the thermal power it will produce, but at the same time it will dry out the air in the room more, making living in the house not entirely comfortable.
So, it is necessary, after consulting with a consultant, to make an informed decision.
Next, you need to find out the area of the room that you plan to heat and the size of the windows in this room.
As a rule, an average formula is used to calculate a radiator - 1 section per 2 square meters of room. For a more correct, but still averaged selection, you can apply the following formula:
K=S×T/P,
Where
K – number of radiator sections; S – area of the heated room;
T - building insulation coefficient (50 - very good insulation, 70 - an ordinary modern house, 100 - an old house without insulation) P - power of one radiator section (depends on the heating temperature).
For example: let’s calculate the number of sections of an Armatura G500F aluminum radiator for heating a room of 20 square meters in a modern house (T coefficient = 70)
We know that the power of one section is 141 watts. Substituting the values we know into the formula, we get
K=20×70/141 K=10 sections
When selecting radiators, it is better to take into account the “random factor” and install a radiator with a 20% margin of the calculated indicator. Thus, for the above example, taking into account the reserve, the number of sections will be 11-12 sections.
Of course, this calculation is very approximate and we recommend seeking help from professionals.
Tips for installing heating radiators.
- Do not block radiators. Closed or built-in radiators must be at a higher temperature to supply the same amount of heat to the room as open radiators;
- Move furniture away from radiators - the distance of tables or sofas from radiators should be at least 10 cm;
- Shelves should be hung above the radiators or the window sills should be widened, so that the warm air will move to the middle of the room, and not towards the window, where it will cool;
- If the walls of the house are poorly insulated, heat-reflecting screens made of aluminum film should be installed behind the radiators;
- During ventilation, it is necessary to tighten the valves of the radiators located in the room. Cold air coming from open windows will cool the thermostat, causing the valve to open as much as possible.
- It is better to ventilate more often and for a short time than once and for a long time.
Hanging the radiator and fixing it to the wall
Next, you need to figure out how to hang a heating radiator and how to secure it to the walls. The process itself is simple, but even before hanging the battery, you should make sure that the wall surface behind it is level.
Next, on the wall, 10-12 centimeters below the window sill, a horizontal line is drawn, which serves as a location guide for the upper edge of the radiator. After this, in accordance with the intended position of the heating device, fastening devices are installed.
The radiator location must be strictly horizontal for heating systems with forced (pump) coolant circulation. If the system operates through natural circulation, then a minimum slope is provided for the battery - approximately 1-1.5°. The reason is simple - at the end of the heating season, the operation of the radiator stops and the water is drained. In this case, it is very important that the draining is complete and that the battery subsequently remains dry.
If the slope exceeds the recommended value of 1-1.5°, then stagnation that occurs during operation will interfere with the normal operation of the device. All these nuances should be foreseen and taken into account before hanging up the radiator and installing a heating system in the home.
To install the hooks, holes are drilled in the wall into which plastic dowels are mounted. Next, the hooks are screwed into them enough to ensure a distance of 3-5 centimeters between the radiator and the wall. In a typical case, the heating device is suspended so that the hooks are located between the sections.
If you use brackets to fix the battery, the installation process is slightly different from that described above. Before hanging the heating radiator, you should attach it to the wall and mark the locations for the fasteners. Next, holes are drilled in these places. Plastic dowels for screws are mounted in them, through which the mounting brackets are screwed.
Another important point regarding how to hang radiators on the wall. Although lower fasteners are also installed along with the upper ones, their role is rather auxiliary - they serve mainly to more reliably fix the radiator in a given position, including during the installation process. Their installation level should be 1-1.5 centimeters below the lower collector. Most of the weight load of the radiator falls on the upper fasteners.
Of course, the heavier the heating device, the thickness and strength of the fastening devices should be greater. For example, if the question is how to hang an aluminum radiator, you can get by with hooks that are not very thick. If a heavy cast iron battery is suspended from the wall, the brackets and hooks should be much thicker and stronger.
Holders for cast iron radiators
The heaviest batteries are cast iron, so the fasteners for them are the most durable and massive. Such a fastening element must withstand not only the weight of the heating device, but also the coolant circulating in it. Since the gaps of the pipes in cast iron batteries are large, a lot of coolant circulates in them, which increases the already considerable weight of the radiator.
To mount cast iron batteries on the wall, separate pins or the same elements mounted on a strip are used. As a rule, such fastening devices are of considerable thickness and are labeled as “reinforced”. The bracket itself may or may not be painted. The standard color scheme for such holders is white, but when installing a designer battery, the bracket can be repainted in the desired shade.
In addition to special brackets, cast iron batteries can be hung on regular hooks. Such elements are sold together with dowels. There is a thread on one side of this hook.
Installation is carried out as follows:
- a hole is drilled in the wall in the right place;
- a dowel is driven into it;
- A hook is screwed into this dowel using a threaded thread on one side.
There is also a special bracket for a floor heating radiator. Such stands can be adjusted in height or have specified standard dimensions. Floor fasteners may differ in the upper arcs, which are responsible for fixing the section on the rack. Thus, there are arcs in the form of a chain consisting of moving links, as well as elements made of steel wire. These stands for heating radiators come complete with clamping bolts.
Attaching the radiator to the floor - how to install it correctly
Apartment wall structures are not always able to reliably withstand the battery load for a long time. If the heating device has a large mass, or the walls have a lightweight structure, then additional floor fixation is necessary. It is carried out using legs, which are sometimes included with the device, or special brackets that are attached to the floor using nails or dowels.
Floor mounting is recommended even for relatively lightweight aluminum and bimetallic radiators; As for heavier cast iron, steel or copper batteries, it is mandatory for them.
Types of fasteners
When choosing fasteners for radiators, you need to focus on the convector model. The brackets allow you to qualitatively fix the heating element in the required place. To mount heating radiators, wall holders are best suited. Floor fastenings are used as additional ones, less often as main ones. Such brackets will be needed when the niche is not suitable for installing a battery or design ideas require such an implementation.
Wall
Convectors installed under the window prevent cold air leaking through the glazing from entering the room. Before attaching the radiator to the wall, you should make sure that the fasteners are suitable for installation and include the following parts:
- anchor clamps of different lengths;
- holders that can be adjusted in height, thereby helping to hide various surface defects. For example, adjustable steel fasteners facilitate faster installation of cast iron heating radiators to the wall. The mount allows you to change the position of the battery horizontally and vertically, and correct possible gaps with the wall;
- holders with rubberized surfaces for better insulation of extraneous noise;
- corner fasteners used in installing small, lightweight batteries.
Hooks
For steel heating radiators, a metal corner mount is suitable. One part of it is attached to the wall, the other is equipped with hooks for further fixation of the heating element. To fix cast iron batteries, use hooks supplied with dowels. As a rule, the clamp is recessed into the wall by approximately 100–150 mm.
If you are installing cast iron appliances with a large number of sections, then hooks alone will not do. It is worth strengthening the structure with floor fastenings.
Brackets
Attaching cast iron radiators to the wall is the most labor-intensive process due to their large mass. Despite this, they are perfectly held using special brackets or bent pins. High quality indicators are achieved through the use of a reinforced metal alloy, indicated in price lists as “reinforced”. You need to take into account that fasteners for heating radiators to the wall require a certain size, because sections with different depths must be equally distant from the wall at a distance of at least 30 mm. Therefore, the bracket must be larger than the heating element by the length of the recommended indentation.
Floor-standing
Installing heating elements on the floor has a number of positive aspects:
- happens quickly;
- you can fix any convector, from the lightest to the heaviest;
- the design will be more stable and reliable.
There are no special differences between wall and floor fixation. You just need to know that when installing on a wooden floor, it is still better to use an additional wall bracket.
If you use a floor mount for aluminum radiators, the battery can be installed even next to a wall made of aerated concrete and similar materials.
The stand for mounting the radiator is designed in the form of a metal leg. It is manufactured in two versions - regular or with a mechanism that allows you to adjust the height. The arches on top are made differently, which are designed to fix the sections in the stop. Some are made in the form of a solid steel wire, others in the form of a chain with moving links.
Connection to pipelines
The final step when installing heating radiators in an apartment with your own hands is connecting to the pipeline system. It can be carried out by the side or bottom, depending on how provided by the manufacturer of the heating device.
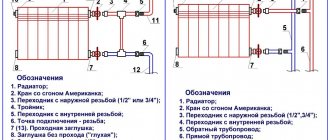
In turn, the lateral connection of the radiator to the pipes can be carried out in several options:
- One way way . It can be single-pipe (most often) or double-pipe. In addition to the pipes themselves, to connect them to the radiator you will need two ball or shut-off valves, two tees and two fittings. With a single-pipe connection method, it is mandatory to install a bypass, which allows you to disconnect the battery without stopping the system as a whole. Threaded connections must be sealed with fum tape or linen winding, on top of which plumbing paste is applied. If technical capabilities are available, the bypass can be connected to the pipes by welding.
- Diagonal connection . This option is optimal because it provides maximum heat transfer. On one side of the radiator, in its upper part, the coolant is supplied, and in the lower part, on the opposite side, there is its return outlet. It is also possible that the coolant is supplied from below and exits from above. The diagonal connection can also be one-pipe or two-pipe, and again with the one-pipe method it is necessary to install a bypass.
- Saddle connection . This method is the most convenient to implement, and outwardly the most inconspicuous in a residential area. Both the supply and return of coolant are carried out at the bottom of the radiator, but from different sides. As in previous cases, the system can be one-pipe or two-pipe. With a single-pipe saddle connection, it is preferable to install a bypass, but installation without it is possible. In the absence of a bypass, if there is a need to remove the radiator, a temporary pipe jumper is placed between the supply and return taps.
How to hang a battery
Installing batteries is considered one of the stages of creating a heating system in a house. Here you need to take into account a lot: the dimensions, the number of heating devices, as well as the design of the mounting of the heating batteries, and so on. To avoid forgetting anything, follow these simple recommendations.
- — heating devices with plugs;
- — spider fasteners;
- — adapters;
- — gaskets;
- - Mayevsky valve or air vent, and also an installation kit;
- — taps with a round hole;
- - metal-plastic or plastic pipes (if necessary).
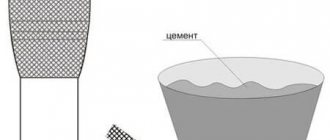
Before purchasing heating radiators, first of all, calculate how many elbows you will need for any of the rooms. Calculate based on one knee for every two square meters. m. area. It turns out that if the room area is 12 m2, six bends will be required to supply it with heat. When you think about the metal for your batteries, remember that in most cases aluminum batteries are installed in personal homes, and in residential areas - bimetallic ones. Cast iron batteries are gradually being phased out. The battery should be hung with a gap of at least 2.5 cm from the wall surface, otherwise its heat transfer will be low. It is also not recommended to place batteries close enough to the floor surface. Step back 8-10 centimeters from the floor so as not to disturb the heat exchange. And it will be easier to clean under the heating device. If you place the battery under a windowsill, you don’t need to place it too close to it. First of all, mark the places for attaching the spider fasteners: one at the bottom and two at the top. Spider fasteners will be attached to the wall using dowels or by recessing them into the wall and then sealing them with cement mortar. Check the verticality of the fastening using a level. Unevenly hung heating appliances look bad, and heating technology is also disrupted. After installing the spider fasteners, hang the battery on them so that the bottom edges of the water collectors rest on the hook of the support. Next you need to combine the battery with the pipes that lead to the heating system. They are equipped with a thermostatic valve and valve. First of all, insert the Mayevsky tap into the top plug of the heating device from the side opposite to the connection. If you still want to paint newly installed heating devices, remember that they cannot be coated with silver paint or any other iron paint. And you need to be careful not to accidentally paint over the hole in the Mayevsky tap.
how to hang a cast iron battery in 2018
Fixing bimetallic radiators
Floor plastic bracket for bimetallic batteries.
Brackets for bimetallic radiators are selected based on the dimensions of the equipment, the number of sections, installation options and features of the structural material of the walls. Compared to cast iron batteries, bimetallic counterparts weigh much less. This type can be mounted directly on a wall (brick or concrete) using universal brackets with dowels. For a plasterboard base, a floor option with adjustable and non-adjustable height (center distance 200, 350, 500) is more suitable.
If the room has a panoramic window and bimetallic radiators (Rifar, Sira, Global) are selected to heat the room, then they can be fixed in the desired position using either floor fasteners or a steel corner product. Brackets for bimetallic radiators must be made of steel.
Fixing the steel heater
Adjustable floor bracket K 11.9.
Although steel heating equipment is heavy, it is not as massive compared to cast iron counterparts. That is why the bracket for steel radiators (Korado) can have a welded structure. A U-shaped and K-shaped element made of steel is suitable here. It is attached to the wall and is used if the panel heater is equipped with special brackets.
In front of the panoramic window, a bracket for floor-mounted steel radiators would be relevant. But in this case it must have a reinforced structure. If the heating device is large in size, then additional fixation is used for its installation using an angle bracket. Two types of fasteners: wall (rod with dowel or steel with plate) and floor, adjustable stand are useful when the structural material of the wall is not durable. This could be wood or porous bricks.
How efficient should the heating of a frame house be and how the degree of insulation affects the efficiency of the heating circuit.
Read about what types of water heating schemes there are for a one-story house here.
Advantages of floor fasteners
A bracket for floor mounting of a radiator will come to the rescue if the structural material of the wall is not able to withstand the weight of the battery, and therefore the wall clamp cannot be used. The above device is used when installing a heating element opposite a panoramic window. A floor clamp can be an excellent decorative element when decorating a room.
It is used to support particularly massive heating appliances made of cast iron, or to install very large radiators. Installing brackets for floor-mounted radiators will ensure reliable fixation of the equipment. During the work you will not need the help of a specialist, since the device is easy to use.
The following types of floor clamps for batteries are distinguished:
- fixed and adjustable, possibly with a plastic cover;
- combination product;
- specialized, the width of which ranges from 80 mm to 100 mm.
Everything you might be interested in about hydrogen heating can be found on our website.
Although solar convectors for heating a home are still very expensive, many are already introducing them as additional heat sources. Details here.