a brief description of
Today, buyers have a huge selection of batteries on the heating systems market. They differ in design options, as well as in materials of manufacture. It should be noted that radiators are:
- Floor-standing. They are installed directly on the floor, as they are equipped with small legs, which are made taking into account the standards for the gap between the floor, window sill and radiator.
- Mounted. Their sections are attached using special metal hangers to the internal walls of the house near the window openings.
Connection
Height calculation
The distance between the radiator and the window sill must be at least 10 cm, regardless of what type of heating device is used. You also need to take into account the height of the battery itself. It is necessary to retreat 8 cm from the rear. The battery itself should rise above the floor by 10 cm, that is, when installing a window sill from the floor according to SNIP, you will need to retreat 70-80 cm.
An important role is also played by what the window sill protrusion will be : it can move significantly away from the wall or be invisible. If there is no radiator under the window, it is not necessary to meet any requirements, but if heating is present, the projection must be strictly regulated. The task of the window sill is to redirect heat flows. Without it, they will rise upward, and proper heating of the room will not occur, since some of the heat will evaporate and be distributed on the ceiling.
Poor convection can also be caused by a window sill that is too wide. It will not allow warm air to escape; as a result, condensation will begin to accumulate on the window, since the main air flows will go up, and some of them will get stuck under the window, heating the atmosphere. In this case, it is very important to calculate the distance from the window sill to the heating radiator, both in height and how much of a protrusion can be made. You can avoid the problem described above by using a slab that does not extend beyond the wall by more than 8 cm.
Tip: when calculating the dimensions, you need to take into account the level of the wall with decoration.
The best option is a solution in which no more than 10% of warm air will be retained in the window niche. To do this, the window sill should not protrude more than 6 cm beyond the radiator, but it should not be shorter than the heating device. If the design solution of the room requires the installation of non-standard wide structures, it is necessary to provide ventilation holes in them. Their size must be sufficient for proper air circulation.
The distance between the window sill and the heating radiator will remain standard in this case. As for the thickness of the structure, it usually does not exceed 4 cm, but this indicator is not a standard. A thinner slab has a risk of deformation caused by warm air currents. The thicker one has more mass and costs more. If such structures are not provided for by the design plan, there is no point in installing them. Detailed instructions for installing a window sill.
Is clearance necessary?
Some window owners believe that the window sill extends deep under the window frame, but this is not the case. The distance between the window and the window sill is approximately 10 mm. Otherwise, the structure may become deformed. The fact is that under the influence of warm air, the material from which the slab is made expands. The gap is left so that the structure can take the desired shape without being damaged. Visually, this technique is invisible.
How to position the curtain?
The distance of the window sill curtain also plays a role. In order for the curtains to move without clinging, without leaving marks on them, and for warm air to circulate freely, the distance must be at least 5 cm.
Conclusion: it is not always possible to apply the standard distance from the floor, radiator, curtains to the window sill, but you can find a way out by observing certain requirements.
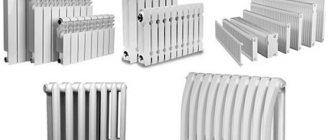
Types of radiators
Modern heating systems are made from a variety of materials, so the choice is quite large. There are the following types of sections:
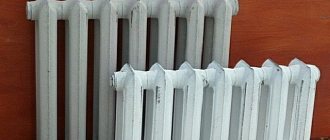
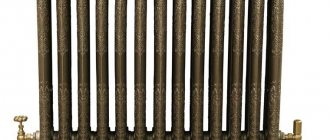
Cast iron
Due to their physical properties, cast iron products heat up well and retain heat for a long time, since they have improved heat transfer. Today, cast iron sectional batteries have a more presentable appearance than those produced in Soviet times.
Today's cast iron radiators are flat panels with even, smooth corners.
Installation diagrams
The service life of such sections is 25–50 years. The disadvantages of this type are significant weight, so it cannot be installed on walls made of gypsum plasterboard and wood.
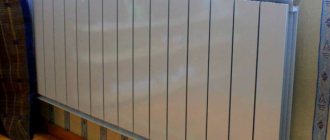
Made of aluminum
The appearance of the presented heating batteries is practically no different from cast iron ones, but one of the advantages is the light weight of the section (only 1 kg). Due to their low weight, aluminum radiators can be installed on any smooth surface. As for the disadvantages, this is sensitivity to the mineral composition of running water, as well as to possible pressure surges directly in the pipeline.
In the living room
Bimetallic
This type of battery is a good option for a room heating system. This is due to the fact that such material is not affected by the composition of the water, and it is also resistant to pressure drops in the system. Bimetallic batteries heat up quickly enough and, when installed correctly, perfectly heat the air in the apartment.
Installation method
Wall option
When doing installation work yourself, it is much easier to mount the battery on the wall. This task is less labor-intensive compared to floor installation, but all operations must be performed very efficiently.
Photo of the foil thermal insulation layer behind the heating device
The installation process itself includes the following steps:
| Installation of fasteners |
|
| Radiator installation |
|
| Work stage | Operations Performed |
| Site preparation |
|
| Marking | We apply markings to the surface for installing the battery (in principle, this should be taken into account when purchasing a radiator, but duplication here would also be useful): |
- From the floor to the bottom edge - 80-100 mm.
- From the top edge to the window sill - 80 - 100 mm.
- The width is no more than 80% of the window width.
Most commonly used brackets
As you can see, the instructions are not complicated, but you need to control the quality of the work at every stage.
Floor option
Sometimes the battery turns out to be too heavy to hang on the wall - there is a risk that the material simply will not hold up. In this case, installation is carried out using floor brackets. Yes, the price of such products will be slightly higher than that of wall mounts, however, the margin of safety is incomparable.
Floor Bracket Drawing with Mounting Diagram
The installation process itself involves the following steps:
- We select a pair of brackets whose load-bearing capacity is sufficient to support the weight of the battery.
- We install racks on the base of the floor, which we fix with anchors. We select the distance from the wall so that the minimum gap between it and the mounted radiator is 60 mm.
Advice! It is better to mount the floor brackets before pouring the screed - this way we can disguise the attachment point.
- We fill the screed, hiding the bases of the brackets and the caps of the mounting anchors.
- We put hooks on the racks, set them to the desired height and secure them with bolts. If the product package includes this, we install metal gaskets that will protect the radiator material at the point of contact with the hook.
- We hang the radiator on the hooks, which we then carefully level.
Despite the great complexity of implementation, this system has obvious advantages: the load from the battery is transferred not to the wall, but to the floor, so the risk of loosening the fasteners will be minimal.
Rules for installing heating radiators according to SNiP
SNiP 3.05.01-85 is a document according to which sections for heating any room are installed. It contains the following provisions:
- The radiators must be placed so that the center of the window and the heating radiator completely coincide. The permissible error is no more than 20 mm.
- According to the rules, the width of the heating battery itself should not exceed 50% of the width of the window opening where the window sill is located in residential premises. Batteries in schools, homes for the elderly and disabled, hospitals and kindergartens should occupy 75% of the light opening. This provision is regulated by clause 3.48 of SNiP 2.04.05-91 and clause 6.5.5 of SNiP 41-01-2003.
- When carrying out installation, it is necessary to take into account that the distance from the floor surface to the bottom point of the section should not be more than 12 cm. The gap between the upper edge of the battery and the existing window sill according to the standards is at least 5 cm.
- As for the distance that is provided from the wall to the radiator, it should be within 10–12 cm. Although it is possible to change these parameters, then it will be necessary to attach a special heat-protective material (mirror insulation or shielding sheet made of aluminum foil) between the wall and the radiator ).
Radiator installation diagram according to SNiP standards
The set of rules (SP 31.13330.2012) and standards states that in U-shaped heating systems it is impossible to install more sections than were used before. If a method of forced circulation of water directly in the heating system is provided, then if there are 24 or more sections, it is necessary to use a versatile connection method.
Minimum distance between multi-storey buildings according to building codes
Urban planning. Planning and development of urban and rural settlements. Updated edition of SNiP 2.07.01-89*”, illumination standards given in SP 52.13330, as well as in accordance with fire safety requirements given in section 15 of the specified set of rules.
According to clause 7 of SP 42.13330.2011, distances (domestic gaps) should be taken between the long sides of residential buildings: for residential buildings with a height of 2 - 3 floors - at least 15 m; 4 floors - at least 20 m; between the long sides and ends of the same buildings with windows from living rooms - at least 10 m.
This is interesting: Land tax in Crimea
Design documentation of capital construction projects and the results of engineering surveys carried out to prepare such design documentation are subject to state examination.
In accordance with paragraph 5 and paragraph 9 of Article 49 of the Town Planning Code of the Russian Federation, the subject of state examination is the assessment of compliance of project documentation with the requirements of technical regulations, including sanitary and epidemiological, environmental requirements, requirements for state protection of cultural heritage sites, fire safety, industrial , nuclear, radiation and other safety, as well as the results of engineering surveys, and assessment of the compliance of the results of engineering surveys with the requirements of technical regulations. The result of the state examination of project documentation is a conclusion on compliance (positive conclusion) or non-compliance (negative conclusion) of the project documentation with the requirements of technical regulations and the results of engineering surveys.
How do the gaps between the heating radiator and the wall affect
The designated set of rules according to SNiP 2.04.05-91 are not just approved parameters for installing a heating battery. Fixed figures allow you to reduce unexpected heating costs, for example in an apartment building.
The justification for compliance with the standards is that the external walls of residential buildings are in constant contact with the environment.
Depending on the outside air temperature, the building can cool significantly. For example, most high-rise buildings are built of concrete, which due to its physical characteristics does not allow heat to be retained indoors.
Fastening and installation
It follows from this that if the heating battery is attached directly to the inner wall of the supporting structure, then most of the heat will be directed precisely to it, and not to heating the air. By making a small distance from the wall to the heating radiator, a kind of air insulation is created, thereby reducing unnecessary costs. According to this principle, it is necessary to install all devices indoors.
What distance from the wall to the battery or radiator is provided if the window sill protrudes significantly in relation to the wall is indicated in the standards. The distance between the radiator and the window opening should not exceed 3/4, since the heating of the air in the apartment will be significantly reduced.
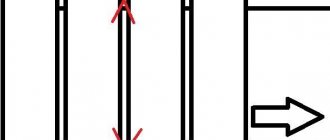
Indoor air movement pattern
What to consider when installing other than distance
Taking into account the indicated norms and rules for installing a heating system, it is necessary to concentrate on such recommendations. In order to avoid unreasonable costs, as well as to ensure that heat is retained in a private house or apartment, you should select heating devices based on the following criteria:
- place of residence, namely the climatic conditions of the region;
- existing heating system wiring;
- method of fastening heating sections;
- temperature indicators in the heating system itself;
- you need to take into account what material the incoming pipes and the pipeline connected to the apartment are made of;
- location of living quarters in the building itself;
- choice of regulatory elements.
Under the window
After analyzing all the options, you can proceed directly to the selection of batteries that will be installed, for example, in a private house, apartment buildings and other premises.
Heating radiator installation
The main way to adjust the required distance to the walls is high-quality and competent installation of heating devices with your own hands or with the help of specialists. Let's look at this aspect in more detail.
Installation of floor views
This fastening option is optimal for products that have a high mass and are most often made of cast iron. Such batteries are equipped with removable or stationary legs, which are fixed to the floor. Depending on the base material, fastening can be done with wood screws, self-tapping screws and plastic dowels, dowel-nails.
The simplest installation option
A necessary element for installing a floor heating device is a wall bracket. It is installed at the required height, which is defined as the desired distance from the floor to the upper longitudinal pipe of the radiator, taking into account the gap. Using fasteners and marking their installation locations, the optimal distance to the floor, wall and window sill is achieved.
Hanging a wall radiator
Each heating device is equipped with one or another type of hangers used for installation on walls. The material and strength characteristics of the brackets must correspond to the weight of the heating battery, taking into account its filling with coolant. Otherwise, the system may leak.
One type of wall mount
Before direct installation, it is necessary to determine the installation location and the required distances to the main surfaces.
To do this, follow these steps:
- Let's determine the center of the window and apply markings on the wall to align it with the center of the radiator.
- Let's measure the distance from the bottom edge of the batteries to the top pipe and add 12 cm. Set this measurement aside from the floor where the brackets are installed, checking that the mounting points are horizontal and level.
- In the places where the hangers are installed, we drill holes with a Pobedit drill, install dowels in them and fix the brackets with self-tapping screws.
Note! Similar instructions are included with each package of sold radiators. Differences may lie in the specific type of suspensions and the features of their installation.
Photo of a simple bracket
Connection diagrams according to SNiP
Before starting installation, regardless of where the installation is being carried out: in the kitchen, in living rooms, connecting batteries on the site between floors, or insulating the hallway - you should select the necessary connection diagram. Several options are presented for consideration.
Rules and regulations
Side connection
In most cases, a lateral connection is made, which helps achieve maximum heat transfer from heating batteries. This requires minimal expenditure on heating the room. The installation principle of the presented option is that the inlet pipe is connected to the upper branch pipe of the section, and the outlet pipe, respectively, to the lower branch pipe. When connected in this way, the pipes will be on one side of the heating radiator.
Diagonal connection
The indicated connection method is intended for attaching batteries that are long. In this case, the inlet pipe is connected to the upper pipe, and the outlet pipe is connected to the lower pipe, which is located on the opposite side of the radiator. As a result, maximum heating of the radiator is achieved along its entire length.
Distance from floor