The nuances of ceiling insulation using clay
It is quite difficult to use it for insulation in its pure form, since it creates a significant load on the ceiling, and the drying process takes quite a long time. And if you reduce the thickness of the layer, then the necessary effect of the thermos is lost. To build an insulating “pie,” various additives, such as straw, sawdust and other natural ingredients, are mixed into the clay solution. If all proportions are correctly observed, the effect of such insulation can surpass the performance of many more modern materials. It is strongly recommended to use a concrete mixer when mixing, since the mixing process is very labor-intensive.
Pros and cons of clay insulation
The popularity of clay insulation is due to its following properties:
Despite the impressive list of advantages, modern materials for thermal insulation have significantly displaced natural materials.
This is due to the fact that along with the advantages there are also noticeable disadvantages:
How to choose clay suitable for insulation?
The material, which is extracted from the depths of the sea, is characterized by a high content of silt in its composition. Such clay is not suitable for use as insulation, since it does not have compressive strength and its adhesiveness is significantly reduced.
How to recognize the type of clay that is ideal for insulating the ceiling area?
Do-it-yourself ceiling insulation using clay
If such work has not been carried out in advance, you need to prepare and install special forms for the formwork. Later they will be filled with a solution of clay with straw, sawdust or expanded clay.
How to prepare the surface?
The quality of thermal insulation will be influenced not only by the components of the insulating layer, but also by the condition of the ceiling material. Before starting work, you will need to perform the following manipulations:
Insulation with a mixture of clay and sawdust
Sawdust with clay is considered the most effective thermal insulator among clay-based insulation materials. The quality will depend on how accurately the proportions of the main ingredients are observed, as well as on the characteristics of the sawdust.
When choosing bulk filler, consider the following recommendations:
After the working mixture is ready, work will be performed in this order:
The attic floor can also be covered with slabs made from a clay-sawdust mixture. This method is good to use in a private home. You will need cellular forms for pouring the solution into them. The cell dimensions should be 50*50*25 centimeters. The grate must be placed on a surface without grooves or bumps, and filled with the prepared mixture. The dried blocks are laid on the attic floor, having previously coated the ends with a fresh clay solution. When cracks appear, they can be easily eliminated by caulking.
Thermal insulation of the ceiling with clay and expanded clay
The sequence of work is as follows:
In another version of thermal insulation, instead of expanded clay, sand is used, applied in a significant layer. Its loose structure will fill all cracks and eliminate possible heat loss. Thermal insulation of the ceiling will not require you to have superpowers or special equipment; everything is done with your own hands. But you need to take into account the labor intensity of this activity. The help of a helper will not be superfluous.
Process technology
Insulation of walls or ceilings is carried out approximately according to the same scheme. First, preparatory work is carried out, the surface is prepared for applying insulation. Then they proceed directly to filling the frame with clay mortar.
Surface preparation
The walls or ceiling must be covered with waterproofing material at the start. If the film does not cover the surface in a continuous piece, the material must be overlapped. This will ensure maximum density of the waterproofing film.
Wooden beams are attached every 30-40 cm. They will form a frame for filling with the mixture.
Preparation of clay solution
Where would you prefer to live: in a private house or apartment?
Definitely an apartment! Comfort, coziness and warmth, surrounded by people and infrastructure
754 ( 7.48 % )
Only a private house! There is silence, peace, a lot of space and few people around!
4588 ( 45.52 % )
Why choose just one? There is an apartment in the city, and a private house outside the city.
4306 ( 42.72 % )
I am a free Citizen of Planet Earth! I don't need a man-made cell!
431 ( 4.28 % )
Back
It all starts with a properly prepared mixture. It is this factor that is decisive. It determines the result and effectiveness of home insulation
When preparing the mixture, it is important to strictly observe the proportions. The process of preparing a solution from clay consists of two stages:
- Fill the clay with water and leave for several days. The mixture should become homogeneous and resemble the consistency of thick sour cream.
- The finished mixture of clay and water must be mixed with sawdust in the following proportion: for 1 bucket of clay, take 2.5-3 buckets of sawdust. They must be small, without large pieces. It is recommended to use sawdust from coniferous trees or oak.
The resulting mixture can be used immediately or the next day. Because clay dries slowly, the mixture can last longer.
The final stage is to apply the prepared insulation into the resulting gaps between the beams.
If small cracks appear during the application of the solution, they must be immediately moistened and rubbed with liquid clay. This thin layer can then be covered with a 5cm layer of sawdust.
After filling all the cells you need to be patient for 2-4 weeks. This is approximately how much clay is needed to completely dry and harden.
Finishing wall finishing work
After the clay mixture has completely dried, the final stages of work are carried out:
- surface plastering;
- final finishing.
The ancient method of using clay is an excellent alternative to expensive materials. It has a lot of advantages and a few minor disadvantages. You don't need to spend much time and effort once to enjoy the results of your work for many years.
Looking back into the past, we can say with confidence that the old methods of using clay in construction over the years, although losing their popularity, remain reliable, proven and safe.
Advantages and disadvantages of insulating ceilings with sawdust
There is a huge selection of modern thermal insulation products on the building materials market, but their prices are quite high. To save money and provide high-quality insulation, I use sawdust with clay.
Sawdust as insulation has the following advantages:
However, despite the advantages of the material, it has disadvantages:
To level out the negative aspects of sawdust, it is recommended to select the right material. In addition, it is necessary to add additional components to the batch to prevent rotting and other undesirable processes.
How to choose sawdust for thermal and sound insulation of the ceiling
Sawdust is divided by fraction:
Experts recommend giving preference to the second type, because fine-grained materials are difficult to work with, and coarse-grained ones cannot provide high-quality heat insulation.
When purchasing wood shavings formed from round logs at a natural moisture level, make sure they are thoroughly dried. If they are not sufficiently dried, you need to lay them out on a horizontal surface and leave them for a week under a canopy. In humid weather, the drying period is increased. It is also recommended to place thick burlap under the sawdust.
It is better to choose coniferous wood as sawdust for insulating the ceiling in a private house, because... They have a high level of resin, which helps prevent insects. The bath should be insulated with larch shavings. Such material, when mixed with ash, reduces the risk of rotting processes.
Important: after purchasing sawdust, you must wait at least six months. This will reduce sugar, which causes rot.
Indicators of high-quality sawdust are the absence of moisture and mold. It is necessary to ensure that foreign impurities and debris do not get into the chips. If this happens, the material is sieved, and large particles are selected by hand.
Which is correct?
The technology for insulating a bathhouse with sawdust is very simple. The main thing is to carry out all operations strictly according to plan. The sawdust must be dried to prevent it from rotting later. It is better to use medium-sized sawdust. It is more convenient to work with such material. Small sawdust creates a lot of dust, while larger ones have poorer thermal insulation. Mixing sawdust with ash will help avoid rotting. The best option is if the sawdust sits for 6 to 12 months before using it. During this period, the sawdust content of substances that cause rot will significantly decrease.
You should pay attention to ensure that there is no debris in the sawdust. If debris is present, you need to sift the sawdust through a special sieve. In order to prepare an insulating mixture, you need to mix sawdust with ingredients such as lime, cement or clay. There are two options for preparing insulation. In the first option, 1 part of cement and lime must be added to ten parts of dry sawdust. You will need 5-10 parts of water. Copper sulfate can be used as an antiseptic. In the second option, one part of lime and five parts of clay are used for ten parts of dry sawdust. You will need from 7 to 14 parts of water. The insulation of a bathhouse with such a mixture is carried out only from above. For this purpose, the ceiling beams of the bathhouse are sheathed with boards. The chimney is covered with a sheet of metal. After this, a layer of vapor barrier is laid. It should cover the walls by 30 cm.
It is worth noting that the widespread roofing material is far from ideal. In a bathhouse, when the temperature is very high, roofing material can melt and then begin to burn. After the vapor barrier layer has been laid out, you can carefully lay out the insulating mixture. It needs to be leveled and compacted all the time. For a bathhouse that is used only in the warm season, a 5 cm layer of insulation will be sufficient. A bathhouse for year-round use requires a layer of 15 cm. The insulation mixture must be completely dry. If using clay, it may take up to 30 days to dry. Sometimes cracks may appear on the surface; you can get rid of them by applying a thin layer of the mixture that was used for insulation. It is also believed that adding rock salt to the mixture helps the insulation not crack. After the insulation is completely ready, it is covered with a layer of vapor barrier. The seams must be sealed tightly.
If you plan to use the attic for any needs, the insulation layer can be sheathed with boards. If not, then just leave everything as it is. As with any other construction operation, insulating a bathhouse with sawdust has its positive and negative sides.
Proportions and technologies for mixing sawdust with clay or cement
To prepare a mixture for ceiling insulation, you will need the following proportions of clay and sawdust - 2 to 3. The consistency of the mixture resembles thick sour cream.
Attention! The use of copper sulfate is prohibited, because When exposed to high temperatures, it releases toxins that are harmful to health.
Before starting work, you need to soak the clay in two parts and leave until completely soaked. Then mix the remaining ingredients, avoiding the formation of lumps. Mix the resulting consistency with the soaked clay. In this case, sawdust is introduced into the solution gradually, stirring thoroughly.
To check the quality of the resulting “cement”, take a stick and place it in a container. A high-quality knead holds the stick in an upright position. If the consistency turns out to be liquid, it is left for a day to thicken. There is no need to cover the tank, because... this prevents moisture evaporation.
Insulation of the ceiling in a house with sawdust and cement is carried out based on the proportions - shavings, water, cement - 20 to 3 to 2. The laying technology is essentially identical to a mixture of clay with sawdust.
The nuances of insulating the ceiling in a bathhouse
Insulating the ceiling in a bathhouse with clay and sawdust involves carrying out work in accordance with the regulations:
Of course, an important point is the preparation of the batch. By observing the proportions and choosing high-quality shavings, you can achieve high-quality insulation of the ceiling. By the way, any type of clay is suitable, but the most common is red.
Note: do not constantly stir the mixture. It is better to add water and leave to infuse for several days. After 24-48 hours, stir thoroughly and drain off excess water.
After the consistency has acquired a homogeneous structure, shavings are added to it in a ratio of ⅔ bucket to 1 bucket of clay. The finished batch is placed on the ceiling. Raising the common question of what layer of sawdust is needed, experts note that the layer should be from 8 cm to 15 cm. Above this thickness, a layer is necessary in climates with harsh winters. However, even in this case it cannot exceed 30 cm. This is due to the weight of the clay, and an excess of layers can affect the foundation.
Source
Methods
The easiest way to insulate with clay begins with covering the ceiling with boards. Their minimum thickness should be 4 cm, but it is better if it is 6 cm. Before carrying out work, the boards must be thoroughly dried. In no case should you paint or varnish boards, because many paints and varnishes are simply not adapted to high temperatures and, under its influence, can begin to release toxic resins and polyesters into the space.
In general , it is better not to use chemicals in a bathhouse unless you intend to constantly inhale its destructive fumes.
After completing the sheathing, you must carefully and carefully cover the gaps between the boards with clay and wait for it to dry completely.
The next stage begins with preparing a mixture of sand and clay, which should be quite thick. All boards laid on the ceiling are covered with this mixture. The thickness of the layer should be at least 5-7 cm. Next, you should wait until the layer is completely dry, and this can take quite a lot of time. A thick layer of sand is laid on the dried clay.
Then the ceiling is impregnated first with liquid steam and then with dry steam. The clay, accordingly, first gets wet, and then finally dries and acquires the ability to retain the heat of your bath for many years.
In order for the insulated ceiling to retain its heat-insulating properties for as long as possible , there must be ventilation in the attic. The simplest and at the same time reliable way to create ventilation is two windows opposite each other.
Another method is insulation with several layers of clay with intermediate layers of sawdust or expanded clay. In order to prepare the clay, it is slightly moistened and thoroughly mixed with straw until smooth. The straw is pre-chopped. The final consistency should be similar to soft plasticine or mortar, which is used in laying brick walls.
The clay layer will again be 5-8 cm. After application, it must be carefully smoothed. Seal the perimeter of the ceiling requires special care. The clay will dry in 20-30 days, provided that the outside temperature is above zero. After drying, cracks may appear. This is normal. You can apply another thinner clay layer to the cracks, and cover it with sawdust, expanded clay or wood chips on top.
To make the ceiling later look more aesthetically pleasing, it can be sheathed with boards or fiberboard.
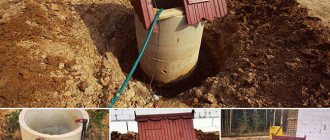
Brick sauna stove. You will read about this in our next article. And this article talks about a columnar foundation for a bathhouse.
How to insulate the ceiling in a bathhouse with clay and sawdust?
Modern owners of houses located outside urban areas have adopted this technique for quite a long time - during the construction of a house, a bathhouse is also being built. Its presence on the territory of a private household is no longer considered an attribute of luxurious life, a sign of prosperity and wealth. Now such a place is associated exclusively with the process of healing and relaxation. The main function of the bathhouse is the ability to perform various hygiene procedures. But we should not forget about the original purpose of the bathhouse. Since ancient times, such a place has served the purpose of raising the vital forces of the body and helping to strengthen human health. In order for such an important process to be as comfortable and cozy as possible, when creating a project and carrying out work, you need to take into account the correct finishing of the bathhouse room and its thermal insulation.
Please note that every year technological progress moves further and further, and at the same time the number of possible methods related to the process of insulating the walls and roof of a bathhouse is growing. The cost of already familiar materials is gradually increasing, and new and modern ones cannot always boast a high degree of safety for human health. Consequently, the choice of insulation material is one of the most important moments in the process of erecting and finishing a bathhouse building.
Do-it-yourself insulation of a bathhouse ceiling with clay
ATTENTION! The process itself will require significant labor. In addition, experts do not recommend using only pure clay.
With this method of application, it will become covered with cracks, which is why its heat-protective properties can be significantly reduced. Over the years, clay has been more commonly used in mixtures with other materials for insulation and construction. These include:
What should sawdust be like?
So which sawdust is best to work with?
Preparatory work before insulation
The ceiling space must be covered with film, which will act as a vapor barrier. You can also use materials such as polyethylene, rubimast, ruburoid or glassine. The film is fastened to staples using a construction stapler.
Work execution algorithm
It is better to carry out insulation work in the summer season. With the arrival of autumn, this type of insulation will dry thoroughly and will serve as an effective heat insulator. A completely dried composition does not sag under human weights, but may crunch a little. The work can be done quite quickly, and you can do without assistants, relying only on your own strength.
Insulation of bathhouse walls with clay
As for internal insulation, it will not withstand exposure to an aggressive environment. Soaking due to high humidity will alternate with cracking from hot steam. Therefore, clay cannot be used to insulate the walls of the bathhouse inside. External insulation can only be carried out for frame and brick structures.
Thermal insulation of bathhouse walls from the outside using clay is done as follows:
- The wall is covered with shingles, which are long slats 2-3 cm wide and 1 cm thick. The individual elements are fastened in the form of a lattice with wooden or galvanized fasteners. This is necessary to reinforce the clay layer.
- Wet the clay with water. Add wood shavings, which will reduce the thermal conductivity of the solution.
- Apply the mixture to the shingles and level with a special spatula. We use a plumb line or a building level to check the evenness.
- After complete drying, we install sheathing on the walls and cover them with wooden siding or block house. Be sure to soak the facing material with an antiseptic before work.
- A more budget-friendly option for exterior finishing involves whitewashing the clay layer with lime mortar.
Due to the increased temperature and humidity in the bathhouse, clay is not used for floor insulation. Under the influence of an aggressive environment, the material will become wet, crack and emit an unpleasant swampy odor. If you want to insulate your flooring with an environmentally friendly material, then consider expanded clay as an option.
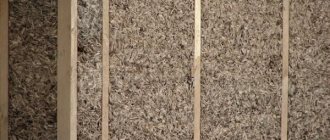
Thermal insulation of the ceiling with sawdust
But do not forget that if you use only sawdust, it can become a source of the following problems:
Experts advise mixing sawdust with cement or clay mortar. You already know the benefits of clay, and the tandem of sawdust and cement can serve as the basis for a durable ceiling screed. Another common option is when a layer of sawdust is sprinkled with a layer of earth. This method is characterized by fire safety and good thermal insulation properties.
Insulation of a bathhouse ceiling with clay and sawdust
Do not forget that the ceiling “pie” must be executed according to all the rules:
The work process itself is not too complicated. It is important to prepare the mixture correctly, without disturbing the proportions of the main components, and to achieve the required thickness. Sawdust and clay also need to be selected according to certain criteria. As for clay, you can use any type of clay. Red clay is the most common type. With sawdust it is somewhat more difficult - you need to choose exclusively dry material. Oak sawdust has proven itself well, but it is not so easy to find it on sale. Coniferous wood products are often used.
REFERENCE. If expanded clay is laid between the clay-sawdust layers, this helps create an air gap that will positively affect thermal insulation.
Insulation of a bathhouse ceiling with sawdust and cement
ADVICE. This type of screed can serve as the basis for the floor of an attic or attic space. The surface is characterized by high reliability and durability.
Thermal insulation of the bathhouse ceiling is the most common method
This method is suitable for insulating a bathhouse with or without an attic. The main thing is that the floor beams are installed, to which the entire “pie” will be attached. This is one of the easiest options to implement. It is first necessary to treat the beams with antiseptics (if this was not done before installation). Then we proceed directly to the installation of the insulation, and at the same time the ceiling.
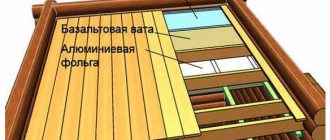
Step 1
. We attach a vapor barrier to the beams on the side of the room. It comes in several types: standard, with an aluminum layer, membrane type. To insulate baths, the best option would be a vapor barrier with an aluminum layer. In addition to protecting thermal insulation from moisture, it solves another problem - it reflects heat into the room, which reduces heating costs and maintaining the required temperatures by 2-3 times. So, once you spend money, you will save it regularly. This is a worthwhile investment, but other materials are quite suitable.
Foil vapor barrier solves two problems - it does not allow steam to pass through and reflects heat back into the room.
The vapor barrier is attached to the beams using a stapler and staples. All seams are taped with special tape for foil (it is advisable to overlap the panels with an overlap of at least 5 cm).
The joints must be taped with aluminum tape.
Step 2.
We nail the sheathing. On the side of the room, perpendicular to the beams, we nail a sheathing that will support the vapor barrier and insulation, and to which the ceiling sheathing will be nailed.
This is what this option for ceiling insulation looks like in cross-section.
This option makes it possible to solve two problems at once: on the one hand, a gap remains between the vapor barrier and the ceiling sheathing, which creates optimal conditions for heat reflection. On the other hand, the insulation will lie tightly on the vapor barrier, which will prevent condensation from forming between them (when wet, the thermal insulation characteristics deteriorate significantly).
Step 3.
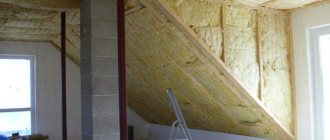
We install insulation. The insulation you choose is placed in the space between the beams from the outside (from the attic or roof). It must be laid tightly, leaving no gaps or voids. It is better to slightly squeeze the insulation and force it in rather than leaving gaps.
We tightly lay the selected type of insulation
Step 4.
External protection – waterproofing. In order to protect the insulation from possible ingress of moisture and dust, polyethylene or thermal film is laid on top of it. It is fixed using a stapler and staples. To improve the thermal conductivity value, a ventilation gap is left between the insulation and the waterproofing layer.
The gap between the insulation and waterproofing will improve the characteristics of the insulation pie
Step 5.
We install the ceiling trim. What material to use and how exactly to hem the ceiling is up to you. The most common material is lining (eurolining) or tongue and groove board, but there are a lot of options.
Option for the “pie” of insulating the bathhouse ceiling
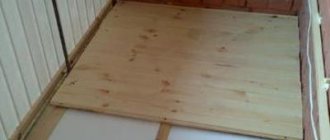
These are all required steps. But to ensure the integrity of all layers of the “pie”, it is advisable to make a subfloor in the attic, which is laid on top of the waterproofing layer. It can be made from unedged or edged boards. If necessary, you can walk on it without fear of damaging the thermal insulation.
Types and nuances of vapor barrier
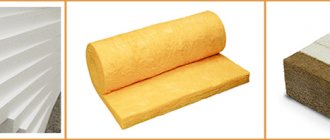
If the ceiling is insulated with mineral wool or other bulk insulation, you cannot do without a vapor barrier.
Types of vapor barrier
The simplest and most obvious option is to use film. Budget materials can be either rough or smooth; more expensive ones include reinforcement.
The basis of isospan is foil craft paper covered with a lavsan layer. It is not afraid of exposure to high temperatures, which means it can also be used in a steam room. The foil layer effectively retains heat, so the room cools down for a long time.
How to properly install a vapor barrier?
First of all, you need to decide on the choice of the base material, and then proceed with the installation of the vapor barrier layer of the bath ceiling. A correctly installed ceiling of a steam room looks like a layer cake, with the following layers: