Materials for sealing and insulating gaps and cracks
The easiest way is to cover the cracks with foam. But as the foam expands, it can deform weak masonry or plaster. In addition, the service life of such sealing is a maximum of five years, no more.
You can treat cracks that are previously insulated with other materials with polyurethane foam:
An important rule is that when insulating with mineral wool, it is imperative to reliably seal the cracks with plaster or water-repellent mastic, since mineral wool loses its properties when wet. Another modern method of thermal insulation is paints with a warming effect, fire-resistant
This paint contains polymers and ceramics and creates a reliable thermal insulation film. You need to apply two layers of this paint, waiting until the first layer is completely dry.
Another modern method of thermal insulation is paints with a warming effect, fire-resistant. This paint contains polymers and ceramics and creates a reliable thermal insulation film. You need to apply two layers of this paint, waiting until the first layer has completely dried.
Sealing material options
The building materials on the market for covering problem areas can be divided into the following categories:
- rubber seal for garage doors, produced in the form of a tape; it can be different in shape and color and is sold in rolls of different lengths;
- tubular rubber - can be of different shapes and sizes, so it’s great for hiding any cracks and irregularities;
- silicone tape - in terms of its working properties, the material is close to the rubber variety, but is noticeably different in softness; a larger amount is required for work;
- silicone material in the form of profiles with different shapes is the best option for reliably filling various gaps;
- compactor-brush - suitable for lazy or inexperienced craftsmen who are not able to carry out calculations correctly or do not know how to do the job at a good level;
- a universal material with the ability to self-expand if necessary, is made of polyurethane foam impregnated with acrylic.
FakeHeader
Comments 51
I chose a day where there was not much thaw and foamed the gap between the threshold and the gate, it became better) By the time I had time, the frosts now reached -30.
The bottom can be made with felt
Frozen to the gate.
Then from the heart's sleeve
Hang a curtain made of dornite, we have one of these hanging in every garage and you will be happy
You can put felt padding on the gates, but I also saw that in the neighborhood in garages people wrap a tarp around a board and just lay it down with their hands every time.
Thank you! I am also inclined towards this design, make brackets for the threshold and insert a board with felt there.
I was also intrigued by the question until I saw that people were just using the boards, not just one person, but quite a lot.
such a good corner for a sealant... my toad says that a profile for drywall would be enough, it is noticeably cheaper!
The threshold is coated with the compound and the foam is applied directly into the crack on the closed door. After hardening, the foam will remain on the door itself, creating a seal and will not stick to the threshold.
I support! I did exactly the same thing around the entire perimeter, everything worked out perfectly and it turned out hermetically sealed. Only I didn’t smear it with polish, but with a thin layer of lithol. Three years have already passed, no complaints.
The threshold is coated with the compound and the foam is applied directly into the crack on the closed door. After hardening, the foam will remain on the door itself, creating a seal and will not stick to the threshold.
You can cover it with tape; the foam won’t stick to it either.
I screwed a doubled fire hose around the perimeter. Bend outward. First, you put a galvanized metal strip with holes into the sleeve. Self-tapping screws every 200 mm.
And I have insulation around the perimeter with frost. Just so neatly.
Nope)) I don’t like this kind of insulation, I used it for a while too)
I sewed up the gate first with a wooden sheathing around the perimeter, then with polystyrene foam and then the whole OSB-3 thing on top. So I tried to adjust the OSB so that it would fit right next to the frame. But there’s still such a neat frost around the perimeter. It doesn’t grow and melts when you heat it too much. Or rather , it doesn’t melt, but falls off in pieces. I’ll have to hang a curtain.
I should have taken a photo of the gap at the bottom too, the options depend on its size
I cut rubber inner tubes from Kamaz into strips. I secured these rubber strips in two layers - on one side and the other side of the rail (it turned out to be a double shutter). I did this around the entire perimeter of the gate. Then I trimmed these strips in place (in width so as not to interfere with the closing of the gate).
Polyurethane foam. I did this to myself, everything tightly in a circle. There are a lot of videos on YouTube.
Now on sale there are a lot of rubber profiles for sealing the joints of window doors and gates. Why reinvent the wheel?
I didn't see the rapids.
You can use the same ones for thresholds. Or too small?
Create an anti-threshold! )))))www.antiporog.ru/ustanovka-antiporoga.html
Cool stuff! I'm afraid it will freeze and the mechanism will become clogged with frost.
to seal the cracks at the gate, the first thing you need to look at is that at the exit from the garage - it’s just the ground that rises in winter or thoughtfully poured concrete... and so that it’s straight according to Feng Shui, or make second light doors so that there is a vestibule so that it plays the role of an “air cushion” or a more budget-friendly option for curtains made of felt and there will be a song
The only problem is with the threshold. I got confused with the rubber bands because I didn’t want a curtain.
A huge canvas curtain covers the entire wall, it will have a very cool effect.
I have a 50th corner welded to the prog without insulation and there are no problems.
a dozen mops with the bristles down. But in general, leave it, ventilation has never harmed anyone.
ventilation and draft are very different things... and where there are cracks, in winter there will be frost and quite a bit of it, which then melts and moisture - one wonders where are the advantages of such “ventilation”...
moisture is where the humid air of the garage comes into contact with cold objects; if there is a blow through the gap under the gate, then there will be no frost there, but if there is frost, what is the problem at the frost threshold? This is not a ceiling. Besides, the more ventilation, the less chance of catching the dew point. And I probably won’t list the advantages of ventilation.
Today we will figure out how to insulate garage doors with your own hands with the least amount of time and money. I bet you will be surprised how easy the job is and how little money is needed to complete the project.
Advice from craftsmen
Simple, proven advice from garage owners will help you reliably seal all the cracks and gaps in garage doors.
Recommendation one - polyurethane foam
The perimeter of the gate frame must be lubricated with grease or machine oil, and the ends of the gates must be thoroughly cleaned and moistened with water from a spray bottle. To treat the gate you will need two cans of frost-resistant polyurethane foam.
Now we close the gate and apply mounting foam. We wait until the foam expands and dries a little, and open the doors.
According to reviews, this option for sealing cracks in gates lasts one to two years. This quick tip is good when you need to quickly eliminate cracks in the gate, but it is not suitable for reliable thermal insulation.
If there are cracks and large voids around the perimeter between the frame and the wall, then first you need to clean out the voids, remove dirt, dust and loose pieces of masonry, and then seal the cracks with polyurethane foam. When the foam has dried, the excess is cut off and the perimeter of the box is additionally plastered with a regular mixture of M150 cement and sand.
Recommendation two – tape and sealant
For a standard gate, two tubes of silicone sealant and a roll of wide tape will be enough. Operating procedure:
- open the gate leaves all the way;
- clean and degrease the surface;
- We stick adhesive tape along the entire perimeter of the gate leaf (choose the width of the tape according to the width of the gate leaf);
- Apply a layer of sealant around the perimeter of the frame, in places where the doors are adjacent to the frame (it is better to use a mounting gun, as the consumption is less);
- close the doors and wait for the sealant to harden;
- When the gate is closed, we also apply sealant to the gaps that remain.
If the gaps between the sash and the frame are large, then this sealing is performed in two steps. So that the first layer adheres well.
Recommendation three - PVA and sawdust
Durable and reliable putty for the gaps between the frame and the walls - a mixture of fine sawdust and ordinary window putty, with the addition of PVA glue. As soon as this mixture begins to thicken a little, carefully seal all the cracks in the gate.
The glue ensures tightness and protects against moisture, and sawdust and putty reliably fill all voids in the gate. The recipe is suitable for small gaps in garage doors around the perimeter of the frame.
Recommendation three - porous rubber
The thickness of such a rubber seal is no more than 20 mm. The porosity of the material allows you to seal gaps of different sizes between the doors and the frame, ensuring a tight fit.
We glue the rubber onto the gate leaves at the top and bottom using the “Moment” universal. The surface of the valves must first be degreased. In the places where the hinges are attached, we glue such a rubber seal onto the end of the gate leaf.
Recommendation four - regular cement
If the gate frame is installed in an opening with large voids, then you will have to make side slopes - simple sealing with polyurethane foam will not work. We assemble formwork for the mortar from narrow boards or plywood around the perimeter of the box, and connect it together with wire.
Into such formwork we pour a cement mixture, preferably a thick mixture of sand, M150 cement and water. When installing such formwork, it is imperative that the solution fills all the voids by punching the screed several times with a reinforcing rod.
Let the screed harden for at least two weeks, then the formwork can be removed. Important - the cement mixture should be very thick, like soft modeling clay.
Recommendation five - seals for gates
Gate seals provide high-quality sealing and beautiful appearance. The price of the material is from 200 to 500 rubles per meter, depending on the width and quality of the seal. This insulation is easily mounted on gate leaves and around the perimeter of the frame.
Be sure to degrease the surfaces before installing rubber or silicone seals.
Do-it-yourself sectional door repair
Do-it-yourself repair of sectional doors is possible if the problem is not serious. Before restoring the system, the owner can carry out diagnostics, which will require simple tools:
- multimeter;
- a set of Phillips and straight screwdrivers;
- set of wrenches;
- level and roulette.
Timely monitoring of the performance of mechanisms to avoid costs for repairs and replacement of components. Let's list the main problems and ways to solve them.
How to straighten a bent garage door leaf?
Photo No. 6: The garage door is moved vertically
The garage door can move due to damage to the guides, a faulty coupling, or a stretched or broken cable. In case of minor deformation, the owner himself can straighten the guides, tighten or replace the cables, and restore the coupling.
How to Seal Gaps in a Garage Door
Repair of sectional doors "Alutech" and "Dorhan" involves sealing the gaps between the leaves and the frame. To eliminate drafts, you can use rubber bands, concrete mix or a nylon brush. It is most logical to fix the material on both sides. Polyurethane foam is not suitable for filling cracks because it breaks down in the open air.
How to replace a bent bottom panel of a sectional door
Damaged panels are exactly the case when you need to evaluate your strength before repairing. If similar structures have been installed before, you can get down to work. Otherwise, it is better to trust the professionals. Scheme of action for replacing the panel:
- lift the canvas 30–50 cm and tie the brackets of the last loop to the guides;
- turn the shaft to loosen the cables;
- unlock the drive and lock the gate;
- replace the panel.
Photo No. 7: Damaged bottom panel of sectional doors
When finished, perform the steps in reverse order.
How to tension a sectional door spring
Repair of sectional doors with Came automatics may also be required if the torsion springs are stretched. To return them to the correct position, proceed as follows:
- check that the marking on the spring is a straight stripe;
- secure the doors by placing a clamp on the shaft;
- place the tension rod in the adjustment hole at the end of the spring and turn it a quarter turn;
- place the second tension rod in the other adjustment hole, remove the first rod while turning the second one a quarter turn;
- repeat steps 3 and 4 until the spring is fully tensioned;
- secure the tensioned spring to the shaft by inserting a key and securing the bolts;
- remove the tension rods;
- check the number of revolutions on the marking strip.
Image No. 1: Torsion spring tension diagram
After this, you need to remove the clamps and check the operation of the system. If the blade is unbalanced, reduce the spring tension by one turn.
How to open sectional doors without a key
You can open sectional doors without a key in case of emergencies (power outages, system breakdowns) using the emergency unlocking system. The mechanism is a special cord that allows you to unlock the gate manually.
Photo No. 8: For autonomous opening of the gate, an emergency unlocking system is provided
When the cord is pulled, the release hooks on the chain carriages will be activated and the blade will rise. To close, simply return the cord to its original position, after which the gate will lower again. Additional methods for unlocking the system include a chain gear, a handle with a lock, and a knob.
You can buy gates, order their preventive inspection and repair at.
I want to share how I insulated the gate around the perimeter. I attached a corner to the slopes and put a car door seal on it. Now I’m racking my brains on how to seal the gap between the gate and the threshold, there’s a breeze coming from there. Tell me, how did you solve the problem?
Insulating a garage with a sealant
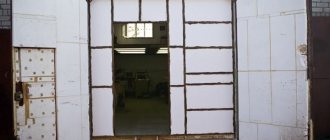
The formation of cracks and cracks in the room can be expected in the following places:
- joining the walls to the ceiling;
- connecting the gate to the garage frame.
Their appearance can be a serious reason that disrupts the functions of the vehicle storage room. It is mandatory to use a special sealant. Proper use of this material will allow you to successfully solve the problem associated with arranging thermal insulation for the garage.
The insulating structure of a building can be damaged due to various problems with the walls and ceiling, so only thermal insulation material can help solve them. The modern market offers different options for seals, including for garage doors.
Before purchasing insulation material, you should familiarize yourself with its main characteristics.
It is important to analyze all the positive and negative aspects of using the sealant. This will allow you to optimally cope with the task.
When planning to insulate garage doors with a sealant, you should carry out preliminary repair work. They involve the elimination (repair) of all cracks located at the joints of the gate structure. Additional thermal insulation may be necessary.
The purchase of a seal should also be carried out if this material is replaced. It is often used for swing gates, since the appearance of cracks in such a structure is considered normal. To create good thermal insulation, it is not necessary to choose a seal exactly according to the size of the gate. This opportunity does not always arise when choosing this type of material, and its geometric dimensions do not always coincide with the structure being insulated.
When choosing a seal for a garage door, you can consider 2 options for using the material:
- Closing joints in the floor, walls, ceiling.
- Hiding gaps between moving elements.
You should purchase a seal only after studying all its useful properties. The performance characteristics of this material must be compared to specific operating conditions. Not only the advantages of the material, but also its disadvantages should be taken into account.
Sectional door repair costs
The cost of repairing sectional doors depends on the nature of the breakdown, the workshop’s policy and the complexity of the measures. The following prices apply to different companies operating in Moscow and the region.
| Type of work | Price |
| Replacing hinges on canvas panels | From 300 rub. (a piece) |
| Replacing the bracket for the roller with a loop | 700–7000 rub. |
| Replacing the roller | 500–1000 rub. |
| Replacing/installing an additional button | 2000–3500 rub. |
| Repair/replacement and adjustment of locks | 2000–3000 rub. |
| Electric drive adjustment | RUB 3,000–10,000 |
| Replacing cables | RUR 2,500–14,000 |
| Drum replacement | 3500–4500 rub. |
| Antenna replacement/installation | 2500–3000 rub. |
| Replacing/installing a radio channel | 3500–5000 rub. |
| Replacing/installing a flashlight | 4000–5000 rub. |
| Shaft replacement | 5000–7500 rub. |
| Replacement/installation of photocells | 5500–6000 rub. (for 2 pcs.) |
| Replacing a torsion spring | 6,000–20,000 rub. |
| Replacing the electric drive | RUB 6,000–14,000 |
| Replacement/installation of chain gear | RUB 7,000–10,000 |
| Repair with engine overhaul | 6000–7000 rub. |
| Replacing the drive control unit | 8000–9000 rub. |
| Panel replacement | RUB 8,000–20,000 |
Urgent repairs of sectional doors usually cost more than planned and/or preventative measures. Amounts are indicated taking into account the cost of materials. We offer repair services for sectional gates only under warranty situations listed in the service agreement.
When is sectional garage door repair necessary?
Repair of garage sectional work is required after system failures due to intensive use, exposure to moisture and precipitation on the mechanism, impacts, etc. Typically, craftsmen note the following types of breakdowns.
Damage/breakage of cables
Rupture or stretching of cables usually occurs for the following reasons:
- wear of parts during intensive use of the system;
- mechanical damage due to sudden loads;
- incorrect installation of the canvas, which, when moving, clings to the rollers, hinges and fasteners;
- wear of the cable when winding on a drum with broken grooves, chips, dust;
- damage to the cable when it comes into contact with faulty pulleys.
Photo #2: Damaged cable usually requires replacement.
Automatic sectional doors when the cables are stretched are repaired according to this scheme. First, specialists find and eliminate the cause of the damage, replace the cable and balance the torsion mechanism. Then the automation is programmed.
Weakened/broken torsion spring
The following problems in the system lead to weakening or breaking of springs:
- wear and tear during long-term use;
- irregularity of preventive examinations and maintenance;
- operation of the fence under aggressive external influences (in conditions of high humidity and critical temperatures);
- failure of the coupling.
Photo No. 3: If the spring weakens, it must be balanced
To correct the problem, specialists balance the spring (or replace it when balancing is not possible), and then repair the coupling.
The remote control does not work
Repair of sectional doors "Dorhan" and "Alutech" in the presence of a faulty remote control system is usually required for the following reasons:
- The remote control battery is low;
- the radio receiver is out of order;
- the electronic circuit of the key fob is worn out;
- electrical wiring is damaged.
Photo No. 4: If the gate does not rise when the remote control clicks, look for a fault in the automation
During the process, specialists check the key and receiver, test the condition of the electrical wiring, replace failed components and configure the system.
The doors do not rise automatically
If the sashes do not rise and fall automatically, the cause of the failure is usually:
- broken electric drive;
- lack of voltage in the electrical network;
- faulty remote control, radio;
- set manual control mode.
To correct the problem, technicians check whether the automatic mode is unlocked, whether there is voltage in the electrical network, whether the drive and parts of the control system are working properly. If problems are detected, specialists carry out repairs or prompt replacement of defective elements.
Photo #5: Gate leaves do not rise automatically
Experts are often called in to solve other problems. These include:
- noise when raising/lowering the sashes caused by dust on the guides or wear of moving parts;
- breakdowns of the gearbox, shaft, drum (often requiring complete replacement);
- deformation of guide bars;
- damaged canvas panels.
Why and how to insulate a garage
Inexperienced car enthusiasts do not attach much importance to the insulation of the garage space. There is a garage for a car and that's good. And soon they are surprised to discover that the car body begins to rust. It's all about humidity. Cold street air, penetrating through the gate without insulation, causes a temperature difference, which leads to condensation.
Fogging in the garage occurs in both winter and summer. This is influenced by both the cooling engine and the change in outside temperature during the day. As a result, increased humidity contributes to the development of mold, which affects the car itself and everything in the room with it. It may not be noticeable at first, but the metal parts, body and electrical wiring begin to rust, and the interior trim begins to crack.
The second point is the garage itself. Car owners use it not only as a parking place for their cars, but also often equip it with a workshop, a carpentry shop, and just a hobby club for friends. If the garage doors and walls are well insulated, then working inside will be much more comfortable. Repairing a car in the cold is still a pleasure.
In most cases, garage walls are made thick and secure. The cold mainly enters through the gate, which must be carefully insulated. The purpose of such thermal insulation is to minimize the leakage of warm air through garage doors. A lot of heat comes from a cooling engine, you just need to prevent it from escaping into the street through the door gaps.
To minimize condensation, it is necessary to provide ventilation in any room. But in the garage it is better to get by with a simple hood with natural circulation. Moreover, it must be made in such a way that it can be blocked. There is not too much heat anyway, there is no heating, air exchange in severe frosts should be reduced to a minimum.
Seals from improvised means
In addition to purchased options, you can make sealing material from available materials. When planning to make a seal in the garage with your own hands, the main thing is to pay special attention to the choice of material.
For this purpose, things that are often found in the garage of many car enthusiasts are suitable: an unnecessary watering hose, a rubber tire and others. This option will save money and show creativity. If you do everything correctly, the end result will be no worse.
This method has only one, but significant, drawback - ready-made seals have good anti-wear properties. In addition, ready-made options are more resistant to temperature changes thanks to special protection. In conditions of in-house production, such an important property is missing.
In this regard, it will be necessary to regularly monitor the condition of the homemade seal and, as soon as possible, replace elements that have become unusable due to the influence of any mechanical influences.
A DIY garage door seal would be a good option for protecting the floor, bottom and side seams. In order to maximize the protection of the room, it is better to use purchased options for sealing side seams, but in other cases of cracks, homemade ones are suitable.
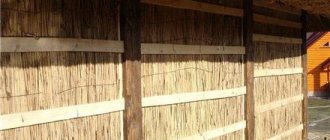
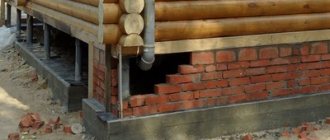
How to get rid of cracks under a fence
Some time after the construction of the fence, cracks may appear under it. Such holes are usually made by pets that roam freely around the site. For example, dogs often do digging. Ground sliding is also possible.
To prevent gaps from appearing, it is recommended to do the following during the construction stage:
- raise the foundation. Even on an uneven area, the foundation can help adjust the fence to one line;
- make embankments. But this is a labor-intensive and expensive method. The fact is that it is necessary to fill the area where the fence will be with soil. Then piles are driven in, which will hold the soil from washing away.
If the owner of the site has done nothing to prevent the soil under the fence from eroding, then actions should be taken during operation to prevent further erosion of the soil.
The photo shows a mound of soil covering the gap.
When the fence is already in place, the owner should:
- Fill the gaps with soil. Small cracks are filled with earth and over time overgrown with grass, the roots of which will prevent them from being washed out. However, animals will be able to dig.
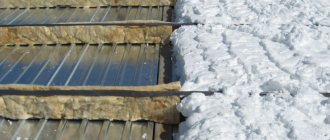
- Another option is crushed stone. Make a small groove along the fence outside the site and pour crushed stone into it exactly to the place where the lower edge of the fence begins. This will protect against the penetration of forest animals. Foxes, for example, love to dig tunnels, but a pile of rubble can stop them. They will not be able to break through a dense mound of stones.
- It is recommended to hide the cracks with wood. It is necessary to cut the boards to the required width and length. After this, you should cover the lower part with bitumen, and the upper part with an antiseptic or other protective solution so that the wood does not rot from dampness. Then the upper part should be attached to the lower edge of the fence, and the lower part should preferably be dug into the ground. This way, no cat or dog will be able to crawl through the boards.
Additional options
You can close the opening with a sheet of slate. But still, this is an ugly material that will look unaesthetic. This type of protection is most often used for temporary barriers.
As with closing the gap between the gate leaves, a chain-link mesh will help. One end of it must be secured to the fence, and the other must be dug into the ground.
You can use corrugated sheets. It also needs to be attached to the lower edge of the fence using self-tapping screws. The part that is on the ground must be carefully buried.
Bricks or stones will help to bridge the gaps. If you carefully lay them out along the fence, they will look like the original decor as a continuation of the foundation.
However, if the owner has small pets - cats or dogs, which often crawl under the fence, then they can cause damage to themselves. Therefore, in the latter case, a hedge is not recommended.
FakeHeader
Comments 51
I chose a day where there was not much thaw and foamed the gap between the threshold and the gate, it became better) By the time I had time, the frosts now reached -30.
The bottom can be made with felt
Frozen to the gate.
Then from the heart's sleeve
Hang a curtain made of dornite, we have one of these hanging in every garage and you will be happy
You can put felt padding on the gates, but I also saw that in the neighborhood in garages people wrap a tarp around a board and just lay it down with their hands every time.
Thank you! I am also inclined towards this design, make brackets for the threshold and insert a board with felt there.
I was also intrigued by the question until I saw that people were just using the boards, not just one person, but quite a lot.
such a good corner for a sealant... my toad says that a profile for drywall would be enough, it is noticeably cheaper!
The threshold is coated with the compound and the foam is applied directly into the crack on the closed door. After hardening, the foam will remain on the door itself, creating a seal and will not stick to the threshold.
I support! I did exactly the same thing around the entire perimeter, everything worked out perfectly and it turned out hermetically sealed. Only I didn’t smear it with polish, but with a thin layer of lithol. Three years have already passed, no complaints.
The threshold is coated with the compound and the foam is applied directly into the crack on the closed door. After hardening, the foam will remain on the door itself, creating a seal and will not stick to the threshold.
You can cover it with tape; the foam won’t stick to it either.
I screwed a doubled fire hose around the perimeter. Bend outward. First, you put a galvanized metal strip with holes into the sleeve. Self-tapping screws every 200 mm.
And I have insulation around the perimeter with frost. Just so neatly.
Nope)) I don’t like this kind of insulation, I used it for a while too)
I sewed up the gate first with a wooden sheathing around the perimeter, then with polystyrene foam and then the whole OSB-3 thing on top. So I tried to adjust the OSB so that it would fit right next to the frame. But there’s still such a neat frost around the perimeter. It doesn’t grow and melts when you heat it too much. Or rather , it doesn’t melt, but falls off in pieces. I’ll have to hang a curtain.
I should have taken a photo of the gap at the bottom too, the options depend on its size
I cut rubber inner tubes from Kamaz into strips. I secured these rubber strips in two layers - on one side and the other side of the rail (it turned out to be a double shutter). I did this around the entire perimeter of the gate. Then I trimmed these strips in place (in width so as not to interfere with the closing of the gate).
Polyurethane foam. I did this to myself, everything tightly in a circle. There are a lot of videos on YouTube.
Now on sale there are a lot of rubber profiles for sealing the joints of window doors and gates. Why reinvent the wheel?
I didn't see the rapids.
You can use the same ones for thresholds. Or too small?
Create an anti-threshold! )))))www.antiporog.ru/ustanovka-antiporoga.html
Cool stuff! I'm afraid it will freeze and the mechanism will become clogged with frost.
to seal the cracks at the gate, the first thing you need to look at is that at the exit from the garage - it’s just the ground that rises in winter or thoughtfully poured concrete... and so that it’s straight according to Feng Shui, or make second light doors so that there is a vestibule so that it plays the role of an “air cushion” or a more budget-friendly option for curtains made of felt and there will be a song
The only problem is with the threshold. I got confused with the rubber bands because I didn’t want a curtain.
A huge canvas curtain covers the entire wall, it will have a very cool effect.
I have a 50th corner welded to the prog without insulation and there are no problems.
a dozen mops with the bristles down. But in general, leave it, ventilation has never harmed anyone.
ventilation and draft are very different things... and where there are cracks, in winter there will be frost and quite a bit of it, which then melts and moisture - one wonders where are the advantages of such “ventilation”...
moisture is where the humid air of the garage comes into contact with cold objects; if there is a blow through the gap under the gate, then there will be no frost there, but if there is frost, what is the problem at the frost threshold? This is not a ceiling. Besides, the more ventilation, the less chance of catching the dew point. And I probably won’t list the advantages of ventilation.