Choice of shape and material
The chimney cap was invented quite a long time ago . It solves several practical problems:
- protects the chimney from external factors: rain, snow and wind;
- acts as an additional roof decoration.
It is important to provide, first of all, protection from wind and precipitation, otherwise the walls of the chimney will be destroyed under the influence of weather conditions.
The cover should be selected in accordance with:
- channel type;
- hole diameter.
Based on these indicators, select:
- a cap made of chrome and nickel if the house is heated with gas;
- a removable product if the apartment is heated by a fireplace, solid fuel boiler or wood stove.
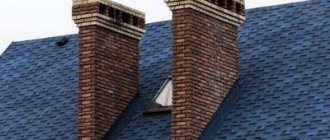
The main types are models with a round and square base, stationary or folding, made of tin - chromium-nickel or black. Many modifications are unfounded. They are fixed directly to the chimney duct.
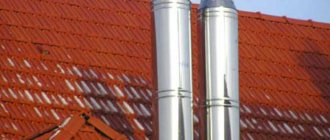
Today, chimneys made of galvanized or stainless steel and copper have appeared. It is also possible to select modifications so that the shade of the cap matches the color of the roof. The selected option must correspond in functionality to the specific type of pipe. It should also match the style of the building.
How to make an umbrella for a chimney with your own hands
Before manufacturing, the diameter of the chimney must be measured, and the step-by-step technology for manufacturing such a structure is as follows:
- cut a tin strip 70-80mm wide and long depending on the diameter of the chimney pipe, adding a small margin for fastening;
- Use a caliper to draw strips with a 10mm indentation from the edge of the tin strip;
- punch the rails with a hammer in accordance with the marked stripes , which will allow you to easily and evenly bend the workpiece;
- make four parts according to the strip marks, tap, make a right angle, wrap and finally punch with a hammer;
- prepare a cardboard round pattern , the diameter of which exceeds the size of the chimney pipe by 150mm;
- cut out a tin circle for the umbrella in accordance with the prepared pattern and cut out an angle that allows you to assemble it in the shape of a cone.
DIY umbrellas
The finished umbrella must be riveted in a couple of places, after which three reinforcement strips or so-called racks must be attached to the structure.
IMPORTANT!
The easiest way to improve the appearance of the finished structure is to beautifully design the edges . For this purpose, you can make cuts in the metal along the edges and slightly bend the resulting “petals” or bend the cut edges in a wave-like manner.
Architectural form
As for the architectural shape of the cap, a multi-slope weather vane can perfectly protect against precipitation and snow. This chimney looks very impressive, especially if you place figures of any animals made of metal on top.
Models with a flat surface are more often used. There are caps with an opening lid, which are also popular. They are convenient for preventive maintenance and unhindered maintenance of the chimney. The deflector, which has a ventilation hole in its body, significantly improves traction.
But the smoker is not always used. There is virtually no need for it in areas where there is rarely precipitation and virtually no wind. But for Russian latitudes it is a necessity.
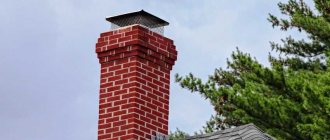
Chimney umbrella
A chimney hood can be installed for several reasons:
- it is capable of partially closing the mouths from blowing wind, due to which the draft is prevented from overturning;
- the chimney prevents small debris from getting inside;
- mesh design provides protection from nesting birds;
- such a product extends the service life of the head of a brick pipe, which can be destroyed under the influence of precipitation;
- A weather vane of this type has good decorative qualities, and therefore is able to complement the architectural appearance of the building.
Installing the hood
Here you should focus on safety and practicality. The last thing you need to think about is the external attractiveness of the structure. It is important to consider the following recommendations:
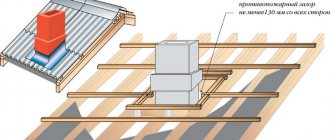
- Round steel pipes cannot be covered with traditional shaped structures. They remove smoke from highly efficient boilers whose efficiency exceeds 85%. It is better to use conical nozzles made in the form of an open nozzle. They will not become covered with a crust of ice in freezing temperatures.
- A brick chimney, devoid of inserts, connected to a high-efficiency heat generator, can be equipped with a cap-shaped nozzle. A pipe passes through it.
- It is advisable to install an umbrella on stoves with vertical channels. This shape performs a protective function on the chimney. But to make this possible, it is advisable to place a stainless steel plate inside.
It is recommended to install hip or gable hoods on smoke exhaust blocks made of brick and equipped with side vents. Due to this, the upper part of the masonry will be protected from precipitation and wind. In this case, contact with the gas duct openings on the sides will be excluded.
To protect a brick block, where chimney and exhaust pipes are open at the top, you can make a box with several through pipes. They, in turn, are inserted into the specified channels. Conventional mushroom-shaped caps are installed on top of the ventilation terminals, while conical nozzles must be installed on gas terminals.
Features of the device and its purpose
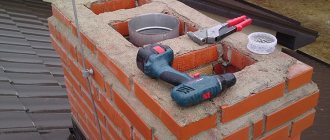
An important part of the heating system is the chimney, regardless of where the smoke is discharged, be it a stove or a gas boiler. Most often, the chimney is a pipe that has access to the roof. An unclosed chimney very quickly ceases to perform its functions, so it needs protection such as an umbrella for the chimney pipe.
In addition to its protective function, the umbrella has the following purposes:
- Fixes and strengthens brick or stone masonry.
- Prevents destruction of the top part of the pipe.
- Removes condensation and excess moisture.
- Completes the appearance of the pipe and the entire roof.
The main part of the structure is the head, made in a free form and with edges lowered down (read: “Which chimney pipe head to make and how to install it”). Additional structural elements include: a drip tray, a device designed to collect condensate, and fixing elements. The drip cap is not a mandatory element, but its absence leads to a reduction in service life, since the masonry is destroyed under the influence of moisture, and corrosion may appear on the metal parts. For the same reason, it is recommended to install additional protection in the form of a mesh.
Making a visor
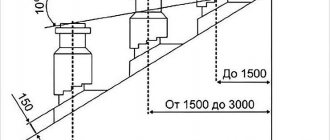
You can make a cap for the chimney pipe with your own hands. The drawings will help you navigate this, but it is important to follow all the parameters specified in it. First of all, you need to determine the external dimensions of the head. The umbrella will be attached here. Following this, you need to sketch a sketch depicting the future structure. To do this correctly, you need to consider the following points:
- the diameter of the product must be 10 cm larger than the dimensions of the pipe so that the edges protrude on all sides up to 50 mm;
- slope angles should vary from 30 to 45 degrees;
- from the chimney cut to the fungus, the minimum height should be 100 mm.
An umbrella is a traditional solution . There are other design options:
- rotating weather vane;
- deflector.
The latter makes it possible to increase traction through wind pressure. Thanks to it, a vacuum is created in the cylindrical body, into which the smoke channel passes. In calm weather, this device retains all its positive qualities. At the same time, it reduces the traction force in the pipe, which results in increased resistance at the exit of combustion products.
A semi-cylindrical weather vane is often popularly called a “sycophant” because it turns with the wind. It is mounted on a special bearing and consists of several components. This is one of the best options, but there are doubts about the reliability of the bearing, and the price of this design is high. It is especially good to install such a model on a round chimney, as it protects the mouth of this device from precipitation and blowing out.
To make a chimney for a canopy with your own hands, it is better to use painted or galvanized metal, the thickness of which is at least 0.5 mm.
DIY visor
Before you make a fungus on a tin pipe with your own hands, you need to create a sketch depicting the future structure. In this case, it is necessary to take into account the following nuances:
- slope angle from 30 to 45 degrees;
- the edges should protrude by 50 mm;
- the height from the chimney to the umbrella is at least 100 mm.
Necessary parameters for making a hood Source izhartezia.ru
The easiest way is to create a round mushroom suitable for ventilation systems. This will require standard tools: drill, metal scissors, hammer, rivets. How to make an umbrella for a pipe with your own hands:
- Take a wooden plank.
- Screw 2 screws into it at a distance of more than 15 mm relative to the radius of the pipe.
- Using the created device, draw a circle on a metal sheet.
- Cut out the prepared circle.
- Draw a sector with an arc length of about 120 mm.
- Cut out the wedge and secure the edges of the workpiece in a vice.
- Prepare 3 holes along the edge of the seam to connect the part using rivets or M4 screws with nuts.
The leg for the manufactured umbrella can be a thin sheet, bent 3 or 4 times. For a novice specialist, this will take a little more than half an hour. Experienced professionals will be able to complete the task in 10-15 minutes.
Ready-made version of the manufactured visor Source stb26.ru
Making a Simple Round Umbrella
To perform such work, you need to prepare tools: a drill, metal shears, a hammer and equipment for installing rivets. Once the size of the fungus is determined , work is performed in the following order:
- Screw two self-tapping screws into a wooden plank, maintaining a distance between them equal to the radius of the product + 15 mm. It turns out to be a homemade compass, with which you can make a mark on the metal, marking the central part of the circle. Its outline is also drawn.
- The workpiece is cut with scissors, after which a sector is drawn, the arc length of which is 120 mm. The resulting figure is somewhat reminiscent of a piece of cake.
- The indicated wedge is cut out, and then the outer edges of the figure are aligned with force. Fix them with a vice.
- Drill three holes along the resulting line and connect the ends of the part with screws or rivets. The upper part of the weather vane can be considered ready.
Using steel strips, legs for the fungus and a clamp encircling the pipe are created. They take thin sheets that are bent several times. These parts are similarly secured to the umbrella with rivets.
Do-it-yourself chimney deflector: drawings and photos
A do-it-yourself canopy for a chimney pipe is not uncommon, and many people try to make it. If you have a sheet of galvanized metal and available tools, you can save a lot of money on the purchase and installation of a deflector. To do this you will need the following:
- a drawing set, a fairly long ruler, as well as a tape measure and a marker;
- metal scissors, fastenings (drill screws with 15 mm press washer or rivet gun);
- drill with various drill bits;
- material for the cap (galvanized, aluminum or stainless steel) with a thickness of 0.3-0.5 mm;
- additional metal parts for making rigid fasteners.
In order to make a smoke hood for a chimney pipe with your own hands, you need to make the appropriate measurements, and then, guided by the drawing, you can start working.
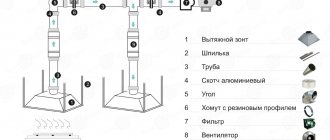
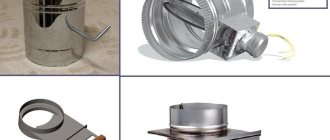
Using metal scissors, you can make a smoke vane with your own hands. To do this, you need to cut out the parts of the required size. Then roll up the diffuser body and drill holes in the top and bottom so that once the rivets are secured, you have a solid structure. Do-it-yourself chimney cap drawings will help you assemble it correctly.
Ventilation deflector: types and characteristics of deflectors for pipes (read more)
Diagram of the deflector-vane device: D = 108 mm; B = 210 mm; H = 80 mm; R = 200 mm; H1 = 530 mm.
After this, you can begin making the upper cone. You can attach the paws directly to it (usually you need about 6 pieces).
Before you completely assemble the wind vane onto the pipe with your own hands, do not forget to fix the fasteners with which the diffuser will be connected to the lower cone of the structure. The same rivets can be used as fastening. In order to install the cap on the pipe, it is best to remove its upper part in order to place the cap on the studs or legs, and then install the entire structure back.
On a note! Do not neglect the quality of installation of the deflector on the pipe. Being under constant wind load, poor-quality fastenings will very soon lose their characteristics and the structure will fall apart.
Of course, a DIY fungus on a chimney pipe has no decorative value. Its design is primitive, but it can increase traction by 20-25%, and also protect the roof from accidental sparks. Using the drawings, you can make a cap for a chimney pipe with your own hands quite simply and at the same time spending a minimum of resources.
Pattern diagram for making a chimney for a chimney.
Gable model
To make a gable weather vane, you need to use a machine called a sheet bender.
Just as in the previous case, first measure the outer surface of the brick chimney. Calculate the pattern and make the corresponding diagram. Next, the cap is assembled using a simple algorithm.
You need to cut the metal and bend it following the dashed lines. The resulting parts must be connected with rivets. The function of rigid racks is performed by ready-made corners made of painted metal , the thickness of which varies from 0.5 to 0.7 mm.
European cap
This model is more designed to prevent the formation of condensation and has a rounded appearance. A chimney of this type can be made independently using a steel sheet and hand-made holders.
How to make a European cap:
- Take a standard metal sheet and carefully bend it around the pipe, or directly along the contour of the chimney.
- They remake the spoons that will hold the cap directly on the pipe. It is best to do this with a special machine or ask a welder you know. You can also make transverse cuts that do not go all the way and carefully bend the strips using pliers.
- These cuts do not have to be transverse. It is permissible to use longitudinal strips if the piece of metal is quite long. A rectangle is cut out along the edges and the tails are left in the center. After this, roll the sheet in the shape of a semicircle and press the tails with a clamp.
- Gently bend the legs.
It is permissible to use a regular chimney pipe clamp to mount such a cap on the pipe.
To make a European cap, all you need is a piece of sheet metal and a grinder disc.
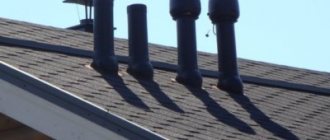
Why is a chimney pipe cap needed?
Caps on the chimney pipe are a fairly common occurrence. However, many people are confused about what they are needed for. There is an opinion that they protect the pipe from condensation. However, this is not quite true. Evaporation and collection of moisture occurs in the inside of the pipe, and a cap on the chimney pipe (photos on the Internet clearly demonstrate the principle of its operation) can do little to help here.
What is a chimney pipe cap actually needed for? Let's look at a few of its main functions:
- protection of the inside of the pipe from various foreign objects, dust and debris;
- extending the operational life of the pipe by protecting it from precipitation;
- some caps, due to their design, increase the draft in the pipe and do not allow strong winds to overturn it;
- perform an aesthetic function, giving the pipe an attractive appearance.
A forged chimney cap gives an aesthetic appearance to the outer part of the chimney.
It is worth recognizing that most of the decorative vanes on the chimney pipe do not improve the functional characteristics of the chimney at all, but, on the contrary, reduce these indicators. The only exceptions to this rule are nozzles that have the following types of design:
- Weather vanes-deflectors.
- Nozzles with similar industrial exhaust deflectors.
The first option is much more effective than the second. The semi-cylindrical body remains movable due to the bearing. It can rotate depending on weather conditions, and like the petal of a weather vane, it is fixed so that its back is always turned to the wind. As a result, smoke draft increases due to the vacuum generated inside.
The principle of operation of the second mechanism is as follows: a certain vacuum appears inside the deflector itself, due to the fact that the air flow formed as a result of wind load goes around the head on the brick chimney pipe. As a result, such an “umbrella” functions differently, depending on weather conditions: in windy weather it increases traction, and in calm weather, on the contrary, it reduces it.
Stainless steel chimney weather vane.
On a note! A strong argument in favor of the first option is that the design of the chimney pipe completely eliminates the danger of the draft being blown out by the wind, which still sometimes happens when using the second type of system.