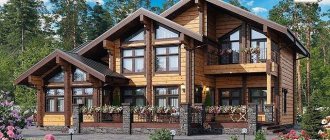
The procedure for insulating walls
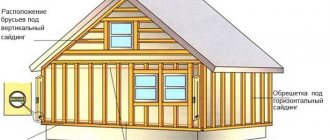
Wall insulation scheme for a frame house
The process of insulating walls is the longest, because the working area is quite large. The whole process is divided into three stages - surface preparation, laying insulation and finishing. The facade can be tiled, decorative plaster or made ventilated.
For insulation you will need:
- thermal insulation material;
- beams or aluminum profiles;
- building level;
- drill;
- self-tapping screws;
- primer;
- vapor barrier membrane;
- cement mortar;
- finishing material.
Step 1. Preparatory work
Preparatory work
The walls are cleaned of peeling paint, plaster, whitewash, wires, external switches, lighting fixtures are removed - everything that may interfere with work. Brick and concrete surfaces are checked using a level, and unevenness and cracks are sealed with mortar. Before insulating the walls, it is advisable to replace or insulate the windows and seal the joints around the perimeter of the openings. Wooden walls must be cleaned of dust and moss, and then covered with 1-2 layers of antiseptic primer.
Step 2. Installation of the sheathing
Installation of sheathing
The next step is performed if the insulation is mineral wool. For polystyrene foam, polyurethane foam boards and polystyrene foam, the sheathing is not installed. The sheathing frame is assembled from 60x80 mm timber or special aluminum profiles. The timber must be well dried, without dents, bends, or traces of mold. Before installation, it is impregnated with an antiseptic primer mixture.
The beams are nailed to wooden walls; they are secured to concrete or brick walls using anchor dowels. The distance between the sheathing posts should be less than the width of the insulation by a couple of centimeters. This will allow you to insert the material as tightly as possible and avoid the formation of cracks.
Step 3. Attaching the thermal insulation layer
Attaching the thermal insulation layer
Mineral wool slabs are inserted between the beams, being careful not to deform the corners. The thickness of the thermal insulation layer should not exceed the thickness of the beams. In cold regions, it is recommended to install a double layer of insulation, selecting the appropriate thickness of the timber.
Polyurethane foam boards and polystyrene foam are fastened differently. First, a stop bar is screwed along the wall, 10-15 cm away from the ground. The planks are overlapped together and connected at the corners with a special profile. Foam boards are applied to the wall, resting the bottom edge against the bar. Each plate is fixed to the wall with fasteners with caps. In the second row of insulation, the slabs must be shifted so that the seam falls in the middle of the bottom sheet.
Step 4. Finishing work
Finishing work
A fiberglass reinforcing mesh is glued onto polystyrene foam and polyurethane foam sheets. After this, decorative plaster is mixed and the walls are finished. Instead of plaster, you can tile the walls. The use of mineral wool implies the arrangement of a ventilated facade, although certain types of mineral wool can also be plastered.
Finishing work
Arrangement of a ventilated facade
Arrangement of a ventilated facade
A polyethylene film or a special windproof membrane is fixed on top of the mineral wool. Fix it to the wall surface using a stapler. Then a horizontal sheathing of boards is nailed onto the timber sheathing. You need to leave a small gap between the boards. After this, an end strip is installed along the outer perimeter of the house and the walls are sheathed with siding.
Warmth in the wrapper
The thermal conductivity of wet insulation increases several times. Therefore, one of the most important rules for installing a ventilated facade on a house is high-quality vapor barrier. Including from the side of the wooden structure. Why?
Let's consider the physics of the process. In winter, the air in hot rooms contains large amounts of water vapor. It moves to the cold side of the structure. Simply put, if there is a cold surface (the outer wall of a log house), then warm air in contact with it inevitably turns into condensation.
To protect the insulation, the outside walls are covered with membrane-type vapor barrier films. The panels are joined with an overlap of 10-15 cm, secured with a stapler. The joints are taped with butyl tape. Please note that one side of the vapor barrier is smooth, and the other is fleecy. When installing it yourself, you will be able to place it correctly - with the fleecy side facing the wall.
The lathing is made from antiseptic-treated timber or galvanized profile. Lumber is selected with the same cross-section as the dimensions of the insulation board. For example, if the thickness of the slab is 100 mm, the sheathing is made of 50x100 mm bars. They are attached to the wall with an edge, vertically, using self-tapping screws of the appropriate size, then a counter rail is nailed to create a ventilation gap. To fix the galvanized profile you will need metal hangers.
Advice! When insulating buildings with your own hands, the distance between the guides is made smaller than the width of the thermal insulation slabs. How much? Depends on what kind of mineral wool - glass or stone - you use. If the edges of the slabs are elastic, like basalt wool, then by 2 cm, soft, like glass wool, by 5 cm. This technique will speed up the installation process and minimize the amount of waste.
Having installed the two outer beams, stretching the cord along them, all the rest are leveled. Using a level, check for significant irregularities on the walls of the log house. You level them with your own hands using plywood pads. The sheathing is also installed in the corners of the house, along door and window openings.
Installation features
The insulation technology primarily depends on the selected heat insulator. If a rolled or slab material is chosen, then the ventilated facade for a house made of timber in the form of a multilayer system is equipped with ventilation gaps. In the case of using sprayed materials, the technology is simplified.
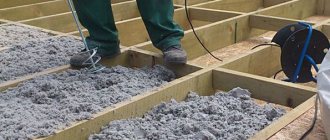
Spray insulation
Sprayed polyurethane foam and ecowool are applied directly to the walls, which does not allow for a ventilation gap to be created between the wooden structure and the heat insulator. In the case of ecowool, this is not important - such insulation is vapor permeable. But if the outside of the house is covered with a layer of polyurethane foam under the siding, the walls stop “breathing”, and you need to be very careful about arranging ventilation in order to avoid dampness in the rooms and the appearance of mold.
Thermal insulation of external walls with sprayed polyurethane foam
Before spraying the material, the walls are cleaned and vertical lathing is stuffed onto them, forming cells for filling with heat insulator. The size of the slats is selected in accordance with the calculated thickness of the heat-insulating layer.
Using special equipment, polyurethane foam is sprayed into open cells, and in the case of using ecowool, the technology depends on the thickness of the layer. If the size exceeds 70 mm, a vapor-permeable windproof membrane is attached to the sheathing. Holes are made in it (one per cell), through which the gaps between the slats are filled. The holes are sealed hermetically.
A windproof film is installed on top of the polyurethane foam layer, as well as ecowool, applied using the open method, a counter-lattice is stuffed, and the external finish is attached. If it is made of wood, the counter-lattice will provide a ventilation gap to prevent rotting of the material.
Arrangement of a traditional ventilated façade
If there is a task to preserve the unique microclimate of a wooden building, it is important to figure out how to properly insulate a house made of timber from the outside. When thermally insulating external walls, the provision of a ventilation gap between the wooden wall structure and the insulation is often neglected.
This leads to the fact that a wooden house does not remove excess moisture through the walls and the wood accumulates moisture. The result is the development of mold, rotting of the walls of the house.
To avoid negative consequences, you cannot install polymer insulation materials or a vapor barrier membrane for a mineral wool heat insulator directly on the wall.
Thermal insulation diagram of a timber house from the outside
First stage. To properly insulate a house made of timber, first of all, a vertical sheathing of edged boards 40–50 mm thick is placed on the walls. A vapor barrier is attached to it. The resulting gap allows air to circulate, removing excess moisture. It is necessary to leave a ventilation gap at the top, covering it with a canopy made of wooden slats to prevent the penetration of precipitation.
It is recommended to level the sheathing to a strictly vertical plane to make it easier to insulate a log house from the outside. All lumber used in the “pie” is pre-treated with an antiseptic and fire retardant.
Second phase. During the insulation of a log house, sheathing slats are attached to the boards of the installed sheathing under the slab insulation. The width of the slats must correspond to the thickness of the heat insulator. The end posts should be at the corner of the wall. The installation step depends on what material it was decided to insulate the house with:
- if it is polystyrene foam or sheet extruded polystyrene foam, then the gap between the slats should be equal to the width of the sheet;
- if the building is thermally insulated from the outside with mineral wool, then the gap should be 10–15 mm less than the width of the slab material.
Third stage. Thermal insulation of walls from the outside requires proper installation of insulation:
- polymer boards are inserted into the cells, all joints are filled with polyurethane foam;
- Stone wool slabs are installed by surprise.
Additional insulation of corners is usually not done, but when installing heat insulation along the edges of the walls, it is necessary to ensure that cold bridges do not arise.
Fourth stage. A windproof film is attached over the sheathing. If the heat insulator is a polymer material, you can use a regular film, but it is better if it is a material that protects from UV rays. When insulating the walls of a log house with a fibrous heat insulator (mineral wool), it is recommended to use membranes that allow steam to escape but do not allow moisture to enter.
Fifth stage. The facade finishing can be done using siding, lining, block house and other materials that are relatively light in weight. The walls should be sheathed using 40mm thick counter battens on top of the wind barrier. This will provide ventilation to the system.
Material characteristics
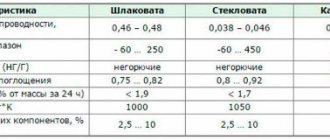
The structure of mineral wool consists of many fibers interconnected using special compounds. There are several types of material that differ from each other in the basic composition of the raw materials, and also have differences in their characteristics and properties.
Varieties
There are three types of mineral wool:
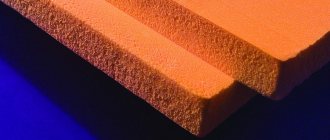
- Stone or otherwise basalt wool. The raw materials for its production are basalt rocks. It is a fibrous material that has low thermal conductivity, is moisture resistant, and has good sound absorption. The insulation does not burn and can easily withstand temperatures up to 1000 degrees. One of the most important characteristics is the absence of harmful components, therefore, stone wool is safe for humans and does not interfere with the environmental friendliness of a wooden house. The insulation is available in the form of slabs or rolls of different densities and is excellent for thermal insulation of facades.
- Glass wool. It is obtained by melting glass melt. Elastic fibers give the material rigidity and strength, making it an ideal choice for external insulation. But you need to work with glass wool very carefully; glass threads can injure the skin and eyes, so it is necessary to use protective equipment.
- Slag-like. Made from blast furnace slag. The material strongly absorbs moisture and has a fairly high thermal conductivity, which makes it unsuitable for insulating walls outside the house.
Criteria for choosing mineral wool
The effectiveness of external insulation largely depends on the characteristics of the material. Today, the choice of mineral wool is huge, therefore, in order to choose high-quality insulation, you must adhere to the following rules:
- For thermal insulation of the facade, only stone or fiberglass wool can be used.
- The density of the material should be from 80 kg/m3. This is due to increased loads on the facade insulation; so that it does not lose its shape, it must be dense enough.
- It is better to insulate external walls using slabs, which have standard dimensions of 120x60 or 100x50 cm. Rolled material is not so convenient for thermal insulation of walls outside the house.
- The thickness of the slabs ranges from 20 to 150 mm and is selected in accordance with the climatic conditions of the region and the thickness of the wall. Wood has low thermal conductivity, so timber and log houses require a smaller layer of thermal insulation than when insulating under brick. For example, in mid-latitudes, for a house made of 150x150 timber, a mini-slab with a thickness of 10 cm would be optimal. For cold regions, insulation is done in two layers.
Do-it-yourself insulation of a timber house from the outside
Many wooden houses do not have thick enough walls, so it is difficult for them to withstand the harsh Russian winters with severe frosts and strong winds.
Even high-quality sealing of all the cracks of the log house is unable to improve the thermal insulation properties of the building. Therefore, in order for the house not to freeze under the influence of extremely low temperatures and maintain optimal temperature conditions, it is necessary to insulate it from the outside. Setting up a good thermal insulation system is not as difficult as it seems at first glance. Today you can find a wide range of different thermal insulation solutions, built using very simple technologies, which allows you to carry out a number of measures to insulate your home without any special skills or abilities.
And to simplify the upcoming task, you can watch a lot of training videos with a detailed explanation of each stage.
Proper external insulation of a log house involves the use of different materials. The main thing is that they meet the following requirements:
- had excellent fire resistance and were not exposed to high temperatures;
- had low thermal conductivity;
- were environmentally friendly and did not emit toxic substances during operation;
- had good thermal insulation properties;
- did not accumulate moisture;
- let various emitted fumes escape from the room;
- had good noise insulation properties.
As for external insulation, this method has many advantages, namely:
- the ability to quickly transform or update your home;
- reduction of fuel costs due to improved thermal insulation;
- providing effective protection from any external factors: noise, moisture, dampness;
- significant savings in free space;
Internal or external insulation?
It is recommended to insulate a house for winter living, assembled from timber, regardless of the thickness of the walls. This is due to the installation technology - the corners are mounted “without residue”, and this design is prone to increased heat loss. The freezing corners of the house become damp, the wood begins to rot and over time the wooden frame collapses.
You can separately decide how to insulate the corners of the building from the outside, using a heat insulator and installing sheathing from wide boards. But such partial insulation is not effective enough and does not decorate the house.
Thermal insulation of a house made of timber from the outside
When figuring out how to insulate a house made of timber, you should pay attention to the key advantages of external insulation over internal
:
- Installation of internal insulation leads to a shift in the dew point inside the wall structures. This means that condensation occurs at the border between heat and cold and this occurs in a wooden wall. The result is gradual destruction of wood due to constant high humidity.
- A heat insulator attached to the walls inside a room is either vapor-tight (slab or roll material made of foamed polymer, including foil), or absorbs moisture, losing its thermal insulation properties, and therefore requires high-quality vapor barrier (basalt wool, glass wool). In both cases, the internal insulation system completely deprives the home of all the advantages of building from natural wood and requires the installation of high-quality ventilation to remove steam.
So, to the question of which side is it better to insulate walls, the answer is simple. Wooden beams are a breathable material, which is detrimental to constant humidity, so installing a heat insulator from the inside is impractical, not to mention the fact that this will noticeably reduce the area of the premises.
The advantages of installing a thermal insulation layer on the facade of a wooden house made of timber include:
:
- formation of a dew point outside the walls made of timber - they will be protected from freezing and dampness during the cold season;
- Carrying out work without interfering with the interior decoration (you can leave the walls in the rooms made of wood, without attaching additional cladding);
- the ability to ensure natural air circulation through the walls, which contributes to a favorable microclimate in a wooden house (but provided that a suitable method of installing the heat insulator is chosen);
- reliable protection of walls from atmospheric influences.
Insulating a timber house from the outside is not without some disadvantages, which include:
:
- linking the work to the season and weather conditions (preparing walls and installing thermal insulation in warm, dry weather);
- the difficulty of carrying out work at height outside with your own hands, the need to erect reliable scaffolding;
- the need to equip the external cladding of the house (cladding with siding, block house, etc.).
Thermal insulation of external walls of a house with mineral wool
Recommendations for external insulation of a timber house from specialists
Experienced craftsmen who have been engaged in this craft for many years agreed to give a list of basic recommendations that must be followed when performing insulation installation work. So:
- If you decide to purchase insulation in advance or simply carry out work in the rainy season, then you run a very high risk of losing all the useful properties of the material. Therefore, it is best to carry out work in dry weather, and also not to leave the insulation in the open air.
- If the pitch of laying the beams of the building is less than 15 mm (and this is the average width of the insulation), then installing the insulation will be even easier, since you will not need fastening materials. You can simply lay the material out.
- You should always remember about safety measures not only when insulating a building made of timber, but also in any other craft that is more or less dangerous to human life. Therefore, be sure to use a respirator, gloves and goggles during installation work.
Carrying out façade finishing of a wooden house
After the waterproofing layer has been laid on top of the insulation, the wooden slats are installed. The cross-section of such slats should be 40*50 mm. They will act as a strong and reliable sheathing, which is necessary for performing facade finishing. If timber is the main material of the building, then for finishing you can use lining, plank, facade boards, wooden siding, and other curtain wall facades, which are ideal for wooden houses. The facades are ventilated, they are excellent for providing comfortable conditions inside the house itself and for protecting against various negative influences from the outside. The façade finishing should be carried out immediately after the insulation is completed; there is no need to wait a certain time. The installation technology depends on what type of finish was chosen.
Safety precautions
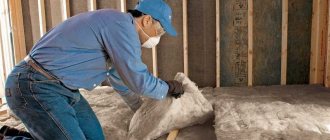
Even if you are not allergic, when working with mineral wool, be sure to protect your nose and mouth with a respirator, and your eyes with safety glasses. You will also need thick clothing with long sleeves and pants below the ankle and gloves. Otherwise, the smallest particles of mineral wool that get on the skin will cause irritation.
We put a barrier to the cold
Hired workers often insulate the facade from the outside with mineral wool, installing 100 mm thick insulation boards in one layer. However, cold air will still penetrate into the cracks between the mineral wool. It is more reliable to fasten 50 mm slabs in two layers, with a slight offset. If there are gaps and gaps left somewhere, they can be insulated with pieces of the same material. It is best to insulate the top layer with mineral wool of higher density.
The next stage is waterproofing the facade. For this purpose, a perforated diffusion membrane is used. It is mounted outside, between the mineral wool and the cladding, with the rough side facing the insulation. This technique will ensure the movement of water only from the inside to the outside. This means that your homemade insulation will be reliably protected from dampness.
What should I attach the cladding to?
The main highlight of the ventilated facade is the presence of a gap between the mineral wool and the facing material. And the constant movement of air quickly dries the water droplets.
For this purpose, slats 50 mm thick are mounted on the frame on top of the waterproofing. Exterior finishing will be attached to them - siding or facade panels, block house or wooden lining, etc. They are laid from bottom to top. If wooden cladding is used, the locking joints are oriented with the tenon up and the lock down. Then water will not get into the joints of the boards.
Air vents must be left at the bottom and top. But on the outside they are covered with a fine metal mesh to keep rodents out. And lastly: insulation will increase the thickness of timber walls by almost 20 cm. Do not leave the insulation open either from below or in the areas of window and door openings. Install sufficiently wide slopes, window sills and ebbs.
Stages of thermal insulation
Now let's figure out how to properly insulate a house made of timber from the outside.
Insulation of a timber house from the outside is carried out in several stages:
- surface preparation;
- formation of a waterproofing layer;
- creating sheathing for insulation on the outside of a wooden house;
- securing the insulation;
- installation of the second waterproofing layer.
At the first stage, it is necessary to clean the surface as much as possible and treat it with emulsion agents against fungus, insects, bark beetles and other pests. You should not skimp on medications and leave some areas untreated, because after insulating the walls of a house made of timber from the outside, you will no longer be able to influence their condition.
Tip: Treat the walls of your house in sunny and dry weather so that the walls dry quickly.
Before you insulate a log house from the outside with your own hands, you will have to protect the walls from moisture. Special membrane coatings are suitable for this. The stronger the film, the better, as the walls will be protected for a long time. A high-quality membrane film will not only keep the walls dry, but also promptly remove accumulated moisture.
Any film of this type has a smooth surface on one side and a rough surface on the other. It is on the fleecy side that all excess moisture will pass through, so glue the waterproofing material with this side to the wall. Place the protective covering overlapping by 10-15 cm, and also tape each joint.
The next stage is creating the sheathing. Measure the width of the insulating boards and begin fixing the wooden slats: the step between them should be smaller than these parameters, by a couple of centimeters.
The first wooden beam is fixed in the corner area of the structure. Use self-tapping screws for installation. After installing it, proceed to secure the remaining beams at the calculated distance.
To do this job efficiently, first leave markings on the surface of the walls. It should be level, so use a building level and scales. After completing the stage of creating the sheathing, make sure again that it is level both horizontally and vertically.
The next stage - installation of insulation - is the most important in this work. After this, waterproofing is carried out again, and this is done in a similar way to the method already described, so we will not stop at this stage. Let’s take a closer look at how to secure the insulation for a log house correctly.
Finishing a house over insulation
Next, the wooden house is sheathed with any finishing material you like. This could be siding, brick panels or a wooden block house. You can also make any hinged ventilated façade coated with any material.
Andrey Cherkasov, 2014, Moscow.
See more on this topic on our website:
- Insulation of a wooden house from the outside with mineral wool When building a wooden house, great importance is given to insulating the walls from the outside, which allows not only to create the most comfortable living conditions in the house, but also to save significantly...
- How to insulate walls with mineral wool in a wooden house from the inside The construction of residential buildings made of wood is gaining more and more popularity due to a number of specific reasons. If some people are interested in wooden houses because of the aesthetic...
- How to insulate a frame house with mineral wool In this material, Anton Fryashkin talks about insulating a frame house with mineral wool. Properly executed insulation of a frame house can significantly reduce the cost of heating the premises. Exactly…
- Technology of insulating facades with mineral wool A long time ago, in Soviet times, when houses were small and prices for gas and electricity were even lower, there was no question of energy saving. But today energy prices...
- How to insulate a timber house from the outside with polystyrene foam and polystyrene foam After building a house made of timber, many people are faced with the question of how much its walls can save heat, because in our harsh winter conditions this is...
Choosing the right material
To insulate a wooden house from the outside, you can use either polystyrene foam, mineral wool, or ecowool. Which material is right for you?
So expanded polystyrene - energy efficient, but not breathable - is eliminated in the semi-finals.
It is better to use mineral wool. It can be either glass wool or basalt wool. However, not all of them are suitable: you can’t insulate a timber façade with rolled material. Only slabs and mats with a density of 80 to 150 kg/m³. This can be glass wool brands Knauf Teplo Cottage plus TS 037 Aquastatik, Ursa P-30 facade or basalt wool ROCKWOOL Venti BATTS, ISOROC ISOVENT, TECHNOVENT Standard, etc. The standard size of the slabs is 500x1000 mm and 600x1200 mm with a thickness of 50 and 100 mm. This is very convenient for DIY installation. But in most regions of our country, only an additional 100 mm of thermal insulation of timber with mineral wool allows for comfortable insulation.
- glass wool insulation
- Basalt wool
- ecowool insulation
As for ecowool, it is a loose, bulk material made from cellulose. It is applied to facades only using the wet-glue method: then it does not sag over time
However, this requires special equipment and, what is important, very high-quality waterproofing of the log house
Selection of insulation material
Before starting insulation procedures, it is necessary to take into account a number of factors that determine the choice of thermal insulation material (including its cost, as well as the thickness of the plates or mats)
When choosing the insulation that is suitable for your conditions, we recommend paying attention to the following mechanical and thermal characteristics:
- thermal conductivity;
- compressive strength;
- elasticity and resilience;
- installation conditions
Taking these indicators into account, the following materials can be used for effective external thermal insulation of a timber house:
- windproof boards Izoplat;
- glass fiber wool;
- stone (basalt) or mineral wool;
- ordinary foam plastic,
- expanded polystyrene with a special structure;
- foamed polyethylene
Each of these heat insulators is characterized not only by its own advantages, but also has certain disadvantages that require separate consideration.
For the most effective and reliable insulation, Isoplat slabs are used
Scandinavian windproof Izoplat boards are made from softwood fiber without the addition of glue or chemical binders. Due to this, the slab does not shrink over time and “works” throughout its entire service life (more than 50 years). Izoplat slabs are chosen because of their easy installation, naturalness and high class of insulation, because 12 mm slabs = 44 mm solid wood. The slabs are also a “breathable” material, which allows you to do without additional vapor barrier and at the same time protect the house from rot, mildew and mold. Installation is very simple and can be done without the involvement of professional workers. The slab is simply pressed against the wall from the outside and nailed, and a ventilated façade is mounted on top.
Glass wool is one of the cheapest thermal insulation materials with good moisture and fire resistance. In addition, it will provide your building with additional soundproofing protection. The disadvantages of this material include the spread of fine glass dust, which is dangerous to the human body.
Mineral wool attracts consumers with its thermal stability and excellent thermal insulation properties. It belongs to environmentally friendly and completely harmless protective coatings for humans, which are quite easy to install with your own hands.
Polystyrene foam and similar insulation materials (expanded polystyrene and polyethylene) are produced in the form of plate blanks with a special structure that provides the required level of thermal protection. According to this indicator, this type of heat insulator is in no way inferior to insulation based on mineral wool and glass fibers. And in some of their characteristics they even surpass the latter (in terms of frost resistance, for example). Thus, polystyrene foam, in particular, can be used at outdoor temperatures down to minus 30 ° C.
Most often used for insulation of wooden houses: polystyrene foam, glass wool and stone wool
Procedure for insulating a wooden house from the outside under siding
Insulation of a wooden house from the outside
Procedure:
- The surface of the walls of a log house must be treated several times with antiseptic agents. The end of the house is processed with special care, since it is from there that the fungus begins to multiply. Such manipulations are carried out on a warm and clear day, since after the manipulations are completed, the surface will take several days to dry completely. Particular attention is paid to the corners and the lower crown of the building.
- The vapor-permeable material is attached to the wall surface using a construction stapler. It is worth paying attention to the fact that the glossy side of the material used should be directed towards the insulation. All joints are overlapped and sealed with tape. A sheathing with a beam diameter equal to the thickness of the insulation used is attached to it. If you lay the material sideways, then auxiliary fasteners will not be needed.
- Heat insulation mats should be laid between the bars, pressing them. If necessary, they can be lightly trimmed using a stationery knife. Fixation with slats will be needed if the insulation material has insufficient rigidity and does not adhere well inside the frame. The final fastening is done using anchor nails.
- If you plan to lay several layers of heat-insulating material at the same time, then this should be done overlapping so that the first seams are not visible. All work aimed at insulating a house made of timber from the outside using mineral wool and without dew must be carried out in protective clothing using a respirator.
- The membrane film is fixed on top of the insulation (to the outside). The joints are overlapped and sealed with tape.
- Then you should begin installing the frame's forced ventilation system. To do this, you will need bars that will help create the necessary gap between the insulation and the facade of the house (about 5 cm). Self-tapping screws are used to secure the bars. Profile hangers will only be needed if the walls are not level, which will allow you to independently adjust the gap to the frame.
- Fastening is carried out based on the technology given by the manufacturer. Timber, block house, metal profiles, and vinyl siding are used as facing materials.
Properties of mineral wool
The fibers of the material are made from basalt, a particularly strong rock. The big advantages of mineral wool are its resistance to mold, fungi, insects, and the ability to withstand temperatures above 1000°C.
In addition, mineral wool fibers have good vapor permeability, which allows vapors to evaporate rather than accumulate in the walls. An important quality of mineral wool is the absence of toxic substances in its composition.
The thickness of the applied insulation slabs depends on the width of the walls of the house itself. For example, for a 150 mm beam it would be correct to use only 5 cm of mineral wool. Thinner slabs are mounted in two continuous layers. The joints must be covered to enhance the heat-saving effect.
Types of mineral wool
URSA mineral wool is a mixture of dolomite (mineral) with quartz sand. Its main advantages are high elasticity and flexibility (facilitate installation) and excellent thermal insulation characteristics (the thermal conductivity coefficient of such insulation is 0.032 W/mK).
For the walls of ventilated facades, the Ursa FACADE material is used in the form of semi-rigid fiberglass slabs, covered with black high-density fiberglass. Additionally, the boards are treated with water-repellent agents. Thanks to all these qualities, there is no need to install windproof films.
ROCKWOOL mineral wool is made from basalt rocks impregnated with a hydrophobic mixture - the chaotic arrangement of mineral fibers ensures high strength. Such material contains a minimal amount of binders. ROCKWOOL is not subject to deformation during operation. It is produced in a variety of forms - rolls, slabs, mats of various thicknesses and areas, which also differ in the degree of rigidity.
ISOVER mineral wool is made from glass fiber and is characterized by excellent heat saving properties, dimensional stability and durability. The upper surface of such plates is covered with fiberglass, so they do not require the use of diffuse membranes. When carrying out two-layer insulation, such material acts as the top layer.
Installation diagram and insulation of a ventilated facade
Perhaps the most correct technology for insulating a log house is clearly shown here
As mentioned earlier, we will focus on the most popular method of insulation - a suspended ventilated system with laying insulation on a wooden frame.
To complete the work you will need to stock up on:
- hacksaw;
- level and plumb;
- tape measure;
- scaffolding and stepladder;
- power tools (jigsaw, screwdriver);
- building materials (frame bars, dowels, screws, insulation).
It is quite possible to insulate the walls outside of a log house with your own hands, without turning to professional builders for help.
Choice of insulation
Mineral wool slabs are also a good option in our case.
So, to insulate a house from the outside you can use:
- Mineral wool;
- Glass wool;
- Basalt slabs;
- Expanded polystyrene;
- Polyurethane foam;
- Other materials with properties identical to those mentioned above.
Expanded polystyrene
In addition to the names of the materials, you need to know the parameters by which experts choose the highest quality and most durable:
- High thermal protection indicators;
- Interference with the internal and external atmosphere (meaning the heat that the material should not let out of the house);
- Environmentally friendly and safe for the human body.
The principle of applying polyurethane foam
By the way, the most popular insulation today is polyurethane foam (PPU insulation), despite its high cost.
Let's look at its main characteristics to understand why people spend so much money and why it is one of the best insulation materials:
- It does not rot, does not fall off, and mice do not eat it;
- It has high thermal insulation properties even after decades of operation;
- Has high sound insulation characteristics;
- Easy to install;
- Its installation does not require the use of additional fasteners;
- Environmentally friendly.
So, if the family budget allows, the choice is obvious - polyurethane (for example, you can insulate a house with polyurethane foam).
Frame assembly
The owner of this house very competently assembled the frame for the ventilation facade and insulation
So we finally got to the main work - external insulation of a log house. Let's start with the fact that markings are made on the wall of the house for the beams. The step between the beams should be equal to the width of the insulation boards, but you should immediately take into account the fact that the insulation should sit tightly in it, so it is recommended to take a step of 1-1.5 cm smaller (this does not apply to insulation with polystyrene foam).
Now, let's start attaching the timber, which is attached to the wall using self-tapping screws. Remember that the position of the beam when fastening should be controlled using a plumb line and level.
If your sheathing turns out to be uneven, the insulation boards simply will not fit. Then they will have to be trimmed and built up, which will create additional problems and loss of time.
Laying insulation
The diagram shows in what order everything needs to be done.
After you have installed the sheathing, you can begin laying the insulation. It is necessary to ensure that the insulation fits tightly to the beams and does not fall out. By the way, if problems arise with fastening, the insulation boards can be easily secured with special dowels.
If you decide to use mineral wool as insulation, then in order to protect it from moisture, you need to use a special diffuse membrane that allows vapors coming from the house to pass through, but repels “external” moisture.
It is customary to use perforated film as a membrane. Polystyrene, glass wool and polyurethane do not require protection and can be installed without the use of additional building materials.
This is what perforated film looks like
Frameless insulation with mineral wool under siding
Unlike the method described above, this method does not involve the installation of a frame for thermal insulation, and mineral wool covers almost the entire surface of the wall. Thus, the problem with cold “bridges” is solved; the lathing elements act as lathing elements in the frame method of wall insulation.
Step 1. The walls of the house should be prepared for insulation - cleaned of debris, dirt and dust, dismantled everything that could interfere with the process and sealed the cracks and recesses with tow or pieces of mineral wool.
Step 2. The cleaned surface of the walls is carefully treated with an antiseptic. If a wooden beam is used as a sheathing, it also undergoes processing.
Step 3. As for the first method, a vapor barrier membrane is attached to the wall with staples.
Step 4. Next, universal U-shaped hangers are attached to the wall. In the horizontal plane, the distance between them should be less than or equal to the width of the mineral wool slab. In the vertical plane, the distance between the suspensions is 50-60 centimeters. They are attached to dowels.
Wall-mounted direct hanger
Step 5. Now you need to line the walls with mineral wool. For this method, you need to be especially careful to ensure that there are no large gaps or cracks through which heat will escape in winter. They must be sealed with pieces of mineral wool.
Fixed mineral wool slabs
Step 6. The next stage is external vapor barrier and wind protection. The rules for laying the membrane are the same as last time - the joints overlap, the seams are sealed with acrylic adhesive tape.
Why is vapor barrier of the facade of a house under siding so important?
Step 7. A sheathing made of steel profiles or wooden beams is attached to the hangers from the outside. It should press the mineral wool slabs against the wall and provide a ventilation gap between them and the siding. Use a level to ensure that the sheathing is installed level.
Profile fastening
Important! When insulating in two layers, the slabs of the second layer are positioned so that they overlap the joints of the slabs of the previous layer. This rule is mandatory for both frame and frameless methods of installing thermal insulation.
It can be noted that insulating a wooden house with mineral wool under siding is a relatively simple matter and does not require the use of expensive materials or complex tools, and therefore every homeowner can do it. By carefully following the instructions, you will receive durable and high-quality thermal insulation that will last you 25-30 years.
Video - Insulation of facade under siding
Materials
Only natural plant fibers are used, which are not based on any artificial additives. They provide an environmentally friendly atmosphere, do not emit harmful substances or unpleasant odors, and insulate sounds well.
All cracks and corners of the building are caulked with sealants made from natural plant fibers.
Auxiliary materials
Experts do not recommend finishing the insulation of a timber house with plaster. The reason is that as a result, the natural ventilation of the wall from the outside is impaired, which makes the wood more susceptible to rot and decay. You need to prepare the following materials for work:
- hydrobarrier;
- bars for the frame with a width corresponding to the heat insulator;
- the insulation itself is mineral wool, polystyrene foam, glass wool in rolls or slabs;
- finishing - siding or lining.