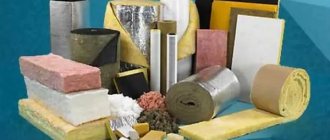
This term has been heard by everyone who has ever replaced windows, insulated walls or changed the heating system in their home.
So, let's look at what a dew point is, why you need to know its location in the wall and how it can be determined using available means.
Defining the essence of the term
At high temperatures and humidity, cold walls become covered with dew.
In simple terms, the dew point is the moment when the internal temperature of the room and humidity significantly exceed the temperature of the surface of the ceiling. In this case, moisture from the air inevitably condenses on the surface of the wall. This moment is influenced by:
- indoor air humidity;
- temperature of walls or ceilings;
- temperature inside the building.
If the room is humid and hot, then dew drops will immediately form on a cold glass.
Why is this term used in construction? Any fence: a wall or a window is a border with the outside world, which means the temperature of their surface differs from the average temperature in the room.
This means that moisture will regularly accumulate in the place where the dew point is located on the wall. Finding the dew point is influenced by:
- characteristics of materials used in construction and their thickness;
- installation location, number of layers and quality of insulation.
It is important that the dew point is on the outside of the building wall. Otherwise, we get a constantly wet surface and, as a result, the formation of mold, mildew, destruction of the decorative layer and the load-bearing characteristics of the structure.
What is dew and where is its point?
The nature of dew on meadow grass and moisture on finishing, windows or, even worse, inside building structures is the same. Dew condenses from water vapor in the air when it cools to its dew point temperature.
Where to look for dew point? Let's imagine a simplified structure of air (Fig. 1). At normal atmospheric (room) pressure, air molecules are quite far from each other. There remains a lot of free space between them, which can accommodate a certain number of water molecules (the same water vapor).
Picture 1
Now imagine that the air is cooling. It is known that the volume of any cooling body decreases. Air molecules are moving closer together, and there is less and less space between them. The microcosm is becoming crowded. There will come a moment when water molecules begin to be “squeezed out” from the volume of the air mixture. What remains for them? Unite together into large drops - dew - or small ones - fog.
The air dew point temperature has been reached - when excess water is “drained” from the air, condensation occurs (Fig. 2).
Figure 2
In other words, each temperature corresponds to a certain maximum of vapors dissolved in the air (Fig. 3). There may be fewer of them, then the air is drier and condensation is impossible. No more, since excess water from invisible steam will condense into droplet moisture. This is an important point, the basis for understanding how proper insulation of a balcony, and indeed the insulation of any room in general, is designed and assembled.
Air can be compared to a porous sponge. While the water is inside, we don’t see it. If you squeeze the sponge (cool the air), some of the water will flow out, and some will remain. If we press harder, a little more will flow out.
Figure 3. Air dew point graph
For example, if at +20 °C 1 m3 (cubic meter) of air in an apartment contains 15 g of water, then we are not in danger of any condensation (Fig. 4). After all, at this temperature, air can dissolve up to 17.3 g of water vapor. Cool the room to +10 °C. At the dew point at this temperature, air can contain a maximum of 9.4 g of water. This means that now in each cubic meter of air mixture there are 5.6 g of liquid extra (15–9.4 = 5.6). It will collect as condensation drops on dense objects or as dampness on absorbent materials.
Figure 4
Dew point calculation
Many owners of square meters are interested in the question of how to independently calculate the dew point in the wall. Purely theoretically, there is nothing difficult about this, especially if you are a mathematician, physicist, or simply remember the school curriculum well.
To do this you need to use the formula:
TP = (b * λ(T,RH)) / (a * λ(T,RH)), where:
- TP – desired point;
- a is a constant equal to the value 17.27;
- b – constant equal to the value 237.7;
- λ(Т,RH) – coefficient, which is calculated as follows:
λ(T,RH) = (a*T) / (b*T+ lnRH), where:
- T – internal room temperature;
- RH – indoor humidity, the value is taken in fractions, not percentages: from 0.01 to 1;
- ln – natural logarithm.
If in school you were more interested in playing basketball or reading Dostoevsky than logarithms, don't worry. Everything has already been calculated in the thermal protection data table under the number SP 23-101-2004, compiled on the basis of measurements and calculations by research and design organizations.
The most likely values under average Russian conditions are shown in the table below:
If you decide to calculate the value, you will get data similar to what is shown in the table. Among other things, you can use an online calculator to calculate.
Dew point. What is this?
The dew point is the cooling temperature of the surrounding air at which the water vapor it contains begins to condense, forming dew, that is, it is the temperature at which condensation occurs.
This indicator depends on two factors: air temperature and relative humidity. The higher the relative humidity of a gas, the higher its dew point, that is, it approaches the actual ambient temperature. Conversely, the lower the humidity, the lower the dew point.
Practical use
Knowing the value of the dew point is important when planning the insulation of a building.
In practice, the meaning of the term dew point is important when insulating the walls of a building. To ensure optimal thermal insulation characteristics of the building envelope, it is necessary to know not only the value of the dew point, but also its position on the surface or in the body of the wall.
Modern construction methods allow 3 options for carrying out work, and in each case the point of condensation may be different:
- A building constructed from a single material without additional thermal insulation. If the body of the wall consists of brick, stone or monolithic concrete, then if the construction technology in such buildings is followed, the dew point is located inside the wall. Its location gravitates towards the outer edge of the surface. As external temperatures decrease, the dew point will shift inside the wall. If the temperature difference turns out to be significant, there may come a time when the dew point is inside the room and moisture appears on the wall. We are all familiar with the situation: windows fogging up in winter.
With proper insulation from the outside, the dew point will be located inside the insulation - The building was constructed with a layer of external thermal insulation. If calculated correctly, this thermal insulation is optimal. Correctly selected material thicknesses will allow you to insulate the structure, while the dew point will be located inside the insulation layer.
- A structure with an internal insulating layer. In this case, the dew point will be close to the inner surface of the wall, and in case of cold weather it will move directly to the surface.
An exception in the case of a wall of the same type would probably be wooden log houses. Wood is a natural material with excellent quality characteristics of low thermal conductivity and high vapor permeability. In such buildings, the dew point will always be located closer to the external surface. Wooden log houses almost never require additional thermal insulation.
The latter option is extremely undesirable and is done only when there is no other option. To learn how to properly insulate the walls of a house, watch this video:
If, however, the insulation is installed inside the building, then additional measures should be taken:
- leave an air pocket between the thermal insulation layer and the cladding;
- provide ventilation openings and heating the room with an additional reduction in humidity levels.
Dew point in the wall - calculation and determination
Determining the dew point in a wall is very simple. Below is an example of how to make the calculation. This can be done by anyone who is interested in the issue of proper insulation.
The dew point is the temperature at which water vapor begins to condense.
What is dew point
The dew point in a wall can move across its thickness as indoor and outdoor temperatures change. For example, if the temperature inside the room is stable, but it gets cold outside, then the dew point will move along the thickness of the wall closer to the room.
The temperature of the object on which steam will begin to condense, i.e. dew point depends mainly on two parameters:
- air temperature;
- air humidity.
For example, if the indoor temperature is +20 degrees and the humidity is 50%, the dew point temperature will be (approximately) +12.9 degrees. If an object with this temperature or lower appears in the room, condensation will form on it.
For example, when a refrigerator is opened, dew from the incoming warm air falls inside it. It looks like "fog coming from the refrigerator."
If it is cold outside, then somewhere in the wall there will be a temperature at which steam condensation will begin, and at this point there will be humidification. If the wall is thin, “cold”, and its inner surface cools to 12.9 degrees or less (at the specified temperature and air humidity), then dew will fall on it, it will become wet, and will very quickly acquire mold.
When insulating walls and house structures, it is useful to calculate the dew point for the highest and lowest values of humidity and temperature in order to know within which boundaries of space the dew point will move when these parameters change.
How the calculation is performed
When calculating the dew point and insulation thickness, some parameters are not taken into account - pressure, air speed, material density... Therefore, we can only talk about approximate values. But this is not critical when it comes to determining the thickness of the insulation.
To determine the dew point in a wall, the easiest way is to use tables of ready-made approximate values, and not try to do the calculations yourself. Moreover, you should not trust homemade programs from the Internet; they often do not take into account parameters and produce false values, and sometimes based on the principle of random numbers.
Below is a table of calculated dew point values depending on air temperature and humidity. These are approximate values, as the influence of other factors is not taken into account.
For example, you can determine that for a room with an internal temperature of +22 degrees and a humidity of 60%, the temperature at which water vapor will condense (dew point) will be 13.9 degrees.
A wall with insulation - how to determine the location of condensation
Solving the problem of finding the dew point in a wall is very simple. Need to know:
- wall thermal resistance coefficient, ?1, W/(m•K);
- coefficient of thermal resistance of insulation, ?2, W/(m•K);
- wall thickness, h1, m;
- insulation thickness, h2, m;
- indoor temperature, t1, deg. WITH;
- air humidity that will reach the dew point,%;
- dew point for temperature and humidity data, deg. WITH;
- outside temperature, t2, deg. WITH.
As a rough approximation, it is assumed that the temperature throughout the thickness of each layer will change linearly.
The desired value is the temperature at the boundary of the layers of the wall and insulation. When it is found, you can build a graph of temperature changes in the “wall-insulation” layer and use it to find the position of the dew point.
To do this, the ratio of the thermal resistance of the wall to the thermal resistance of the insulation is found, based on which the change in temperature in one of the layers is determined, which will make it possible to find out the temperature at the boundary.
Let's look at an example.
Calculation example
An example of conditions is as follows. Reinforced concrete wall h1=36 cm, insulated with polystyrene foam h2=10 cm. Thermal resistance coefficient of reinforced concrete is ?1=1.7 W/cmK, polystyrene foam - ?2=0.04 W/cmK. Temperature inside t1=+20 degrees, outside t2=-10 degrees. Humidity indoors and outdoors is assumed to be the same - 50%. According to the table, the dew point will be 9.3 degrees.
Thermal resistance of the wall and insulation is defined as h/?, W/m2K. In this example, the thermal resistance of the wall will be 0.36/1.7=0.21 W/m2K, insulation 0.1/0.04=2.5 W/m2K.
The ratio of the thermal resistances of the first layer to the second (walls to polystyrene foam) will be: n=0.21/2.5=0.084. Then the temperature difference in the first layer (wall) will be T = t1- t2xn = 20-(-10)x0.084 = 2.52 degrees.
Accordingly, the temperature at the layer boundary will be equal to t1-T=20-2.52=17.48 degrees.
Now we can build an approximate graph of temperature differences in the wall-insulation layer on a scale and mark the dew point on it.
From approximate calculations and an approximate graph, you can find out the main thing - the dew point is located in the insulation, far from the wall, i.e. even worsening conditions, taking into account the calculation errors, will not lead to harmful moisture in the wall.
An example of determining the location of the condensation temperature inside a wall
The temperature inside is +22 degrees, outside - 15 degrees (region to the north), humidity - 50%, dew point - 11.1 degrees. A wall 38 cm thick is made of brick (1.5 bricks + joint + plaster is taken as “brickwork”).
The thermal resistance coefficient for brickwork is 0.7 W/cmK, for mineral wool - 0.05 W/cmK (taking into account its moisture content in real operating conditions).
Thermal resistance of the wall: 0.38/0.7=0.54 W/m2K, insulation 0.1/0.05=2.0 W/m2K. The ratio of the thermal resistances of the first layer to the second will be: n=0.54/2.0=0.27, and the temperature difference within the first layer will be T=22 - (-15)x0.27=9.99 degrees. Temperature at the boundary of layers: 22 - 9.99 = 12 degrees.
As we see, the situation is “butt-to-end”. With an increase in humidity, which is a common phenomenon, with a drop in indoor temperature, or in a cold winter, the dew point will “walk” inside the wall.
Such insulation for a relatively “warm” brick wall will already be considered insufficient, both according to the position of the dew point and according to the standard values of heat loss through the enclosing structures.
The dew point can be moved by heating the room using internal heating and dehumidifying it. Naturally, this is an extreme measure, which is used only when it’s time to “dry the walls.” Dew point in the wall - calculation and determination
What values should be taken for calculation
Typically, the indoor temperature is 22 degrees, more often it is lower near the floor, and reaches 27 degrees near the ceiling. For central regions, the minimum outdoor temperature is considered to be -15 degrees (short-term temperature drops to -20 - -25 degrees are allowed).
For the southern regions - -7 degrees, with a short-term drop of -15 - -20 degrees. (You can choose the minimum temperature yourself - what temperature is constantly maintained in winter? To what values does it drop for a short time?)
The air humidity in the room is usually assumed to be medium (but not low) - 50%. There is usually some reserve here, since often in winter the indoor air is drier due to actively working heating - 30 - 40%. But many homes combat dry air by installing humidifiers and growing plants. The optimal humidity is 50%, which is also the calculated one.
In autumn and spring, steam will flow through the insulation in the opposite direction - from the street. To calculate the “demi-season” for vapor-permeable insulation, the humidity should be about 90%.
Where should the dew point be?
The insulation of a fence is considered “normal” only when the dew point in cold weather is mainly (!) located in the insulation and does not move into the wall.
What does "mostly" mean? At maximum negative temperatures, which usually last for several days, a week, and occur periodically, the dew point can shift into the wall.
For a wall made of dense, heavy materials, there is nothing dangerous about this. But for walls made of porous materials, which, as usual, transmit steam very well and absorb moisture, the appearance of the dew point should be short, especially when they are combined with vapor barrier insulation.
Such walls require the most insulation, especially considering that they themselves are warm. To shift the dew point you will need 2 times more insulation. They combine much better with vapor-transparent insulation, since moisture can be removed here, but only if the insulation has excellent ventilation.
Visual temperature graphs for various insulation schemes are provided. The dew point is approximately indicated as 16 degrees, achieved when the inside of the house is particularly comfortable at +25 degrees, 55 - 60% humidity.
- 1 - wall without insulation;
- 2 - insufficient insulation layer - the dew point is inside the wall. Its constant presence will cause a leaky wall to become wet, an unhealthy atmosphere, and the danger of destruction of the material if the wall insulation layer has greater resistance to the movement of steam than the wall itself (improper insulation);
- 3 - sufficient insulation, dew point in the insulation (most of the time), normal preservation of wall materials and heat in the house, if the thermal resistance of the structure is not less than the standard one, because for very cold walls it is possible to shift the dew point from them with a small layer of insulation
; - 4 - internal insulation is the worst solution. The dew point on the surface of the wall or close to it leads to the wall getting wet, and damage to the health of residents, wet freezing and destruction of structures. It is used in desperate situations, provided that the wall is completely covered with a vapor barrier insulation, which prevents the penetration of steam to the dew point. Those. condensation is impossible due to humidity close to 0.
The standards indicate the thermal resistance of enclosing surfaces for specific climatic zones. The state forbids us to reduce this value.
More often, the standard requires a thinner insulation thickness than what is needed to shift the dew point into the insulation. Therefore, it is, in principle, desirable to select insulation for all surfaces and according to the condition of shifting the dew point into the insulation.
These values are compared with the regulatory requirement, and, as a rule, an even greater value is accepted, a multiple of the thickness of the insulation that is on sale.
What to do to bring the dew point out of the house?
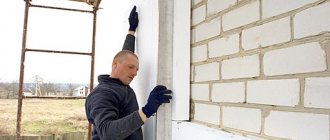
What is the right thing to do when the house has already been built and is in use, but the walls have begun to become damp? All of the above tells us that it is necessary to change the factors influencing the dew point. This means that you can either increase the heating to reduce the humidity level, or reduce the difference in the temperature of the coatings, namely, lay a layer of external thermal insulation.
Wall insulation options
Why do we insulate the walls from the outside? First of all, it's convenient. Secondly, in this case, the temperature of the external environment will be not the wall of the house, but the thermal insulation layer. The temperature decrease curve will become flatter, and the dew point will actually move towards the edge of the insulating layer. For important tips on this issue, watch this video:
The thicker the coating, the more likely it is that the dew point in the thermal insulation body will shift beyond the walls of the house. As a result, houses that are well insulated on the outside last longer and do not require high heating costs.
Step-by-step technology for attic insulation
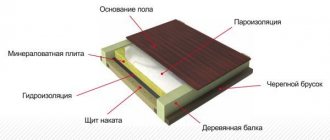
To properly insulate the attic from the inside, you need to form a cake of five layers, starting from the roof inward:
- Ventilated air.
- Wind and moisture insulation from a vapor-permeable membrane.
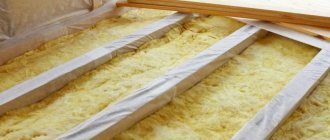
- Insulation between rafters.
- Vapor barrier.
- Attic ceiling lining.
The vapor barrier is made of glassine, polyethylene or polypropylene film. The best choice would be a special membrane with one side rough and the other smooth. With this material, the risk of condensation formation is reduced to almost zero.
For a vapor barrier layer, the vapor permeability should not exceed several tens of grams/m2 per day; for vapor-permeable membranes, this figure is hundreds of grams/m2 per day or more - these films must not be confused.
The following membranes are suitable for wind and moisture insulation:
- porous;
- two-layer film;
- three-layer superdiffusion;
- perforated.
Superdiffusion membranes last the longest and are the most effective. However, they are more expensive than other options.
At the same time, it is recommended to use perforated fabrics and films when insulating a residential attic only as a last resort. They are more designed for waterproofing cold sloping roofs in non-residential attics. When installed with insulation in a warm room, these materials are often covered with frost in severe frosts, which reduces their vapor permeability to nothing.
Let us consider in detail all stages of the process of thermal insulation of an attic roof.
Arrangement of ventilation ducts
Before you insulate the attic roof from the inside with your own hands, first of all, you need to treat the wooden rafters with antiseptics and fire retardants.
It is best to install the insulation from the inside of the attic on a special sheathing under the rafters, but most often this material, together with the upper vapor-permeable film, has to be laid between the rafter beams
If you add insulation from the bottom of the rafters, the interior space of the attic will be reduced. The thickness of the thermal insulation cake can reach 30–40 cm. If you subtract these centimeters from the top and sides, the room may turn out to be too low and small.
At the same time, the installation option with lining the sheathing under the rafters and laying insulation on it eliminates the appearance of cold bridges. If mineral wool or EPS is inserted between the beams, then they themselves and the gaps that form over time in the thermal insulation layer near them will draw heat from the attic.
The steam, along with the air currents, should rise to the highest point of the roof and leave from there completely outside. Moreover, this should happen without obstacles and as quickly as possible.
Before packing the membrane onto the rafters, you must first correctly calculate the thickness of the insulation. If the thermal insulation layer turns out to be larger than the size of the rafter beams, then you will have to build them up with bars. The main insulating material should be inside this frame and not protrude from it.
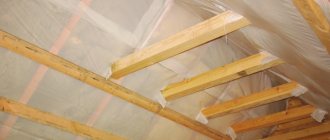
Installation of a vapor-permeable membrane
At the top of the roofing pie there should be a material with high vapor permeability from the insulation to the street and high waterproofing in the opposite direction. The purpose of this membrane is not to prevent steam from escaping from the thermal insulation, while preventing water and moisture that can drip from a leaky roof from entering it.
Attention! The smaller the gap between the insulation and the vapor-permeable film, the better and more efficiently vapor will be removed from the thermal insulation.
The best material for this vapor-permeable layer, which also serves as wind and moisture protection, is superdiffusion membranes. They are not clogged with dust and ice formed from condensation in severe frosts.
These membranes are laid in horizontal stripes with a 10-15 cm overlap of the top row onto the bottom row from the outside. As a result, a single canvas should be formed, if water drops hit it through the roof from the street, they would flow down without getting into the insulation.
The joints of the membrane rows from the inside of the room must be taped with mounting tape of the same brand as the vapor-permeable film. The composition of the adhesive and the membrane material from the same manufacturer are selected so as not to harm each other and remain reliably glued for many years. If you take them under different brands, then problems are possible.
Laying the main insulation
The thickness of the insulation is selected in accordance with SNiP 02/23/2003. To do this, it is necessary to perform appropriate calculations taking into account climatic conditions, design features and structure of the roof, as well as the parameters of the thermal insulation material and the internal lining of the attic.
It is not worth laying a thermal insulator with an excessively thick layer because it will waste money, and a layer that is too thin may not be enough to provide the required protection against heat loss.
Installation of insulation is carried out from the inside of the attic on top of a laid vapor-permeable membrane. If mineral wool is chosen, then it must be cut into pieces with dimensions 2–3 cm wider than the gaps between the rafters or sheathing bars. Mineral wool should fit between them with light pressure and stay there due to expansion.
EPS will have to be laid on top of the rafters, and not between them. The slabs of this insulation are mounted end-to-end. If you put them inside the rafters, like mineral wool, then through holes will appear in the thermal insulation layer.
Some craftsmen fill such gaps with polyurethane foam from a balloon. However, you shouldn't do this. This can lead to membrane deterioration due to a chemical reaction between the components of the spray foam and the vapor-permeable film material.
It is better to take away 10-25 cm from the top and sides of the room on the sheathing with EPS, rather than get a layer of protection with through holes.
Vapor barrier film flooring
A vapor barrier made of glassine or polypropylene or polyethylene film should be laid on top of the insulation on the inside of the attic. The purpose of this layer is to prevent water vapor from entering the insulation from the room. It is laid in the same way as the very first vapor-permeable coating.
The editors of santehnikportal.ru recommend that you pay maximum attention to the joints of vapor barriers - if you leave even the slightest gaps in them, the steam will find these gaps and wet the thermal insulation material
In addition to regular film, you can also use foil film. The extra layer of foil will reflect most of the heat energy back into the attic, reducing heating costs. In this case, the installation of such a film is carried out with “aluminum” inside.
The vapor barrier is fastened with staplers or nails with a wide head. And in places where the film adjoins cables, pipes and structural elements of roof windows, it should be additionally reinforced with a special one-sided tape with a heat-reflecting coating.
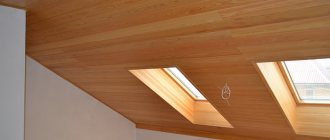
Headlining
At the end of the thermal insulation work, fill the sheathing under the cladding. It can be made from bars 15–25 mm thick, so that there is a small space left above the vapor barrier for ventilation.
Stuff sheets of plasterboard, plywood or chipboard on top of the sheathing to create a future ceiling in the attic.
The sheathing bars, on the one hand, are necessary for fastening the sheathing material, and on the other, for additional fixation of the vapor barrier membrane and pressing it against the insulation.
The sheathing itself can be painted or whitewashed. There are many cladding options. You don’t even have to install drywall and chipboard, but just put the clapboard on the sheathing.
Thus, do-it-yourself internal insulation of an attic in a private house requires the correct selection of the material, its thermal conductivity thickness and other properties. It is also important to carry out installation work, including vapor barrier and wind and moisture insulation.
When choosing insulation, remember that the attic is a living room, which should not only be warm, but also safe. Therefore, choose non-flammable materials that meet sanitary standards and contain no toxins.
Why is the dew point determined?
Aerated concrete is a popular material that is perfect for low-rise construction.
In order for a house made of aerated blocks to be warm and cozy, you need to correctly determine the thickness of the wall. At the first stage, it is decided: will the house be built with or without insulation? And, it is advisable to add a calculation of the dew point to the calculations of the thermal efficiency of a given house. The dew point in aerated concrete shows at what temperature steam will condense into water. The dew point is affected by air humidity and temperature inside and outside the room. Ideally, the dew point should be outside the aerated concrete or closer to the outside of the wall. Condensation will lead to gradual destruction of the material and deterioration of thermal conductivity characteristics.
Vapor permeability and dew point
At the design stage of a house, taking into account the vapor permeability of building materials is very important. Vapor permeability is the volume of water vapor that a material can transmit per unit time.
All materials from which houses are built (brick, aerated concrete and foam concrete blocks, wood) have pores through which air and water vapor pass. Taking this into account, it is necessary to monitor the choice of materials that will be used in the future for insulation and finishing of the house. They all need to be vapor permeable. The following principles will help you in your choice:
- the vapor permeability of the walls should increase from the inside to the outside;
- moisture should come out easily and should not condense;
- the thermal conductivity of all materials that make up the wall should increase towards the outside.
Correct calculation of the dew point is the key to a comfortable climate in a house, apartment and any room, as well as the safety of the material of walls, ceilings and other things.
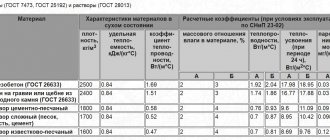
Table of vapor-permeable properties of materials
When is it possible or not to insulate walls from the inside?
Now let's look at when it is possible to insulate a wall from the inside, when it is not, what it depends on and how it depends. What is this “no”, what are the consequences?
The main “is it possible or not” is what will happen to the wall after insulating it from the inside. If the wall is dry, it’s possible.
If the wall is dry, and only with a sharp, unexpected (which happens once every ten years) cold snap can it get wet, you can try to insulate it from the inside (at the discretion of the customer).
If the wall is consistently wet throughout the winter design period (with normal winter temperatures in the region), it cannot be insulated from the inside.
As we have already found out above, these consequences depend on the position of the dew point. And the position of the dew point in the wall can be calculated, and then it will be clear (BEFORE insulation) whether it is possible or not to insulate a particular wall from the inside.
Now a little discussion on the topic of what affects the possibility of insulation from the inside, and how it affects it.
This part of the article was prompted by questions from readers of the following nature: “Why can one person insulate from the inside, but I can’t, because he and I (further options) have the same apartment layout, or the houses are built from the same material, or the same city of residence, or the same wall thickness etc.
As we have already found out above, the consequences of internal insulation depend on:
- dew point (condensation temperature);
- the position of the dew point in the wall before and after insulation.
In turn, the dew point (temperature) depends on: room humidity and room temperature.
And the humidity in the room depends on:
- Mode of residence (permanently or temporarily).
- Ventilation (both supply and exhaust, are they sufficient according to calculations).
And the room temperature depends on:
- Heating quality.
- The degree of insulation of the remaining structures of the apartment building, except for the walls (ceiling, roof, windows, floor).
The position of the dew point depends on:
- thickness and material of all layers of the wall;
- indoor temperature. What it depends on was clarified above;
- temperature outside the room. It depends on whether it is outside or another room, as well as on the climate zone;
- indoor humidity. What it depends on was found out above;
- humidity outside the room. It depends on whether it is outside or another room (and on the mode of operation of this room), as well as on the climate zone.
Here is a list of these factors:
- mode of residence in the premises (permanently or temporarily);
- ventilation (both supply and exhaust, are they sufficient according to calculation);
- quality of indoor heating;
- the degree of insulation of the remaining structures of the apartment building, except for the walls (ceiling, roof, windows, floor);
- thickness and material of all layers of the wall;
- indoor temperature;
- indoor humidity;
- outside temperature;
- humidity outside the room;
- what is behind the wall, a street or another room (its mode of operation).
It becomes clear that there may not be two identical situations regarding insulation from the inside.
Let's see what (approximately, without specifics) the situation looks like when insulation from the inside is possible:
- permanent residence premises,
- ventilation is carried out according to the norm (for this room),
- The heating works well and is done according to standard,
- the remaining structures are insulated according to the standard,
- the wall that is planned to be insulated is thick and quite warm. According to the calculation of additional insulation for it, it should not be more than 50mm (foam plastic, cotton wool, EPS). In terms of heat transfer resistance, the wall “falls short” of the norm by 30% or less.
I think it is clear that in each specific case you need to consider your “input data” and then make a decision.
Everything that is written above gives the impression that there are very few cases when internal insulation is possible and not harmful. This is true.
In our experience, out of 100 who came up with the idea of internal insulation, only 10 can do it without consequences. In other cases, it is necessary to insulate from the outside.
How to determine the dew point?
To calculate the dew point, you can use information from the free website Teploraschet.rf.
Let's look at a specific example. The wall for the calculation will be made of aerated concrete grade D500. This is the optimal gas block in terms of strength and thermal conductivity characteristics.
The dew point in aerated concrete will be calculated at an outdoor temperature of -20, indoor temperature +22. The ambient temperature was taken as the statistical average for central Russia. Condensation will form faster if there is a large difference between the internal and external temperatures.