Every owner of a private home is looking for budget-friendly ways to insulate the ceiling. And many, having considered all the available methods, come to the conclusion that the best option would be to use ordinary sawdust, which remains in huge quantities at woodworking enterprises. Such material can be obtained for free or for a symbolic price, and installation work does not require much effort and time. For this reason, insulating the ceiling with sawdust can be done with your own hands . This and much more will be discussed in today’s article.
Ceiling insulation with sawdust
The relevance of using sawdust for thermal insulation
Current insulating materials are constantly being improved; moreover, more and more new thermal insulators appear on the market every year. But technological progress inevitably leads to rising prices. Often people save money for many years to repair their home (including insulation) or even take out a loan from a bank. And if we remember what materials our ancestors used to insulate walls and roofs, we can come to the conclusion that the “old-fashioned” methods are still relevant and effective. At the same time, it is difficult to predict what the condition of, say, polyurethane foam will be after 20 years of operation. But the sawdust has successfully passed the test of time.
Using sawdust as insulation
So, the main advantages of insulating the ceiling with sawdust include:
- widespread dissemination of this material;
- symbolic price;
- environmental cleanliness;
- extreme ease of installation;
- long service life.
Moreover, the savings here consist not only in reducing capital investments, but also in caring for natural resources, which contributes to a significant improvement in the environment and a reduction in the cost of heating a home.
Sawdust prices
sawdust
How to make sawdust
Note! Insulation of a residential building always consists of a number of stages, including the floor, ceiling and walls. Moreover, each of these surfaces has its own thermal insulation characteristics. But the ceiling is characterized by the fact that the insulating material here can be laid externally and internally.
Modern thermal insulation materials
To clearly demonstrate the economic benefits that can be obtained by insulating a home with sawdust, let’s consider the cost of popular thermal insulators and the work involved in their installation.
Table. Prices for popular insulation materials.
| Type of heat insulator | Price, per 1 m² (in rubles) | Installation cost, per 1 m² (in rubles) |
| Styrofoam | 100 | From 70 |
| PPU | 350 | 300 |
| Glass wool | 150 | About 100 |
| Mineral wool | 190 | 120 |
| Sawdust | For free | About 50 |
It turns out that insulation with sawdust will cost almost free. In fact, wood companies can even deliver sawdust to your home for a small fee. But here it should be clarified: not all varieties of this material are suitable for thermal insulation.
Advantages and disadvantages of the material
Sawdust has successfully passed the test of time and still remains one of the most practical materials for insulation.
Main advantages:
- availability;
- versatility;
- environmental friendliness;
- ease of installation;
- long service life.
The disadvantages of insulating the ceiling with sawdust are that the material quickly absorbs moisture and is considered a fire hazard. Therefore, you should take care of high-quality waterproofing and use only materials treated with antiprenes. The technology of application differs according to the type of placement of the material: from inside the room or outside. But before you start work, you should choose the right sawdust.
Stage one. Selecting raw materials
The best option for use as insulation is sawdust of the middle fraction. The reason is extremely simple: it is difficult to work with fine starting material, and coarse sawdust has insufficient thermal insulation properties. Sawdust from cutting in carpentry production is considered the best, because it has low humidity, so it does not require additional drying, and will not begin to rot when used.
If sawdust is available exclusively from round timber, which has natural moisture, then before laying it should be spread out under some kind of canopy and dried thoroughly. There is no need to cover, otherwise they will start to rot.
Choosing sawdust for ceiling insulation
What types of sawdust are more suitable? Give preference to coniferous species - they contain a lot of resin, which creates a lot of inconvenience for various types of pests. But if you are insulating a bathhouse, it is preferable to use sawdust from deciduous trees.
Also, before laying, sawdust should be left to rest for up to 1 year - during this time the level of sugars, which provoke rotting, will noticeably decrease. Pay attention to ensure that the raw materials are free of debris and other foreign impurities; if any are present, sift the sawdust and remove large debris by hand.
Sifting sawdust
Rules for choosing insulation
The first thing you need to pay attention to is the size of the elements. Sawdust of the medium fraction is best suited: large ones show low efficiency, while small ones are more difficult to work with. You need to choose woodworking material - such material is already well dried and will not rot or deteriorate. If necessary, the insulation can be dried in the open air at positive temperatures.
The type of wood is taken into account - coniferous species are characterized by greater resin content, therefore they are considered the most suitable material for insulating residential premises. However, in a bathhouse, resin will cause inconvenience; here preference should be given to deciduous wood.
Important! Before insulating the ceiling of a private house with sawdust, the material must sit for 9-12 months. This is necessary to reduce the level of sugar, which causes fermentation and rotting of fractions.
If there is debris in the mass of raw materials, it should be selected, the sawdust sifted and further dried.
Stage two. Hemming the floor beams
Start work by filing the ceiling. The algorithm of actions is given below.
Step 1. To hem the ceiling beams, use boards about 2.5-3 cm thick (the specific figure depends on the pitch between the beams). Ideally, the board should be tongue-and-groove or with a quarter, and it must be planed and dry, even if it costs more than an unplaned edged one.
Step 2. On top of the fixed vapor barrier, nail the boards completely with nails 10 cm deep or screw them with screws 5-6 cm long (2 pieces at each fastening point).
False ceiling installation
Note! Drive the nails at an angle relative to the plane of the boards. It is important that the direction of adjacent nails does not coincide - this way the fastening will be as reliable as possible.
Treat boards and beams with an antiseptic and fire retardant before starting installation work. This will protect the wood from pests, fungi, and also reduce its flammability.
Prices for edged boards
edged board
Bioprotective tinted antiseptic
Disadvantages of insulation with mixed materials
Most of the recipes for arranging a warm layer begin with laying a waterproofing film on the base of the ceiling.
Pouring mixed materials based on cement or clay is carried out according to the following method:
- A mixture mixed in a concrete mixer, prepared from 1 hour of cement, 1 hour of lime, 10 hours of sawdust and 5 hours of water, is poured into the voids of the rough floor and lightly compacted along the line of contact with the wooden beams;
- After 3-4 days, the insulation surface is covered with a vapor barrier and covered with plywood or boards. Sometimes the top layer of the screed is covered with ground ash to protect the beams.
Technology based on cement and sawdust can be confidently called the most ineffective way to insulate the ceiling. The cured mixture is only slightly inferior to wood concrete blocks. For comparison, the thermal conductivity coefficient of cement-sawdust insulation is 0.10-0.15 W/(m*Co), while for sawdust this figure is 0.04 W/(m*Co). The difference is three times. This level of ceiling insulation is only slightly better than foam concrete blocks, but wood concrete and aerated concrete are intended for walls and are building blocks, not thermal insulation materials.
In another option, mats made of clay, lime and sawdust are stuffed into wooden molds, dried in the sun and transferred to the ceiling lining for insulation. The coefficient for a single dry block is 0.08-0.09 W/(m*Co).
For your information! The clay base retains a large amount of water, so the sawdust mass remains waterlogged for the most part.
In addition to poor thermal insulation, mixed materials have a decent weight, about 3-4 times more than ceiling insulation made from poured and compacted sawdust. Experts say that any mixtures based on waterlogged chips greatly lose the quality of thermal insulation, so even at a low cost, the effectiveness of their use is a big question.
Stage four. Laying insulation
There are several methods of thermal insulation of the ceiling using sawdust, and this can be either the use of pure material or the additional use of special additives (lime, clay, etc.). Let's take a closer look at the popular methods of thermal insulation.
Prices for antiseptic
antiseptic
Method No. 1. We use clean sawdust
The procedure is extremely simple and consists of only three steps.
Step 1. Spread sawdust on the ceiling of the attic in a layer of 15 cm to 20 cm, carefully level it (this is often done to the top level of the beams), but do not compact it.
Ceiling insulation with sawdust
Step 2. Place a layer of stove ash on top of the insulation. Although today, instead of ash, a superdiffusion vapor-permeable membrane is used.
Note! Thanks to this coating, moisture will be freely removed from the sawdust, which will prevent the development of rotting processes. Also, such films, if anyone doesn’t know, are characterized by one-sided vapor permeability.
Step 3. If the attic space will be used in some way, then secure the plank flooring along the beams. But nail the boards in such a way that there are small ventilation gaps between them.
Method No. 2. We use additives (cement, lime)
There are several recipes that can be used in this case. Not only clay, but also cement, lime, etc. can serve as an additive.
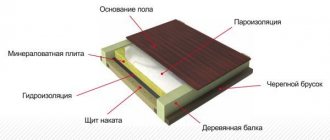
Scheme of floor insulation with sawdust
To prepare the insulating mixture according to the first recipe, prepare the following ingredients:
- sawdust, thoroughly dried (10 parts);
- water (5 to 10 parts);
- lime (1 part);
- cement (also 1 part);
- a little copper sulfate - it will serve as an antiseptic.
Below is the necessary algorithm of actions.
Step 1. Start by mixing cement and lime.
Prices for vapor barrier
vapor barrier
Mixing cement with lime
Step 2. Place the sawdust that you prepared in advance in some container of the required volume. If possible, you can use a concrete mixer instead of such a container.
Step 3. Add the cement-lime mixture to the sawdust, then mix all the components thoroughly.
Step 4. Add copper sulfate to the product, which, as noted earlier, has antiseptic properties. To prepare a solution of this substance, add 3 tbsp. spoons in 10 liters of water. When working with copper sulfate, remember to take protective measures - be sure to use rubber gloves and a mask. Slowly add the prepared solution to the resulting mixture.
Step 5. Next, mix all the components until the sample of the mixture that you take in your hand crumbles when you unclench your palm. Typically, water should not drain from the sample either.
Insulating the ceiling with a mixture of cement and sawdust
There is another recipe for preparing a heat-insulating mixture from sawdust, cement and limestone. This recipe is in most cases used for insulating bath ceilings. Vitriol is not used here, since under high temperature conditions it can release harmful fumes into the environment.
Method number 3. We use additives (clay, lime)
In this case, to prepare the mixture you need to prepare:
- dry sawdust (10 parts);
- water (from 7 to 14 parts);
- clay (5 parts);
- lime (1 part).
Step 1. Fill the clay with 2 parts of water and wait until it (the clay) is completely soaked. Mix the resulting solution thoroughly - as a result, its consistency should resemble thick sour cream. There should be no lumps in the finished solution.
Step 2. Mix lime with sawdust, add the resulting mixture to the clay solution. Mix all the ingredients thoroughly, periodically adding new portions of sawdust to the container.
Ceiling insulation with clay and sawdust
Step 3. To check if the solution is ready, you can use a simple wooden stick. Place it vertically into the mixture and wait a bit. The composition can be considered ready for use if the stick does not fall. If the mixture turns out to be too liquid, let it sit for 24 hours to allow any remaining moisture to evaporate.
Note! As an alternative, you can use another recipe - it uses the same amount of gypsum instead of clay. However, this recipe has one significant drawback, which is that the prepared mixture dries out quickly. Therefore, in this case it must be prepared in small portions.
Laying thermal insulation from sawdust
The procedure for laying a sawdust-based mixture is not complicated and is not much different from the technology for using pure raw materials. After preparing the ceiling, begin laying the insulation in small layers, leveling and compacting each of them. The height of the thermal insulation layer should be level with the top of the ceiling.
A
Preparing a mixture of clay and sawdust using a mixer
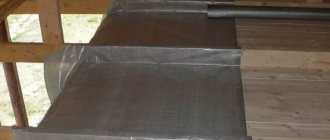
Sprinkle a thin layer of ash on top of the mixture - it will protect the material from fungi and pests. 2 or 3 weeks after installation, when the thermal insulation has completely dried, lay a layer of vapor barrier on top of it. The latter is necessary to prevent sawdust from saturating the moisture present in the air. Attach the vapor barrier material (in most cases, regular PET film is used) to the floor beams using a mounting stapler. As a result, you will receive an insulating layer, covered at the bottom and top with a vapor barrier material.
Video - How to insulate a ceiling with sawdust
Advantages of making thermal insulation from sawdust
The shavings generated during the woodworking process are often used to insulate floors, walls, roofs and ceilings of commercial and residential buildings. Sawdust has low thermal conductivity and is inexpensive.
However, only specially treated sawdust is suitable for insulation. They are often mixed with cement, gypsum or lime, and treated with boric acid or copper sulfate. Untreated material is spoiled by rodents and quickly ignites.
Advantages of sawdust thermal insulation:
- The main advantages are low cost and high reliability.
- This natural and harmless material does not emit toxic compounds.
- The thermal insulation characteristics of wood chips are no lower than those of modern insulation materials.
- The material has stood the test of time and has previously been used everywhere.
- Simple installation that you can do yourself.
- Impressive service life.
- Light weight material. Thanks to this, the ceiling structure does not become heavier.
- Reducing space heating costs and saving natural resources.
- Sawdust has good soundproofing characteristics.
If we compare the cost of purchasing sawdust and laying it with installing other thermal insulation materials, the savings are significant.
For comparison, below are the prices for the purchase and installation of modern heat insulators:
- polystyrene foam – purchase 1.6$/m², installation price per square meter starts from 1.2$;
- glass wool - 2.5 and 1.6 $/m², respectively;
- polyurethane foam – 5.8 and 5 $/m²;
- mineral wool – 3.2 and 2 $/m²
- sawdust - can be taken for free, installation price is less than a dollar per square.
Disadvantages of ceiling insulation with sawdust:
- the material is not resistant to high humidity conditions;
- installation is quite labor-intensive;
- sawdust in its pure form quickly ignites and is susceptible to damage by insects and rodents.
Important! Not all types of sawdust are suitable for use as thermal insulation.
Stage five. Further arrangement
In the end, all that remains is to build up the floor beams and install lathing on top of them in order to subsequently make a finishing or subfloor. There is a third option - you can lay a metal mesh on top of the beams and make a cement screed. The choice of one option or another depends on what kind of material you intend to use for the flooring.
Extended beams
Special option for ceiling insulation with sawdust mass
The problem often arises of how to insulate the ceiling with sawdust in a wooden house. The method of arranging thermal insulation of floors for wooden and frame buildings is similar to the previous scheme, but has slight differences:
- Before laying insulation, wooden structures are impregnated with an aqueous solution of antiseptic and fire retardant, large cracks are filled with foam;
- Agrotextiles are laid on the base of the ceiling;
- The lower space between the beams is first filled with large shavings, the upper layers are made of the finest sawdust;
- The finishing layer of agrotextile fabric is laid, the insulation is sewn up with boards or sheet material.
In this case, vapor barrier membranes and films are not used. Evaporation and water vapor freely penetrate through the thickness of the chips and are carried out of the room by attic ventilation. As a result, there is no excess water vapor or condensation in a wooden house. Lime is not added to the mixture - it makes no sense, anyway, water vapor with carbon dioxide penetrating into the thickness of the insulation will turn it into chalk in a matter of months. In order to protect the top layer from bark beetles, the shavings are covered with ground slag or ash.
Bathroom ceiling thermal insulation technology
Here, as in the case of a private house, the ceiling needs to be covered with wide boards. To install a chimney pipe, you need to make a ceiling cut - this can be purchased ready-made or made with your own hands (cut a sheet of stainless steel that completely covers the hole, cut a circle in the middle for the passage of the chimney, seal the edges of the cutout in the ceiling with basalt wool, and on top Lastly, fill the strips of metal; during installation, the chimney is secured with guide strips, but so that it moves freely during thermal expansion; a plate is screwed from below, and the resulting passage is insulated).
Step 1: First, take care of the vapor barrier layer in the attic. Do not use roofing material, because at high temperatures it will soften, begin to emit unpleasant odors, or even catch fire. As for PVC film, it is also unacceptable here.
Lay the vapor barrier with an overlap of 10-15 centimeters and the same bend on the walls.
Step 2. Lay the sawdust mixture, prepared according to one of the recipes described above, in layers, thoroughly leveling and compacting each layer. If you plan to use the sauna only in summer, then the thickness of the insulating layer can be 5 centimeters, while for winter use you will need at least 15 centimeters.
Insulating the ceiling in a bathhouse with sawdust
Step 3. Upon completion of installation, wait until the insulation layer dries. If cracks appear on the surface after this, seal them with the same mixture. By the way, to keep the number of cracks to a minimum, add salt to the solution before installation (5-6 tablespoons per 10 liters of water).
Step 4. Once the mixture has dried (which can take up to a month), pour a thin layer of lime on top of it and lay a vapor barrier. Then, if desired, you can cover the surface with boards.
Note! If you use a mixture of sawdust and gypsum for insulation, then apply it in thin layers. The gypsum solution, as noted earlier, dries quickly.
In addition, both methods of insulation can be used for both horizontal and vertical surfaces. But in any case, special attention should be paid to the insulation of electrical wiring. Hide all the wires in high-quality metal corrugated hoses, and seal the ends of the latter with fire-resistant material (for example, PENOSIL Fire Rated fire-resistant foam). This will protect the wooden structure from fire in case a short circuit occurs.
How to cover the ceiling in a bathhouse?
You will find the answer to this question with step-by-step instructions in this article! We also recommend reading the material on how to insulate the ceiling in a bathhouse with a cold roof.
Is it possible to insulate the ceiling with sawdust?
Before choosing for yourself how to insulate the ceiling in a private house with sawdust, you need to decide whether it is worth using chopped wood chips and shavings at all, because the high flammability of the material is well known.
This is not all the problems. In addition to the ability to burn, sawdust has even more unpleasant properties that you should know about before planning a warm ceiling:
- Thick layers of wood shavings stored in open spaces tend to self-compact and actively absorb water. The inner layers of sawdust, under the influence of microorganisms, actively rot into dust;
- A thick layer of dry shavings laid on the ceiling or walls is considered a favorite wintering place for mice; removing rodents from cavities filled with sawdust is very difficult.
The shortcomings are serious, but quite fixable. If the situation with insulating the ceiling in a private house with sawdust was so hopeless, then wood shavings would not have been used for centuries as an effective heat insulator.
For your information! Dry wood shavings surpass even polystyrene foam and expanded polystyrene in their thermal insulation characteristics. In addition, laying a layer of sawdust on a sub-ceiling is easier, faster and cheaper than insulating with mineral wool or foam sheets.
In terms of thermal insulation efficiency, the sawdust-shaving mass is inferior to bulk granular foam. But during fire and thermal decomposition, the insulation layer on the polystyrene foam ceiling releases a large amount of toxic gases. Sawdust does not even burn, but smolders without releasing toxic substances.
Ceilings
68 votes
+
Vote for!
—
Vote against!
A properly and efficiently insulated ceiling can significantly save on energy costs. Insulating the ceiling with sawdust is the simplest and most economical option. To complete this process, you do not need to involve specialists, and to purchase the material you only need to spend quite a bit. We will consider the features and technology of ceiling insulation using sawdust below.
Table of contents:
- The relevance of insulating the ceiling with sawdust in a private house
- Selection of sawdust for ceiling insulation
- How to properly insulate a ceiling with sawdust: preparing a solution
- Recommendations for insulating the ceiling with sawdust and clay
- Technology for insulating the ceiling of a house with sawdust
- Features of ceiling insulation with sawdust in a bathhouse
- Ceiling with sawdust: insulation options
The relevance of insulating the ceiling with sawdust in a private house
Although the construction market assumes the availability of a huge amount of modern thermal insulation materials, their cost is quite high. To ensure high-quality ceiling insulation, you will need to spend a lot of money. Therefore, in order to save money, but at the same time, sawdust is used to obtain a high-quality insulated ceiling.
Among the advantages of using sawdust on the ceiling are:
- affordable cost of the material, in addition, it is possible to purchase sawdust at woodworking factories or enterprises for almost nothing;
- versatility of use, sawdust is suitable for insulating various types of ceilings and has an almost unlimited scope of use;
- the ease of installation of this insulation does not imply the use of additional fasteners or brackets that will fix the insulation to the surface;
- The service life of sawdust used as insulation has been tested over the years, in relation to modern materials that appeared not so long ago.
Selection of sawdust for ceiling insulation
There are several types of sawdust, which differ primarily in size. Select material:
- fine-grained;
- mid-fraction;
- large faction.
It is better to give preference to the second option, since small sawdust is quite difficult to work with, while large sawdust is not capable of providing high-quality thermal insulation.
If possible, choose sawdust that was formed during the cutting process of carpentry in drying; they do not require additional preparation and are practically not subject to rotting.
When purchasing sawdust, which is formed from round timber with natural moisture, it must be dried. To do this, lay them out on a horizontal surface, for example, under a canopy for a week. If the weather has been humid these days, the drying time should be increased.
In relation to the type of wood from which sawdust is made, it is better to give preference to coniferous trees. Since they are characterized by a high resin content, which prevents the development of all kinds of insects in the sawdust.
In the process of insulating a bathhouse, larch will be an excellent option. Such sawdust must be mixed with ash to avoid rotting. After purchasing sawdust, 6 to 12 months should pass. Thus, the level of sugar, which causes rot, will decrease and the risk of rot will decrease.
Make sure there are no foreign impurities and various types of debris in the sawdust. If available, you should sift the sawdust through a sieve. Select large particles of debris yourself.
Requirements for sawdust used for ceiling insulation:
- aging from six months to one year;
- lack of moisture;
- no mold;
- middle fraction.
How to properly insulate a ceiling with sawdust: preparing a solution
There are a huge number of compositions that are suitable for ceiling insulation; most often their main components are sawdust, lime, cement, sand, and clay.
We offer a universal recipe, tried and tested over the years. To prepare it you will need:
- dried sawdust, in relation to all components there should be ten times more;
- one part lime;
- how much cement;
- three tablespoons of borax or copper sulfate should be used as an antiseptic;
- the amount of water depends on the desired consistency of the solution and the moisture content of the sawdust, the average value is from 5 to 10 parts.
The procedure for preparing this composition is as follows:
1. Mix previously prepared cement with lime.
2. Pour the sawdust into a clean container like an old bathtub.
3. To prepare the solution, it is preferable to use a concrete mixer, so the mixture will be homogeneous and the adhesion between the components will be significantly improved.
4. First, sawdust is poured into the concrete mixer, then a mixture of lime and cement.
5. Water is poured into a bucket, into which three tablespoons of antiseptic are poured. Please note that this material is quite toxic, so you should use gloves and a mask during the work.
6. Gradually pour water into the previously mixed dry ingredients. Watch its consistency. To test the solution, just take a small part of it and make a lump out of it. When you unclench your palms, it should hold its shape. In addition, it should not contain excess moisture.
Recommendations for insulating the ceiling with sawdust and clay
This option is most acceptable in the process of insulating the ceiling, which is located in the bathhouse. At the same time, the use of copper sulfate in this case is unacceptable, since when it is exposed to high temperatures, it begins to release substances harmful to human health.
To prepare such a composition you will need:
- sawdust;
- clay;
- lime;
- water.
The ratio of the components in the order of use is: ten to five to one to 8-15 parts of water.
At the beginning of the work, you should deal with clay. It needs to be soaked in two parts of water and left for a while until it is completely soaked.
All other components are mixed together, the mixture should become creamy, there should be no lumps in it. Sawdust, after purchase, must be kept for at least half a year. Since there is no antiseptic in the solution, reducing the sugar in them will prevent them from rotting.
The resulting solution is mixed with clay. Please note that sawdust is added gradually, and the mixture must be thoroughly mixed. The finished solution should have viscosity and thickness.
To check its quality, use an ordinary stick; when placing it in the tank in which the mixture is located, it should stay in it. If the solution is too thin, you should wait about 24 hours until it thickens. At the same time, you should not cover it with a lid, so as not to interfere with the evaporation of moisture.
There is a variant of exactly the same recipe, in which the clay is replaced with gypsum. With its help, it is also possible to insulate a bathhouse, however, its preparation must be carried out exclusively in portions, due to the high rate of hardening of the gypsum.
Technology for insulating the ceiling of a house with sawdust
Insulation of the ceiling with sawdust is possible only on its upper part. To carry out this process, you will need to purchase wooden boards that are used to stitch the ceiling beams. The thickness of the boards should be about 30 mm. The most economical option would be to use standard planed boards, previously dried from moisture.
Although, according to the recommendations of experts, a better method is to use tongue-and-groove boards. To fix the boards to the beams, nails or screws are used. Please note that the mass used as insulation is quite heavy, so the boards must be fixed in a special way.
The fasteners are driven into the boards at an angle, and each time it must be changed in the opposite direction. The length of the nails should be about 10 cm, and the screws 5 cm.
Next, all boards and beams are treated with an antiseptic solution. It will help prevent the wood from rotting and the development of mold or mildew.
A vapor barrier film based on polyvinyl chloride is installed on top of the boards. It is possible to use roofing felt. The film is installed with an overlap of 11-14 cm; bitumen or tape is used to glue the joint areas. Please note that the end sections of the film should extend beyond the surface of the walls by 100-150 mm. If there are voids in the side areas, polyurethane foam is used to get rid of them. The film is fixed on the side sections of the walls using a stapler.
Next, sawdust is laid out, thoroughly leveled and compacted. The embankment must be of such a height as to reach the ceiling. Next, it is recommended to sprinkle a layer of sawdust with ash, which has good antiseptic characteristics and helps prevent their rotting.
After this, the sawdust should lie in place for about two to three weeks so that excess moisture evaporates from it. Next, they are covered with a vapor barrier material. This will help prevent the insulation from coming into contact with moisture. A stapler is used to fix the vapor barrier to the beams. Thus, you will get a structure in the form of an envelope, with a vapor barrier installed on the bottom, sides and top, and sawdust inside.
Next, the floor beams are built up, and the rough and finished flooring is installed. A metal mesh is laid over the beams, on top of which a concrete screed is mounted.
Features of ceiling insulation with sawdust in a bathhouse
The technology for insulating a bathhouse is slightly different from insulating a regular living space. First of all, this is due to the high humidity that is present in this room. In order to hem the ceiling, wide boards are used. To insulate the chimney pipe, it should be sheathed with a sheet of steel or asbestos. A vapor barrier is being installed in the attic; please note that the material must be resistant to exposure to high temperatures; roofing felt is not suitable for these purposes, as there is a risk of it catching fire or softening. The option with polyvinyl chloride film is also not recommended.
The vapor barrier is also laid with an overlap of 12-13 cm, on the walls the material is bent up to 20 cm. Next, a mixture is laid, which contains clay and sawdust, which are well leveled and compacted. If you plan to insulate a summer bathhouse, then it is enough to lay sawdust in a layer of 5 cm, otherwise the layer thickness increases to 15 cm.
Next, you should wait until the solution dries; if there are small cracks that formed after drying, you should treat them with the same solution. According to the recommendations of experts, adding rock salt to the finished mixture for insulation helps prevent it from cracking. For two buckets of clay, you will need about 15-20 tablespoons of salt.
The solution will dry completely in about a month, provided that the work is carried out in the warm season. To improve the antiseptic properties of the solution, sprinkle a thin layer of lime on top. After the heat-insulating material hardens, it is covered with the same vapor barrier, forming an envelope. If the attic space of the bathhouse is planned to be used as a place for rest or storage, then a flooring made of boards is laid on the vapor barrier.
When using gypsum-based insulation, it is laid in portions, in thin layers, since gypsum has a high drying rate. The use of this type of insulation is possible both on straight sections and on inclined surfaces. Please note that if there are electrical wires in the attic, they must be insulated in a special corrugation.
Ceiling with sawdust: insulation options
To prevent rodents from growing in the sawdust and to avoid a fire, lime must be present in the solution. To protect the insulating material from mold, it is recommended to add an antiseptic such as boric acid or copper sulfate.
It is possible to insulate the ceiling with sawdust and cement; for this, you will need to accurately determine the insulation layer to be laid on the ceiling. The quality of thermal insulation depends on the correct calculation of the layer. The more severe the climate of the area and the higher the heat loss of the building, the thicker the layer of cement-sawdust mortar will be required.
If the building is used year-round, the minimum layer thickness should be 25 cm.
For one part of cement you will need about ten parts of sawdust and one part of lime. Next, the antiseptic is diluted with water and the finished ingredients are poured with this mixture.
To insulate the ceiling in a house with sawdust, you will need to perform a number of steps:
- material in the form of cardboard or glassine is spread over the entire area of the ceiling;
- then the previously prepared composition is distributed evenly;
- Good tamping will get rid of air accumulation in the mixture.
After two weeks, the solution becomes strong; when walking, it should crunch, but at the same time not bend.
Ceiling insulation with sawdust, lime and clay is carried out in almost the same way. Sawdust, in this case, must be well dried and of high quality. To prepare the solution, you first need to pour water into the clay. Next, it is mixed until a homogeneous consistency. Sawdust is gradually added to the clay until the mixture reaches medium thickness. Glassine or film is spread on the ceiling, fixed with a stapler. The minimum thickness of the layer applied to the surface is 50 mm. After thoroughly compacting the solution, it is left to dry for at least 3 days. All resulting cracks are sealed with the same mixture. The material dries completely after one month.
Another option is to insulate the ceiling with sawdust and gypsum. In this case, the ratio of ingredients is: 85% to 10% to 5%, sawdust: lime: gypsum. To begin with, the sawdust should be treated with an antiseptic and dried thoroughly. Next, all the above components are thoroughly mixed together. At the end, water is added, with the help of which the consistency of the composition is adjusted. The thickness of this layer should be about 250 mm. Good tamping should rid the material of shrinkage and air. All work must be carried out very quickly, since the plaster sets very quickly.
Insulating the ceiling with sawdust video:
The process of insulating a ceiling structure with sawdust
Ceiling insulation using sawdust is possible only in the upper part of the structure. In order to complete this work, you need to stock up on wooden boards with which you need to flash the beams. The thickness of the purchased material should be no more than 3 cm. See the article on the topic of interfloor ceilings on wooden beams.
In order to firmly fix the boards to the beams, it is worth using screws and nails. When attaching the material, it is important to remember that the weight of the insulating mixture is quite large, so the result of the work must be of high quality.
Ceiling insulation with sawdust
The fasteners must be driven into the tree at an angle, with each one being in the opposite direction from the previous one. The length of screws must be at least 50 mm, and nails - at least 100 mm.
Next, all wooden surfaces must be treated with special antiseptic agents. Their action is to protect the material from mold and fungi. If this point is not followed, you can see the consequences that will subsequently affect the surface of the ceiling itself.
Next, the vapor barrier film is laid. Roofing felt is often used for these purposes. After this, a mixture of wood insulation material with cement and lime is laid out, which should ultimately have a smooth and compacted appearance. Insulation with sawdust should be carried out to the floor level. Experts recommend sprinkling sawdust with some ash, as it can prevent the material from rotting.
Next, you should stop all work for a couple of weeks to allow the moisture to evaporate from the insulation. After this, the surface is again covered with a layer of vapor barrier. You can use a stapler to attach this film.
To finish the ceiling of a room such as a bathhouse, where sawdust is also used as insulation, it is necessary to take more serious waterproofing measures, since there is excess moisture there.

