What is this building material?
First, let's figure out what polystyrene foam is? Knowledgeable people sometimes call it expanded polystyrene. This material, which is often used in construction for insulating houses, is a plastic mass.
These masses are usually filled with gas or air. The most common type is foamed polystyrene. The dimensions of the foam do not exceed 15 millimeters. Polystyrene foam contains 2% polymer, the rest of the space is filled with air.
The material is made from polymer under high pressure and using a gas generator, due to which it has a high density. High sound and thermal insulation are the distinctive features of this material, which is why it is so popular in construction.
The advantages of this insulation
What are the main advantages of insulation with this particular material? Several points can be highlighted here.
The first is, as mentioned above, high thermal insulation. Polystyrene foam is made using gas, which allows it to maintain the optimal temperature in the house.
The second is environmental friendliness. The material does not contain toxic substances, but only if the manufacturer did not use heat treatment during production.
The next advantage is high moisture resistance. This material does not retain moisture or accumulate it, that is, when insulating, dampness or the possibility of mold appearing is completely eliminated.
The fourth advantage is ease. The lightness of foam plastic greatly simplifies the insulation process, since the material can be easily cut or sawn.
And the last thing I would like to note is accessibility. The cost of this material is not high, absolutely anyone can afford it.
Advantages of expanded polystyrene
We found that polystyrene foam is resistant to environmental factors and mechanical stress. But this is just one item from a wide list of advantages :
- Effective energy saving . Due to the structure of cells filled with gas, polystyrene foam has low vapor permeability and thermal conductivity, and has excellent thermal insulation properties. According to statistics, the thermal insulation properties of a layer 3 cm thick are equal to 123 cm of concrete, 64 cm of brickwork, 11 cm of wood or 6 cm of mineral wool.
- Durability . Research conducted in the homeland of expanded polystyrene, Germany, showed that the material that was used to insulate the roof back in 1950 did not change its insulating and other properties.
- Safety . The material is not a source of harmful dust and does not contain fibers. Therefore, it does not require special protective equipment (glasses, gloves) and can be easily processed without causing irritation of the mucous membranes and other health problems. Even if a piece of polystyrene foam is swallowed, there is no negative impact on health, and the material passes through the digestive tract without changes in structure.
- Lightness . The low weight of polystyrene foam makes it the most economical and convenient material for insulation.
- Resistant to chemicals and biological attack . Expanded polystyrene is resistant to various chemicals, UF radiation and temperature changes. It is not susceptible to decomposition, leaching and mold development. This material does not create a breeding ground for the life of fungi and bacteria, and is also not digestible by rodents and other animals.
- Eco-loyalty . Polystyrene foam is an environmentally friendly, non-toxic material. It does not contain binders, does not emit formaldehyde resins, does not destroy the ozone layer and does not pollute the environment. Therefore, in addition to construction, it is used for the manufacture of children's toys, food packaging and growing greenhouse fruits. In addition, polystyrene foam is recyclable and is 100% recyclable without harmful consequences for nature.
- Fire resistance . Expanded polystyrene is flammable. But if its cells are filled with carbon dioxide or other fire-resistant components, the material does not ignite and does not allow the flame to spread further.
- Moisture resistance . Expanded polystyrene is not exposed to moisture, its absorbent and diffuse properties are practically zero, due to which it does not require additional waterproofing.
You will learn how and how external insulation of a wooden house is done by reading this article.
And here is an article about insulating a wooden house with mineral wool.
Disadvantages of insulation
Despite all the above advantages, polystyrene foam also has disadvantages, and they are not as few as it might seem.
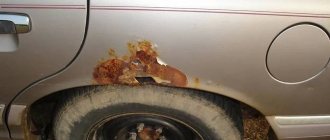
The first disadvantage is the fire hazard; in the event of a house fire, the material is highly flammable. I would also like to say that polystyrene foam is the favorite material of rodents; they gnaw passages in it with great interest, which significantly reduces its lifespan.
Insulation specialists also point out that the material has a short service life, it does not exceed 15 years and this is the upper limit of its life if installed correctly.
If you heat the foam too much, its properties will change, and steam will penetrate inside - this can lead to rotting of the wood, and this, in turn, will affect the appearance of mold or mildew.
And the last, but also very important disadvantage is that the material releases toxic substances when ignited. These substances can lead to a deterioration in the well-being of all people who have direct contact with the foam.
Disadvantages of polystyrene foam
Polystyrene foam is easily damaged by rodents and is a fire hazard.
Fragility or term
Even with proper installation and operation, the service life of this thermal insulation material is only 10-15 years.
Mold and fungi
The structural properties of polystyrene foam begin to change for the worse after heating it above 70°C. Low vapor permeability leads to the need for ventilation under such insulation. In its absence, mold and mildew will form on wooden walls.
Release of harmful impurities
Although in the absence of open fire the material extinguishes itself, even when it smolderes, harmful substances are released. Therefore, it is necessary to carry out additional fire retardant treatment of the foam. During the operation of a building insulated with such material, fire safety rules must be especially carefully observed.
Insulating the facade of a wooden house with polystyrene foam is a fairly simple task, so you can do the job yourself. To get a good result, you must strictly follow the rules for performing the work. If the technological process is disrupted, situations may arise in which the effectiveness of insulation decreases, and everything will have to be redone.
Designation of foam plastic and types existing on the market
Many beginners come across different letters when comparing this material and do not know what they mean. These letters are a type of foam. Usually, it is marked as “PS”, then other letters and numbers are added depending on the type. There are several types of foam on sale.
The first type is non-press, it is manufactured without pressure. The granules are dried and foamed, and the process is repeated several times. The output of this material is more voluminous, airy, and the cost is much cheaper than the others.
The next type is extruded. It is made using a forming hole and the material is passed through it. This foam is completely waterproof.
The third type of foam is pressed foam, it is made by pressing. The material turns out to be more dense, but this does not make its thermal insulation higher. Pressed foam is not popular, since the market price for it is higher than that of non-pressed foam, but at the same time it is almost no different.
The last type found on sale is autoclave. It is produced by one American company, there is no additional information about it.
Foam depending on density
When insulating a wooden house with polystyrene foam, it is important to choose it wisely. The material is also distinguished by density.
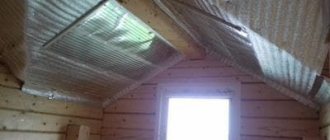
- PSB-15 is the lowest density. It is used when strength is not required. This type of foam is used in insulating carriages, attics and attics.
- The most popular type is PSB-12, it is found most often on the market. This material is universal and is used for insulating walls, floors and facades. A big advantage of this type is also its high sound insulation.
- The third type is PSB-35. You can guess that this is high-density foam. This type is used for insulating foundations or, for example, underground structures.
- The final look is PSB-50. This material has the highest density and is used, for example, in road construction or in industry.
Advantages of polystyrene foam
One of the thinnest insulation materials
If we compare polystyrene foam with all other insulation materials, what makes it unique is its low thermal conductivity coefficient, in which no one can surpass it. It follows from this that it will have a minimum thickness, unlike other materials. This fact is clearly confirmed by the list of known insulators indicating the value of their thermal conductivity:
- Penoizol (50 mm).
- Foam insulation (75 mm).
- Mineral wool (125 mm).
- Wood (340 mm).
- Brick wall (900 mm).
- Concrete (2132 mm).
The lightest insulation
Even when choosing polystyrene foam, you can find out how much the foam board weighs. Just look at the packaging, which contains information about the density of the material:
The density value that corresponds to one cube should be considered the mass of the product. This nuance will help you determine how high quality the material offered to you is. If the description of the foam indicates a density of 25 kg/m3, and weighing shows a different result, you can be sure that there is something wrong with this material.
You can carry out insulation work with any polystyrene foam, regardless of its density. The important point is that as it decreases, the strength of the material will deteriorate. It would not be the best decision to insulate the first floor of the building, since any mechanical impact will lead to damage to the facade. Therefore, you should choose a material that has the maximum density value.
One of the most inexpensive insulation materials
One of the most important advantages of polystyrene foam is its low cost. Today in construction the following types have become widespread:
- sheet foam;
- foam chips or balls.
Moreover, the cost of these materials is almost the same. It can be assumed that this was influenced by an increase in demand for balls, which are necessary during roof insulation. They are introduced into the cement-sand mixture, after which a layer of the required thickness is created on the ceiling. This option allows you not only to save money, but also to retain heat and provide the necessary strength.
Polystyrene foam is a very multifunctional insulation material.
Polystyrene foam has become widespread when performing work such as:
- wall insulation;
- roof insulation;
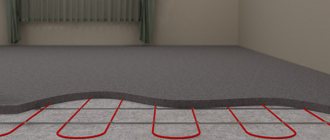
- floor insulation;
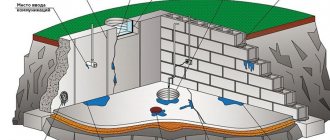
- insulation of the basement of the house.
Most often, polystyrene foam is used to insulate walls.
The important thing is that, in addition to all other qualities, this material has a long service life, even when under a layer of plaster. If you believe the manufacturers, the facade, which is made on the basis of polystyrene foam boards, can survive without major repairs for 30 years
There are rumors that if polystyrene foam was used to insulate a house in Germany, the owner can count on longer insurance than usual, which can reach 100 years.
Recommendations for selecting polystyrene foam
Thickness is the main and most important criterion when choosing polystyrene foam, and here you cannot be guided by the rule that the thicker the insulation, the longer it will last. After all, if the material is thick, there is a possibility that the material inside will begin to bulge when the temperature changes.
Indeed, it is important to take into account the density of the material, as well as manufacturing standards (when purchasing, look carefully at the fault line, it must be correct), it is worth choosing well-known manufacturers.
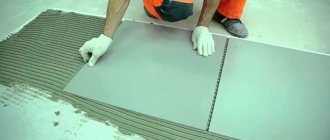
Preparing walls for insulation
You can’t just go ahead and start attaching polystyrene foam to the walls. A special insulation technology was invented a long time ago; it is quite simple. For insulation with this material, a special construction adhesive is used.
It can be purchased in “build. materials." Just like tile adhesive, it is sold in powder form, which must be diluted with water. This glue provides excellent “adhesion” of the foam to the wall.
If the surface is perfectly flat, then you should apply the adhesive mass as thinly as possible. Thin application should be both on the foam and on the wall.
In order not to “accidentally” waste all the glue at the very beginning of work, you can run a comb over these layers. After this, lean the foam against the wall, press and hold until it “sticks” completely.
If the surface is not smooth, then the application principle is different. The glue should be applied to the surface in small sheets, as well as along the boundaries of the wall and the material. For optimal fixation, you also need to apply glue to the existing recesses.
The insulation is glued onto the wall in a strict order, like on a chessboard, and after installation it is secured with special mushrooms. Here you will need a hammer drill to make holes and install the mushrooms. They are also attached in several ways: along the edges and at the joints.
Installation of insulation
After the preparatory work, you will need to calculate how much insulation will be used for the entire house. To do this, you need to calculate the total area of the walls. Calculations are made by multiplying the length of each wall by its width and adding the results obtained. From this number it is necessary to subtract the area of windows and doors and add 10% for unforeseen situations. Next, you will need to divide the result obtained by the area of one sheet of foam. When the number of insulation sheets is known, they can be divided by the number of sheets in the package to find out the number of the latter. In addition to foam insulation, you will need the following elements:
- foam glue;
- fasteners;
- drill;
- level;
- boards for sheathing.
In order for the insulation to adhere best to the wall surface, it must be provided with additional support points. This can be easily done using foam lathing. Wooden blocks are used as boards for lathing under the foam, the width of which will be equal to the thickness of the foam. This is done to make it easier to attach the finishing material. The distance between the boards for lathing under the foam will depend on the width of the foam sheet. In this case, it is necessary to achieve such a position that the foam sheet fits tightly between two adjacent sheathing boards.
Advice! The formula for calculating the distance between sheathing boards for foam plastic is as follows: B+L-5.
The first variable is equal to the thickness of the sheathing board, the second variable is equal to the width of the foam sheet, and “5” is 5 mm, which is subtracted for a tight fit of the foam.
The sheathing boards under the foam plastic must be strictly vertical. This will allow you to visually align the walls due to finishing if any shortcomings were made during construction. To achieve a vertical position of the sheathing boards under the foam, you can use a regular building level. In some places you will have to make small notches in the wall to align the plank. The sheathing boards are fixed to the wooden walls using hardened wood screws.
Advice! If there are no boards of the required width for the sheathing, then in order to bring them to the same level with the overall thickness of the foam, it is necessary to use additional bars that are screwed on top.
Once the sheathing is ready, the installation of insulation begins. When working, it is better to move from the bottom up. It must be secured using special polyurethane-based glue, as well as using plastic umbrellas. Such measures are necessary for a perfect fit of the foam to the wooden walls. Polyurethane foam adhesive must be applied over the entire surface of the sheet. This can be done with a snake or a rectangle with diagonals. After this, a hole is drilled with a drill, into which a plastic dowel is inserted and driven in with a hammer. When laying polystyrene foam, it is necessary to ensure that the sheets lie close to each other. The joints between them are filled with glue so that there are no cold bridges.
After installing the foam on all planes of the walls, it must be protected with a waterproofing membrane. It must be laid according to the manufacturer's instructions so that moisture is removed from under the membrane. The waterproofing is laid horizontally with an overlap of 15 cm. The individual layers are glued together with tape or adhesive tape. The membrane is fixed to the sheathing boards using a construction stapler. The last stage is cladding with siding, block house or clapboard. A video about the opposite point of view on polystyrene foam insulation for a wooden house is below.
Frameless and frame methods of insulation
There are several methods of insulation - frameless and frame. What is their difference? The first one differs in that when insulating, the foam is mounted close to the wall.
All surfaces are treated in a certain sequence so that the insulation adheres better. The frame method of insulation differs in that processing is required only where the guide bars will be installed.
Description of insulation processes
Each of the above insulation methods is carried out according to an individual technique.
Thermal insulation algorithm using the frameless method
The method involves attaching the insulation directly to the wall of the house and subsequent finishing.
Sequencing:
- Calculation and purchase of foam plastic and fasteners. It is easy to calculate the amount of insulation required. The perimeter of the task is multiplied by the height of the walls and the area of window and door openings is subtracted. Dividing 100 by the selected sheet thickness in cm, you get the area that 1 m3 of material can cover. 5-10% is added to the result obtained in case of unforeseen situations. To fasten the foam, dowels with disc-shaped caps are purchased. To attach one sheet measuring 1x1 m you will need 5-6 hardware.
- To seal the seams, buy adhesive foam or polyurethane foam. You will need a special gun for application. It should be noted that foam adhesive is more expensive, but is better suited for sealing seams, since it expands less after application, without deforming the insulation sheets.
Excess foam that needs to be removed
Important! Be sure to purchase a foam cleaner - you won’t be able to wash your tools, hands and clothes with any other means.
- Prepare the surface of the walls for insulation. It is best to carry out work in the summer, when the walls are best dry. Timber, logs, boards are cleaned of dirt and old paint is scraped off. Gaps in walls made of logs and timber are sealed with tow or caulked. The surface is treated with an antiseptic to prevent the appearance of fungus, mold, and destroy wood pests. Damaged areas of the walls are restored by removing the damage. Finish the work by applying fire retardant (fire retardant impregnation) twice. The walls are drying.
- Using a building level and a plumb line, apply horizontal and vertical markings for the first row of insulation. If the first row is suspended, a support bar is attached to the wall.
Installation of the first row of insulation
- Using a drill, the insulation is attached using dowels. The second and subsequent rows are installed offset relative to the first. It is important to install the first row strictly in a horizontal position - this will prevent gaps from occurring in subsequent rows.
- Seal the seams with foam. Removal of excess sealant is carried out after it has completely cured; the process usually takes from 12 hours to 24 hours.
- Using a toothed roller or improvised means, perforations (punctures up to 1 cm deep) are applied to the surface of the insulation. Perforation promotes better adhesion of the plaster to the foam.
- A layer (1-2 mm) of polystyrene foam glue is applied to the surface of the foam and leveled.
- I apply and lightly “sink” a fiberglass plaster mesh onto the surface coated with glue. The joints of the canvases overlap by 10 cm. The seams between the foam plates and the edges of the mesh should not coincide.
Laying reinforcing mesh
Important! When purchasing a mesh, check its compatibility with the composition of the plaster adhesive that they plan to use - some meshes can be destroyed by the cement included in the adhesive composition.
- The reinforcing mesh is leveled with a spatula from the center to the edges, embedded in the adhesive composition. Having leveled the mesh, apply a second layer of glue, leveling the surface.
- The dried surface is treated with a deep penetration primer; it is advisable to apply a second coat after the first has dried.
- The surface is plastered with compounds for external use. As a finishing option for experienced builders, we can recommend bark beetle plaster. A simplified option is to paint the surface with facade paint.
Frame thermal insulation method
The frame method differs from the method described above. Here is his step-by-step algorithm:
- Geometric measurements of the walls of the house are taken, including the perimeters of windows and doors. Having calculated the area to be insulated, purchase polystyrene foam; you can buy material with a density of 15 kg/m3.
- Calculate and purchase wooden bars and a galvanized profile for the frame. The amount of material depends on the finishing material used. Usually I make vertical logs at a distance of 50 cm so that the siding can be securely fastened and foam sheets can be used without waste. In cases where extruded polystyrene foam is used, they are guided by the geometric dimensions of the insulation plates.
- Similarly, with the method of frameless insulation, the walls are prepared - cleaned, treated with impregnations.
- Fix the sheathing on the wall. For wooden blocks, use self-tapping screws and nails of suitable length. Wide products are secured using corners. The metal profile is mounted on pre-installed brackets. It is important to maintain the exact distance between the frame guides so that the foam “lays down” as tightly as possible. For example, if foam plastic with a width of 50 cm is used, then the distance between the edges of the joists should be 49.5 cm.
Ready-made sheathing for foam insulation
- Install the insulation between the sheathing joists, securing the polystyrene foam additionally with dowels with disc-shaped caps.
- Gaps between the insulation and the frame larger than 1.5 mm are foamed - this will prevent the appearance of cold bridges in winter.
- A waterproofing membrane is attached on top of the foam to protect the house from moisture penetration, and the foam from destruction.
- If the house is finished with siding, thin slats are attached on top of the waterproofing membrane, which will provide a gap for ventilation.
- Install the finishing material using self-tapping screws.
How best to install: inside or outside
Who doesn’t know, there is a big difference when insulating a house from the inside or outside. If you read information on the Internet about insulating a wooden house. You can get confused, people’s opinions are radically different: some say one thing, others say another.
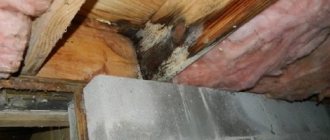
I am of the opinion that it is much more correct to insulate the walls from the outside. Why am I so sure of this? In the winter season, the temperature outside drops significantly, but the house remains warm. If you install it indoors, the wall will be exposed to cold weather and the dew point will be closer to the material.
Condensation will appear between the wall and the insulation, the surface will always remain wet, but that’s not all, the water will gradually turn into ice, which after a certain period of time will lead to its destruction.
If you insulate a wooden volume from the outside, the dew point will move further towards the street. The heat from the house will protect the wall from all sorts of negative influences of the weather, and it will remain dry.
Foam insulation technology
The choice of synthetic material is due to its positive qualities:
- Low specific gravity. Wooden houses are built on lightweight foundations that are not designed for heavy loads. For example, to cover a log house with bricks, you will need to pour an additional foundation. Foamed polystyrene weighs from 15 to 35 kg/m3. One cubic meter of material 5 cm thick is enough to insulate 20 m2 of wall.
- Low price for the material. Polystyrene foam PSB-S-15 costs from 1,500 rubles/m2, and a “cube” PSB-S-25 will cost 2,300 rubles.
- Low thermal conductivity, which contributes to energy saving during the heating season in winter and summer heat.
- Excellent sound insulation.
- Possibility to carry out installation and finishing on your own.
Types of foam
Polystyrene granules are the raw material for the production of polystyrene foam (foamed polystyrene) and extruded polystyrene. Different technologies make it possible to obtain materials with different strength characteristics, density and thermal insulation properties.
In construction, foam plastic is usually called foamed polystyrene, which when broken looks like balls pressed together. The material is obtained by treating polystyrene granules with hot steam. The finished product does not withstand mechanical stress and needs protection from sunlight.
Extruded polystyrene is a much denser material and is less susceptible to moisture.
Insulation of buildings with extruded polystyrene
The main article is how to insulate a frame house with polystyrene foam.
On many Internet resources you can see the opinion that polystyrene foam is not suitable for insulating wooden houses - supposedly low vapor conductivity will contribute to the accumulation of moisture at the junction of the wooden wall and thermal insulation.
This can be approached in different ways, but:
- In a heated residential building in winter, air humidity is low due to operating heaters. This does not contribute to the “wetting” of the walls from the inside.
- Wooden walls “breathe” and with regular ventilation, excess moisture is removed through windows and doors, and not through the walls.
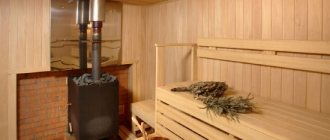
Important! Do not use polystyrene foam for insulation of baths, saunas, damp utility rooms, vegetable stores dug in the ground.
There are two technologies for sheathing a wooden residential building on the outside and inside:
- Frameless/
- Using a frame.
Technological difference between internal and external wall decoration
Most often, interior wall finishing is done using wet technology, that is, using glue. To save space inside the house, you should not use an additional frame or anything else. The stages of work are as follows:
- Surface preparation and adhesive application.
- Installation of foam plastic boards and blowing out the joints between them.
- Applying the base layer of plaster.
- Applying the final layer of plaster.
Exterior finishing is also done using wet technology in most cases. There is almost no difference between them. External installation differs only in some details and the number of work processes. An insulating film is used here, since external factors act on the foam from the outside. Stages of work:
- Cleaning the base and priming it.
- Installation of the base profile.
- Layout of insulation placement and “fitting” on glue.
- Eliminate gaps with foam and fix them with dowels.
- Attaching the waterproofing film.
- Applying the first layer of plaster.
- Reapplying a layer of plaster.
- Final application of the third layer of plaster.
- Decorative finishing upon request.
Summing up
In my opinion, insulating a wooden house with foam plastic is the optimal, high-quality and fast type of thermal insulation. In addition to all this, polystyrene foam is a cheap material, it retains heat well and practically does not absorb moisture.
During installation, it will not be difficult to interact with it, since it can be easily cut even with a knife. It is worth taking into account the fire hazard and paying great attention to its “communication” with the sun. The insulation must be installed using high-quality plaster and glue. Only then will it last for a very long time.
Undoubtedly, it’s up to you to decide whether it’s worth insulating your house in this way or not. “It depends on the taste and color,” as they say, but it’s not for nothing that thousands of people every month choose polystyrene foam to decorate their wooden house.
Insulating a wooden house from the outside with polystyrene foam: installation technology, reviews and videos
Insulation of a wooden house from the outside with polystyrene foam is carried out using the technology of applying the material to a prepared base made of timber or a metal profile. The ventilated facade system is widely used, but it is possible to place slabs in the internal wall structure.
Thermal insulation of timber structure with foam plastic
Regarding how to insulate a wooden house with polystyrene foam from the outside, a professional installation video will help you understand the question:
Since polystyrene foam has a lower vapor permeability than a log house, it is not recommended to use it as insulation. If you decide to use this particular type of insulation, you can use ordinary foam plastic of the M15-25 brand. However, it is very susceptible to mechanical damage.
Features of thermal insulation
- The use of slabs must have a thickness of 30 mm;
- To more firmly fix the sheets, before applying the adhesive composition, use a needle roller to create a perforated coating.
- The adhesive composition is placed throughout the sheet, which eliminates the formation of air chambers - places where condensation accumulates.
- It is not recommended to use anchors that exclude the hermetic properties of the material. Reinforcement is carried out using T-shaped profiles between the slabs.
- To ensure an increased level of safety, a fireproof coating is used.
Thermal insulation of a building made of solid foam
Stages of applying thermal insulation
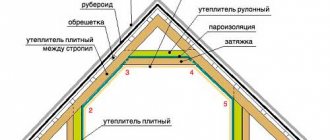
Insulation of wooden buildings is provided using sandwich technology using vapor barrier. The whole process consists of several stages:
- Preparation of the façade surface.
- Placement of profile structure.
- Placement of the adhesive base on the insulation.
- Fixing the insulation to the surface.
- Fixing dowels.
- Installation of corner reinforcement.
- Fastening the reinforcing mesh.
- Creation of a protective and decorative layer.
Coating preparation
To create the façade base, the surface is cleaned of dirt and damage. At this stage, the base is milled, plaster and primer are applied to the resulting cracks.
Attention!
To create the most even coating, use a level.
Foam insulation
Placement of the profile frame
Installation of the starting bar is provided for in the project documentation. Its fixation is ensured in a horizontal position using dowels in increments of 30 cm. To avoid the formation of defects when the material expands, it is necessary to leave gaps of 2-5 mm.
Placement of adhesive composition
Based on the base option, there are two options for coating with glue:
- Using a notched trowel (on a flat surface).
- Using pendulums (on uneven surfaces).
If there are significant irregularities, special beacons can be used. The application of glue is ensured in small proportions at small intervals. When air pockets form, gaps form. Excess glue is removed from the surface, which prevents its penetration into the connecting holes. The adhesive coating makes up at least 40% of the material.
Application of foam plastic on a wooden facade
Fixation with glue
Application of the slabs is ensured in a horizontal position using staggered technology. Placement is carried out from bottom to top. The plates are pressed tightly. Installation of the first row is carried out on the profile. At the corners, the plates are interlocked using teeth. Whole slabs are used on doors and windows, eliminating the formation of joints at the corners. The gaps between polystyrene foam boards are treated in different ways: using construction foam, sealant, or using insulation for large gaps.
Fixation with dowels
The foam is fastened with dowels. This is facilitated by the formation of holes along the edges and in the center of the panels. They require driving dowels with screwing in a spacer core. The dowel head should not go deep into the panels. The number of fastenings is determined by wind loads and the number of storeys in the room.
Corner amplifiers
External corners in window and door openings, as well as at the corners of the room, are reinforced with special strips.
Installation of foam plastic insulation
Reinforcement
Painting corners are fixed. The wall is first divided into sections approximately 1 m wide. The foam is covered with glue or putty. Using a notched trowel, furrows are created to embed the fiberglass mesh made of aluminum composition. The canvas in the form of a lattice is fixed with an overlap of 10 cm. Then a special product is applied and grouted with fine sandpaper.
Decorative finishing
As a finishing touch, putty and paint are used or siding is placed. A vapor barrier film is placed outside.
Before applying the slabs to the facade of the building, it is important to provide for the presence of breathable waterproofing (vapor-permeable membrane).
User reviews
If you need to insulate the outside of a wooden house with polystyrene foam, reviews from experienced craftsmen and novice specialists will help you choose the installation technology and brand of proven material.
Vadim, Irkutsk
For the first time, I insulated the facade with 50 mm polystyrene foam, the top covering was clapboard. He didn't last long. He just didn't last long. At that time, all kinds of waterproofing and extruded slabs had not yet come into fashion. This summer I did everything smartly: I used the Teremok program and calculated the thickness of the wall and its compatibility with the insulation. Only there the requirements for thermal protection of buildings are too strict, so the conditions had to be changed. In general, the cake was made from rockwool, membrane and siding.
Misha, Magnitogorsk
I used polystyrene foam in my dacha as insulation for a wooden facade. Heat loss is minimal, there is no smell, it is cool in summer, generally normal. Recently I made an opening in the wall - the structure has not changed in 3 years. The internal lining is made as timber. Expanded polystyrene was placed between the posts without mounting foam. I made the markings with an allowance and cut them with a sharp knife. It stands up with effort, but without gaps. On the outside, just in case, I made a Tyvek gasket.