Advantages and disadvantages of polystyrene foam when insulating a house
The main volume of expanded polystyrene (EPS) is gas, which largely determines the two main advantages of the material - light weight and high thermal insulation ability. In addition, polystyrene foam is also a good sound insulator, which, due to its structure, dampens sound vibrations. But there are also other advantages.
Ease of installation
Working with polystyrene foam is not difficult due to its light weight, which in turn is due to the presence of gas. This makes the material “weightless”. It is easy to cut foam sheets and adjust them right on the installation site. The work is easy to do yourself without the involvement of craftsmen, which reduces the cost of the process.
Multifunctional solution for the construction industry
Expanded polystyrene is suitable for insulating various parts of buildings - basement, walls, roofing, floors, ceilings. Moreover, it is permissible to sheathe the material not only for residential buildings, but also for industrial buildings. There are two types of thermal insulation material:
- traditional stoves;
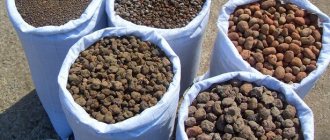
- crumbs or balls.
The slabs are suitable for thermal insulation of walls, and the crumbs are used in roofing.
Styrofoam
Resistance to temperature changes
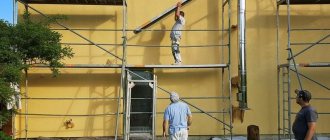
The foam material is able to retain its properties even when exposed to extremely low and high temperatures - from -50°C to +50°C. Therefore, polystyrene foam is widely used to insulate building facades.
Moisture resistance and durability
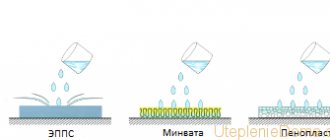
Foam insulation is not able to absorb water. You don’t have to worry about the development of insects, mold and other microorganisms.
Low cost
For most consumers, this factor is one of the main advantages of the material. Analogs are entering the construction markets that are superior in quality to foam plastic.
Disadvantages of the material
Disadvantages must be taken into account when using this type of insulation:
- This is flammable material! When contacting a flame, polystyrene foam melts, burns and releases harmful compounds. Therefore, it is important to protect him from such influence. For this reason, the use of foam plastic in ventilated facades is highly discouraged, since all the optimal conditions for combustion are created. The void inside the material acts as additional air draft.
- Not the highest strength! Any mechanical impact destroys the structure of the foam. As a result, the thermal insulation ability is reduced, and in case of severe damage, it is completely lost.
- Nitro-based paints must not be used! Substances contained in paints and varnishes corrode the structure of the foam.
- Poor vapor permeability! Decorating residential premises with polystyrene foam requires good ventilation, otherwise the house will become a kind of thermos.
Therefore, the insulation needs a reliable protective coating. Plaster serves ideally in this capacity.
What type of foam is suitable for plastering?
Expanded polystyrene plaster is a special type of finishing. According to manufacturing technology, polystyrene foam is produced in two types:
- pressless PPS;
- press PPS.
Pressless foam
Press foam
The structure of pressless sheets is formed during sintering of oval or round granules. The output is a fragile, vapor-permeable material. The granules do not absorb moisture, but liquid may accumulate between them. As a result, the plaster begins to deteriorate faster.
Pressed foam boards have a smooth surface. They are stronger, more durable and have low thermal conductivity.
Advice! For subsequent plastering finishing, it is better to choose the following types - PSB-S-25, PSB-S-15. The structure of these plates will not be destroyed during mechanical impact on them.
Sequence of plastering processes
Various manufacturers have both universal mixtures that are used for gluing and plastering foam, as well as specialized ones. They perform only one function - plastering polystyrene foam or gluing slabs.
Universal mixtures for gluing and plastering facades on foam plastic
When using specialized materials, you should adhere to the rule - mixtures used at all stages of work, especially those in contact with each other, must be from the same manufacturer.
Ceresit line of adhesive mixtures
Features of the plaster mixture
The average consumption of the universal mixture is: for gluing reinforcing mesh about 4 kg/m2, for external plaster on foam plastic - up to 6 kg/m2.
The consistency of the mixture for gluing the mesh must be in full accordance with the manufacturer’s recommendations on the packaging. For leveling, as practice shows, the solution should be much thinner, practically flowing off the spatula.
Preparing the surface for plastering
It is useless to prime polystyrene foam, since it does not absorb moisture. In order for the leveling and decorative layer to remain on the surface, a plaster mesh having a density of 140-160 kg/m2 is used.
Important: the greater the density of the mesh, the smoother the plaster will lie on the foam, but it is very difficult to paste over the corners with such a mesh.
Preparatory stage, facade plaster on polystyrene foam, video of gluing the base with mesh:
Pasting of external and internal corners of walls, including window and door slopes, occurs using the following technology:
- A strip is cut 30 cm wide and about 1 m long;
- Bends exactly in the middle;
- Apply glue to the foam with a spatula;
- The mesh is applied and rubbed in with a spatula away from the corner and down.
Pasting the main surface with mesh:
Gluing the mesh
- The mesh is cut into pieces of 1 across the entire width of the roll;
- Glue is applied to the wall with a 350 mm spatula, strip width 90 cm, length 1 m;
- The cut is placed in the middle of the strip, leaving 5 cm on the sides for gluing the joints;
- The mesh is smoothed from the center, from top to bottom. The glue should almost completely protrude above the surface;
- The joints are glued overlapping with glue applied on top, otherwise the joints will be visible even through the decorative plaster.
After the glue has dried, grouting is done with a plastic float with a sandpaper sole, applying little force so as not to damage the foam. Next, a leveling layer is applied. Its thickness is up to 3 mm, depending on the quality of the gluing performed. The boundaries of the areas should not coincide with the joints of the mesh on the foam. After drying, grouting is done.
The preliminary stage of plastering the walls with your own hands using polystyrene foam, grouting the leveling layer is done in a circular motion. Important: the leveling layer must be grouted no later than 4 days from the moment of application, otherwise it will “overwork” and you will need to apply excessive efforts.
After grouting, it is necessary to prime the surface; it is recommended to apply it using a roller. Foam polystyrene façade plaster is applied to the primed surface.
The sequence of processes for insulating a house and plastering with polystyrene foam with your own hands, video:
Is it possible to plaster polystyrene foam and why is it done?
Long-term exposure to external weather and other factors has a negative impact on the structure of the insulating coating. Over time, this leads to destruction of the material. Plaster on polystyrene foam provides reliable protection against such harmful effects. And this has its advantages:
- a reinforced layer is created that prevents the insulation from collapsing under mechanical stress;
- direct access to direct solar ultraviolet directly on the PPS sheets is closed;
- plaster prevents moisture penetration;
- fire safety increases, since the plaster coating is not flammable;
- the protective coating is too hard to be damaged by insects and rodents;
- As a result, two layers are formed, which increases noise absorption and prevents heat leakage.
A large number of plaster mixtures of various compositions are supplied to the construction markets and each type performs tasks in its own way. As for foam insulation, it is worth choosing the best option to achieve the desired result.
Plastering on foam plastic
How to plaster polystyrene foam outside the house
First of all, the construction mixture must create a durable coating that will remain on the surface for years. Adhesion plays a significant role. When insulating facades, it is advisable to give preference to plasters for external use or universal materials. In the case of insulation from the inside of buildings, any type of mixture is suitable, but mainly focused on interior work.
The economical approach to plastering the surface with cheap material is not suitable - you need to purchase a composition that will not crack after 2 or 3 years. Professional builders recommend brands such as Ceresit, Stolit, Osnovit, Knauf, Ecomix. There are certain types of material used for specific work:
- fastening insulation sheets to surfaces;
- plaster for foam plastic to protect it;
- universal compositions.
When using cheap plasters, the coating will definitely begin to develop cracks, which will ultimately only increase costs. Gypsum plaster is definitely not suitable for facade work. There are options that deserve special attention.
Mineral plaster
The mineral composition includes white cement, lime hydrate, and mineral chips. The plaster is supplied for sale in the form of a dry powder, which then requires dilution with water. This mixture is characterized by good adhesion, and the coating itself resists precipitation and other factors. But such material retains its properties for 10 years, and after that the surface needs to be updated.
Mineral plaster
Mineral plaster has the lowest cost and does not provide the coating with the necessary quality. The mixture is difficult to apply due to poor adhesion to foam. Therefore, notches are made first, and the insulating surface is coated with a primer.
Acrylic mixtures
Acrylic plastic compositions are made from acrylic resins with the inclusion of mineral binder additives. As a result, the performance qualities of the coating are improved. It also withstands most external influences, including temperature changes. The service life depends on the specific manufacturer and is 15-25 years.
Silicone variety
Silicone plaster is made on the basis of silicone resins and various fabric fibers. The inclusion of special additives allows you to improve the performance of the construction product. The coating is resistant to adverse weather conditions. The mixture does not need to be diluted with water, as it is sold ready-made. It has a different color palette, but if necessary, you can add the appropriate color to get the desired tone.
Acrylic mixture
Silicone plaster
Selection of plaster
After you have figured out whether it is possible to putty polystyrene foam, it is time to proceed directly to the selection of the mixture itself. The protective coating for foam plastic must have good density and resistance to mechanical stress. The plaster mixture must have a high level of adhesion, since the foam itself has a fairly smooth surface. But the vapor permeability parameter does not play a special role here, since the insulation itself has a low indicator for this property.
There are several types of plasters - for attaching insulation, leveling and universal. If all the work is done with your own hands, then it is better to stop at the last option. Universal mixtures can be used at any stage of finishing. If two separate mixtures are purchased, then the following proportions must be observed: glue - 4 kg per 1 sq.m., plaster - 6 kg per 1 sq.m.
You can also putty with a cement-sand mixture, but it will only partially protect the foam. Therefore, it is better not to save money, but to choose more expensive compounds that will not crack in 2-3 years. Among the special plasters there are those that contain certain additives. It is best to opt for:
- Mineral plasters. The base consists of white cement, lime hydrate and mineral chips. Dry powder is available for sale and must be diluted with water. This type is characterized by good resistance to precipitation, temperature changes, and good adhesion to the surface. But for the sake of fairness, it is worth saying that these plasters have a service life of up to 10 years, after which they require updating.
- Acrylic plasters. This is a plastic mixture that is created on the basis of acrylic resin. The composition also includes mineral binder additives, which significantly increase the performance properties of the coating. This option, due to its plasticity, is not afraid of cracking, is not afraid of seasonal changes in temperature, and also easily absorbs moisture. Depending on the manufacturer, acrylic plaster can last from 15 to 25 years, so it is recommended to be used for exterior work. But among the disadvantages, it is worth noting not only the high cost, but also the tendency to burn out.
Among professional builders, such companies as Ceresit, Stolit, Osnovit, Knauf, and Ecomix are especially popular.
Mineral and acrylic plaster
Main article: how and with what to paint polystyrene foam?
Advice! To plaster polystyrene foam, you need to use two types of mixture - an adhesive mixture, which will become a reinforcing layer, and a leveling one. It is recommended to use products from the same manufacturer. This ensures uniform coverage and equal service life.
When choosing color and material, it is worth considering some features:
- plaster should have a higher vapor permeability than polystyrene foam;
- to treat areas of the house that bear a higher load (eaves, plinth, parapet, areas of elevation changes, etc.), a mixture with enhanced water-repellent properties will be required;
- The more saturated the color, the higher the likelihood that it will quickly fade when exposed to sunlight.
All these points must be taken into account when selecting plaster.
Features of plastering polystyrene foam
An important condition when applying plaster to polystyrene foam is the presence of a reinforcing mesh. You can’t do without it, since you won’t be able to achieve the required strength.
Along the façade
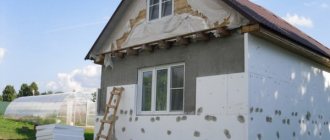
From the moment when builders began using PPS slabs to insulate buildings, specialists began introducing developments based on different cladding materials. A striking example of this is the technology called “wet facade”. Its essence is that a multi-layer cake is created, where each material plays its role:
- primer for subsequent application of plaster;
- plaster-adhesive mixture;
- PPP sheets;
- adhesive plaster solution;
- reinforcing mesh;
- leveling plaster coating;
- primer;
- finishing layer.
Cladding the facade with foam plastic has a reasonable approach, since condensation forms outside the room. When working outside, the interior space is not lost. The indoor air cools more slowly. But there are situations when it is not possible to cover PPS slabs with plaster.
Facade plaster
Indoors
The need to insulate walls with expanded polystyrene indoors arises for various reasons:
- Lack of access to the wall due to the proximity of other buildings.
- It is completely problematic to insulate a balcony (loggia), which is located at a high altitude, from the outside.
- The building has the status of a historical monument.
- There is a ban on the design of buildings located in the central part of populated areas.
Note! You can use polystyrene foam to insulate the slopes of entrance doors or windows when there is no other option. For interior work on walls, the preparatory stage is carried out in the same way as when using conventional plaster.
After this, PPS sheets are attached, and a reinforcing mesh goes on top of them. And then plaster is applied as in the case of the facade. If at the final stage the walls need to be covered with wallpaper or painted, the coating should be smooth.
Plastering indoors
DIY plastering
Now let’s take a closer look at how to properly plaster polystyrene foam. The algorithm is as follows:
- preparation of the base;
- fastening the reinforcing mesh is the first adhesive layer;
- applying a base leveling layer;
- finishing mixture.
Tools you will need:
- mixer;
- container for mixing;
- reinforcing mesh;
- sandpaper for rubbing;
- putty knife;
- building level;
- adhesive solution and mixture for plastering (rough and decorative);
- primer.
Preparing the walls
The foam slabs themselves are even, but before plastering, check that their level matches. To do this, follow the rule along the wall: it should not cling at the joints of the panels. This is important because subsequently it will take a larger amount of plaster to level the defect than originally planned.
Each seam is sealed with polyurethane foam, and the excess is cut off clean.
Since the material is smooth, it makes sense to roll the surface with a needle roller or “comb out” with a fine-toothed hacksaw. This will increase adhesion: the plaster on the “combed” foam will stick better.
The mounting dowels are puttied and then rubbed. The evenness of the surface is checked by the rule.
Installation of mesh with glue
Reinforcement of polystyrene foam with fiberglass mesh is necessary for better performance with plaster, to give it strength. Without this reinforcement, the finish will crack and fall off. For outdoor work, choose a dense mesh that is resistant to alkalis. The corners of the building are covered with a special perforated corner with a mesh.
The reinforcement process is quite simple:
- An adhesive composition with a mesh width of + 10 cm is applied to the entire height of the wall;
- The mesh is pressed against it and smoothed out from the center to the edges, from top to bottom. Choose the length of the segment as it will be more convenient for you to glue;
- The top of the mesh is completely covered with a thin layer of glue;
- The next part of the wall is strengthened in the same way. But it is worth remembering that the mesh is laid overlapping with the previous one.
- The corners are glued in the same way.
Grout and primer
After the mixture has completely dried (3-4 hours in hot weather and about a day in cool weather), the mesh must be leveled so that it does not protrude above the layer of solution. This is done in a circular motion using sandpaper or a grater. If in some area the plaster has not dried and remains on the sandpaper, then the paper is changed.
Before applying a layer of cement-sand plaster, the surface is primed. This is necessary to increase adhesion and bind dust. The primer also prevents the absorption of moisture from the applied plaster - the dehydrated solution quickly sets and loses strength. In general, priming is a must.
A deep penetration primer, for example Ceresit CT 17 or KNAUF Izogrund, is well suited for these purposes.
A roller is used for priming. Drying time will range from 5 hours to a day depending on the weather.
Applying the base layer
The mixed cement-sand mortar is applied to the wall manually with a spatula. Then it is leveled with a rule along the entire wall. If the mesh is laid well, then a layer 2-5 mm thick is enough.
Immediately after this layer has dried, it is also necessary to wipe down the surface - if you leave the work for “later,” there is a risk of the plaster drying out, and it will be more difficult to carry out the treatment.
The dried plaster is primed. After this, the facade of the building is ready for decorative finishing or painting.
Features of working with extruded polystyrene foam
Applying a solution to extruded foam plastic is fraught with a number of nuances, which is a distinctive feature of this material:
- EPS boards have a smooth surface, which is why the solution runs the risk of not adhering well. And if it does adhere, then after drying the coating may begin to crack or even fall off.
- Due to the lack of hygroscopicity, moisture from the building mixture is not absorbed into the insulation, but remains, which prolongs the drying time.
- The thermal expansion of plaster and foam is different, and this leads to cracking of the finishing material.
To avoid problems, it is necessary to approach the preparatory stage responsibly:
- It is worth using a needle roller to create notches on the foam surface to improve the adhesion of the solution;
- EPS slabs are necessarily coated with a primer, which further increases the adhesion of the plaster;
- another necessary component is a reinforcing mesh;
- The thickness of the coating should not exceed 3-5 mm.
Such preparation will avoid the appearance of cracks, and the solution itself will better adhere to the surface of the insulation. In addition to gypsum compositions, traditional materials containing cement and sand cannot be used for plastering extruded polystyrene foam, since such a solution corrodes the foam.
Extruded polystyrene foam
Step-by-step instruction
We plaster the polystyrene in several stages - at the initial stage you need to fix the mesh, and then move on to priming and final coating of the sheets. The peculiarity of surface treatment is that insulation applied in several layers will improve the properties of the material significantly.
Instructions for rough finishing
In order for the slippery material to be securely attached to the insulation, at the first stage a reinforcing mesh is glued to the wall. This layer will guarantee that the plaster layer will not fall off the surface in the future.
- To give the polystyrene surface roughness and unevenness, you need to use a sharp nail to mark the surface every 10 cm vertically. Transverse strokes can be horizontal or chaotic in nature.
- Prepare the surface as described above until completely leveled.
- Cut the reinforcing mesh into pieces, allowing for an overlap of at least 10 cm.
- Preparing a solution for gluing reinforcing mesh. To do this, you need to carefully study the manufacturer's instructions. According to reviews, the correct mixture should be a little thinner than recommended. Do several stirrings with a break of 5-10 minutes.
- Apply the mesh to the surface of the extruded polystyrene plaster and apply glue in two or three places. The hand holds the material from falling. Next, completely glue the canvas by applying glue with a spatula (layer width - 2-3 mm).
- Apply a second layer of glue to the surface and allow to dry completely for at least 24 hours.
The more accurately and evenly the reinforcing mesh is fastened, the less you will have to align them in the future. Therefore, it is important to straighten the material as evenly as possible until the glue completely hardens and carefully level it with a spatula.
Technology of wall insulation with polystyrene foam for plaster
Plastering PPS boards is only relevant when they are attached to the wall using construction adhesive or mortar. There is another technology for facade insulation, when the material is placed in special cells. In this case, using plaster is pointless. It is important to completely cover the PPS sheets with mortar, otherwise the appearance of the facade will become unattractive. It is necessary to inspect all the joints of the sheets and close all the cracks that are found.
Important! The humidity level should not exceed 60%, and the temperature should be kept within acceptable values - no more than +30 °C and no less than +5 °C.
Facade work must be carried out in calm and dry weather. The surface itself must be protected from precipitation by constructing a canopy. In the premises, first disconnect all sockets on the walls being treated. The use of heaters, fans, and other similar devices is prohibited - let the coating dry naturally.
Insulation of walls with foam plastic
How to plaster polystyrene foam
Plastering foam plastic material includes several operations:
- Carrying out material measurements taking into account a safety factor of 1.2.
- Purchase of primer, plaster mixture, reinforcing elements.
- Preparation of all instruments.
- Surfaces are prepared for further processing.
- Preparation of the solution.
- PPS boards are attached.
- The adhesive solution is applied and the reinforcing mesh is installed at the same time.
- A leveling coating is formed.
- The grouting stage is underway.
- Next, putty is applied to the walls.
- The treated surface is prepared for finishing.
- The decorative composition is applied.
- The final finishing is wallpaper or paint.
Plastering of walls with foam plastic is carried out without interruption. When applying the mixture, the spatula should be held in a position inclined to the surface. The thickness of the layer of plaster being laid directly depends on the degree of pressure of the tool. However, try to avoid putting too much pressure on the insulation itself.
Tools and materials for work
To protect the thermal insulation material from harmful external influences, you will need the appropriate tools:
- construction mixer - to stir the solution and give it the desired consistency;
- metal spatulas (wide and narrow) - they will be used to apply the mixture to the work area;
- plastic grater with sandpaper - this tool can easily remove uneven surfaces and carry out sanding;
- short-haired paint roller - will be needed at the priming stage;
- a hacksaw, as well as a construction knife - with their help it is convenient to cut and trim sheets of PPS and make notches;
- scissors - to cut the reinforcing mesh;
- plastic corners - for reinforcing slopes;
- several containers for mixing the solution and water;
- Master OK;
- brush;
- masking tape;
- building level.
Tools and materials for plastering walls
It is necessary to competently approach the determination of the amount of materials and take them with a reserve, since it is impossible to calculate everything exactly. It is better to choose a trowel with rounded corners.
Preparing the mixture
Preparation of the solution includes several steps:
- Cold water is poured into the prepared container and all the powder from the packaging is poured out. Each batch must have the same content of components.
- Mix everything with a mixer until smooth.
- Cover the container and let the solution sit for 5 to 15 minutes. There is no need to add anything further.
- After infusion, the mixture is stirred again to lift the settled heavy particles.
For your information! If, while stirring the solution, splashes fly off to the sides, it is worth changing the rotation of the mixer working tool. In this case, the mixture will be thrown not to the periphery, but to the center of the container.
Preparation of plaster
Preparing the base
The preparation of the base must be carried out even before gluing the insulation boards. The process works as follows:
- All the old coating is removed and, if there are large protrusions, they get knocked down.
- If there are chips and cracks, they need to be repaired.
- It is extremely important to clean the surface of any stains and dust, otherwise the necessary adhesion will not be achieved. It is better to wash the walls, let them dry, and then treat them with special means.
- Metal objects must be insulated with oil-based paint.
- Mount the base profile using a level.
- Secure the PPS sheets with glue and dowels with caps.
After this, all that remains is to prepare the foam itself for plaster. This is done in the following sequence:
- Check the evenness of the entire plane - the joining slabs must be on the same level. To do this, run the rule along the wall.
- The protrusions must be carefully cut off, and the joints must be cleaned with sandpaper.
- Remove dirt and dust from the foam.
- Walk over a soft surface with a needle roller to form holes.
If the wall is exposed to high mechanical loads, a primer will not be superfluous. You can use compounds such as concrete contact or Ceresite.
Preparing the surface for plastering
Closing seams
Seams at the joints of EPS sheets must be filled with polyurethane foam to avoid the formation of temperature bridges. Excess foam that is outside the joints is cut off. You need to make sure that all seams are completely filled. If they are large, it is worth cutting strips of polystyrene foam of appropriate dimensions along with the foam.
Selection and fastening of reinforcing mesh
The mesh is needed to increase the strength of the plaster coating. It is not necessary to attach it to the entire surface of the wall - 1-2 meters above the ground or floor is enough. It is this area that is subject to shock loads.
The optimal solution is fiberglass mesh of varying densities, based on the dimensions of the cells and the thickness of the thread. Optimal indicators are from 130 g/m2 to 160 g/m2.
Before attaching the reinforcing mesh, you need to make sure that all the dowels along with their caps are recessed into a soft surface without protrusions. The recesses must be covered with an adhesive mixture. Draw a line on the wall that will be the height boundary of the grid.
Reinforcing mesh
The reinforcement procedure begins with the installation of perforated corners with fiberglass mesh at the corners of the wall. It is also necessary to strengthen areas with complex shapes. The sequence of actions looks like this:
- Prepare the corners - cut to the desired length.
- Prepare the solution.
- The mixture is applied to the corners on both sides in the form of a continuous vertical strip; it needs to be leveled. Apply a corner and lightly tighten it, checking with a level that the installation is strictly vertical. The profile must be pressed into the solution along its entire length, remembering to ensure verticality. Using a spatula, smooth the mesh from the corner to the sides and at the same time downwards. At the same time, excess solution is removed.
- After reinforcing the corners, it is worth moving on to strengthening the slopes. The corners are cut to the required length. Next, the solution is applied, and the profile is attached in the same way as on the corners. When the width of the slopes is small, it is convenient to apply the corners and meshes separately. As a result, the mesh will not bulge at the joints and will not create interference in the future. To begin, completely cover only one slope, secure both corners (external and internal) and remove excess mixture with a spatula. Next, the mesh is cut 10-15 mm smaller than the width of the slope and carefully pressed against the wall. In this case, the strip should deviate from the corner edge by 5-7 mm. You need to smooth it along the length, then from the center to the edges.
The building mixture is applied in a continuous strip, starting from the edge of the wall along the entire length of the strip, but 50 mm less than its width. The layer should be within 2-3 mm, no more. Now a piece of mesh is applied to the surface and smoothed with a wide spatula from the center to the periphery until the solution hides the material. Leave the side edge of the mesh open (50 mm). This is done to apply reinforcing pieces using the overlapping method without forming rough joints.
Grouting the surface
After fixing the reinforcing mesh, you need to give 24 hours for the adhesive solution to dry. Next, the plane is rubbed without wetting. It is enough to remove all sharp protrusions that will interfere with further work. To do this, use a grater with sandpaper. Its grain size is selected based on specific purposes:
- For subsequent use of the decorative mixture, coarse sandpaper is needed.
- If you plan to paint the walls or wallpaper, then fine-grain sandpaper will do.
Grouting plaster
Final alignment
For final leveling, the solution is made slightly liquid so that it flows freely from the instrument. You should not make a thick layer - 1-3 mm is enough. Then let the surface dry and rub it again.
Preparation before applying the decorative layer
At this stage, a primer is applied to the insulated walls in one or two layers, based on climatic conditions. If there are several of them, give each one at least 24 hours to dry. The composition itself must be selected according to the plaster used and the material for the finishing coating.
It is not recommended to use paint compositions that contain substances that destroy foam:
- toluene;
- acetone;
- benzene;
- xylene;
- drying oil
Attention! Paint based on gasoline, kerosene or coal and polyester resins is not recommended.
Application of decorative plaster
The decorative mixture is prepared according to the instructions included in the kit. If you need to cover a large area, it is better to prepare small portions so that the solution does not harden early - it is not recommended to dilute the mixture a second time. It is undesirable to use heavy compounds (stone chips), since the strength of the insulation is not designed for such heaviness.
The plaster is applied in two layers, and the thickness of each should be no more than 4 mm. The new coating should be applied when the first layer has dried. In the meantime, while the surface is still fresh, it is possible to give it the desired texture using figured rollers or other objects. A brush or crumpled plastic bags will do. The implementation of a high decorative effect is achieved with special tools, as well as special techniques.
Application of decorative plaster
How to plaster extruded polystyrene foam - technology
If insulation boards are installed on the walls of a building, it is necessary to cover them with finishing as quickly as possible. Professionals recommend doing this immediately after the glue used to fix the material has dried.
Carrying out calculations
It is better to buy material for plastering with a reserve. I wouldn’t want to run for an extra bag in the midst of work. But how do you know how much materials you need? To do this, carry out a simple calculation:
- calculate the area of the walls being processed without taking into account window and door openings;
- on the packaging of the decree the approximate consumption of the mixture per square meter. For different compositions it fluctuates in the range of 4–6 kg;
- multiply the indicated value by the area to be treated and obtain the required amount of mixture;
- We add another 10% to the resulting value - this will be the final amount.
Preparation of plaster mixture
Usually the manufacturer provides instructions for preparing the solution, so be sure to study the packaging and recommendations. If you are plastering polystyrene foam for the first time, do a small batch first to get used to the solution and the execution process.
- Pour the dry mixture into the container.
- Add water in small portions.
- You can mix by hand, use a hammer drill with an attachment or a construction mixer.
- When the consistency is completely satisfactory, leave the solution for 5 minutes to ripen and stir again.
In some cases, it is necessary to make the solution a little thinner than indicated in the instructions.
Pasting with reinforcing mesh
First of all, corners and slopes are processed. To do this, cut the reinforcing mesh into strips so that there are 10–15 cm of material on both sides of the corner.
- a thin layer of mortar is applied to both sides of the corner;
- apply a mesh and smooth it from the corner so that the material is completely immersed in the solution;
- if the length of the piece is not enough, make an overlap of 10 cm; you cannot glue it to the joint.
Next, proceed to the total area of the wall. They work in the same order:
- The wall is covered with mortar.
- The width of the strip is slightly larger than the size of the reinforcing mesh.
- Apply the material and smooth it using a wide spatula or smoother.
- The next layer of mesh is located on the previous one, by 10–15 cm.
Grouting plaster mesh
The first layer must dry completely. After this, use a grater and sandpaper to process the surface using light circular movements. This will remove small unevenness and help you use less leveling solution.
Leveling the surface
We prepare a new solution and begin leveling the plastered polystyrene foam. Now work with a wide spatula:
- a small amount of solution is collected onto a wide spatula;
- applied to the wall using arc movements from top to bottom;
- layer thickness no more than 3 mm.
Make sure that the surface is as smooth as possible.
Grouting the second layer
Grouting is started only after the layer is completely dry. They work with the same grater and sandpaper. Just be sure to select fine grain to remove small flaws. Otherwise, you can simply ruin the whole job.
Primer
This stage should not be neglected. If you do not coat the base with a primer, the decorative layer will either be poorly applied or quickly lose its attractiveness. The composition of the primer depends on the finishing method:
- Further decorative plastering - a composition containing quartz sand is used, it helps to increase adhesion.
- Painting - a composition without sand, makes the base even smoother.
Finishing
Having chosen one or another finishing method, they act strictly according to the plan provided by the manufacturer. Both painting and decorative plaster have their own nuances and methods of applying the material. Therefore, you will have to study a few more articles to figure out how to do everything correctly.
Consumption of façade plaster on polystyrene foam
When using a universal building mixture for facade work, its consumption will be 10 kg per 1 m2. The same amount of polymer material will be required - 9-10 kg. In this case, 3.5-5 kg is needed only for attaching foam sheets, and the rest will be used to create a protective coating.
The insulation of buildings with polystyrene foam is becoming widespread. But, like any other thermal insulation material, PPS sheets must be protected from external influences. Plastering foam plastic does not cause any particular difficulties, but it is worth considering a number of nuances, which makes the work easier.
Did you manage to learn something new? Share it in the comments!