Rationale for using vapor barrier
Today, in order to save money on fuel, the building is additionally insulated from the inside. That is, the dew point shifts towards the premises. Due to temperature changes with humidity, condensation forms in the space between the thermal insulation and the wooden wall, which is destructive for many materials. This is especially true for the ceiling, as hot air tends upward.
Protective measures are aimed at preventing the penetration of moisture into the insulation and the effects of steam and condensation on the constituent elements of the bath. The solution here is a vapor barrier. It is often confused with a hydraulic barrier. The difference is resistance to water and steam.
Vapor barrier of walls
No material can compare with the latter in terms of thermal conductivity. But if water constantly gets on it, over time it becomes lumpy and stops performing its intended functions.
An important point is to protect the insulation from getting wet from the outside and inside. This task will be performed by a vapor barrier, which does not allow hot steam rising to the ceiling to moisten the insulation. To do this, for example, the same foil is attached to the top of the material.
Types of vapor barrier
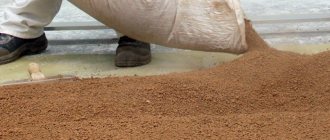
Initially, a mixture of clay and sawdust or straw was used to vapor barrier the inside of the bathhouse. This composition was diluted with a small amount of water to obtain a viscous mass. Spread the solution in a layer of 1-2 cm.
A mixture of clay and straw Source yandex.net
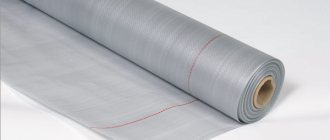
Modern achievements have practically replaced the ancient method. On the construction market, vapor barrier materials resistant to high and low temperatures are represented by three main groups. Metallized or heat-reflecting samples are usually used for steam rooms. In the shower, washing room or room with a swimming pool, stretch plastic film. In the rest room and dressing room with small differences in temperature and humidity, it is important to use craft or construction paper and membrane-type insulation.
Polyethylene
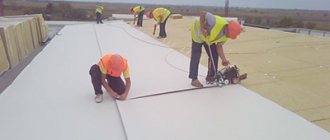
Inexpensive waterproof polymer fabric does a good job of protecting walls from getting wet and provides additional resistance to heat loss. But the small amount according to the estimate does not compensate for the fact that due to large temperature differences in the steam room, the fabric is deformed without recovery. This leads to rapid loss of quality and tightness of the vapor barrier
Polyethylene floor insulation in the attic of a bathhouse Source proroofer.ru
However, polyethylene can still be used to protect the walls in the dressing room or restroom. The main thing is to choose the right film. There is a simple way to determine proper quality. You need to fold the canvas and look at the fold line. The material suitable for vapor barrier of a bath will remain smooth. This indicates good density and recovery ability.
Another option is a multilayer fabric with perforations to allow steam to pass in one direction or another, or with pores to retain moisture. There are options with an impermeable layer and a corrugated shell. Before using membranes, it is important to consider the technical features of the materials and the direction of steam movement.
Polypropylene
This film is characterized by its resistance to variable conditions regarding humidity levels and bath thermometer readings. The material is practically not subject to cracking without mechanical stress placed on it.
Vapor barrier membrane Source yandex.net
The advantages also include:
- preservation of properties when heated;
- resistance to ultraviolet radiation (it is permissible to install a wind barrier on the side of the facade);
- vapor permeability (the insulation remains dry);
- applicability for use in steam rooms.
It is also worth noting modern environmentally friendly analogues with slightly improved thermal conductivity. Here, cellulose or viscose fibers are added to the base of the material. This film has a rough surface. Despite the ability to absorb moisture, a ventilation gap in the area of the insulation is needed; it is enough to assemble a frame 2-3 cm wide.
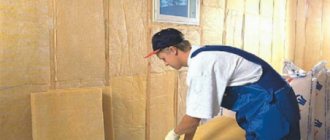
Kraft paper
The material is made from cellulose fibers using the kraft pulping method. The result is high-density construction cardboard, which is suitable for use as a vapor barrier for a bathhouse inside. The fabric cannot cope with aggressive conditions in a steam room, shower room, or room with a swimming pool. High humidity causes the paper to get wet and peel. In the waiting room or rest room - this is a good option. On the market you can find three options relevant for baths: isolar, megaflex and rufizol.
Technical paper Source informatorprasowy.pl
Foil fabric
Vapor barrier materials with a heat-reflecting shell are able to withstand periodic heating up to a temperature of +120 degrees Celsius. The use of such protection promotes rapid heating of the room and prolonged cooling. Such vapor barrier is used for the ceiling in the bathhouse, walls and floor in any room.
Experts recommend considering only samples with aluminum foil, since this metal does not emit harmful substances and is not afraid of moisture. The base can be kraft paper, fiberglass, or polyethylene foam. Mineral wool with a foil or lavsan shell is also considered a popular option.
Products Izospan
The company has established itself over 15 years as a responsible manufacturer of materials with an optimal price-quality ratio. Izospan for baths is used in three versions. The sample labeled FB is in great demand. This is kraft paper with a mylar reflective coating. Izospan FX is made from polyethylene 2-5 mm thick with a similar coating and is additionally used as waterproofing and insulation.
Izospan FX with lavsan coating Source stroysystemy.ru
A polypropylene woven membrane with metal coating (isospan FS) is attached to the ceiling and walls; its properties combine the previous options.
See also: Catalog of companies that specialize in the design and construction of baths of any complexity
Liquid rubber
Polymer-based products, after drying, form an elastic, waterproof film. It is able to cope with the conditions that are typical for a steam room, but it is important to pay attention to the composition without toxic components. Also, such steam and waterproofing for a bath additionally resists heat loss and exhibits good acoustic properties.
The main use of liquid rubber is the protection of bath floors and walls made of concrete or brick, foam blocks. It can also be made of wood. Before applying the mastic, you need to saturate the base with primer. The composition has high adhesion to most substrates. It is worth noting that the consumption of the composition depends on the problem being solved. For vapor barrier of walls, 1.5 kg per square meter is required, for floors - from 3 kg. To install a hydraulic barrier you will need about 4-5 kg. In the second option, a coating 7-8 mm thick is formed.
Waterproofing the floor with liquid rubber Source stroyfora.ru
What happens to the heated air in the baths?
The vapor barrier of the bathhouse ceiling made of natural materials could not protect the wood 100% from steam, but after washing, the heat remained in the bathhouse, and the moisture accumulated in the log evaporated during this time. The bath heated up and cooled down slowly.
There was no sharp temperature difference inside the bathhouse and on the surface of the ceiling , just as there were no prerequisites for creating a dew point - the temperature at which warm air saturated with moisture cools down and cannot retain moisture that condenses on cold surfaces. Even if moisture appears on the surface of the ceiling, it will not penetrate deep into the wood, but will form drops on the ceiling, which will stop dripping onto the floor as soon as the bathhouse warms up.
In modern baths, the finishing materials are made of moisture-resistant wood , but the design of the stove, in most modern baths, is designed to quickly heat the steam room. Now imagine what happens during warming up if there is no vapor barrier on the ceiling and walls.
The stove gives off heat almost instantly. The walls and ceiling that have not yet been heated take on the heated hot air; Some of the wet steam finds the dew point on the surface of the cold walls and ceiling and condenses on them in the form of droplets.
The dew point does not stand still, it moves as the walls and ceiling heat up.
What happens if there is no vapor barrier on the ceiling in the bathhouse? Warm air penetrates behind the sheathing and encounters insulation, which has a temperature lower than the warm air entering. A condition of temperature difference may be created in which moisture condensation occurs directly in the insulation (internal condensation), and since the insulation has low thermal conductivity, the dew point in it can be maintained for a long time and the insulation will become wet, like a sponge, absorbing moisture.
This is the difference between an ancient Russian bathhouse and a modern one. For an old Russian bath, there are practically no conditions for condensation of warm air, or they are reduced to a minimum (surface condensation). A modern bathhouse must have steam protection . Moreover, this protection is based on specific conditions, which take into account:
- Stove type: with an open type heater and a constant firebox, and a closed type with an intermittent firebox and high heat capacity;
- Features of the room design;
- Construction material.
Based on these conditions, choose a protection method:
- Maximum insulated room with impenetrable vapor barrier, protection against internal condensation;
- Partial vapor barrier, eliminating the formation of dew point in the bath structure.
Installation technology
Insulation and vapor barrier measures involve the construction of multi-layer structures. When there is a risk of damage to the rough base or dampness of the heat insulator, a ventilation gap must be formed using lathing. In the case of a bathhouse, installation work is carried out in exactly this way. Let's take a closer look at how to properly create a pie of walls, ceiling and floor in a bathhouse with a vapor barrier in a steam room or dressing room.
Walls
Experts recommend thinking through and completing the finishing process so that it can be easily dismantled and reused. This way it will be possible to repair or replace insulating layers: vapor barrier, insulation, water barrier. Another option is a pre-thought-out decision to use expensive, high-quality materials with a long service life (no less than decorative finishing).
Pie wall with insulation in the steam room Source otoplenie-gid.ru
The wall pie structurally looks like this:
- Load-bearing walls .
It can be a log house, monolith or block masonry. In any case, the inner side is subject to preventive treatment with antiseptic agents (wood also with a fire retardant).
- Insulation.
Mineral wool is most often used in the form of rigid slabs, as they do not shrink and have good breathability. The mats are fixed using vertical lathing in increments of 60 cm. The thickness of the insulator here can be 2 times less than for the top.
- Vapor barrier.
The vapor barrier for the walls of the bathhouse is attached to the ceiling (10-15 cm) with double-sided tape (less often) or with staples under a construction stapler on a wooden sheathing with tension. The fixation points are isolated with sealed adhesive tape, which will also prevent further destruction of the canvas. An overlap of 10 cm is made on adjacent walls, the edges overlap with a width of 15-20 cm.
Heat-reflecting foil vapor barrier for a bath is laid with a metal shell inside the room. The joints must be sealed using the method recommended by the manufacturer. Metallized adhesive tape (plumbing tape) is most often used.
Foil vapor barrier for walls in a bathhouse Source psdom.ru
- Counter-lattice.
All points of attachment of the vapor barrier are covered with counter-battens with a thickness of 20 mm on galvanized nails with a pitch of 15-20 cm. They are subsequently used as a supporting base for finishing the walls with sheathing materials. As a rule, lining is also used here.
Almost any type of vapor barrier can be used here, since the steam load on the walls in the bathhouse is less than on the ceiling. It is important to pay attention to the acceptable operating rules regarding the temperature in the steam room or dressing room. The moisture resistance parameters should be considered maximum, and the coefficient of thermal expansion should be considered minimum.
Traditional insulation methods and materials
Progress has both disadvantages and advantages. But when it comes to vapor barriers, traditional methods of making ceilings vapor-tight turn out to be very questionable when compared with what modern technology has given us.
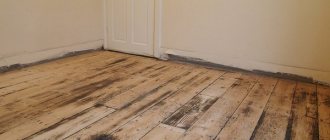
Just for reference: in Russia, ceilings in log buildings were made on three beams attached to opposite walls of the log house. Poles were placed across these beams - these were logs or half-logs. They formed the basis of the then ceiling. Of course, gaps formed between the poles .
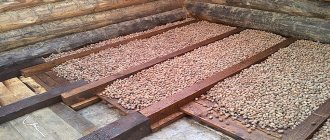
So, the only analogue of a vapor barrier in the construction of floors at that time could be covering these cracks with clay . Yes, but as insulation they put everything on top of them - straw, and even hay, and yarn, and hemp, and flax, and twigs, and dry leaves... In general, they put what was at hand.
For reference, we studied part of an archaeological book about construction in Rus' in the 10th-11th centuries. Now think for yourself - why bother so much when even with the smallest budget you can buy plastic film and protect the attic space from steam with it?
Video description
This video describes and shows how to properly make insulated ceilings in a two-story bathhouse in different rooms:
To insulate the ceiling in a bathhouse, basalt or stone wool is often chosen.
Rigid basalt insulation boards Source izolux-volga.ru
A thickness of slabs or sheets of 5 cm is sufficient for a temperate climate. But most craftsmen recommend doubling the height of the thermal insulation layer. The mats are laid in 2 rows with offset and overlap of previous joints.
Insulation options are also used to create a seamless barrier. This is ecowool, polypropylene foam or expanded clay. Sawdust is considered a proven alternative.
If you decide which vapor barrier for a bathhouse ceiling is better, then experts give preference to metallized samples. This is justified by the fact that warm air tends to escape through the upper areas of the premises. Many craftsmen recommend using mineral wool with aluminum foil.
It is worth mentioning that the insulation on the attic side also needs protection. This applies to natural precipitation that can penetrate into the premises. The problem with mechanical load is also solved. Solutions - moisture protection and rigid flooring made of boards or sheet materials.
Plank floor in the attic Source sense-life.com
Which vapor barrier is best for a bathhouse?
Which vapor barrier is better? One that will protect the insulation and block the leakage of steam to the outside. Having considered the characteristics of foil Aerolam Super Alumet above, we can safely say that it is the best for the ceiling in a bathhouse. It is suitable for baths of the traditional Russian type, and for modern baths, which differ from saunas only by the addition of steam.
Before deciding which vapor barrier to choose, you need to proceed from the preferences of the bathhouse owner. If the bathhouse maintains a traditional temperature of 60-70 degrees , then instead of foil, a regular PVC vapor barrier film , but if the bathhouse temperature is 100-110 degrees , then it is better to replace the film with foil .
The topic of vapor barrier for a bathhouse is extensive, but there are postulates, truisms that should not be deviated from, the main thing is to prevent condensation conditions . The main protective agent can be not only foil material, but also natural materials, you just need to correctly understand the nature of condensation formation and act consciously.
Advice. Always leave air gaps between layers of vapor barrier, insulation, and attic flooring. Air gaps not only enhance thermal protection, but also disperse small amounts of moist air within their volume, preventing condensation from forming.
Additionally, you need to build in an adjustable ventilation duct to ventilate the room after washing.
When a vapor barrier is not needed
Initially, the bathhouse was a log house. It was not additionally insulated. Today this option is rare, but it is practiced. Here the structures do not need vapor barriers. The only protection for wood is antiseptics, fire retardants, and moisture-resistant agents.
Less commonly, polymer products are used to insulate a bathhouse. These are extruded polystyrene foam, penoplex, which are characterized by vapor permeability close to zero. There is also no need for additional vapor barrier.
In the locker room, dressing room, and rest room, changes in relative humidity and temperature are insignificant. The maximum load on the structure is not constant. The short-term nature of the aggressive environment allows for the refusal of additional vapor barrier in the bathhouse. But here it is necessary to arrange proper ventilation so that moisture leaves indoors as quickly as it appears. The tree breathes, so it will not suffer from the negative effects of steam in such an environment.
Which material is better to choose
The best steam and waterproofing for a bathhouse is a foil-based material. It perfectly retains steam and, at the same time, reduces losses by reflecting heat waves into the room. There are people who are sure that foil for a bath does not affect anything, and this is a waste of money, however, as practice shows, almost everyone uses foil-coated materials when building baths.
Naturally, no one will use simple thin foil, since it is very easily damaged. Construction foil with a paper base is preferable.
There are several types of such material available on the market:
- RufIzol S. It has a moisture-repellent base made of kraft paper. Can be used at temperatures from -60 to 120 °C.
- Alucraft . This type of material has an additional intermediate layer between foil and kraft paper in the form of polyethylene film.
- Izospan FB . It is craft paper with a layer of metallized lavsan. It is not considered a metal, which raises questions about its suitability for use in a steam room. However, according to the manufacturer, the material can withstand temperatures up to 140 °C.
- Megaflex KF . Similar to the previous option.
- Yutafol H170 AL . It has a membrane consisting of 4 layers, and this vapor barrier is suitable for saunas and baths.
There is also a vapor barrier for a steam room in a bathhouse with a fiberglass base. It has increased strength and can withstand up to 450 °C (short-term up to 600 °C), which is even an excessive value. Such indicators allow it to be used for insulating chimneys.
Naturally, the cost of such material will be significantly higher. It has enhanced thermal insulation properties, so it will be possible to save on additional thermal insulation (reduce the layer).
According to the manufacturers, fiberglass insulation is environmentally friendly, making it ideal for finishing baths. Although you will have to pay three times more for it than for kraft paper-based material.
Almost all the material on the market is unbranded.
Among the famous brands are:
- Thermofol ALST – up to 400 oC;
- Folgoizol;
- Armofol - up to 150 oC, there are variations on a self-adhesive base.
You can also use foil thermal insulation. The method of laying it is the same as for simple insulation, thus saving on installation time.
The following brands of foil material are available:
- Isover Sauna;
- Ursa (Ursa);
- Sauna Butts.
It is also worth noting that when selecting a material, it is important to take into account its flammability characteristics. It is better if it is non-flammable or slightly flammable material, because bathhouses are fire-hazardous structures, and in this case it is advisable to play it safe.
Briefly about the main thing
Vapor barrier material is designed to create an obstacle so that moisture does not penetrate inside the protected structure.
In the bathhouse, walls, ceilings and floors, which are made with an insulating layer, are subject to mandatory protection.
There is no need to use vapor barrier sheets for a log bath without insulation. In the waiting room, rest room or locker room, protection is at your discretion. If extruded polystyrene foam or penoplex is used, then it is also not necessary to install moisture protection. The materials themselves practically do not allow steam to pass through.
Three groups of vapor barrier materials are used for bathhouses: craft paper, metallized shell, polyethylene or polypropylene.
For the ceiling and steam room, heat-reflecting vapor barrier is considered the best option; for walls in a shower room, washing room or in a room with a swimming pool, the option with a polymer membrane or film is optimal.
Ratings 0
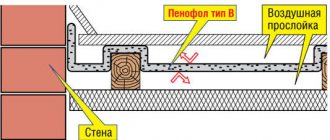
Ceiling
The general diagram of ceiling insulation is shown in the figure.
Here it is necessary to pay special attention to the fact that in those areas where the wall and ceiling meet, the vapor barrier is laid in such a way that its edges extend slightly onto the wall.
To ensure maximum tightness, the edges should be secured with metallized tape.
Let's consider the old-fashioned version of vapor barrier for a steam room in a bathhouse using a clay solution. The ceiling beams must be hemmed with boards of at least 55 mm thickness.
The vapor barrier is installed from the attic side. The edges of the material being laid should be carefully sealed, and softened clay mixed with sawdust should be applied on top of it.
After the clay paste has dried, it is necessary to lubricate the cracks that appear with the same mixture of clay and sawdust. After this, you can begin installing thermal insulation.
Important! It is recommended to lay a vapor barrier layer on the attic side as well, in order to protect the thermal insulation from condensation drops, as well as from precipitation that can penetrate through the roof.
Please note that the installation process is quite difficult and painstaking, so be patient, have high-quality materials and you can get started.
On the steam room side, the insulation cake is sheathed with boards or using clapboard.
Installation of vapor barrier on the ceiling
When installing a vapor barrier for a bath on the ceiling, watch the joints near it - the material should be laid overlapping the wall to minimize heat loss. You can secure the material with the same double-sided tape, or by pressing it with strips. In this way, maximum reliability will be ensured.
Often, in addition to the main insulation, a layer of moisture-repellent material is also placed in the attic. There it is especially needed, since after precipitation droplets of moisture can seep through the roof. In any case, it doesn't hurt to be on the safe side. Only in this case will a vapor-permeable waterproofing be required - it will allow the steam that has penetrated through the insulation to enter the attic and evaporate there.
It is possible to perform a vapor barrier on the ceiling in a bathhouse using publicly available materials. This method involves hemming ceiling beams with thick, more than 50-60 mm, boards, sometimes unedged. In the attic, a vapor barrier is laid on the boards.
If the budget is really tight, then cardboard impregnated with drying oil, wax paper, glassine, or other material with similar properties can be used. The edges and joints are carefully processed, after which a mixture of pasty clay is laid on top. Sometimes straw or sawdust is added to give the finished material increased viscosity and the formation of a minimum number of cracks in the future.
After the clay layer has completely dried, the newly formed cracks are covered, and again wait until the material dries. Next, they move on to laying the heat-insulating layer, and the ceiling in the steam room itself is covered with wooden clapboard.
Bathroom floor installation: flooring, heating and vapor barrier
This article, accompanied by a video about the installation and installation of heated floors, will tell you how to install insulation and vapor barrier depending on the design features of the floor and create a heating system.
The design of bathhouse floors has a number of specific features. The floor in the steam room is raised, and in the shower room it is lower than the level of the finishing coating in the dressing room and the relaxation area of the bathhouse.
Floor installation
To obtain an elevation in the paired compartment, backing beams measuring 70x100 mm are used as the basis for the floor joists. In addition, the flooring receives an additional margin of safety, since the beams act as a support and partially absorb the main load. The entire installation process is controlled by a horizontal building level to avoid distortion. All wooden structural elements must be treated with an antiseptic before starting assembly.
The basic procedure for arranging floors in a bathhouse comes down to the following actions, which require accuracy and precise execution. Such work, as a rule, does not require professional skills:
- Before laying the backing beams, the strip foundation is covered with a double layer of insulation. In this case, roofing material can be used.
- The ends of the beams rest on the foundation walls at the shortest distance from wall to wall, and its central part rests on 2 support pillars.
- The logs are cut 20 mm towards the central part on both sides and laid on top of the support beams. From the bottom, skull blocks are nailed to them, on which the rough covering will be installed.
- The waterproofing is laid on the rough covering with an allowance of up to 200-250 mm on each wall to connect with the waterproofing layer from the wall.
- The insulation layer is placed tightly, but without deformation, on the insulating layer.
- Hydro- and vapor barrier is installed layer by layer on the top of the insulating material.
- The finishing coating is a finishing flooring made from edged or tongue-and-groove boards.
It's important to know that
Providing a ventilation gap of only 20 mm between the inner surface of the finished floor and the insulating layers will ensure the safety of the insulation cake for many years.
If mineral or basalt wool was used as an insulation material, then they need high-quality vapor barrier, since dampness is detrimental to mineral insulation. They lose their properties when moisture penetrates internally.
Vapor barrier of floors in the bathhouse
Materials that retain steam are represented in two segments on the modern market. The first of these is numerous film materials, including membrane-type vapor barriers. Fundamentally opposite products are representatives of the second segment. These are liquid and mastic-like vapor barriers that carry the properties of waterproofing agents. As a result, the second segment is represented by “Two in One” products, which is very beneficial in modern construction of buildings and structures, especially wooden baths.
A typical representative of such materials is liquid rubber. With its 100% water impermeability, it provides 100% vapor impermeability. This material is mainly used in wooden construction. In this case, it is very appropriate to use it as a vapor barrier when installing wooden floors in a bathhouse or sauna.
Vapor barrier for wooden flooring
The structure of the wooden floor in the bathhouse consists of layers of insulation cake:
- subfloor as an independent wooden structure;
- logs laid directly on the foundation;
- vapor barrier laid on the joists and protecting the plane of the subfloor;
- insulation tightly laid between the joists;
- top layer of vapor barrier protecting the layer of insulation material;
- thick plywood or fiberboard, which take on and distribute the entire load onto the logs;
- finishing surface made from edged or tongue-and-groove boards.
In order to prevent heat loss through the ceilings, be it walls, ceiling or floor, especially if the bathhouse operates throughout all weather seasons, and therefore is heated in winter, it is necessary to build high-quality insulation in it. Full operation of the insulation over a long period of operation will not be achieved if the insulating layer is not provided with hydro- and vapor barrier, especially if a vapor-permeable material is used as insulation.
As a rule, various types of rolled film material are used as vapor insulators. It is spread out and secured with an overlap. To prevent the formation of cracks, the film is glued together using sealants or construction tape. Methods and methods of installation are different, but do not always give the result for which this technique is designed. During installation, air vents may form, which will allow moisture to enter the inner layer of insulation. It is almost impossible to identify this right away, and only in the third or fourth season from the start of the bathhouse’s operation can one say how well the vapor barrier was laid.
Today, industrialists are proposing a completely new method of laying a vapor barrier layer for floors in wooden buildings, including bathhouses and saunas. It is characterized by 100% coverage of the entire surface, including hard-to-reach places.
We are talking about liquid rubber and its analogues, materials made on a bitumen-polymer basis. Such material is capable of not only covering the surface of the ceiling without the formation of seams, but also tightly attaching to the surface, with a sufficient amount of adhesion for every square millimeter.
The formed film, thanks to the use of liquid rubber or its analogues, will not allow a drop of moisture to penetrate into the insulating layer over a very long period of operation. As you know, rubber has strong molecular bonds, which neither hot air, nor dampness, nor heating have any effect on, and its service life is unlimited.
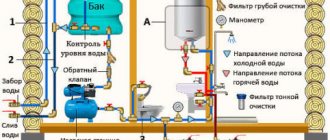
Heating in the bathhouse
In the entire room, as a rule, there is one stove located in a steam compartment. But its functions are limited. In winter, the firebox is unable to heat either the dressing room or the locker room, not to mention the relaxation area. In order to avoid discomfort after taking the procedures while resting, it is necessary to take care of the heating of the rooms associated with the steam room.
You can heat a bathhouse using any method used in residential buildings. The only difference is in the frequency of heat supply to the room - at the time of receiving the procedures. A wood-burning stove is not suitable for these purposes, since it is not heated regularly, and it is advisable to maintain heat in the bathhouse constantly, especially in winter. Conducting steam heating is quite an expensive pleasure. It is possible to install heaters, but the floor in the bathhouse will remain cold, which will seriously affect the enjoyment of the procedures.
Underfloor heating system
The autonomous system of arranging heating built into the floor, used as the main and additional heating, has gained enormous popularity today. It can be installed in absolutely any premises, but requires compliance with certain safety regulations, both during assembly and during operation.
Since the bathhouse has some design features, they must be taken into account before installing an electric or water floor.
Warm electric floor
The device is characterized by its simple design and ease of installation. It is located under the outer floor covering in a concrete screed. The basis of the device is an electric heating cable made of high-resistance alloys. The cable is located on the mounting tape and laid under the external floor covering at the time of installation of the screed.
Floor heating occurs by converting electric current into heat waves. Each system is equipped with a thermostat that adjusts the level of heat supplied to a level that is optimally comfortable for the consumer.
There are two types of underfloor heating system models:
- Using a single-core cable equipped with two couplings in the design.
- Using a two-core shielded cable in its design. This model is equipped with one coupling and a pair of plugs located at both ends of the cable. This design has protection in the form of a metal screen and shell.
For ease of installation, each cable of a certain length is packaged in a mat corresponding to its parameters. Thanks to this packaging, you can install a thermal electrical cable yourself without having any specific skills. It is only necessary to observe the safety measures specified in the accompanying instructions for laying the device. For cables packed in a mat, a concrete screed is not required. The device is simply spread under the flooring.
Video about installing a warm electric floor under a concrete screed:
Infrared floor
Easy to install under parquet, laminate or ceramic tiles. Its special properties include uniform thermal radiation from the entire surface of the device. The degree of radiation belongs to the far infrared spectrum, completely harmless to the human body. In the form of sensations, the radiation resembles the heat emanating from the sun.
An infrared heated floor is a device in the form of a film heater. Its carbon heating elements are covered on all sides in electrical polyester, more often in special-purpose polyethylene, in this case used as an electrical device. This coating prevents any moisture from entering the structure, ensuring its complete tightness and reliable protection against electrical sparks. The device is ideal for use as the main or additional heating for a bathhouse.
Infrared heating devices can also be used as wall heating.
Rod mats with a self-regulating system
Warm infrared floors, which are based not on heating films, but on flexible carbon rods based on graphite and silver. The system became available as a result of innovative developments in the field of alternative provision of thermal energy to the population.
Externally, the rod mat is a flexible thermoplastic with flexible electrically conductive tires built into it at the edges. Orange-colored heating rods made of composite material are located between the tires like sleepers. The rods are placed on the mat with a step width of 10 cm.
The design features include the fact that if one rod fails, this failure does not affect the entire device as a whole. Rod mats are not afraid of kinks or being blocked by furniture, and the mats are not afraid of overheating. The device has a high degree of fire safety.
Warm water floor
Allows you to maintain a constant temperature throughout the entire bathhouse without any special financial costs. A device consisting of water pipes of a certain cross-section, connected to a double-circuit heating boiler and laid under the external flooring, will simultaneously heat the bathhouse and provide hot water in the shower compartment.
A water heated floor is installed directly into a concrete screed, only its thickness will be slightly greater than when laying an electric heated floor, since the pipes carrying water are much thicker than the electric cable.
Pipes are laid in two ways: in the form of a “snake”, or in a spiral – “snail”. The laying step depends on the thickness of the concrete screed. With a thickness of 100 mm, the pitch will be 200 mm. The thicker the layer, the shorter the step and the higher the energy consumption.
Before laying polyethylene pipes, they must be filled with water to prevent deformation under the influence of a heavy solution. If the pipe is rigid, metal-plastic, then it does not need to be filled with water.
Correct installation of rolled vapor barrier ↑
If there was a need to make a vapor barrier for an already finished bathhouse, you would have to remove all the old casing. If a new building is being built, the insulation is installed after the insulation layer, and then the walls are sheathed with finishing material.
General rules for covering a room ↑
The most important thing that needs to be achieved when installing vapor barrier materials with your own hands is complete tightness of the coating. Steam should not get under the sheathing through the gaps between the ceiling and walls or through the joints of the panels.
To do this, all seams must be taped with special foil or double-sided tape. If you don’t have such tape, you can use regular wide tape, but the service life of the vapor barrier will be shortened in this case.
Gluing fabrics with foil tape
The canvases are placed on top of each other with a gap of 5-10 cm. For fastening to the walls, thin strips are used, which are pressed tightly to the surface, after which they are nailed with thin nails in increments of 15-20 cm. Alternatively, the insulation is fixed with a construction stapler, and the seam is fixed with staples additionally sealed with tape.
It is also necessary to consider the gap between the vapor barrier and the finishing cladding of the room. Traditionally, the interior of the bathhouse is decorated with smoothly planed boards. A ventilation gap is necessary so that condensing moisture has the opportunity to evaporate and not be absorbed into the wood.
Making such ventilation is very simple. 2-5 cm thick bars are stuffed onto the insulated and steam-protected surface, and finishing boards are attached to them. We should not forget that the sealed room must be ventilated after each bath so that the moisture dries out and does not provoke the development of fungus.
Insulation and vapor barrier scheme
Vapor barrier work assumes that the walls are insulated. That is, a layer of mineral wool should already be fixed on the walls. The sheathing for the insulation should be wooden, because the vapor barrier will also be attached to it.
In order for the insulation to work as efficiently as possible, a vapor barrier film is also laid between the mineral wool and the wall. For these purposes, it is better to take a membrane film, so that condensation formed on cold walls will not get into the insulation.
Consumables and tools for work ↑
First, prepare all the necessary materials and tools. To vapor barrier a bath with isospan, isolon or other vapor barrier films you will need:
- required amount of film;
- tape for gluing joints;
- a construction stapler with staples or a hammer and small nails;
- clamping strips, if nails are chosen for fastening;
- bars for the ventilation gap with a thickness of at least 2 cm, if fastening will be done with staples;
- wood screws;
- screwdriver or strong screwdriver.
Installation using a stapler
Step-by-step instructions for covering walls ↑
The stages of work on vapor barrier of bath walls with your own hands look like this:
- The required amount of material is calculated based on the total area of the walls, taking into account the overlap on the ceiling and floor of 10-15 cm. The width of a standard roll is 1.5 meters. To minimize the number of joints, the canvases are attached horizontally rather than vertically, that is, you get one horizontal seam around the perimeter of the entire room.
- The work is carried out by two people - one unwinds and holds the roll of film, and the other attaches it to the wall.
- Sheathing begins from the bottom corner. Make an overlap of 10 cm on the adjacent wall and the same amount on the floor.
- Carefully unwind the roll along the length of the wall and secure it with a stapler in several places so that the film does not fall off.
- Having reached the next corner, the vapor barrier is not cut off, but simply left to stand vertically until the turn comes to covering the second wall.
- When installing foiled isospan or any other metallized film, it is laid with the base inward and the shiny layer outward.
- If the work is carried out with a stapler, attach the film to the wooden sheathing with staples in increments of about 20 cm.
- In the case when fastening is carried out using clamping strips, apply the strip along the sheathing, nail its ends, and then additionally fix it with nails in increments of 15-20 cm.
- Move to the next wall, continuing to unwind the roll. If the roll runs out, the next sheet is overlapped with the first one, and the joint is well taped. The entire lower part of the room is sheathed in a similar way.
- Move to the top. Work begins again from the corner. The film is positioned in such a way that it overlaps the ceiling and the lower layer of vapor barrier.
- Around the doors and windows, if there are any, the canvas is additionally secured with pressure strips and taped.
- All joints and places where they are fixed with staples must also be protected with tape. The absence of any gaps is very important, otherwise there will be no effect.
- If fastening was carried out using clamping strips, the finishing trim is mounted directly on them.
- If staples were used, you will have to install additional vertical strips at least 2 cm thick to provide a ventilation gap.
Installation of membrane vapor barrier