How to insulate a cellar from the inside against freezing: options for insulating walls, ceilings and floors
The main purpose of the cellar is to store vegetables and other food products in fresh or canned form.
Poor quality thermal insulation, both outside and inside, creates moisture accumulation and unfavorable temperature conditions, which causes the development of mold and rot.
A low level of waterproofing can cause groundwater ingress.
Solving these issues is possible with competent and proper insulation of the cellar.
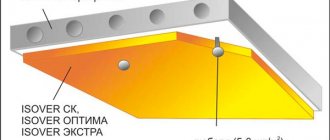
Insulation of the cellar floor
Thermal insulation of a cellar is a process that can be carried out using mineral wool, but for this you will have to make a special design:
- Special bars are attached from the inside.
- Mineral wool is placed inside the sheathing, not outside.
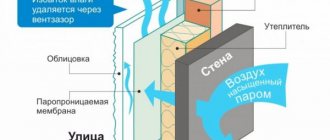
- Vapor-proof film is useful for protecting insulation from water.
Insulation materials:
- Chernozem.
- Peat soil.
- Expanded clay.
- is often used .
The cellar serves as a warehouse during the winter period. With the help of this simple room you can preserve vegetables and homemade preparations until the start of the next season. This is accompanied by various microclimate conditions inside the cellar - a certain air temperature, humidity, as well as air pollution.
In order for the necessary conditions to be maintained over a long period of time, care should be taken in advance to insulate the internal and external parts of the room. Since warm air tends to rise, you need to make sure that it always remains within an enclosed space. This can be facilitated by an insulated hatch into the basement.
How to insulate a cellar lid on the street? To do this, you need to follow some rules and follow tips that will allow you to preserve vegetables for a long time.
Walls
The main purpose of insulating cellar walls from the inside is to protect against heat loss.
Reliable insulation of wiring is also considered important to prevent short circuits, breakdowns and fires. When insulating, the following goals must be achieved:
- dry walls;
- high-quality wire insulation;
- waterproofing joints between walls and foundation;
- treating walls with special products to prevent the appearance of mold and mildew;
- insulation of wall surfaces from the inside.
Let's consider some insulation options.
A fairly inexpensive and reliable option for insulating a cellar or basement is polystyrene foam. The material has high thermal insulation rates, is easy to use, and can be coated with any solution if necessary.
In case of high humidity, it is recommended to use polystyrene foam with a density of 25 kg/m³ or higher, the properties of which allow it to not allow moisture to pass through. It is also possible to use extruded polystyrene foam, which costs an order of magnitude more, but at the same time has absolute hydrophobicity and a long service life.
The first step is to carefully seal the seams, joints and cracks with foam or sealant. If there is a possibility of underwater water entering, it is recommended to treat with a penetrating solution, which experts note as the best remedy for moisture.
How to properly insulate a basement
Having understood the variety of materials, we move on to installation. Of course, its type will depend on the material, but we will try to combine the information, placing emphasis along the way.
Surface preparation
We start by inspecting the basement walls - you need to understand what protection they already have, and what needs to be added.
Treatment of walls against mold is carried out first.
- If the walls are covered with mold, this is a signal of a high level of humidity, which means that the walls do not have external waterproofing, or it is faulty. You can also talk about freezing, but this practically never happens underground.
- The mold needs to be removed. The most effective method is to coat them with chlorine-containing substances, the same “Whiteness”.
- Next, the walls are cleaned of dirt and dust. Priming is carried out - the type of composition is selected depending on the material that will be mounted on top.
Penetrating coating waterproofing
- Since we don’t have access to the concrete walls from the outside, all that remains is to make the concrete itself waterproof. For this purpose, penetrating compounds are used, which penetrate deep into the structure of the material and endow it with the appropriate properties. By the way, such coating will be an excellent primer for plaster.
To enhance the effect, it is recommended to cover the walls with roll waterproofing with a mandatory overlap of 10 cm at the seams.
Wall insulation
Further actions will depend on the type of heat insulator, future finishing and the surfaces to be insulated. Let's start with the walls.
Insulation of a basement in a private house
- We can use rigid board insulation and sprayed materials on the walls. The former can be placed inside the frame (this applies to soft wool) and mounted using adhesive or mechanical methods.
- The frame is set according to the type of material. For example, drywall is used. We make a grid under it with cells 60*50 cm. We cut the insulation as needed and insert it inside.
- It is better to do insulation in two layers in order to cover the seams between the slabs, which will become cold bridges.
- For adhesive and mechanical installation, we attach the slabs directly to the wall using the chosen method. In the first case, we use polyurethane foam, and in the second, special umbrella dowels.
Dowel-nail for fixing the insulation
If you used mineral wool, cover it with a vapor barrier. At the end we install the finishing.
Sprayed materials are simply applied to surfaces and left to dry. Any finish can be installed on top of them.
Floor insulation
Insulation can be placed on the floor in two ways - under the screed or between the joists.
Insulation of the cellar from the inside - floor
Both methods involve raising the height of this surface. Under the screed, it is best to use extruded polystyrene foam, as shown in the photo, or dense bulk insulation that is not afraid of water.
Any insulation can be installed in the log system. The work is carried out according to the same scheme as the frame for the walls.
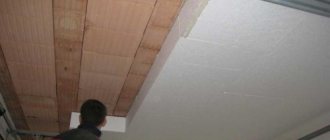
Ceiling insulation
Bulk and soft materials are not suitable for the ceiling. Just like for walls, we use mineral wool, polystyrene foam or spraying.
It is possible to install soft insulation on the ceiling, but it is inconvenient
Often the ceilings of basements and cellars are left unfinished.
Polyurethane foam
The material is the most reliable and durable method of insulation.
The absence of seams and resistance to moisture allows you to create a high level of thermal insulation and the maximum permissible microclimate in the room. At the same time, the cost of the material is quite high when compared with previously presented analogues.
Polyurethane foam is an environmentally friendly material, so it will be the best option for insulation in rooms intended for storing vegetables and preparations.
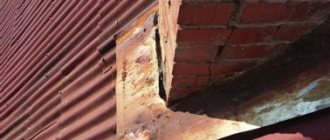
Ceiling
Concrete ceiling slabs in the cellar are subject to the greatest freezing. You can ensure a dry and warm atmosphere by using moisture-proofing substances to treat the ceiling.
After drying, foam sheets are glued on top of the dry concrete and additionally secured with dowels. It is also possible to stuff the slats and then lay insulation in them.
After this, it is necessary to seal all the seams of the structure with polyurethane foam. Then the mounting mesh and layer of plaster are adjusted.
Floor
The floor plays an important role in ensuring optimal temperature and a favorable indoor climate. For reliability and durability, flooring requires hydro and thermal insulation, which is achieved in several ways.
Insulation using expanded clay occurs in several stages, namely:
- the base is leveled, after which it is covered with roofing felt, onto which a waterproofing agent is glued;
- expanded clay is poured, its layer should be 10-25 cm;
- A concrete screed with reinforcement is poured onto the expanded clay.
Stages of floor insulation using sand and crushed stone:
- the prepared surface is covered with 15-20 cm of crushed stone, then with a 5-10 cm layer of sand;
- the surface is covered with roofing felt or construction film for reliable waterproofing;
- installation of a reinforced belt and pouring concrete.
Floor insulation with foam plastic:
- preparing a gravel or sand cushion, subsequently covered with a waterproofing agent;
- laying foam on the surface;
- filling the screed.
It is worth remembering that the features of insulation largely depend on the location of the cellar, be it a garage, barn or a separate building. In any case, the general recommendations presented in the article can be safely applied in practice.
Advice from professionals on how to insulate a cellar in a garage
Not only rural residents and summer residents, but also many city dwellers dream of having their own cellar. A basement in a garage is a rational use of space and saving on expensive acres of land. However, garage buildings are often not heated, and storing vegetables and jars of pickles requires a positive temperature.
Even if there is a heating system in the main room, it is recommended to additionally insulate the cellar to prevent dampness. Every rational owner is interested in learning how to insulate a cellar in a garage. An insulated utility room in the garage provides significant advantages:
- prevents heat loss through the floor;
- makes it possible to use the utility room at any time of the year;
- saving space;
- low cost of repair work.
How to insulate a cellar door
Previously, this was done using felt or other soft materials. The most effective way to insulate a cellar from the inside is to choose a hard material as the basis for the insulation.
- The insulation is glued to the door.
- The insulation is covered with plywood (you can use other similar material).
- It is necessary to get rid of any minor defects.
- Where the door comes into contact with the frame, you need to install a door seal.
What materials exist
The choice of consumables depends on the degree of soil freezing, the type of structure and the depth of groundwater flow.
Naturally, insulation materials must meet important requirements: maintain water resistance, heat and protect against fungal infection. Thermal insulators are different for walls, ceilings and floors.
Mineral wool
Mineral wool is an excellent thermal insulation material that, in addition to everything, allows air to pass through. To insulate walls and ceilings indoors, you can use slabs of medium and soft hardness. This material does not burn and is easily attached to the surface.
Basalt wool, which has higher thermal conductivity and noise insulation properties, has proven itself especially well. It is important to remember that additional vapor barrier protection will be required to prevent moisture accumulation.
Expanded polystyrene
This is a high quality thermal insulation material that is perfect for a basement. It has high resistance to mold and the spread of rot.
Its important characteristic is almost absolute waterproofness. In addition, the material has a long service life.
Often used for cellar insulation. It differs from expanded polystyrene in its manufacturing technology and higher vapor permeability. Has the following distinctive characteristics:
- does not allow moisture to pass through and does not change shape under its influence;
- weighs little and does not create additional load;
- affordable.
Reflective Thermal Insulator
New materials include reflective insulation.
In its production, special rolls are used, which, on the one hand, are made of foamed polyurethane foam, and on the other, of polished foil.
This insulation effectively saves room space, since its thickness is 3-5 mm.
Glass wool
Glass wool is used less and less today. But it has one undeniable advantage. It's cheap.
When working with such material, it is worth stocking up on protective gloves, and you also need to protect your eyes. It is necessary to additionally insulate with film or foil.
Warm plaster
This material performs both decorative and heat-insulating functions.
Plaster can be used as an independent raw material, or can be combined with other thermal insulators. In any case, it must be applied in a very thick layer.
The floor in the basement can be insulated with expanded clay. This is an inexpensive option, very easy to use and effective. The thickness of the expanded clay layer depends on the expected load.
It is recommended to choose two types of expanded clay with fractions of 5-20 mm, this will protect the floor from subsidence. The size of the bulk layer should not be less than 10 cm.
Sand and crushed stone
The construction of sand, crushed stone and screed is also quite effective.
First we deepen and level the floor. The first layer is crushed stone, 10 cm thick, then sand, 5 cm thick. After thorough compaction, fill it with hot bitumen and make a reinforced concrete screed. This is a traditional and inexpensive option.
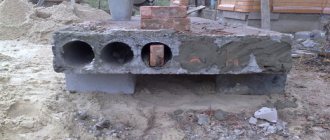
Insulation of the foundation in the garage cellar
Concrete is the most common material for the construction of any foundation. Properly performed work on pouring or installing blocks, insulation and waterproofing (see Waterproofing the garage and basement: doing the job correctly) is the key to long years of operation of the foundation.
Attention: The foundation in the garage cellar has a very important role and benefit in the household: as a storage place for vegetables and preparations in the winter. It should also be taken into account that dampness from the cellar penetrates into the room. And this is the durability of the entire structure.
Insulating the foundation with foam plastic
In order to avoid incurring losses, you should immediately think about insulating the foundation in the cellar. At the first stages of construction, it is worth deciding on the choice of good and high-quality insulation (see How to build a basement in a garage in different options).
Measures to insulate the garage floor and foundation
Like the foundation, the subfloor must be protected from external factors. The only danger is groundwater. Having compacted soil at the base, you can easily notice its moisture. And accordingly, there can be no talk of any dry room for storing food. This task is not difficult to cope with by making a cushion of crushed stone and sand. There are several steps to making a good floor foundation:
- We apply waterproofing (see Waterproofing basement walls and floors) to the lower part of the foundation, taking into account the height of the floor; bitumen mastic or roofing felt are good for this.
- We lay waterproofing materials on the ground, an example would be geotextile dornite or the more accessible and cheaper material roofing material
- The first layer is laid with crushed stone of a fraction of 20-40 mm, with good compaction. This layer will create additional drainage. Backfilling will follow, it is best to use river sand, as well as crushed stone, the sand should be well compacted
Attention: The materials used must be dry. So, once you purchase them, you should use them immediately or store them in a dry place.
- Cover the sand cushion with a layer of vapor barrier. As a vapor barrier, you can use ordinary construction polyethylene. Laying the vapor barrier should be carried out with allowance for the basement walls.
- We install a reinforced mesh on a ready-made base and fill it with concrete or cement-sand mortar. The subfloor is ready.
This base can be used as a finished floor or, if you choose, you can make a sheathing from timber and floorboards.
Insulation of basement walls and hidden communications
When building any basement, the main protection will be not only waterproofing and thermal insulation, but also hidden communications. Any basement area of the garage will not receive sunlight. Thus, it is worth considering options for lighting the basement.
We pay attention to the insulation of communications
Attention: The most common method is to lay electrical cables on top of the walls. The isolation of such networks must be completely safe because In basements you can often observe dampness, mold on the walls and fungus. Which can lead to a short circuit and fire.
- In order to avoid the consequences of a fire, it is worth treating the foundation walls with polyurea or other septic tanks that will protect against the ingress of groundwater and the accumulation of condensation on the walls and electrical networks.
- Another very important factor will be natural or, mainly, artificial ventilation of the room. In the early stages of construction, a 100 mm pipe is installed in the garage. A ventilation device (see Basement ventilation in a garage: choosing and making) can be installed in an already built garage.
- Electrical outlets in basements are not installed in the foundation walls; all wiring must be routed through the ceiling or walls.
- The basement walls must be well insulated; in this case, polyurethane foam materials are suitable. Polyurethane foam protects against freezing and groundwater ingress; in addition, the material has a long service life and you will not have to make repairs after a year or two, compared to other building materials.
Insulating walls, both in detached garages and in complexes, is not easy to do. The biggest danger is groundwater. They adversely affect the base, thereby destroying it. To avoid damage to the foundation, you should resort to a number of rules:
- Perform good soil compaction before laying the foundation
- Treat all sides of the foundation with antiseptic or polyurea impregnation
- Waterproof joints and cold bridges where the foundation adjoins the base of the wall
- Place all existing electrical networks in a corrugated box; the wire connections are well insulated
Step-by-step instructions for insulation
Most experts recommend using polystyrene foam as a heat insulator. To insulate a cellar in a garage, you should choose a material with a thickness of 40-50 mm. Such insulation will maintain a stable temperature for a very long time.
Foamed sheets have a cellular structure, due to which they have lightness and low thermal conductivity. You can do the installation work yourself.
Selecting installation tools
When insulating, you need to stock up on numerous construction tools:
- level;
- hammer;
- trowel;
- spatulas;
- glue;
- dowels;
- plaster mortar;
- primer and putty;
- brush for applying primer.
Preparing the premises
Before installation work, we clean the basement from dirt. If the surfaces are uneven, then we perform putty and primer. Moreover, the latter procedure effectively protects against fungus. We moisten the surface and polystyrene. This can be done using a garden sprayer.
You can also create a ventilation layer between the wall and the material. To do this, we attach a special frame to the wall, and then mount the slabs on it. Ventilation can be installed after laying the sheets, but you will have to use drywall.
There are two ways to attach the material to the surface: adhesive and fungal.
Fastening with adhesive method
The first method is mounting using an adhesive solution. This is a great option as the glue has excellent adhesion. We dilute the solution in a plastic container and mix well with an electric drill. After moistening the surface, apply the glue in the form of spots with a distance of 20 cm from each other.
Using a trowel, apply another layer of glue to the resulting stains. It can also be applied to the end parts, this will make it easier to join the slabs. Press the sheet against the wall and tap it well with your palm. The slabs should be laid from top to bottom, that is, from the ceiling to the floor.
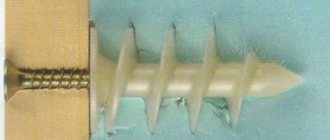
Mushroom fastening
For the second method you will need dowels. These are small screws with a head. For this material, it is better to select disc-shaped screws, which can be metal or plastic. It is better to choose plastic products: they are not subject to corrosion and will not allow cold to pass through.
Using a drill, we make through holes in the wall and material for dowels. In the corners we leave indentations of 10-15 cm. When choosing the length of the screws, you should take into account the thickness of the polystyrene foam, plus 4-5 cm.
Eliminating cracks
After 5 days, when the glue has completely hardened, we seal the cracks with polyurethane foam using a construction gun.
Finishing materials are attached to polystyrene foam using lathing. You can install drywall first, and install panels on top or simply paint. The most popular method is plastering.
Before plastering, it is recommended to perform a certain sequence of actions:
- prime the polystyrene foam coating;
- we perform reinforcement with a special mesh;
- level the surface, grind thoroughly;
- prime again;
- and do the finishing touches.
You can use mineral and acrylic plaster. A basement with an acrylic finish will last for decades. It also has excellent adhesive properties and protective functions.
The procedure for insulation work
To insulate outside walls, special slab insulation materials are usually used, which are easy to install. The slabs are fixed to the waterproofing layer using adhesive mixtures or mastics. Treating the entire surface of the insulation board with mastic reduces the risk of the insulation shifting when the ground moves.
It is recommended to carry out insulation immediately during the construction of the house.
Cold mastic must be applied to the surface of the slab, then pressed against the wall and held until the adhesive hardens (usually 30-40 seconds).
The laying of thermal insulation slabs should begin from the bottom (strictly along the perimeter); the slabs can protrude 30-40 cm above the ground.
It is important that the insulation boards are of the same thickness. In addition, it is necessary to ensure that they are tightly adjacent to each other. It is recommended to immediately seal all resulting voids with construction foam. In the future, the slabs will be securely supported by a layer of soil. The main thing is that they do not move apart or move.
Insulation of basement walls, as noted above, should be carried out during the construction phase of the building. If for some reason this was not done, then it is better to insulate the basement yourself only from the inside. External insulation in a built house can only be done efficiently by professionals. It is not recommended to do such work yourself without the appropriate skills due to the high risk of weakening the foundation and walls of the building.
Ventilation and communications
To create an optimal microclimate in the basement of the garage, a natural ventilation system must be provided. It is best to use two different ventilation ducts, which will be mounted in different corners of the cellar; this will allow you to quickly ventilate the basement due to intensive air exchange. If you need to create good draft, then install one of the ventilation pipes 1 meter higher than the garage roof, and install the second pipe at the bottom near one of the walls.
Scheme of ventilation of the cellar in the garage
Due to the difference in heights, good natural traction will be provided. Even if the cellar in the garage is heated, with natural ventilation all the hot air will simply rise up to the ceiling, and the floor and the space above it will remain cold.
Communications (electricity, heating, water) must be securely installed before work on insulating the cellar begins. Electrical wiring must be carried out in a protective corrugation; wire switching points must be in an easily accessible place using cross-connect boxes. Also, all joints of heating or water pipes must be accessible for maintenance.
Causes of condensation
It has been noticed that in autumn and spring, condensation practically does not appear in the cellar or basement, but this happens in summer or winter. The reasons for its formation have a physical basis: in the cellar, as in any room, warm air rises up to the ceiling. When it encounters colder ceiling material, the air cools sharply and goes down, and the moisture in it condenses and settles in droplets on the surface of the ceiling and adjacent walls - just like in nature, dew appears on leaves and grass in the morning.
If condensation appears occasionally and in small quantities, then you can ignore it - it will quickly disappear on its own. But if drops of water appear regularly and in large quantities, then you need to look for the reason for its mass appearance and resolve the issue of eliminating it.
There may be several reasons why the basement “sweats”:
- close location of groundwater to the ground;
- destroyed foundation base;
- improperly organized ventilation;
- lack of thermal insulation of walls and ceiling.
Proximity of groundwater
If site drainage is not done or is not properly done, groundwater poses a serious problem for basements. When building cellars, owners often try to save on waterproofing. In the best case, only the walls and ceiling are waterproofed, and the floor remains defenseless from moisture coming from the ground. If the cellar is being built on an elevated, dry place, then such construction is justified, otherwise the cellar will turn out to be too dry. But if it is built in a lowland or in an area where groundwater comes close to the surface, then excess moisture inevitably penetrates into the basement. In the same way, moisture appears in the caisson if it is installed incorrectly.
Destroyed foundation base
A destroyed foundation base is more typical not for cellars, but for basements located under houses. Many owners plant fruit trees near their homes. On the one hand, this is convenient: you can get ripe fruits almost from the doorstep, and shade from the hot summer sun is provided. But such convenience is fraught with serious consequences - the roots of planted trees eventually reach the foundation and begin to destroy it. Due to these violations, moisture in the soil, which the solid foundation contained from the outside, reaches the basement, penetrates it and condenses into drops.
Lack of thermal insulation of walls and ceiling
If the ceiling in the cellar is wet only in winter, and condensation does not form in summer, then the reason lies in poor thermal insulation of the ceiling. Frost cannot reach the walls protected by the earth, and the ceiling in the basement or in the caisson, when used as a cellar, is more vulnerable in this regard. In addition, to save space in the yard, outbuildings, such as a barn or garage, are often built on top of the cellar.
In this case, it is not possible to pour a layer of earth sufficient to provide reliable protection from frost on top of the ceiling; the walls of the barn or garage themselves cannot provide protection from severe frosts.
Improperly organized ventilation
Even in a good basement, properly built and properly protected from moisture and cold, with poor ventilation of the basement or its complete absence, water condensation on the ceiling in the cellar is guaranteed. The air in such a room will stagnate, and the moisture in it will inevitably settle on the ceiling and walls.
Choosing insulation
We decided to insulate the cellar, but we don’t know how to do it, and most importantly, what material to use.
Let's look at how to insulate a cellar in a garage using modern materials that experts use to insulate basements:
- polystyrene foam or extruded polystyrene foam;
- mineral wool;
- warm plaster;
- glass wool;
- reflective thermal insulation.
Insulating a cellar in a garage with the materials described above allows you to achieve good thermal insulation properties and prevent the appearance of fungus in the room, but each material has its own advantages and disadvantages.
Extruded polystyrene foam or polystyrene foam
- simple installation;
- environmental friendliness;
- you can use extruded polystyrene foam for floor insulation;
- service life up to 40 years or more;
- excellent water resistance;
- low cost;
- perfectly tolerates sudden temperature changes.
- is flammable;
- does not allow air to pass through.
Expanded polystyrene PSB-30
Foam plastic PSB-35
Density (kg/m3)
Thermal conductivity coefficient (W/mK)
Compressive Strength (MPA)
Mineral wool
- allows air to pass through, allowing the room to breathe;
- excellent sound insulation;
- excellent thermal insulation;
- affordable price;
- long service life of 30 years or more.
- an additional frame for installation is required;
- allows moisture to pass through;
- work is performed in special clothing and gloves.
Warm plaster
- excellent thermal insulation;
- affordable price;
- excellent sound insulation.
- it is necessary to apply a thick layer for good thermal insulation;
- difficulty in installation.
Glass wool
- low cost;
- good thermal insulation properties;
- good sound insulation properties.
- work is performed in special clothing and gloves;
- an additional frame for installation is required;
- allows moisture to pass through;
- If exposed to moisture, it may emit an unpleasant odor.
Reflective Thermal Insulation
- high thermal insulation properties;
- material thickness is only from 2 to 5 mm;
- simple installation;
- possibility to use facing material.
- price;
- possible heat loss
Other types of insulation
Today on the construction market you can find a very large number of different insulation materials. Many of which will cope very well with the task of insulating the basement. Let's consider the most suitable materials for basement insulation.
Glass wool
The material of such insulation consists of very small fibers, which are waste from the glass industry.
Glass wool has a fairly low thermal conductivity.
This insulation is considered one of the inexpensive materials, but has several disadvantages.
Example of glass wool. Click on photo to enlarge.
Firstly, glass wool must be insulated from moisture, since it tends to lose its qualities when exposed to water.
It is very flammable.
When working with glass wool, be sure to protect your eyes and throat from small particles.
It is not advisable to insulate the basement from the outside with such material.
Mineral wool
This insulation is similar in appearance to glass wool, but it is made from different raw materials. It is produced during the melting of basalt rocks. In the process of a large number of operations, fibers of such cotton wool are formed.
Mineral wool has very low thermal conductivity and a relatively short service life. Like glass wool, mineral wool also needs protection from moisture. And this is the only drawback of such insulation.
Polymer insulation
This is what polystyrene looks like. Click on photo to enlarge.
Such insulation will not need to be insulated from moisture, since it is waterproof. Has low thermal conductivity.
The material is made in the form of plates, which are very simply and easily attached to any surface. It is possible to attach such material using special glue, foam or dowels.
The material is very easy to cut with a knife and you can make any desired shape out of it.
Expanded polystyrene and polystyrene are indifferent to mold and fungi.
The cost of such insulation is relatively low.
Among the materials of this type there are those that do not burn.
We insulate the ceiling of the cellar
Before starting insulation work, we check the entire surface of the ceiling in the basement for cracks, potholes, etc. We carefully clean all these defects and seal them with a solution or carefully blow them out with foam. After this, we treat the entire surface of the ceiling with antifungal solutions (quicklime or copper sulfate).
There are a lot of options for insulating a basement ceiling in a garage - from polystyrene foam to reflective insulation.
The ceiling can be insulated with any of the materials described above; for insulation with mineral wool or glass wool, a special frame will be required, which is then sheathed with HA sheets, plastic, plywood, etc. Installation of polystyrene foam or expanded polystyrene can be carried out on parachutes with the preliminary application of a special solution, then the mesh is applied and plastered surface and painted, you can also use facing material (decorative tiles, panels, etc.). Decorative cladding material can also be used for reflective thermal insulation.
Materials for cellar insulation
To work on thermal insulation of the external walls of the cellar, various heat insulators are used:
Cellar layout diagram.
- Mineral wool is a traditional mineral-based material that has proven itself in construction. It is easy to install and lightweight. But when laying it, you must remember that reliable water protection is required, otherwise the mineral wool will simply get very wet and cease to perform its functions;
- Expanded clay, sawdust and other bulk materials for insulating external walls are used less and less today, since this work is lengthy and requires the construction of an additional brick or block wall. The material is poured into the cavity between this wall, providing excellent waterproofing so that moisture cannot penetrate inside the structure;
- polystyrene foam boards are the leader in use. They are used as wall insulation for a wide variety of buildings, not just cellars and basements. This is due to the reasonable cost of the material, its excellent properties, and extremely simple installation. In addition, polystyrene is not affected by water, that is, when laying external insulation there is no need for a thick layer of waterproofing;
- ecowool consists of natural cellulose and is an excellent option for insulation. But to apply it to the walls, special equipment is required, that is, an operator must be invited.
You may be interested in: Website about sewerage.
Insulating the hatch cover
The cellar lid, like the ceiling, should also be insulated, since there will be a large leakage of heat through it and the possibility of moisture getting from the main garage into the basement.
DIY cellar lid insulated with foam plastic
It is best to use polystyrene foam to insulate the hatch cover; it is better to choose the highest density of 100 or 150 kg/m³. We pre-treat the lid with antifungal solutions (quicklime or copper sulfate). We cut a piece of polystyrene foam to the size of the lid and fix it with special glue or foam. To make a decorative surface for an insulated cover, you can use plywood, which is fixed with self-tapping screws to the hatch cover itself. You can first make a wooden frame around the perimeter of the lid to cover the visible parts of the polystyrene foam. After fixing the plywood, it can be painted to protect it from moisture.
Construction of a hole in the cellar
Structurally, the cellar hatch cover is always built according to the same design; there may only be slight differences in the material used, the structure of the canopies and the design of the frame. The moving part of the device, the hatch or hatch, rests on a base frame fixed to the floor slab.
The inner surface of the passage or manhole is lined with sheet metal, plywood or lining in order to prevent foreign objects, dust or warm air from entering the cellar from the space between the floor and the floor slab.
The lid can be suspended from the frame on regular hinges or hidden rotary canopies, as in the diagram.
This device allows you to ensure the maximum opening of the hatch above the hole into the cellar.
Important! The use of internal rotating canopies makes it possible to make a cellar lid with your own hands without elements and parts protruding above the floor plane.
This option can do a good job, especially if the hole is built in the center of the living room or kitchen. Spring carports are often used as hinges for cellar lids. A spiral or twisted spring built into the hinge design allows you to effortlessly lift and lock the trunk hatch or car hood in the open position.
But before you make a hole into the cellar with a lid on car hangers, you need to make sure they are working and properly adjusted. Due to the fact that the cellar lid is much heavier than the hood or trunk, at a minimum a reinforced or double set of hinges will be required.
In addition to internal hinges, you will need a built-in lock and a hidden handle embedded in the thickness of the wood. Often, a lock is installed on a cellar lid not to protect the contents; most often, the locking device plays the role of a stopper, securing the heavy lid from moving and slamming under the influence of air currents. Conventional ball or roller devices used to secure interior doors in the frame, in this case, turn out to be too weak, they are not designed for increased load, so it is better to use a regular door lock.
We insulate the floor in the cellar
Answering the question of how to insulate a basement in a garage, we go directly to the insulation process and start with insulating the floor covering.
Rigid polystyrene foam is effective for thermal insulation of floors
To insulate the floor, you will need to perform preparatory operations:
- we deepen the floor, digging a hole about 30 centimeters deep around the entire perimeter, and level the entire surface of the floor;
- we add fine crushed stone about 10 centimeters deep along the entire perimeter of the floor;
- Next, apply a layer of sand approximately 5 centimeters thick (this will avoid the formation of moisture on the floor);
- apply a layer of insulation - it is best to choose extruded polystyrene foam, at least 5 centimeters thick;
- We reinforce the floor with mesh and fill it with concrete screed.
Making a wooden cellar lid
The wood is ideal for making a cellar lid. Unlike the metal version, making a hatch will require little carpentry skills, since you will not only need to assemble the structure correctly, you will also need to install it exactly along the opening of the hatch.
The manufacture of a wooden cover begins with the arrangement of the entrance box and hatch opening. The box is used to protect the walls and hold the entire structure. The dimensions of the box usually coincide with the dimensions of the supporting frame or tray to which the lid will be attached.
Waterproof plywood, 15-20 mm thick, is best suited for making boxes. The assembled frame is reinforced at the corners by stuffing wooden or aluminum corners and installed in the manhole opening. The box-shaped structure must be “sewn” to the floor slab and other load-bearing elements of the floor.
At the second stage, you need to make the loot and the lid. First, the hatch is assembled; it can be knocked down from a fifty-fifty board or timber. The stitched boards are reinforced with two longitudinal cross members, as in the photo.
The hinges are attached to the same crossbars with self-tapping screws. Using the finished lid as a conductor, the loot is knocked down from the same board. The frame and the hatch are connected with hinges into one structure and transferred to the box, leveled and fixed. If laminate or parquet is used on the floor, then the lid with the tray must be slightly “recessed” before fastening, so that the laminate laid on top of it is flush with the main covering.
We insulate the walls
Regardless of what material the walls will be insulated with, all seams and cracks must first be carefully sealed and all walls must be treated with antifungal solutions (quicklime or copper sulfate).
To insulate walls with mineral wool or glass wool, a special frame made of wall profiles is used. This is done so that the wool does not flow down under its weight, but is firmly fixed along the entire perimeter of the wall. After this, the frame can be covered with HA sheets, plywood, etc. with subsequent finishing.
An economical solution - insulating basement walls with foam plastic
To fix polystyrene foam or expanded polystyrene to the wall, a special solution and parachutes (dowels with a wide cap) are used. All joints between sheets of foam plastic must be carefully blown out with foam. After this, a special mesh is applied to the entire surface of the wall and plastered. After plastering, the walls can be painted.
Reflective thermal insulation is installed quite simply; it is glued to the wall surface along the entire perimeter. On the wall side the base of the material is polyurethane foam, on the outside there is polished foil. A decorative or cladding coating can be applied on top of the reflective insulation.