Features of installation of different materials
The tactics of action depend on the chosen material and the location of its placement - from inside the room or from the attic.
Laying mineral wool
Installation of insulation is carried out along the attic floor.
When constructing a thermal insulation cake, it is important to meet two conditions:
- ensure protection of mineral wool from water vapor coming from inside a warm room;
- arrange ventilation of the outer surface to ventilate moisture from the insulation.
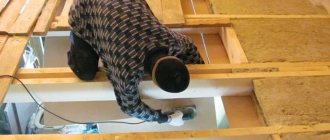
Mineral wool slabs are laid between beams or strips of prepared sheathing. Can be mounted on the ceiling surface.
Before starting work, it is necessary to check the boards for rot and treat the wooden elements with an antiseptic. Make sure the roof is not leaking
The surface is cleared of debris, and if necessary, a wooden frame is constructed.
Further actions:
- Install a vapor barrier membrane.
- Roll out rolls or place mats between beams.
- Install a wooden base, maintaining a ventilation gap between the insulation and the hard floor.
The last step can be missed. However, it will not be possible to walk in the attic or store things there, since mineral wool cannot be pressed.
Internal lining with expanded polystyrene
This thermal insulation option is suitable for concrete ceilings. Expanded polystyrene slabs are fixed to the surface with glue and secured with “fungi”.
At the preparatory stage, the ceiling is cleared of debris and old finishing, holes, cracks and gaps between the slabs are sealed.
Before installing the insulation, the ceiling is treated with an antifungal compound and primer.
The procedure for attaching polystyrene foam boards:
- Apply glue to the insulation, apply and press it to the ceiling.
- Cover the entire area with slabs, leaving no gaps between the elements.
- Use a hammer drill to drill holes for fasteners.
- Kill the fungi.
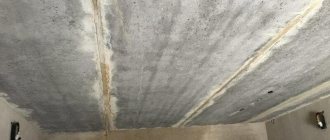
- Foam the joints and gaps between the plates.
- Cut off the remaining foam and fix the reinforcing mesh with adhesive.
- The surface should be primed and plastered.
After the layer has dried, clean the ceiling and apply the final decorative coating.
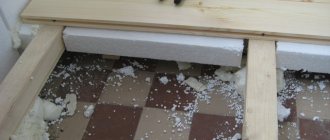
Filling the attic with expanded clay
The minimum layer of bulk insulation is 20 cm. To adjust the height of the backfill, you need to prepare a beacon - make the necessary mark on a piece of reinforcement, securing a piece of electrical tape.
If a wooden base is insulated with expanded clay, then the floor must first be covered with waterproofing extending onto the walls. Polyethylene film will do
There is no need to lay a water barrier on a concrete base.
Sequence of work:
- Pour in expanded clay and distribute the granules evenly.
- Check the thickness of the insulating layer. Its height should be 3-4 cm below the level of the flooring. If this norm is neglected, then when walking through the attic the sound of granules rubbing will be heard.
- Lay a layer of vapor barrier membrane and seal the joints of the panels with tape.
- Install a rigid base. Boards, fiberboard or OSB panels are suitable.
The floor on top of expanded clay makes it easier to move around the attic and increases the effectiveness of the insulation cake.
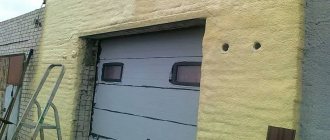
Application of Spray Insulation
It will not be possible to carry out the work yourself, since spraying will require expensive equipment - a high-pressure apparatus. In addition, skills in working with equipment are required to evenly distribute polyurethane foam.
To start the device, a voltage of 380 V is required. If there is a two-phase network in the house, a generator is connected that produces the required value of the electric field.
It is better to entrust the work to a specialized company and conclude an agreement with them for the provision of services. At the appointed time, a team arrives and extends a hose with a gun into the house.
Recommended work order:
- Install wooden joists on the attic floor. They will be needed for subsequent fastening of the flooring.
- Fill the device with components in the required proportions.
- Set the gun to the minimum foam supply force.
- Apply polyurethane foam between the joists in an even layer.
- Wait for the composition to dry. If the thickness of one layer is not enough, then the treatment must be repeated.
- Level the cured coating by cutting off the excess to the level of the joist.
- Mount on boards on a rigid base.
To insulate a small ceiling yourself, you can use a disposable foam spray kit.
The kit contains everything you need: cylinders with components for preparing foam insulation, a spray gun, hoses, personal protective equipment
Assembly and preparation takes a couple of minutes, no power supplies are needed - the device operates autonomously.
Styrofoam fastening
Installation of expanded polystyrene sheets begins with gluing the first row of material, focusing on the starting profile. The prepared adhesive composition is applied with a trowel to the middle of the sheet, then to its edges so that the glue does not get on the ends of the part when gluing the insulation.
The quality of installation of subsequent rows depends on the correct installation of the first belt.
It is important to carefully monitor the vertical and horizontal position of the sheets. Insulating blocks are mounted so that the seams of the top row are offset relative to the bottom rows by at least 15 cm
To avoid the appearance of cold bridges, the ends of the foam plates should fit together as tightly as possible. When making window openings, the insulation seams should not coincide with the edge of the slope. Installation of thermal insulation boards at the corners of the building is carried out using the gearing method, in which part of the sheet protrudes beyond the cinder block wall.
After the adhesive composition has partially hardened, which takes 12 hours, the seams between the sheets of expanded polystyrene are sealed with polyurethane glue. After it hardens, the surface of the insulation is cleaned to eliminate irregularities in the area of the seams. After 72 hours, you can additionally secure the foam sheets with dowels.
The process of insulating cinder blocks is completed by reinforcement with fiberglass mesh. After the reinforcing mortar has dried, a primer is applied to its surface, and then façade plaster.
Advantages of external insulation
When building a house from cinder blocks, most owners prefer to insulate it from the outside. This is due to the advantages of this method:
- The insulation installed outside reliably protects the walls of the house from fluctuations in air temperature. The absence of exposure to temperature changes on the wall material (freezing and subsequent thawing) significantly increases their service life.
- Placing thermal insulation on the outside of the wall changes the location of the dew point so that moisture does not condense in the inside of the wall, but evaporates from the surface of the material.
- The decorative finishing of the thermal insulation layer becomes an additional protection for the walls from the effects of negative external factors (snow, frost, rain and ultraviolet radiation).
- External insulation helps the walls accumulate heat received from heating the room. This property of cinder blocks makes it possible not to use additional heating during a short-term drop in temperature.
- Installing insulation on the outer surface of cinder blocks preserves the usable area of the premises.
Floor insulation using slag
When building a house, proper floor insulation is always the developer’s area of special attention. The entire heat flow is directed to the residential part of the building through the walls, as well as through a large floor area. During construction work, the developer insulates the basement in such a way that the temperature at the base of the floor is at the same level as the air temperature in the living area. Its fluctuations within a range of about 2°C are permissible. For floors, the heat absorption coefficient is very low. For flooring and subsequent insulation of the floor, you need to prepare the necessary tools and materials:
- nail puller;
- axe;
- mites;
- chisel;
- hacksaw;
- roofing felt;
- wooden blocks 2-3 cm thick;
- level;
- slats;
- rule;
- antiseptic;
- drill;
- hammer;
- insulation;
- nails;
- pencil.
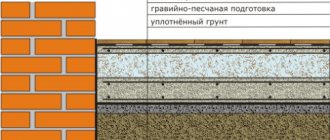
Dry floor screed installation diagram.
When carrying out floor insulation, the work is carried out in 3 stages: first, work is carried out on the subfloor, then the insulating material is installed, and the work ends with the finished floor. It is possible to use a layer of waterproofing laid before the process of creating the subfloor.
Laying slag as a heat-insulating material is done on top of the subfloor. Insulation involves creating a gap of 15 cm from the insulation layer. Insulators must be treated with all responsibility: they must have high performance, be durable, and be easily cut to the required size.
Foam insulation
The easiest way to insulate is to finish the ceiling from the inside with foam plastic. Its advantages include:
- relatively low cost of material;
- light weight;
- unique steam and moisture repellent properties;
- ease of installation;
- environmental friendliness.
Stages of work
First, a waterproofing layer is attached to the false ceiling between the beams. For this you can use glassine or plastic film.
Foam boards are attached on top of the waterproofing using special glue. After applying the adhesive to the insulation, you should wait 1 - 2 minutes and press it tightly to the ceiling. The slabs are mounted end-to-end. If there are gaps between thermal insulation products, they are sealed with polyurethane foam. It is better to additionally fix the insulation on the surface using self-tapping screws with washers of large diameter (10-14 mm).
After installing the slabs, a layer of glassine or other vapor barrier material is laid again. The whole process is completed by cladding and decorative finishing of the ceiling structures.
Modern industry produces foam sheets of various colors and textures. The front surface may contain an abstract pattern, which, if chosen correctly, will enrich the interior of the room.
Sawdust as insulation
Finally, we come to a material that has been used as insulation for decades, even before foam and mineral wool were invented. This is sawdust. They can be used either independently, simply filling the attic with them, or as part of a mixture with clay or cement.
The only advantage of such insulation is its low cost - you can either use waste from your own construction, or go to the nearest sawmill and get the material for free or for a nominal price. But does the cheapness of sawdust outweigh all its disadvantages?
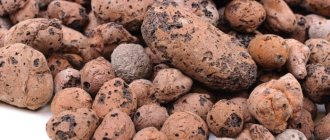
Prices for expanded clay
expanded clay
- Sawdust burns well, so when using it, you should protect all electrical wiring in the attic with metal boxes. In addition, this material should not be used near a stove or fireplace chimney.
- Rodents, insects or fungus may appear in the sawdust, and without impregnation with an antiseptic it will not be possible to get rid of these problems.
- The material shrinks greatly over time, which significantly worsens its thermal insulation properties. In addition, you will have to regularly add fresh sawdust.
- With such insulation, it is impossible to use the space under the roof - neither build an attic, nor store old furniture and other things in the attic.
Ceiling insulation with sawdust
The cement-sawdust solution is prepared as follows: for 10 parts of sawdust of fine or medium fraction, take 1 part cement and 1 part lime. The substances are thoroughly mixed together until a dry mixture is formed. Then you need to take 5-10 parts of water mixed with a few tablespoons of copper sulfate. In our case, vitriol acts as an antiseptic that will prevent the sawdust insulation from rotting. Pour in the mixture and bring it to a homogeneous mass. Checking whether it is ready is quite simple: take the cement-sawdust mixture and squeeze it in your fist. If no water drips from it, then it is ready.
Using clay with sawdust for external ceiling insulation
Next, you need to prepare the attic for insulation. To do this, you need to lay a vapor barrier material and treat all wooden structural elements with a fire retardant (impregnation that protects against burning). After this, you need to lay out the cement-sawdust mixture, level it and leave it for a couple of weeks so that it dries completely.
Characteristics and properties of slag as insulation
The main characteristics of the slag are as follows:
density from 300 to 1000 kg/m3, depending on the components present in the composition; specific gravity from 2.56 to 3.65 g/m3; granule sizes from 0.7 to 20 mm; melting point up to 15000C; compressive strength up to 150 MPa; thermal conductivity coefficient from 0.0326 to 0.05 W/m K.
Slag has increased moisture resistance
Ceiling insulation with slag is beneficial due to its excellent performance properties:
resistance to sudden temperature changes; natural composition, no toxic substances are released during operation; chemical and biological resistance; absence of shrinkage, as well as deformation and destruction under the influence of external loads; increased moisture resistance.
When insulating, the main indicator is thermal conductivity. According to GOST and SNiPs, the thermal conductivity coefficient of crushed stone from blast furnace slag is 0.21 W/(m°C).
Flakiness. The indicator characterizes the volume of smooth and angular elements in the filler.
If the bulk of the filler consists of smooth grains, then it reduces the percentage of adhesion of the material to each other, as well as to the binder solution. The indicator is applicable only for bulk materials, such as slag insulation. Strength—characterizes the level of pressure and mechanical load, the maximum allowed on the filler. Slag insulation is stronger than mineral wool and polystyrene foam.
Due to their rigidity, they are not prey for rodents. In this respect, insulation outperforms mineral wool, polystyrene foam, and polyurethane foam. Frost resistance. The parameter characterizes the number of frost cycles that the filler can withstand without changing its technical characteristics and properties.
Manufacturers of all types of insulation adhere to this standard. Radioactivity characterizes the class of radiation emitted. There are 3 classes, in the construction of residential buildings the 1st class is used, this applies to insulation of any type. Density. This parameter shows the mass of filler per unit volume.
Slag insulation is heavy insulation. Their density on average ranges from 300 to 1000 kg/m3. This is several times higher than the density of other insulation materials.
https://www.youtube.com/watch?v=WX-txHbYx7A
For example, the density of mineral wool averages 50-125 kg/m3. Thus, when insulating, it is necessary to take into account the high density and, accordingly, the heavy weight of the slag.
The characteristics of the filler fraction deserve special attention. The following levels are distinguished:
0*5 mm;3*8 mm;5*10 mm;5*20 mm;10*20 mm;20*40mm;25*60 mm;40*70 mm.
Penoizol and expanded polystyrene
Polymer insulation materials, which include penoizol, polystyrene foam and expanded polystyrene, are also in great demand. Of course, insulating the ceiling with foam insulation or similar materials is superior to other methods in terms of efficiency and ease of use. Such insulation materials are very resistant to adverse conditions; they can withstand both low and high temperatures without deforming at all. Mold does not form on them, so the materials do not rot and can last a very long time.
In addition to thermal insulation properties, polymer insulation materials excellently absorb sound, and therefore can also be used as sound insulation. Despite their artificial origin, these materials are environmentally friendly and do not emit any harmful fumes.
But they also have disadvantages. Foam boards are quite fragile, and working with them requires care. During combustion, polymer insulation materials emit very acrid smoke. Well, besides, their prices are very high. There are insulation materials made from polystyrene foam or expanded polystyrene in the form of granules; this material is cheaper, but less effective for thermal insulation.
Insulation with sawdust
Sawdust insulation is one of the most affordable and popular solutions. Sawdust is the cheapest method of insulation, requiring special attention, because this material is potentially fire hazardous. To do this, an “option” such as material processing is added to the technique, which increases the protection of sawdust.
Definitely, to the question of whether it is possible to insulate the ceiling with sawdust, the answer will be positive, but you need to take into account some nuances.
There are several main disadvantages of such a heat insulator:
- Rodents.
- Fire hazard.
Of course, before applying the material, it is necessary to calculate the thickness of the heat insulator. The volume of sawdust depends on factors such as the purpose of the building (basement, bathhouse, attic, room); it is necessary to take into account the climatic conditions in which the house is located (the more severe the cold, the thicker the sawdust insulation).
The binding elements for such insulation are cement and clay.
Ceiling insulation technology using sawdust:
- The ceiling is covered with special parchment.
- Boards and floors are treated with fire retardants.
- Prepare a mixture of water, cement and sawdust.
- Pouring liquid insulation.
Before preparing the solution, sawdust is mixed with lime or gypsum, which increases the fire safety level of the material and makes it unsuitable for rodents.
Externally, this heat insulator is very similar to wood concrete.
Advantages of sawdust insulation:
- Reliability.
- Durability.
- Economical.
- Moisture resistance.
- Easy to install.
The main disadvantage of this type of insulation is the fact that in the future the attic space will become unsuitable for use due to its fragility and vulnerability.
Necessary materials
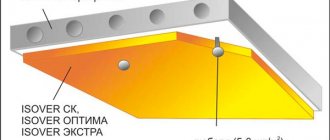
First of all, to insulate the ceiling and the space between the beams in the house from the inside and outside, we will use a layered structure. Each layer of our pie plays a strictly defined function. List of layers used:
- Vapor barrier layer
- A layer of waterproof, high-density thermal insulation
- Waterproofing layer
- Layer of main insulation
- Waterproofing layer
Vapor barrier layer
Glassine or plastic film can be used as such a layer. Its function is to prevent the penetration of water vapor from the living space into the ceiling.
A layer of waterproof, high-density thermal insulation
This layer consists of 50 mm thick foam plastic slabs. It is a reliable insulation material for the ceiling in a wooden house.
Polystyrene foam has a high water-repellent property and a very low thermal conductivity coefficient. It plays the role of the last line of defense against low temperatures.
Foam boards
Layer of main insulation
Mineral wool made from basalt fibers is used as the main protective layer. Thanks to the interweaving of basalt threads, this ceiling insulation retains a huge amount of air.
In addition, basalt fibers have a low thermal conductivity coefficient. All this prevents precious heat from evaporating. Mineral wool is produced in rolls or mats 50 mm thick.
Waterproofing layer
This is a layer of the same material as the vapor barrier layer. The difference lies in the function performed - to retain water in case of possible roof leaks.
Tools for getting the job done
To insulate the ceiling in a wooden house you will need the simplest set of tools:
- Wood hacksaw
- Knife
- Hammer
- Construction stapler (can be replaced with a hammer and small nails with a wide head)
As you can see, such a set can end up in the workshop of almost every home craftsman.
Important to remember! Insulating a wooden ceiling with mineral wool will require the use of a respirator, safety glasses and gloves. Dust from basalt fibers is hazardous to the respiratory tract and can cause irritation to the skin and mucous membranes of the eyes.
Work order
Installed vapor barrier
You are in the attic and all the necessary materials have already been raised there. Now let's look at how to properly insulate the ceiling. The first step is to attach the vapor barrier layer.
If you use polyethylene film (reinforced is recommended), then it is laid out over the entire area of the attic. The film should fit tightly to the beams and the space between the beams, and extend onto the walls with an overlap of at least 10 cm.
A stapler is used to fix it. If it is necessary to lay a new strip of vapor barrier, then make an overlap of at least 10 cm onto the adjacent strip.
After installing the vapor barrier, they begin laying the foam. This material, necessary for ceiling insulation, is usually produced in slabs measuring 1 m x 1 m. For installation, it is marked and cut with a knife so that the slab lies between the beams with force.
A gap of 1 cm is left between adjacent foam plates. Later it is filled with polyurethane foam. It will securely fasten the plates together and eliminate small cracks through which heat can escape.
Mineral wool is laid on top of the waterproofing. It is recommended to lay two layers. The second layer should overlap the joints of the first. The level of insulation should be equal to the height of the floor beams.
https://youtube.com/watch?v=790sgi2anTc
The main insulation is covered with a layer of waterproofing. If you plan to use the attic as a living space or storage, you can immediately lay a floorboard or cover the floor with plywood slabs.
Insulation from the outside is complete, you can begin insulating the ceiling from the inside. To do this, a board or beam with a width of at least 50 mm is attached to the ceiling to the ceiling plank.
Then, between the boards, waterproofing is installed on the ceiling and the insulation is attached to the ceiling (it is laid in the space between the boards). From above, everything is covered with a layer of vapor barrier and a finishing ceiling (plasterboard, plastic, fabric or PVC film).
Now you know how to insulate the ceiling of a wooden house. This ceiling will reliably protect you from the cold and will last at least 30 – 50 years.
Types of slag insulation
The choice of insulation for a particular room depends on several parameters - price, properties of raw materials, availability for use, service life and safety. The following types of slag are used as insulation in the construction industry:
- fuel;
- coal;
- metallurgical;
- domain.
To insulate the ceilings of both residential and industrial premises, fuel type slag is most often used . It represents focal residues formed after the combustion of solid fuel in boiler furnaces, and also contains ash particles fused into separate pieces. This slag is used by builders to produce Portland slag cement. Mineral wool, slag pumice and slag casting are produced from melts of these raw materials.
Coal slag is a material that is mixed with a binder to produce strong and durable slag concrete. It has good thermal insulation characteristics and is several times cheaper than brick, but is not inferior in quality. Slag concrete does not contain any admixtures of sand, ash or clay, which ensures excellent thermal insulation qualities. Coarse-grained slag concrete is used to insulate the walls outside the building, and fine-grained slag concrete is used for thermal insulation of the floor and interior walls of the house.
Metallurgical slag is produced from nickel and copper smelting compounds. Such raw materials are often used for thermal insulation of floors.
Blast furnace slag is the material that remains after the smelting of various cast iron products. It is used in the production of Portland cement, which helps improve the performance of the solution. The composition of blast furnace slag resembles a cement mixture.
Wall insulation with polystyrene foam
Laying foam plastic is carried out in almost the same way as installing mineral wool.
The first stage is surface preparation. Elimination of defects and application of primer. Next, after preparing the adhesive solution, we proceed to installing the insulation sheets.
Important: there should be no gaps or cracks between the plates!
After laying the insulation boards on top of them, you need to fix the reinforcing mesh. Next, this entire cake is carefully primed and puttied, after which you can proceed to the final stage - applying a decorative coating.
When a house is insulated from the inside, the interior space of the room is significantly reduced. However, this fact is not critical for abandoning insulation completely and suffering from low temperatures outside during cold seasons or throwing money down the chimney to heat the house.
Before answering the question of how to properly insulate a cinder block house from the inside, you need to understand the materials that construction stores offer. Today the market offers insulation based on foam plastic and mineral wool. Installation of both one and the other does not require any specific skills from the performer.
We insulate a cinder block house with polystyrene foam
The difficulty of installing this material lies in the preliminary alignment of the walls on which they will be glued. In the case of a brick wall, plastering and puttying will be required. Wallpaper must be removed from the walls and paint residues must be removed.
Every owner of an apartment or house undoubtedly has a dominant desire to preserve the final result for as long as possible. That is why the use of a waterproofing underlay, even inside the house, should be indispensable. For what? In order to thus prevent the accumulation of condensate that destroys the foam.
To work you will need:
- five-centimeter foam;
- comb or notched spatula;
- glue (usually Ceresit).
Installation work is extremely simple. Insulation plates purchased from a building materials store are attached to the prepared wall using diluted glue. Then they are tapped thoroughly to remove any possible air bubbles from under them. In this matter, an important point is to apply the adhesive mixture directly to the wall and in no case to the foam sheets themselves. They should always be dry.
Next, for optimal insulation of the house, all cracks and loose fits of the material should be treated with polyurethane foam. This must be done in order to isolate the glued layer from changes in humidity in the room.
In the process of fastening foam boards, you can also use special fastening dowels. However, an adhesive solution will be sufficient. The final step will be the front finishing of the walls and their possible painting.
Quite a fast and practical way. Its most important advantage is the elimination of the stage of preliminary leveling of walls. The thing is that mineral wool slabs are installed in a specially created metal structure. Then, step by step, the entire frame is covered with plasterboard slabs, which will give your wall a perfectly flat surface.
So, a special structure is assembled from metal or wooden profiles - lathing. Plasterboard slabs are installed on it. Next, the joints are puttied and the wall is either painted or wallpaper is applied to it.
Installation
We thoroughly clean the surface from dirt and debris. If there are cracks or damage, we carry out repairs, and if the strength is insufficient, we dismantle and refill the floors. We treat the surface with antiseptics. We lay the vapor barrier film overlapping by 15-20 cm and gluing the seams.
Along the perimeter we place it on the walls to a height of 20 cm above the floor level. We fill the slag in an even layer over the entire surface. We try to make the layer as dense as possible. The strength of the finished floors depends on the density of the slag, so if there is waste (granules with foreign inclusions), we try to get rid of them. We lay a reinforcing grid with a rod thickness of 3-4 mm, a cell size of 5-10 cm. We fill the finished floor and lay the floor covering.
Once the appropriate material has been selected, the question arises: how to insulate a cinder block house from the outside? If a person is far from the construction business, then it is advisable to use the services of professional teams, but you can do everything yourself. The main thing is to strictly follow the chosen instructions.
Any process begins with a preparatory stage. It is definitely present when installing foam plastic.
- Protruding elements are removed from the base. This may include excess mortar, fasteners and hanging structures (antennas, drainpipes).
- If there are deep potholes, cracks, or broken pieces of cinder block, you should get rid of them. To do this, the surface is plastered.
- When the layer of plaster has dried, you need to apply primer. Such measures will help increase adhesion (adhesion of the adhesive solution and the base) and protect the wall from mold.
Only after the primer has completely dried can you begin installing the foam.
- The first step is to install a starting galvanized or stainless steel profile. It serves as a support for the entire structure. It is necessary to correct the horizontal. A building level is suitable for this. If there is even the slightest distortion, it can cause deformation and even collapse of the insulated and finished facade. The profile is attached to dowel nails.
- Next, prepare an adhesive solution that is suitable for outdoor use and for foam plastic. If you buy the first one you come across and do not read the instructions, then the consequence of such a rash step may be a poor-quality facade that will peel off from the cinder block walls. Before cooking, be sure to read the instructions; manufacturers indicate the exact quantities of ingredients.
- The glue is applied in small blots at the corners of the foam and in the center.
- The first insulation board is laid with its lower edge in profile towards the lower left corner of the building. It is necessary to press the element a little and move it from side to side so that there are no voids left.
- The next sheet of material is coated with glue in the same way, only the composition is also applied to the end part. Press the part tightly against the first one so that there are no gaps or cracks between them.
- The second row is laid so that the joints do not coincide. To do this, the slab is shifted a third or half to the side. In the same way, insulation is carried out over the entire area.
- After the glue has dried, you also need to fix the foam mechanically. This will make the structure more reliable. You will need dowels with a wide head. The approximate number of fasteners is calculated as follows: 5 pieces are needed for one slab.
- Now you can move on to the façade cladding.
Mineral wool
The installation process of this insulation is a little more complicated, but it all starts with preparation. The base is cleaned of stains, dust, dirt, and protruding elements. It is not necessary to plaster the surface; it is enough to seal deep cracks and treat the walls with primer.
Then a metal profile is installed to create a support. Next, prepare the adhesive solution according to the instructions indicated on the package. The glue is applied in a thin layer to the entire surface of the slab (it creates a water-repellent layer), and then several small blots are made in the corners.
After the mineral wool has completely covered the walls, you need to glue the reinforcing mesh. The same adhesive solution is applied to the surface of the slabs and fiberglass is embedded in them, smoothing it with a spatula. After this layer has dried, you can begin decorating.
Thermal insulation using penoizol
An alternative to expanded polystyrene and polyurethane foam is penoizol, which is a “liquid” foam. Due to the fact that it contains special additives, it does not have the disadvantages that are present in its solid counterparts - flammability and the presence of rodents.
Penoizol has a drawback: to apply it, you need to use the services of a team of craftsmen with special equipment. This kind of work is quite expensive. Insulation with penoizol involves laying a vapor barrier and filling the space between the attic beams with a layer of liquid material 20–30 centimeters thick. An additional layer of roofing material is placed on top and a plank floor is laid.
Types of slag
Roof insulation with slag can be done using one of the following types of this material:
- fuel;
- coal;
- metallurgical;
- domain.
Fuel
Fuel slag is a bulk material based on loose silicate masses. It is obtained by burning coal in the form of fractions or dust in a layered or chamber manner. The first type of slag has a heterogeneous structure, and the second has a fine-porous, homogeneous structure.
The ash content per unit volume can reach 40%, which indicates the relatively low strength of the material. In addition, it may contain residues of unburned fuel, which impair the thermal insulation properties.
Fuel slag
Fuel slag is porous and therefore capable of accumulating moisture, which requires the use of high-quality waterproofing during installation.
The main advantages of this type of slag are:
- high level of sound insulation;
- Possibility of obtaining a level base for laying flooring.
Coal
Coal slag is formed as a result of the combustion of coal and the occurrence of high-temperature reactions with the inorganic components that make up its composition. It is highly durable, as the ash content is up to 4%. The amount of unburned fuel is up to 20%, depending on the combustion method and chemical composition.
Features of coal slag are:
- volume fraction of the crystalline phase up to 80%;
- types of oxides in granules: aluminum, silicon, calcium;
- According to their chemical composition, they are super-acidic, basic and acidic.
Metallurgical
Metallurgical slags are obtained by melting nickel and copper compounds. They do not disintegrate, are not subject to rust, and have a high tensile strength - up to 300 MPa. Their main use is fibers for mineral wool.
Metallurgical slag
They have resistance to chemical influences, noise insulation properties, low porosity and moisture absorption.
Domain
Blast furnace slag is a by-product of smelting pig iron from iron ores in blast furnaces. When melted, it floats above the cast iron, making it easier to separate from the main mass. Properties depend on the composition of the ore, the fuel used, the smelting process and the cooling rate.
Ceiling insulation options
When insulating the ceiling with sawdust, you should be careful not to miss the cracks that are always present on the surfaces. To eliminate them, polyurethane foam is used.
There are several options for arranging thermal insulation of the ceiling using sawdust, both using pure wood raw materials and by adding additional additives to it, such as clay, lime, etc.
The most popular methods are:
- use of sawdust in its pure form;
- the use of additives - cement and lime;
- the use of additional components - clay and lime.
Technology of insulation of building structures
Thermal engineering calculations and instrumental measurements show that 5 - 10% of heat leaves a home through the floor and ground, 20 -30% through the walls and the same amount through the attic floors and roof. For these building structures, you can use slag insulation.
The sequence of work to improve the thermal insulation characteristics of the floor, ceiling, and walls differs.
Floor insulation
Depending on the design of the home, floor insulation with slag in private houses is carried out differently. If in the spring and after heavy rains water appears in the subfloor or basement, waterproofing must be done.
Brief instructions for insulating an earthen floor:
- The surface is cleared of debris, leveled, and compacted if necessary.
- Waterproofing is done by covering the floor with clay dissolved in water and thoroughly mixed until it forms a dough. Another option: spread a layer of waterproofing roll material and glue the joints with mastic.
- Carefully pour a layer of insulation of the required size - the thicker the better. For most regions, adding 15–20 cm is sufficient.
- Pour 5 cm of sand and tamp it down.
- Pour a cement-sand screed (CSS) 5 - 10 cm.
If the height of the ceilings in the basement does not allow you to arrange such a “pie,” you can fill the floor with concrete using slag as a filler. Before pouring, arrange a sand cushion, which is spilled with water and compacted.
The sequence of work is simple:
- Remove debris, dirt and dust.
- Cracks and technological holes are sealed with cement mortar.
- The plate is treated with an antiseptic to prevent the occurrence of mold and mildew.
- Cover the surface with a layer of vapor barrier film (membrane), which will prevent the penetration of vapors from the basement, but will allow moisture to evaporate into the underground room. Homes with dry basements do not need a vapor barrier.
- A DSP is made on top of the heat insulator layer.
- After drying, finishing is carried out with finishing materials (laminate, chipboard, linoleum).
Ceiling insulation
Technologically, the work on insulating the floor and ceiling is no different.
Before insulating the ceiling with slag, you need to carry out calculations so as not to put unnecessary load on the structures. To do this, you need to find out the load-bearing capacity of the floor slabs and compare it with the mass of the backfill.
Slag as a ceiling insulation has the same pros and cons as when used in other building structures.
The height of a non-residential attic allows you to pour a layer of any required thickness (taking into account the characteristics of the slabs). The insulation will retain its properties throughout the entire life of the house.
In order for slag for ceiling insulation to retain its properties, it should not be exposed to precipitation. The dormer window should not be closed tightly - this will help the moisture to evaporate in a timely manner.
- Floor slabs are covered with a layer of waterproofing.
- Add the required amount of backfill.
- A concrete screed with a thickness of 10–15 cm is installed, maintaining a slope to drain water during precipitation.
- Waterproofing is carried out using rolled materials.
To ensure that the coating lasts a long time, follow the instructions of the building material manufacturers.
Insulation of hollow walls
Insulating walls with slag does not require special preparations. As the wall is built, any slag is poured between the outer and inner layers of brick. It is better to choose a porous material of the middle fraction. Such characteristics will make the house warmer; there will be no voids between the pieces of backfill.
Characteristics and properties of slag as insulation
Slags are silicates that were obtained as by-products from the smelting of raw materials, metals, intermediate products, purification and ore reduction. They contain basic, acidic or neutral oxides of silicon, aluminum, zinc, calcium, magnesium or iron.
The main characteristics of the slag are as follows:
- density from 300 to 1000 kg/m 3, depending on the components present in the composition;
- specific gravity from 2.56 to 3.65 g/m3;
- granule sizes from 0.7 to 20 mm;
- melting temperature up to +1500 0 C;
- compressive strength up to 150 MPa;
- thermal conductivity coefficient from 0.0326 to 0.05 W/m·K.
Ceiling insulation with slag is beneficial due to its excellent performance properties:
- resistance to sudden temperature changes;
- natural composition, no toxic substances are released during operation;
- chemical and biological resistance;
- absence of shrinkage, as well as deformation and destruction under the influence of external loads;
- increased moisture resistance.
Styrofoam fastening
Installation of expanded polystyrene sheets begins with gluing the first row of material, focusing on the starting profile. The prepared adhesive composition is applied with a trowel to the middle of the sheet, then to its edges so that the glue does not get on the ends of the part when gluing the insulation.
The quality of installation of subsequent rows depends on the correct installation of the first belt.
It is important to carefully monitor the vertical and horizontal position of the sheets. Insulating blocks are mounted so that the seams of the top row are offset relative to the bottom rows by at least 15 cm
To avoid the appearance of cold bridges, the ends of the foam plates should fit together as tightly as possible. When making window openings, the insulation seams should not coincide with the edge of the slope. Installation of thermal insulation boards at the corners of the building is carried out using the gearing method, in which part of the sheet protrudes beyond the cinder block wall.
After the adhesive composition has partially hardened, which takes 12 hours, the seams between the sheets of expanded polystyrene are sealed with polyurethane glue. After it hardens, the surface of the insulation is cleaned to eliminate irregularities in the area of the seams. After 72 hours, you can additionally secure the foam sheets with dowels.
The process of insulating cinder blocks is completed by reinforcement with fiberglass mesh. After the reinforcing mortar has dried, a primer is applied to its surface, and then façade plaster.
Insulation of ceilings in a house with mineral wool
Mineral wool is a fibrous heat insulator produced in the form of rolls or slabs. The composition of the material is determined by GOST R 52953-2008, and there are three types of mineral wool - stone, slag and glass (better known as glass wool). Let's take a closer look at them.
Prices for mineral wool
mineral wool
Stone wool is made from various rocks, such as diabase or gabbro, and also contains clay, limestone, dolomite and a binder containing formaldehyde resins. The average thermal conductivity coefficient of stone wool is 0.08-0.12 W/(mK). In our case, the lower its value, the more suitable the material is for the role of insulation.
Unlike stone, slag wool is made from blast furnace slag and other metallurgical waste. The thermal conductivity coefficient averages 0.47 W/(mK), which, combined with its high hygroscopicity (the ability to absorb moisture), makes slag wool an unsuitable material for insulating ceilings. In addition, it has residual acidity, so it should be kept away from metal pipes, beams and other products.
Slag
Glass wool ranks first in terms of thermal insulation quality among mineral wools - 0.03 W/(mK). It is also distinguished by a very low price. The disadvantages include the fact that particles of this material can cause harm to humans if they get on the skin, eyes or lungs. But this is, to one degree or another, characteristic of all types of mineral wool, therefore, when working with them, it is necessary to wear gloves, safety glasses, a respirator mask and closed work clothes.
The main advantage of all types of mineral wool is that this material is very convenient for transportation, carrying and installation, as it is light in weight. In addition, it is non-flammable and at very high temperatures can only sinter (while losing its thermal insulation properties)
And it is especially important for country houses that mineral wool is not an attractive place for rodents, insects, fungi or mold
The most famous manufacturers of this material are Ursa and Paroc
If quality is important to you, then when going to a hardware store, look for mineral wool from these companies
When choosing, also pay attention to the density of the material - the ceiling may not withstand samples of mineral wool that are too dense and heavy
The insulation process should begin by determining the area of the ceiling, because first you need to calculate how much mineral wool, vapor and waterproofing films you will need. Next, the technology of external ceiling insulation will be considered. If you require internal insulation, follow the same instructions, but swap the layers of hydro- and vapor barrier.
Mineral wool
Modern materials are more effective in terms of thermal insulation, and therefore ceiling insulation with ursa or mineral wool is now the most popular. Such insulation materials are available in rolls and in the form of slabs of various thicknesses. These materials have many advantages: lightweight, extremely plastic, durable, wear-resistant. Insulating the ceiling in this way does not require much effort; you can handle it alone. The most important thing is to follow the technology, then the ursa will not lose its properties, and the house will always be warm.
All types of mineral wool retain heat well and do not allow noise to pass through, they are not flammable, do not emit harmful substances, and rodents do not like them. To ensure maximum insulation, the material is laid in two layers, overlapping the beams and tightly hammering the corners.
Of course, this insulation also has disadvantages. For example, mineral wool must be carefully covered with waterproofing, otherwise it will pick up moisture and lose its properties. It should also not be compacted so that there is as much air as possible in the fibers of the material.