Principles of insulation
There are two broad classes of roof construction: flat and pitched (or attic). And if we talk about functions, then there are also two of them: protection from atmospheric phenomena and thermal insulation.
In a flat roof, both functions are combined in one “pie”, which has the following arrangement of layers: ceiling, thermal insulation, roofing.
Insulation of a pitched roof can have three fundamentally different options:
- cold attic with insulated ceiling;
- used or residential attic with insulated roof:
- combined roof with a warm contour of a dedicated attic.
But regardless of the design and location of the thermal insulation, all schemes have a common fundamental rule on how to properly insulate the roof of a house - on the side of the warm room, the insulation must be covered with a continuous and unbroken layer of vapor barrier materials. And the design itself must ensure the weathering of moisture from the insulation.
There are two main reasons for protecting insulation from getting wet - loss of thermal insulation properties and increase in the weight of the roofing cake. And if the loss of thermal insulation properties, apart from discomfort, does not threaten anything serious, then an excessive increase in the load on the supporting structure of the roof can lead to its collapse. In addition, vapor barrier in a pitched roof protects wooden structural elements from rotting and loss of load-bearing properties.
The vapor barrier must be continuous for the entire protected surface Source instroi.com.ua
Roof insulation from above
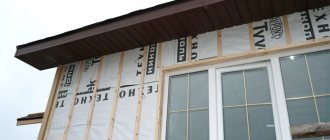
Thermal insulation of the roof above the rafters will qualitatively protect most of its structural elements from precipitation and temperature changes. In this case, the insulation is laid on solid wooden sheathing. This method is also interesting because it provides the opportunity to use open rafters when decorating the interior of the attic.
But a problem immediately arises - where and how to attach the waterproofing material? The modern market offers thermal insulation panels with already provided waterproofing. In this case, you need one level of air circulation located between the thermal insulation material and the roof. The air cavity is created by means of a counter-lattice, in which the slats are laid parallel to the rafters. A necessary condition for the high-quality functioning of such thermal insulation is the installation of a good vapor-proof layer on the inside of the roof.
The advantages of this roof insulation scheme are the minimal risk of cold bridges, constant temperature and humidity of all structural elements, which eliminates the possibility of thermal deformation of materials; the most effective sound insulation compared to other constructive methods; maximum use of the entire internal space of the attic floor.
Disadvantages - the difficulty of performing insulation work on a roof with a complex shape, high requirements for under-roofing films, and the impossibility of carrying out installation work in bad weather conditions.
Insulation of a flat roof
The technology for insulating a flat roof depends on the floor materials and operating conditions.
Insulation of a flat wooden roof
Typically, flat wooden roofs are considered a “sign” of a frame house. This is precisely the scope of application that is indicated even in the “proprietary” description of roofing systems of companies producing thermal and waterproofing materials TechnoNikol. But even in brick houses, a wooden flat roof is not uncommon, since with a relatively light weight of the structure, it is possible to ensure sufficient rigidity and strength of the roof of a low-rise building.
One of the possible insulation schemes for a flat wooden roof Source newspasky.ru
The insulation scheme looks like this:
- Base . Moisture-resistant OSB board (class 3 or 4).
- Vapor barrier film . Spread the strips overlapping by 15-20 cm on the long side and on the short side (when increasing in length). Along the perimeter, the vapor barrier should rise to the parapet and adjacent surfaces by the same 15-20 cm. Polymer-bitumen vapor barrier films are attached to the base using glue or telescopic fasteners (together with thermal insulation). Polypropylene or polyethylene film can be spread without attaching to the base, fixing it around the perimeter to the walls of adjacent surfaces using self-adhesive vapor-tight tape.
- Insulation for the roof of a house . Three types of materials can be used for thermal insulation of a flat roof: stone wool mats, extruded polystyrene foam, and rigid polyisocyanurate foam boards.
- Roof covering.
Perhaps the most common example of a flat insulated roof over a wooden floor is a terrace with access from the second floor. But in this case, the design of the roofing pie is closer in structure to the insulated ceiling of a cold attic.
Insulation of the terrace floor on the second floor is carried out between the beams Source plotnikov-pub.ru
See also: Catalog of companies that specialize in roof repair and design.
As a roof covering for flat roofs, roll waterproofing materials are used, which make it possible to create a continuous and unbroken top layer. But, as with the insulation of a pitched roof, the waterproofing layer must be “breathable”. There are two main options for installing a breathable flat roof:
- the use of polymer membranes with high mechanical strength and resistance to direct exposure to ultraviolet radiation;
- two-layer bitumen coating - fused roll insulation on top, a substrate with ventilated channels on the bottom (for example, Uniflex Vent).
Two-layer bitumen roofing on an insulated flat roof Source ziko55.ru
The advantage of a wooden flat roof is that a slight slope is created due to the position of the floor beams.
And it is needed even on a flat roof to drain precipitation into the drain.
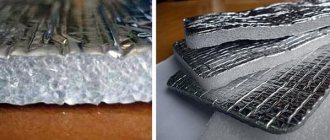
Glass wool: no needles!
The most interesting thing is that for the average person who decides to insulate the roof of their house, the most significant disadvantage of insulation is the possibility or impossibility of installing it with bare hands. That is, if the material pricks and causes irritation, it is a “bad” insulation, but if it is pleasant to the touch and looks dense and solid, it means it is “worth it.”
In fact, such a parameter as the effect on uncovered skin does not say anything about the quality of the material itself, and it is always advisable to carry out such construction work in protective clothing. This is exactly how professional construction teams work, and they are always equipped with epic equipment, but you can understand an ordinary person - a shirt, for example, is never completely washed off from small glass needles.
Then, it would seem, it’s worth putting on gloves and providing yourself with personal protective equipment - then what difference does it make what kind of glass wool to lay on the pitched roof? But the result of such insulation is known to those who have at least once spent the night in a freshly renovated attic with such insulation: despite the clapboard finishing, clothes after such a night are all “prickly” for some reason. In fact, these are tiny needles that fall into the air. And, if you insulated even just the roof with low-quality glass wool, there is no guarantee that its harmful particles will not enter the home through the ventilation system. But you can insulate the attic floor or flat roof with this material.
But there is a way out: buy high-quality glass wool from a good manufacturer. You will be surprised that glass wool and glass wool are different. The thing is that the production of such insulation involves a considerable number of stages, and each of them must meet serious requirements. Why, at the enterprises of large manufacturers who are concerned about their own reputation, fiberglass production occurs under close quality control. But in all other cases, it is not difficult to imagine what the insulation will be like. In practice, this is well felt: when working with glass wool from a well-known brand, the construction team doesn’t even particularly protect their hands - they’re used to it, but at another site, when they handle a handicraft product, they itch for three days, up to serious dermatitis.
And the quality of the finished fiberglass products is determined by the thickness-length of the fiber and the binder, which acts as glue. Thus, in Izover materials, the fibers on average reach up to 5 cm, the thickness is up to 6 microns, and the binder content is only 4.5%. This is what the comfort of working with this material depends on!
And the main disadvantage of fiberglass is that once it absorbs random moisture, it never dries out again.
Have you decided? Then follow the instructions:
- Step 1. Lay the roofing - outside.
- Step 2. Install a ventilation grill or simply leave a ventilated layer.
- Step 3. We fix the under-roofing film - a modern wind and waterproof membrane with high vapor barrier properties.
- Step 4. Now we roll out glass wool between the rafter beams.
- Step 5. Cover the insulation with a vapor barrier film and carefully seal all joints.
- Step 6. And now - interior decoration: lining, OSB boards or drywall.
If you do everything correctly, there will be no negative consequences.
Insulation of a pitched roof with a cold attic
Insulation of a pitched roof with a cold attic occurs along the ceiling. And depending on the flooring material, the patterns differ slightly.
Insulation of concrete attic floors
The layout of the layers is partially reminiscent of the insulation of the floor of the first floor:
- A layer of vapor barrier is spread over the ceiling (overlapping strips, with gluing of joints and abutments to the enclosing surfaces).
- Install logs (lathing) for laying the heat-insulating layer.
- Lay thermal insulation. Typically, non-combustible materials are used as thermal insulation for the roof of a house - stone wool mats or loose expanded clay.
- Lay a layer of waterproofing with high vapor permeability. According to the standard, laying a strip 1 m wide from the line of intersection of the ceiling with the external walls is required. When insulating the attic floor of a private house, the procedure is simpler - lay a waterproofing membrane over the entire area.
- A spacer strip is attached along the joists (needed for a ventilated gap).
- Installing the attic floor.
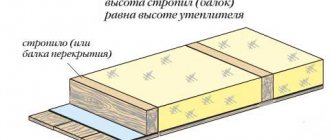
The height of the logs is chosen taking into account the thermal insulation layer Source domir.com.ua
Insulation of the wooden floor of a cold attic
The insulation scheme for a wooden floor differs fundamentally in the location of the vapor barrier. The vapor-proof film is not attached to the floor beams from above, but is hemmed from below.
Insulating the roof from inside the house
When laying thermal insulation material below the rafters, most often the under-roof waterproofing is installed from above, along the rafters, without making a solid wooden sheathing, because the ventilation gap in any case will be large - almost the entire thickness of the rafters. The disadvantage of this method of roof insulation is the reduction in the volume of the attic.
Selecting material for roof insulation
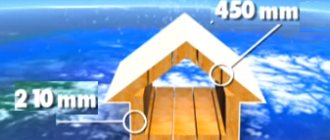
As insulation, you can use the same materials as when installing thermal insulation between the rafters: glass wool and mineral fiber mats, polystyrene foam and polyurethane foam boards. The thickness of the thermal insulation material should not be less than 100 mm, but at the same time it cannot exceed the thickness of the rafters.
Video description
How to properly make hydro- and vapor barrier insulation of a cold attic floor, see the following video:
If you do the opposite, then water vapor from warm air will penetrate into the pores of the wood, but will not be able to erode - there is a vapor-proof barrier on top. This will lead to wetness of the wooden elements of the supporting structure, and no treatment with antiseptics will save the wood from waterlogging and rotting.
The scheme for insulating the wooden floor of a cold attic looks like this:
- On the side of the room there is a vapor barrier, on top of which there is lathing for decorative finishing of the ceiling. Vapor barrier can be of several types: simple film, with an anti-condensation surface, with a reflective (reflective) surface. In addition to protecting the thermal insulation from getting wet, it protects the room from insulation particles getting inside.
- Thermal insulation between beams is stone wool mats or expanded clay.
- A layer of waterproofing superdiffusion membrane.
- Distance bar.
- Attic flooring.
Typical scheme for insulating a wooden floor in a cold attic Source forumhouse.ru
“Living” roofs, or insulation from nature
Today, it has become commonplace to see roofs with real green grass. Even entire educational institutions overseas are being built using this interesting technology, and in terms of thermal insulation, it justifies itself remarkably well. But this invention is not at all the work of modern ecologists: even the ancient Scandinavians insulated the roofs of their houses with moss and turf, which in this combination grew well and kept the house warm in early spring and late autumn, and already in winter the same snow played its role .
Insulation of pitched roofs
This type of insulation of the roof of a house is used for arranging attics or if engineering equipment is installed in the attic (for example, a hydraulic accumulator, expansion tank, fan coil or ventilation system recuperator).
The standard roof insulation technology has the following scheme:
- On the rafter legs, a waterproofing superdiffusion membrane is stuffed from bottom to top in overlapping strips. Vertical joints when extending the membrane in length must overlap and be on the rafters. Subsequently, the lower edge of the waterproofing is glued to the drip edge (to drain condensate into the gutter).
- On top of the waterproofing, a counter batten is nailed to the rafters, which provides a ventilation gap between the membrane and the roofing. To seal the fastening line, an elastic tape can be laid between the lath and the waterproofing.
- Mineral wool mats are laid between the rafters.
- A continuous layer of vapor barrier is attached to the inside of the rafter legs. If it has an anti-condensation or reflective surface, then it is turned towards the attic.
Manufacturers mark the inside of the vapor barrier Source de.decorexpro.com
- Place a spacer strip on top of the vapor barrier. It is necessary for the “correct” functioning of the anti-condensation or reflective layer. The second purpose of the slats is lathing for the interior lining of the attic.
A combined insulation scheme is used to highlight the “warm contour” of the attic. The principle of this scheme is to insulate the vertical fences inside the attic and only that part of the roof that is adjacent to the attic.
Do-it-yourself roof insulation
If you plan to work on your own, carefully study the recommendations outlined above and select the insulation material. If all this has already been done, then you can start.
How to prepare a roof for insulation
The first step in preparing the roof for insulation is to draw up a clear work plan. Check the structure from all sides for deformation, get rid of dampness, moisture and other defects. Wooden roof elements must be treated with an antiseptic, and metal ones with a special anti-corrosion substance.
The developed roof insulation plan should provide for heat retention in the room and good ventilation of the under-roof space
Make sure that the insulation and other materials for thermal insulation are always dry, since high humidity will lead to significant heat loss (up to 70%). Water and rust are unacceptable; vapor barrier and ventilation of the under-roof space will help get rid of them.
Check the functionality of the heating elements, water supply, and electrical wires.
The second stage is preparing the necessary tools and materials. To work you will need:
- hacksaw;
- building level;
- goniometer;
- screwdriver;
- drill;
- plane;
- Bulgarian;
- small hammer.
Roof insulation from the inside
Work on internal roof insulation is carried out in the following way:
- Vapor barrier - its installation is carried out on top or under the sheathing. In this case it doesn't matter. The material is laid in layers, with an overlap of about 10 cm. The vapor barrier is secured using a stapler, and the joints are taped with adhesive tape. When sealing the roof, pay attention to various difficult areas, for example, film joints between walls, pipes and other elements.
The vapor barrier film is laid overlapping and attached to the rafters using a stapler - Insulation - the insulation that was initially selected is placed in the cells of the frame. Traditionally, the frame is assembled in such a way that a standard size insulation sheet is several centimeters larger than the pitch between its elements. The thermal insulation material fits very tightly into this design. The insulation is installed in two layers, with the top layer being laid offset to the bottom. It is unacceptable for the joints of insulation elements in different rows to coincide. Then, bars are screwed perpendicular to the rafter system, which will support the insulation. Instead of bars, you can hammer nails around the perimeter of the rafter legs and stretch the wire between them.
The insulation must be laid in the space between the rafters in two rows - Waterproofing - must completely cover the rafters, sheathing, as well as the insulation itself. The film is fixed using staples from a stapler. Next, the waterproofing is installed under the roof overhang, making water drainage more efficient.
The waterproofing film must completely cover the insulation and the entire rafter system
Internal insulation is done no earlier than six months after the completion of the roof, which should shrink completely during this time. Otherwise, the structure will “lead” and the insulation will shift.
Video: do-it-yourself roof insulation from the inside
Roof insulation from the outside
Thermal insulation of the roof from the outside is done as follows:
- Laying the base over the frame. To do this, you can use edged boards, which should be secured end-to-end or at a slight distance from each other.
- Installation of vapor barrier material, which is a special film that allows water vapor to pass through only in one direction. This way, condensation will not accumulate inside the roof.
It is important to lay the vapor barrier film with the correct side facing the inside of the room. - Installation of insulation. Thermal insulation is laid in a continuous layer, starting from the overhang and ending with the ridge. At the same time, do it so that you get a minimum of joints.
- Laying waterproofing. The sealed film protects the insulation from moisture seeping through the roof covering. Purchase material that is vapor-tight in one direction only.
Waterproofing is laid in layers, starting from the roof overhang - Drainage sand-cement or expanded clay layer. It is done only on flat roofs. The drainage layer ventilates the space under the roof and removes all water. It is impossible to do this on gable roofs. Therefore, a ventilation gap of 200 mm thick is left here. Vents are made in the overhang of the roof and under its ridge.
Features of insulation with different materials
Mineral wool. For installation you will need:
- Installation of a frame made of profiles or wood.
- Vapor barrier film to protect cotton wool from moisture.
The vapor barrier material should overlap by 10 cm at the joints. Double-layer thermal insulation should be laid so that the joint lines do not coincide. The main feature of the installation is the complete isolation of mineral wool from moisture. Then the service life and insulation efficiency will be noticeable.
Extruded polystyrene foam is widely used in various construction works. Roof insulation has also become popular. The installation method depends on the type of roof. The slabs are laid on top of the waterproofing film between the rafters. For fastening, special glue, screws and dowels are used. The sheets must fit tightly to each other and to the rafters.
For convenient arrangement of the material, you can make a frame sheathing according to the size of the foam sheets. All cracks after installation must be carefully filled with foam. For greater efficiency, the working surface can be supplemented with foam insulation. The excellent characteristics of the material will provide reliable thermal protection when paired with polystyrene foam. Finishing can be done with plasterboard or plywood.
Preparing surfaces for insulation
Before carrying out thermal insulation measures, you need to clearly know what kind of structure you will have to work with . Based on its technical characteristics, a work plan is determined. The following factors are taken into account:
- geometry features (angle of inclination, width, length, etc.), shape and number of slopes;
- type of roof covering;
- type of rafter system;
- main building material of the building;
- availability of laid communications;
- the roof extends beyond the main structure.
Preparing roof surfaces
It is worth correctly calculating the necessary materials and the approximate time for their installation. When the process is visually presented, everything is weighed and scheduled, then you can cope with absolutely any task. Whether it’s the roof of a rural house or a huge country villa, the algorithm of actions is similar. To properly insulate a roof, you need to properly prepare it:
- carry out a thorough inspection of the rafters and sheathing - if damaged elements are found, they must be replaced;
- treat wooden parts with varnish or antifungal solution;
- check the integrity of communications laid in the under-roof space.
Communications under the insulation
Once the preliminary stage has been completed, you need to make sure that you have all the materials and tools necessary for insulation. If everything is in order, you can start working.
Advantages of insulation
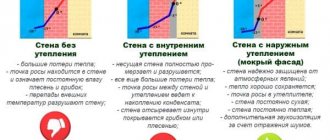
- The insulation layer on the roof will become a reliable barrier to heat loss. The warm air flowing upward will circulate inside the room, effectively heating all rooms. This will allow you to regulate heating devices, reducing energy consumption. As a result, there will be significant savings in energy use.
- The inside of the room will become dry, which will prevent microbiological processes. Mushrooms and mold that are hazardous to health will not have a chance to appear.
- In winter, snow will melt off the roof evenly without forming icicles.
- If the attic space allows, you can arrange an attic room. When properly installed, a warm roof will guarantee a comfortable microclimate.
- In an insulated roof structure, the temperature regime is balanced. This creates favorable conditions for the operation of wooden elements and extends their service life.