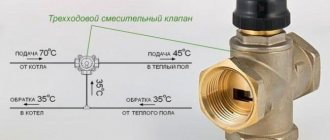
Why is it necessary to pressurize a heated floor?
You can ask a logical question - “Why do you need pressure testing of a heated floor?” After all, manufacturers always provide a guarantee for high-quality heat-resistant pipes. However, despite this, pipes may have individual defects that you cannot see with the naked eye. For example, there are sinks on the walls that, when pressure is applied, form leaks.
In other words, crimping of underfloor heating pipes is necessary both to check the quality of the connections on the fittings and to check the quality of the pipes used .
Pressure testing of a heated floor system can be carried out even if you have not yet connected the boiler or have only completed one room. It is still possible and even necessary to check integrity. And there are 2 ways to carry out the work.
What is crimping?
If the installation itself does not raise any questions, then not all home craftsmen know what crimping is, especially if they have never had the opportunity to install this heating system. However, this procedure is extremely important and must be approached no less responsibly than installation.
The point of crimping is to check the functionality of the system before performing the screed. To do this, the pipes are filled with liquid or air, after which the heated floor is kept under operating pressure for some time. If no leak is detected in the system, then screed is performed, otherwise the problems should be removed before the floor is poured.
We will describe this operation in more detail below.
How to pressurize a heated floor with water
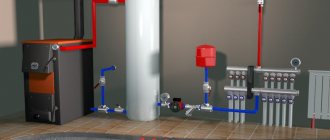
Before starting work in this way, the circuit must be rolled out over the area of the room and already connected to the distribution manifold. By the way, shut-off valves should also already be installed on the manifold.
There are also special valves on the manifold to fill or drain the system. You can fill the circuit just through them by connecting the hose. When filling with water, it is necessary to create a pressure of 2.5-2.8 atm, but if any problems arise, then 2 atm may be sufficient.
Filling of the heated floor should be carried out in the direction of movement of the coolant fluid, in other words, from the supply. First of all, you need to turn all the return valves (they are blue) to the closed position. After this, open the valve to the inlet of the supply manifold. Once the system begins to fill with water, you will hear hissing sounds. Don't worry, because... this will release air through the Mayevsky tap. If you have an automatic air exhaust device installed, then at this moment it will work.
Next, you need to open any of the valves on the return manifold and release air through the tap to drain the liquid from the return manifold. Once the air is released, you close this tap and move on to the next one. Repeat the operation with all circuits until you release air from all of them.
Then you need to close the tap to the supply manifold and open it to the return.
Once the system has been completely filled and air removed, you should leave it pressurized. Naturally, you should check all circuits for leaks. Of course, if anything is discovered, then proceed to elimination.
How to pressurize a heated floor with air
When it is not possible to pressurize a water-heated floor with water, the test can be carried out using air .
First of all, you need to check the closed position of all taps, including Mayevsky taps, etc. If there is an automatic drainage device, then during the test you need to unscrew it and replace it with a plug.
Pressure can be created by a compressor, car pump, etc. In the absence of such, it is quite possible to use a household sprayer to create pressure, but it is advisable to have a pressure gauge connected. To connect the hose, you need to find a fitting, and you should definitely place a tap before the fitting, because... when you stop pumping the air will go back.
When air pressure testing occurs, it is necessary to create a pressure that will exceed the working pressure by 2 times, that is, when it is assumed that the system will operate under a pressure of 1.5-2 atm, then it should be checked (pressure tested) at a pressure of 4-5 atm .
We draw your attention to the fact that the specified pressure must be created only in the heated floor circuit, and not in the interval from the collector to the boiler. The thing is that most heating devices maintain a pressure of up to 3 atm, and if you create more, you can damage it. You should pressurize this area separately, creating the permitted pressure.
There are special devices for air crimping - crimping machines, but buying such a device for one or two checks will be impractical, since they cost a lot.
After you have filled the system with air to the required pressure, you need to close the tap and leave everything for 1 day. At the same time, you need to monitor how the pressure drops. By and large, it should not fall. However, from practice it is worth saying that a slight drop will still be present, because when you pump in air, it will heat up and then cool down.
Let us also draw your attention to the fact that the created pressure should be left until the screed is poured. After filling the system, you need to treat all existing connections with soapy water. This way, if there are leaks, you will be able to see them.
Test run of a water floor or pressure testing
After the system is assembled, before pouring the screed, the water floor must be checked for functionality. This way it will be possible to eliminate any shortcomings that might have been made during installation. To do this, first the water floor pipes must be washed, drained well, and then filled with the coolant that will be used.
There is no need to drain the system before screeding: the solution is laid when the pipes are filled so that they take on “working” dimensions.
There are three methods for checking the functionality of the system and identifying installation defects:
- bring to operating temperatures and leave in operation for several days;
- test with cold coolant at high pressure;
- Pressurize heated floors with air.
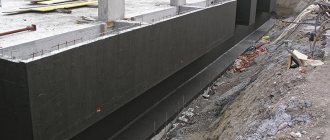
Before pouring screed or laying rigid base slabs, the underfloor heating system is pressure tested - pressurized
The choice is yours, but running the system at high pressure without a tie may result in the pipes being torn out of their sockets. This is if you used mounting tapes or single fasteners. To prevent this from happening, you can install beacons for the screed before the test run, and secure them with small sections of mortar at a certain step. Pressure testing must be carried out after the solution holding the guides has set. You will get a kind of frame that will hold the pipes, so they will not break out of their sockets. Will the guides interfere with troubleshooting? No. If the pipes were not bent during installation and the coil was rolled out, then your pipes are intact and there will be no problems in this part. If leaks can occur, they will occur at the junction of the pipes and the manifold, in the boiler piping.
You need to make a frame if you used self-focusing fastening systems. If you tied the pipes to the mesh, there are no problems.
Now let's talk about how to test the system using each method.
The first method is running at operating temperatures . The system must be brought to operating temperature gradually, starting from 20°C. After a few hours, raising it to 5°C. All this time you need to monitor the joints, connections, contours. If leaks are detected, stop the system, drain, repair, refill and test. After reaching the design coolant temperature, leave the system for 2-3 days. If no damage is detected, you can fill the screed (after pre-cooling the coolant).
A manual device for pressure testing water supply systems, with which coolant is pumped into a heated floor system
Second method: with excess pressure . Here everything is somewhat simpler: having filled the system with a “working” coolant, create a pressure 1.5-2 times higher than the working one and leave it for a day. If in a system made of PERT or PEX the pressure drop during this time does not exceed 1.5 Bar, there is no leak - you can fill the floor. If there are any shortcomings, everything is exactly the same as when reaching the temperature: stop the system, drain it, fix the breakdowns, fill it, test it.
The third method of dry pressure testing is used if it is impossible to fill in coolant for some reason or for special cases. Then, using a compressor, air is pumped into the system . But in this case you will have to create a pressure that is 2-3 times higher than the working one. This method is not entirely reliable, especially if you use a heated floor with antifreeze. “Anti-freeze” products are characterized by increased fluidity. Therefore, it is advisable to check the system before filling the screed with the working fluid. Moreover, the screed needs to be poured on filled pipes, and air is poorly suited for this.
When testing with pressure above 4 Bar, the air vent valves must be closed, because after a while water or coolant will begin to come out of them.
More about which testing method is used with which pipes. For metal-plastic pipes, testing with cold water at high pressure (6 bar) is recommended. If the pressure in the system has not dropped within a day, then the system is reliable and you can pour the solution or lay base sheets when using flooring systems.
The automatic crimping machine does everything yourself, you just need to control it
Crimping of a system made of cross-linked polyethylene takes place differently. First, the system is checked three times in cold water at high pressure. The test pressure is twice as high as the working pressure, but the lowest is 6 bar. Bring the pressure in the system to 6 Bar, after which it begins to drop. Leave the system for half an hour, then raise the pressure to 6 Bar again, and after half an hour again (3 times in total). After this, raise the pressure to the pressure test (twice as high as the working pressure) and leave it for a day. If during this time the pressure drop is insignificant (less than 1.5 Bar) and there are no signs of leaks, the test was successful.
But that is not all. According to German standards (this country has the most stringent safety requirements for construction technologies and materials), after pressure testing in cold water, the system must also be run at operating temperatures. Smoothly bring the system to operating temperature and leave for several days. After successfully passing all tests, we can confidently say that the system is reliable.
Which method should you choose?
After studying both methods, you may be puzzled - “Which crimping method is better?” By and large, air would be better. You may immediately ask, “Why?” Let's explain. When you pressurize a heated floor with water and leave it under pressure, but you can’t put everything into operation in time, then when cold weather sets in, you have a chance to defrost the entire system. And here it will not matter at all whether it is a warm floor or heating radiators. When using an air system, you will not have such a problem - pressurize it and calm down. This feature especially applies to underfloor heating systems, since if necessary, you can quickly drain liquid from the radiators, but this will not work with underfloor heating circuits.
Selection of options
When deciding which method is best to perform crimping in specific conditions, it is necessary to take into account several factors.
When using metal-plastic pipes for water circuits, it is advisable to test with cold water, creating a pressure with a reading of 6 bar. The system is maintained in this state for 24 hours. If the pressure remains unchanged, the pipes can be filled with concrete. It is important to consider that the pressure gauge readings do not change during the installation of the screed, that is, the circuit remains under pressure.
Test table for underfloor heating system pipes
If pipes made from modern cross-linked polyethylene are used, the instructions stipulate that the pressure created in the system must be twice the operating indicators, and it cannot be less than 6 bar. After 30 minutes, when the pressure subsides, it should be restored to its previous values.
A similar procedure is repeated twice. The pressure is then brought back to its original value and the water floor system is left for 24 hours. It is considered operational and has passed the test if after 24 hours the pressure drops by no more than 1.5 bar.
Sometimes it is recommended, after test control with cold water under pressure, to additionally check the system at the maximum temperature of the coolant, inspecting all connections again and making sure the integrity of the pipes. The temperature rises smoothly to the desired value. The circuits should remain in this mode for several days. If the need arises, the connections are tightened. A working system can only be refilled after it has cooled, without reducing the pressure.
Table for determining water pressure in a heated floor system
If you choose between the method of performing pressure testing with water or air, many experts prefer the second option. It is believed that if pressure testing is carried out in the warm season, there is a risk that before the onset of cold weather, the system, already filled with screed, will not yet be ready for operation. Because there is water in the circuits, it can freeze and cause irreparable damage. Air can be present in the system at any time of the year without fear.
Operations after crimping
After filling the circuits with air or water, you should carefully check everything for leaks. When pressure testing with water, you will be able to see the leak points yourself. Well, if air is used for pressure testing, then you will need a careful examination with a soap solution. At the same time, you need to check not only the joints, but also the pipes along the entire length, since mechanical damage may occur during operation or defects may occur.
Upon completion of filling and checking, you should leave everything for 1 day to allow leaks to develop. During the checking process, you should take into account that the pressure will drop slightly for natural reasons - due to temperature changes. However, such a drop can be no more than 0.5 atm.