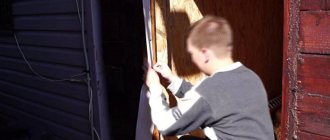
Polystyrene foam, penoplex, expanded polystyrene - are they the same thing?
The name “foam plastic” combines foamed materials based on polymers. The raw materials can be polyurethane, polyvinyl chloride, phenol-formaldehyde and urea-formaldehyde plastics, as well as polystyrene. In everyday life, the polystyrene version (expanded polystyrene) is more common. This lightweight snow-white material is used for the manufacture of protective packaging, thermal insulation panels, disposable tableware, and elements of life jackets.
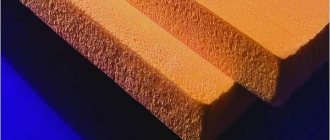
Another type of porous polymer is also made from polystyrene - extruded polystyrene foam. One of its trade names is penoplex. It has the same chemical composition as expanded polystyrene, but differs in production technology. To obtain it, the extrusion method is used - squeezing out a polystyrene mass foamed with a special agent.
Penoplex has the appearance of frozen foam of a yellowish tint. Penoplex blocks are used in construction to insulate walls, roofs and communications; model details and letters are cut out of them.
Properties of foam plastic
Foamed polystyrene is a lightweight white polymer consisting of tightly compressed balls containing air. Polystyrene foam is very popular due to the following advantages:
- affordable price;
- ease of processing;
- non-toxic;
- inability to burn independently;
- waterproof;
- high thermal insulation potential;
- frost resistance;
- good sound insulation;
- resistance to fungus and other microbiological factors.
Styrofoam
How can you not glue foam plastic, what destroys it?
Not just any glue is suitable for gluing this type of polymer. Some of the commercially available and quite popular adhesive compositions contain components that react chemically with the foam. When they come into contact with the polymer, it partially dissolves, leading to deformation. What can not be used to glue this type of plastic?
List of substances unsuitable for working with foam:
- compositions containing acetone (usually they are used for preliminary degreasing of the seam area before gluing);
- petroleum derivatives (gasoline, kerosene, xylene and their analogues, as well as types of glue containing them);
- alcohols (may be present in glue, primer or degreasing fluid).
How can I glue foam?
There are several proven adhesive compositions suitable for gluing foam parts to each other or to other materials. The choice of adhesive depends on the type of foam, as well as the desired strength of the seam after gluing.
List of adhesives for foam plastic:
- one-component polyurethane adhesive (“Titanium”, “Dragon”);
- dry adhesive mixtures (“Ceresit-CT83”);
- polyurethane foam;
- liquid foam (“Penosil”);
- polyvinyl acetate glue (PVA);
- hot melt glue (a heating gun is required to work with it);
- solvent-free liquid nails for latex-based polymer materials (LN-604 or Macroflex MF 190);
- two-component epoxy compositions (“Ceresit”);
- acrylic compositions (“Ultima”);
- bitumen mixtures (“Bitumast”).
How to glue foam parts together?
In practice, several means are used to glue foam or penoplex parts together. They differ in seam strength, polymerization period, and cost.
PVA glue is suitable in cases where a high-strength seam is not required, for example, when making foam plastic models or for children's creativity. It is very important to wait until it dries completely, which occurs within 24 hours.
Titan glue is several times stronger, so it can be used in construction and installation work for fixing penoplex blocks to the wall or to each other.
How to glue the material to paper or wood?
Sometimes you need to glue foam letters to paper or a wooden stand. A composition based on polyvinyl acetate is best suited for this. It is ideally compatible with wood, paper and foam. PVA glue dries slowly, so letters or other glued parts should not be touched during the day. Also, foam glues well to wood using wood glue. One of its options, casein glue, can be prepared independently from low-fat cottage cheese, guided by the material “How to make casein glue from cottage cheese with your own hands at home?”
- sand the wood and foam in the area of future gluing for better adhesion;
- Clean the surfaces well from dust using a brush;
- apply glue around the perimeter of the part and in its center;
- combine the fragments and leave until completely dry;
- remove excess dried glue using a utility knife.
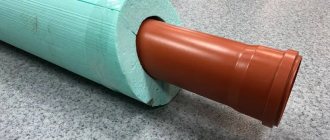
Bonding to metal
You can use expanded polystyrene to insulate a door or walls in a garage made of metal, as well as the inner surface of a roof made of corrugated sheets. Which fixation method is suitable for these purposes? Strong adhesion can be achieved using Dragon glue. This universal polymer glue costs about 70 rubles. for 500 ml. It is frost-resistant and does not contain flammable components. Before applying it, you should dry the surface thoroughly and make sure there is no condensation on it.
Foam blocks are smeared with glue and pressed against the metal for several minutes. This time is enough for the foam to stick to the metal, but complete stabilization of the adhesive composition occurs after about a day.
The gluing process will proceed faster if you use liquid nails. They set quickly, but the seam is less strong than when gluing with “Dragon”. This problem can be solved by using both adhesives at the same time. “Dragon” and liquid nails are applied pointwise to the insulation in different places. Due to the quick drying of liquid nails, the foam will quickly attach to the metal sheet, and it will not need to be fixed until the more durable “Dragon” has completely polymerized.
How to glue the fabric?
You can glue the fabric to the polystyrene foam or cover it with turns of twine or woolen thread using several compounds. PVA and hot melt adhesive are well suited for these purposes. Both materials, after drying, form a transparent and invisible seam. If immediate fixation is required, it is better to use hot glue. PVA takes longer to dry, about a day, but it allows you to achieve a stronger connection than hot glue.
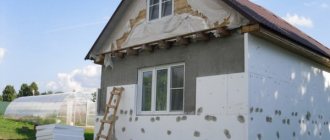
Insulating walls from the inside using putty
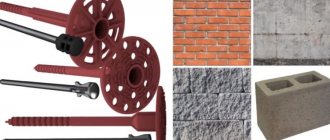
Using “fungi” the insulation is attached to the wall
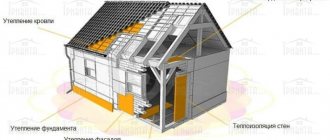
This type of insulation, together with other work, will be more difficult than insulation under drywall, but nevertheless it can be done. In general, insulating walls with foam plastic with your own hands, without the help of professionals, is quite affordable if it is carried out according to the given instructions. When insulating with foam plastic under putty, two options are possible. We will look at them without video.
Option one
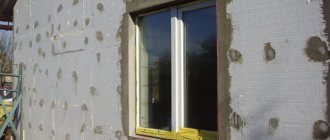
The wall needs to be plastered according to the beacons. This means that it will be absolutely flat. We attach foam sheets to the dried and primed plaster. To do this, either tile adhesive or mounting adhesive for drywall is applied to the sheet at five points (in the corners and in the center), and the sheet is carefully glued to the wall.
Mounting foam to the wall
After this, the material is fixed with screws for fastening. We use 5 fungi for one sheet of foam plastic, with the same arrangement as the glue - in the corners and in the center. With this insulation option, the rules and requirements for installation are almost the same as for tiles. Sheets should be placed on the wall, keeping them as flat as possible. We cover the joints with putty. If it's not clear what we're talking about, watch the video showing how to install tiles on a wall.
After the putty has dried, apply a layer of primer and also let it dry. Now we need to putty the wall. This is where all the mistakes that we made when aligning the foam sheets on a plane will be reflected. It was not for nothing that we said that the requirements for installing insulation in this case are almost the same as for tiles. This determines how smooth the wall on which the insulation is attached will be.
Putty is done as usual. First, the starting putty, then, after the starting putty has dried, the finishing putty and, finally, painting the wall.
Option two
This time there is no need to plaster the wall. You need to apply a layer of primer on it. The installation procedure is similar to the first option. Apply mounting tile or plasterboard adhesive to a sheet of foam plastic in five places and apply the sheet to the primed wall. We fix this sheet at five points (along the edges and in the center) with fastening mushrooms. We cover the joints with putty. What is the difference with the first method? The fact is that now we do not need to maintain a strict plane.
We prime the insulation laid on the wall and install lighthouse perforated profiles on it. To install the lighthouse perforated profile, we apply a putty path to the wall along a vertical line. The path can be made either continuous or with frequent dots. We glue the lighthouse profile onto it. We set it by level.
The final touches of insulation
In order to level the profile, you need to press the beacon with the same level. Therefore, the level should be used as long as possible so that the beacon profile does not bend when pressed. If there is no level of the required length, use a rule with a short level attached to it. The distance between the beacons should be slightly less than the length of your rule so that you can pull the putty.
Further work on putty is carried out as usual.
Useful tips
Several recommendations for choosing material and gluing technology:
- before purchasing, check the composition of the glue and make sure there are no components that destroy polystyrene;
- buy glue with a small reserve in case of possible overuse;
- pre-test the adhesive composition on an unnecessary piece of foam;
- for better adhesion, sand the surface of the polystyrene foam with sandpaper, walk over it with a needle roller or make notches;
- on large parts, glue should be applied around the perimeter and pointwise, in several places - along the inner surface;
- When gluing with polyurethane foam, leave the fragments under pressure until completely dry.
I hope the material presented is enough to glue foam in any situation. The next video is about how to use hot melt adhesive to join polystyrene foam.
Main characteristics of polystyrene foam
Before gluing to a wooden, concrete or brick surface, as well as when deciding how to glue the foam together, you need to learn about the properties and characteristics of this material. Polystyrene foam, or, as it is otherwise called, expanded polystyrene, is formed as a result of foaming polymers. 98% of the material is gas, located in tiny cells with very thin walls.
Typically, foam boards are used as insulation for the walls of building facades and for finishing ceilings, walls, slopes indoors, in basements, on balconies and loggias. Expanded polystyrene can be glued to concrete, wood, metal, brick, plasterboard and gas silicate bases.
Main characteristics of polystyrene foam:
- excellent rigidity with low weight;
- long service life;
- excellent thermal insulation properties;
- resistance to moisture;
- expanded polystyrene with fire retardants does not burn;
- does not pollute the environment when disposed of after use;
- protects from wind if used outside the building;
- does not emit substances harmful to the human body; you can work with this material without protective equipment;
- does not dry out or shrink during long-term use, is resistant to temperature changes;
- It is easy to work with polystyrene foam - it is not difficult to cut, installation can be carried out using improvised means;
- mold fungi do not develop on it;
- inexpensive.
Using expanded polystyrene as an insulation material instead of wood, brick, concrete or mineral wool saves time, money and space indoors.
Polystyrene foam has disadvantages:
- breaks easily;
- has very poor breathability;
- is destroyed by the action of mixtures that include nitro varnish;
- deforms when solvent and ultraviolet rays hit the surface.
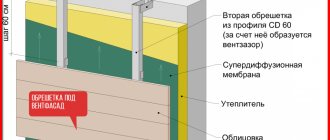
Insulation of a wooden wall
Insulation of wooden walls occurs in almost the same way as surfaces made of stone and concrete. That is, polystyrene foam is applied either under drywall, or under putty, or under lining in exactly the same way as on a stone or concrete wall. True, here we do without plastic dowels and fasten the brackets with screws directly into the wall. And if there is a need to fix the sheets with glue, then it is better to use universal tile adhesive.
There is one very important point that concerns insulating the wall from the inside. Polystyrene foam is afraid of moisture, under the influence of which it quickly decomposes. So the entire thermal insulation structure must be covered from the inside of the room with a vapor barrier membrane. It will become a reliable barrier to moist air penetrating under the foam. Air moisture comes into contact with the cold wall and condenses on the insulation. Please note that this is shown in the video.
Methods of gluing and types of adhesive compositions
You can attach foam boards to the surface using glue, dowels, or both. Foam plastic is usually attached with adhesive compounds indoors, and with dowels and glue - when working on the facade. Fixation only with dowels is used in extremely rare cases, this is explained by the fact that the required level of reliability cannot be achieved in this way. If the roof is insulated, then expanded polystyrene is simply inserted into the sheathing.
Foam gluing is carried out using dry compounds and ready-made adhesive mixtures.
Advantages of powdered products:
- excellent adhesion (adhesion) to brick, plaster, concrete, cement;
- immunity to temperature changes and precipitation;
- elimination of small irregularities on surfaces;
- relatively low cost.
Disadvantages of dry mixes:
- the adhesive composition must be prepared, this will take time, in addition, you need to know how to properly combine the powder with water in order to achieve a uniform consistency;
- You will need a mixing container and a construction mixer;
- Dust is released during the cooking process.
Ready-made adhesives will allow you to quickly and efficiently glue polystyrene foam to polystyrene foam, concrete, brick and wood surfaces, OSB panels or cellular blocks. Aerosols are most often used in cans based on polyurethane foam. Such materials are very convenient, and one cylinder is enough to glue approximately 10 m 2 of foam plastic boards inside or outside the building. The glue is resistant to temperature changes and high humidity, hardens in about half an hour and securely attaches the foam to the base.
Penosil polyurethane foam
Important Never use mixtures that contain toluene, alcohol or acetone for gluing foam plastic, as they destroy the structure of the material. The disadvantage of ready-made adhesives is their high cost. Popular ready-made adhesive mixtures:
When deciding how to glue polystyrene foam, you should not write off other ready-made adhesives, for example:
- silicone sealant is used if it is necessary to fasten small fragments of thin foam to a leveled base;
- “liquid nails” is a universal adhesive composition made on the basis of polymers. For example, “Installation Moment”, Dragon, which perfectly connects a metal base with foam. They are convenient for gluing polystyrene foam to the ceiling.
Advice Before gluing, clean the metal surface from rust, grease and paint.
Thermal insulation adhesive Tytan Styro 753 O2
How to attach foam?
There are several options for how to secure foam boards. Let's look at each of them.
Glue mount
This method is the simplest and fastest - just apply glue to the slab and fix it to the surface. Properly selected adhesive composition guarantees the quality of adhesion.
All foam adhesives are divided into the following types:
- Liquid compositions , which include the well-known PVA glue and “liquid nails”. If the latter have excellent adhesion to any materials, then PVA is better suited for attaching foam to metal surfaces.
- Dry mixtures are bulk materials containing cement and various binding components. Before use, a solution should be prepared from them in accordance with the instructions on the package.
- Foams are specially developed compositions for reliable fixation of foam boards on various surfaces. These include foam adhesive and polyurethane adhesive in cans, designed to work with a special gun.
Fastening with dowels
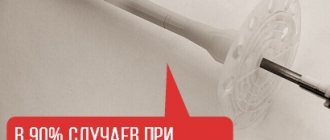
Compared to the previous method, fastening to special dowels (so-called umbrellas or mushrooms) with a wide head is a rather complicated operation. Regardless of the type, the dowel consists of a core and a sleeve into which a metal or plastic nail is driven for spacers. In some cases, self-tapping screws are used.
For reliable fixation, the plates are attached in the center and in the corners.
Most often, dowels are used to fix foam plastic for external wall cladding.
Combined method
This method involves the simultaneous use of adhesive and umbrellas. This allows not only to qualitatively isolate the surface from the action of the external environment with the help of glue, but also to securely fix the slabs.
This technology is justified to a large extent during facade work, especially when, after installing the insulation, it is planned to cover it with heavy facing materials.
Stages and nuances
Gluing foam plastic is carried out in several stages:
- Disconnect power from the electrical wiring.
- Clean the base from paint, whitewash, residual finishing materials and dirt.
- Remove irregularities deeper than 1 cm, that is, level the surface. If this is not done, the foam boards will break during installation.
- Treat the surface with a primer that contains antiseptics. This will improve adhesion and prevent the appearance of mold.
- Wait for the primer to dry.
- Foam boards are usually glued from a corner or lamp. During operation, the desired configuration is given using a mounting knife.
- If aerosol glue is used, insert the can into the gun and cut off the tip. Apply the composition to the underside of the foam board in strips along the edges (step back 2-4 cm from the very edge) and diagonally. It is also permissible to squeeze out the glue in dots - in the center and in the corners.
- Dilute the dry mixture with water until you obtain a homogeneous consistency and spread it on the stove with a small notched spatula, you should get a homogeneous thin layer. Another option is to apply glue pointwise around the perimeter and in the middle, spreading it evenly over the surface.
- Press the foam onto the base and hold for a few seconds. Remove excess glue with a damp cloth or even spatula.
- In the same way, glue the next plate end-to-end to the previous one. If a gap more than 2 mm wide has formed between them, fill it with foam or putty.
It is necessary to press the foam to the surface as a rule, and level it using a building level.
Tip When using additional fastening (dowels), wait until the adhesive has completely dried and only then drill holes and drive in the umbrella dowels.
Insulation of the outside of the building
Insulation of walls outside
The technology for insulating walls on the outside remains essentially the same as on the inside (see video). True, it is not as diverse as in an apartment.
Apply universal tile adhesive to the insulation at five points (along the edges and in the center) and apply it to the primed wall. Then we additionally fix it with fastening mushrooms at the same five points. We try to maintain the plane as much as possible. Carefully seal the joints with the same glue and apply a layer of it to the foam-covered wall.
After the glue has dried, we can give free rein to our imagination. There are several options for exterior finishing of walls insulated with foam plastic. This includes external putty followed by painting work, bark beetle, and cladding with brick or clinker, siding or the same plasterboard. And these two options have several more sub-items.
Attention! Do not try to insulate an apartment or house above the first floor yourself. This is LIFE DANGEROUS! Such work is carried out by professionals who have a license and permission to work at heights.
How and with what to glue to concrete, wood and brick surfaces
If you need to mount polystyrene foam to a concrete base when carrying out external thermal insulation work, then it is better to use dry compositions in powder form. This is explained by the fact that they contain a cement component, polymers and sand, which provide reliable adhesion.
The best means are:
The “T-Avangard-K” composition is suitable for attaching foam plastic boards not only to concrete, but also to brick bases, gypsum and cement plaster. The dry mixture is available in 25 kg bags. One package is diluted with 5-6 liters of water. The powder is good for 6 months from the date of issue. Summer and winter versions are available. The first is recommended for use at temperatures from +5 to +35° C, the second - from –10 to +5° C. The cost of one bag is, on average, 275 rubles.
Polyurethane foam Ceresit CT-8
Ceresit CT 83 (“Ceresit CT 83”) is a high-quality quick-hardening composition that is perfect for any mineral base. Available in 25 kg bags, the finished mixture should be used within two hours. The price per bag varies from 413 to 539 rubles.
The ready-made adhesive mixture (adhesive foam) Ceresit ST 84 Express should be used at temperatures from –10 to +40° C and in conditions of high humidity. It is perfect for concrete, brick surfaces, as well as cellular blocks and OSB boards. Ceresit CT 84 Express adhesive foam consists of butane, propane and polyurethane. One cylinder with a capacity of 750 ml costs 600 rubles.
Rolled foam plastic is most often used for finishing and thermal insulation indoors. For it, it is better to use gypsum-based powder mixtures.
Gypsum Perlfix is produced by Knauf. Packaged in 30 kg bags. The glue will do an excellent job of gluing foam plastic to substrates made of foam concrete, plaster, and ceramic brick. It is not necessary to level the surface before using the composition. To increase the adhesive properties, foam blocks are pre-treated with concrete contact. It is not recommended to work with glue if the room temperature is below +5° C. One package of Perlfix weighing 30 kg costs, on average, 280 rubles.
Description of brands
Among the highest quality brands:
- Ceresit Ct 83 Strong Fix;
- Ceresit Express Ct 84;
- Tytan Styro 753 Gun;
- Knauf Klebespachtel;
- Prospectors Teploizol;
- TechnoNIKOL Professional;
- Penoplex Fastfix;
- Bitumast.
Ceresit CT 83
Ceresit ST 83 brand adhesive is very durable, can withstand heavy loads, and has high adhesion. The mixture is vapor-permeable, so moisture does not linger in the room where the heat-insulating boards were attached with the plaster-adhesive mixture. Does not ignite when exposed to fire. The composition is used to attach heavy slabs of large thickness (up to 20 cm) to the wall outside the house.
You can work with the ST 83 brand at zero temperatures, but then the powder is diluted in heated water to +30 °C.
Advantages:
- environmental friendliness;
- low consumption;
- vapor permeability;
- speed of preparation.
Flaws:
- price;
- inadmissibility of gluing on other paints and varnishes;
- sticker on concrete only three months after it is poured;
- You can mix a good solution without lumps only with a mixer or a drill with a mixing attachment at 400-800 rpm.
Ceresit CT 84
This is polyurethane foam, the basis of the composition is polyurethane and flammable gas. ST 84 – frost-resistant glue. Used at sub-zero temperatures down to -10 °C. In cold weather, the composition hardens several times longer, up to 7-10 hours. While in warm weather, hardening takes only 2 hours.
ST 84 is applied first along the perimeter of the heat-insulating sheet, then diagonally. Presses against the surface. Exposed mixture residues can only be removed with a solvent.
Advantages:
- absence of freons;
- moisture and water resistance;
- consumption;
- simplicity and speed of installation.
Flaws:
- poor adhesion to paint and varnish coatings;
- mandatory fastening with dowels;
- Before applying to foam blocks, the latter require priming.
Tytan Styro 753 Gun
Titan Styro foam in 750 g cans. Application requires a construction gun, which speeds up installation.
The foam layer is no more than 5 mm, this is a drawback, because outside the house such fastening is unreliable. Additionally, fastening with dowels is required.
Bonds EPS sheets to brick, concrete, mastic, plaster and cement bases.
Advantages:
- economical consumption;
- the foam is ready to use, does not require preparation;
- simplicity and speed of application (with a construction gun);
- good adhesion to metal, concrete, brick, plastic and wooden surfaces.
Flaws:
- price;
- requires additional fastening with dowels;
- operation only at t °C above zero.
Knauf Klebespachtel
Powder that is diluted with water. Packaging: 25 kg. For interior and exterior work.
Application is possible by machine using G4 and Monojet pumps. This significantly speeds up coverage of large areas.
Suitable for EPPS.
Advantages:
- Can be used for reinforcement;
- setting time – 1 hour;
- the presence of a machine application method;
- operating temperature range.
Flaws:
- consumption;
- packaging is heavy, inconvenient for transportation;
- takes a long time to apply by hand.
Prospectors Teploizol
Manufacturer – Russia. Release form: powder. Fixing foam plastic to the wall outside the house. In original packaging the shelf life is up to one year.
Advantages:
- no need to pre-treat the surface;
- low consumption;
- used for reinforcement;
- After mixing, the solution is suitable for three hours.
Flaws:
- high price;
- discomfort during transportation;
- slow period of complete hardening (three days);
- operating temperature only above +10 °C.
TechnoNIKOL Professional
TechnoNIKOL Professional adhesive foam has a polyurethane-based composition. Used as a sealant. Fastens all types of polystyrene foam.
Operating temperature up to 30 degrees Celsius, but not below zero.
Advantages:
- price;
- resistance to water, moisture, fungi and mold;
- the ability to correct the position of the slabs within 20 minutes after fixing;
- high adhesion;
- Suitable for external and internal installations.
Flaws:
- installation only at positive temperatures °C;
- installation only with a construction gun;
- chem. reaction when interacting with silicone and polyethylene;
- the required humidity level is 50% for rapid hardening.
Penoplex Fastfix
Penoplex is produced in 750 g cylinders, inside of which there is foam material. Used in conjunction with a mounting gun for fastening extruded and foamed polystyrene foam. Fixation is possible on concrete, brick, ceramic surfaces, and aerated concrete blocks.
It is used both outside and indoors for insulating loggias, rooms, and roofs.
Has a light blue tint. Dries in 10 hours and withstands 100 frost cycles. Installation temperature from -10 °C to +40 °C.
Apply with a construction gun in vertical continuous strips with a distance of 5 cm between each. Press the insulation sheet after 5-7 minutes and strengthen it with dowels.
Bitumast
Resinous bitumen for extruded polystyrene foam. Half a kg of mixture is consumed per 1 m2. Bitumast dries for two days. Withstands 100 freezing cycles. The gluing temperature is only above zero, up to +30 °C.
Cannot be applied to facades or inside rooms or buildings.
Bitumen adhesive needs to be pre-diluted with water. Has good adhesion to any type of substrate. The setting time is long compared to other mixtures. The sheets will have to be pressed until the polystyrene holds on itself and does not slide off. Very high price.
What is the best way to glue foam together?
How can you glue foam plastic:
- Dry cement mixtures. The packaging of such products indicates that they are intended specifically for polystyrene foam; other mixtures are not suitable for this.
- PVA. It is advisable to use only for gluing to metal.
- Polyurethane foam. Not widely popular for gluing foam.
- Polyurethane glue. One of the best options for thermal insulation.
- Liquid nails. A good option for fast and high-quality work.
- Aerosol glue. Its cost is slightly higher than its analogues, but it is considered the most practical and convenient option for gluing foam. It is characterized by fast hardening and economical consumption.
Dry glue
Dry construction adhesive for extruded polystyrene foam includes sand, cement and auxiliary components that are needed to improve properties. It is usually sold in large bags of 5 and 25 kg. To prepare the glue, you need to mix it with water in certain proportions, which are indicated by the manufacturer on the packaging.
The positive aspects of such an adhesive substance can be identified:
- Can be glued to various substrates, including concrete, plaster, brick.
- Suitable for gluing foam plastic together.
- Has an affordable price.
- Tolerates temperature changes and high humidity well.
- Can correct unevenness and defects in the foundation.
Of the minuses, it is worth noting the time required for mixing the product. The glue has a certain time to work after preparation. After 1-3 hours it becomes unusable, so you need to work quickly.
Polyurethane foam
The use of polyurethane glue will be a profitable and modern solution. Such a composition can glue the material together and stick it to other surfaces. The glue is not afraid of moisture, working with it is simple and convenient. The product is applied in a small layer, which is enough for a long and reliable fixation. This also makes this gluing method economical.
Polyurethane foam
The use of polyurethane foam for polystyrene foam is not always justified. It has certain disadvantages that are important when gluing this particular material.
Why is it better not to glue polystyrene foam with polyurethane foam:
- It expands after application, which can cause deformation of the material.
- The elements will need to be fixed after gluing for reliable adhesion.
- Due to expansion, foam takes up a lot of space, reducing the area of the room.
- The composition may contain components that damage the foam.
- High material consumption compared to other gluing options.
Reference! If you choose polyurethane foam, then only to glue the foam to the stone, then there will be maximum fixation.
It is better to choose PVA glue for gluing foam to metal. When gluing, you will also need burlap, which will improve adhesion. To do this, you need to moisten it in PVA and apply it to the base. Afterwards, the entire surface of the sheet is smeared with glue. When the mixture begins to harden, the sheet is applied to the wall and pressed for a few seconds.
Liquid Nails
Liquid nails are an excellent option for gluing foam to different substrates. They are universal and significantly speed up installation work. For reliable adhesion, you do not have to press the sheets for a long time.
Reference! This method also has disadvantages - high cost, the need for careful preparation of the base.
Liquid nails are applied pointwise along the entire perimeter of the sheet. You can also apply them from corner to corner diagonally, which will be enough for high-quality attachment.
Aerosol formulations
Polyurethane spray adhesive can be used for external and internal work. Working with them is simple and fast. The hardening period is no more than half an hour. A can of glue will be enough for 10 meters. The consumption of such a composition is significantly less than when working with dry construction mixtures and foam.
Spray adhesive is considered the best option for foam for the following reasons:
- Saves time during thermal insulation work.
- Has better adhesion to various substrates.
- Improves the quality of insulation and insulation.
- Ready to use, it does not need to be kneaded, which eliminates errors.
Bonding to concrete and other surfaces
You can glue foam to concrete using many adhesives, including dry mixes, polyurethane glue, aerosol and polyurethane foam. Regardless of the composition used, the surface must be prepared before gluing. If you ignore this, there is a high probability of poor thermal insulation, which will not last long.
How to properly prepare the base before gluing the foam:
- Use a hard spatula to go over the entire surface of the ceiling or walls, removing excess debris and concrete residues. You may need a hammer drill to remove the buildup. All protruding elements must be removed with a grinder.
Advantages of polystyrene foam
Before figuring out what kind of glue to glue foam plastic with, let’s look at its properties. Polystyrene foam (expanded polystyrene) is a material obtained by foaming polymers. It consists of 98% gas, enclosed in microscopic cells with thin walls.
The material in the form of slabs of various thicknesses is used for insulation of house facades, as well as for preliminary finishing of ceilings, walls, floors, window slopes in residential premises, basements, loggias, and balconies. It can be glued to foam concrete, brick, gas silicate, concrete, metal, plywood, wood, plasterboard, OSB boards.
Main characteristics and advantages of polystyrene foam:
- rigidity with low weight;
- durability;
- high thermal insulation properties at different temperatures;
- moisture resistance;
- protection of premises from wind when used outdoors;
- resistance to temperature changes - the foam does not change in size throughout its entire service life (does not shrink, does not dry out);
- fire safety - the material does not burn (true for expanded polystyrene with fire retardants);
- harmless to humans - polystyrene foam does not emit toxic substances, it can be worked with without personal protective equipment,
- environmental friendliness - after the end of its service life, the material can be disposed of without harm to the environment;
- resistance to mold growth;
- ease of installation - it is easy to cut and fix using available tools;
- low price of slabs.
Fixation methods and types of glue
When figuring out how to glue foam to a wall, you should know that there are three main ways to fix the material:
- using glue;
- using dowels;
- with the simultaneous use of glue and dowels.
The first option is practiced more often for interior work, the third - for exterior work. Fixing heat-insulating boards only with dowels is rarely done, as it does not provide the required level of reliability. When insulating the roof, foam plastic can simply be inserted into the sheathing.
Additional fixation of foam to the wall using dowels
It is permissible to use various means for gluing polystyrene foam. They can all be roughly divided into two groups - dry compounds and ready-made adhesives.
Dry products
If the question arises about how to glue foam plastic to concrete during facade thermal insulation work, you should opt for dry mixtures. They contain cement, sand and polymer fillers. Well-known products are Ceresit CT 83, T-Avangard-K, Armierungs-Gewebekleber.
For interior finishing work, dry gypsum-based compounds are used. Their main purpose is installation of drywall. Popular mixtures are Knauf Perlfix, Volma.
To prepare the glue, the powder must be diluted with water according to the instructions. After drying, the mixture hardens, forming a strong, rigid connection between the foam and the main surface.
Using dry mix Ceresit CT 83 for working with foam plastic
Advantages of powdered products:
- high degree of adhesion (adhesion), ensuring durable fastening of foam plastic to various surfaces - concrete, brick, cement, plaster;
- resistance to temperature changes and precipitation;
- the ability to compensate for minor unevenness of the base;
- relatively low price.
- time required to prepare the glue - it should be properly combined with water and mixed thoroughly, achieving a uniform consistency;
- the need for additional equipment and tools - mixing containers, construction mixer;
- release of cement or gypsum dust during work.
Ready-made adhesives
When solving the problem of how to quickly glue foam plastic, it is recommended to pay attention to ready-made adhesive compositions. The main option is an aerosol product based on polyurethane foam in cylinders.
Foam for attaching foam to various surfaces
This foam adhesive for polystyrene foam is very convenient to use. One cylinder is enough to fix about 10 m2 of slabs. The mixture hardens in an average of 30 minutes, providing reliable fixation that is resistant to moisture and temperature changes. The only negative is the relatively high price. Popular products are Penosil, Titan Stiro 753, Ceresit ST 84 Express.
Foam based on polyurethane foam can be used if there is a problem with gluing foam to polystyrene foam, concrete, brick, cellular blocks, OSB panels. It is suitable for indoor and outdoor use.
Other ready-made adhesives:
- Silicone sealant. It is advisable to use it if you need to fix small elements made of thin foam plastic on a flat surface.
- Universal construction polymer adhesive or “liquid nails” (Dragon, “Montazh Moment”). It is indispensable when solving the problem of gluing foam plastic to metal. To improve adhesion, the surface should be cleaned of rust, paint and grease. In addition, using “liquid nails” it is convenient to fix the insulation to the ceiling.
Liquid nails Moment
Important: To attach foam plastic, do not use products containing acetone, toluene or alcohol. These substances can disrupt the structure of the material.
Attaching to wood
Fixing the foam using dowels is performed in the following sequence:
- The material must be anchored at least 4 hours after its application. This is necessary so that the hardened glue is not destroyed during the installation of fasteners for foam plastic.
- On the hammer drill, along the length of the dowel used, you need to install a special limiter for the most accurate drilling depth.
- The disc-shaped dowel is inserted into the hole made. The plastic core is carefully driven into the dowel and wedged into the hole.
- The dowel must be hammered in so that it presses the insulation lightly. It is highly undesirable to crumple foam plastic; this can lead to deterioration of the thermal insulation characteristics.
If the core does not fit in normally, it is enough to replace the damaged drill and make a normal hole.
Attaching foam to wood
To determine the correct method of attaching polystyrene foam to a wooden wall, you need to familiarize yourself with the modern technologies used:
- Fixation between the sheathing.
- Using special nails.
- Adhesive composition.
- Polyurethane foam.
Fasteners for foam plastic to wood in the form of special nails are used quite often, since such elements securely hold the sheets. However, every place where such nails were used must be puttied.
Adhesives require great care when used. This material must be sufficiently moisture resistant and not afraid of temperature changes. Often, a cement mortar with the addition of a small amount of glue is used for this. Conventional polyurethane foam is used extremely rarely for fixing foam. Often it is used only to fill cracks.
Wood is a material that allows air to pass through well. This is considered the main advantage of wooden houses. Therefore, many have certain doubts about insulation using polystyrene foam. If you do not use breathable insulating materials, a wooden building may be completely deprived of its main advantages.
Noticed a mistake? Select it and press Ctrl Enter to let us know.
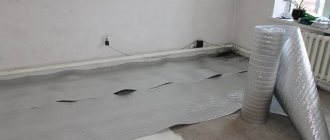
Environmental influences, moisture, temperature changes, cold have a certain effect on any materials. Areas where access is restricted require special attention. To protect wooden walls and house structures when insulating with polystyrene foam, it is necessary to pay attention to waterproofing and vapor barrier. For this purpose, special roll materials are used.
Vapor barrier film
During the insulation process, the waterproofing material must be fastened on the cold air side (street, ground, concrete base). The vapor barrier is installed on the side of the warm air flow (inside the room). An alternative vapor barrier option can be polyethylene film used to cover garden greenhouses.
Having figured out how to insulate a house with polystyrene foam, it is necessary to dwell in more detail on the methods of its fastening. There are several ways to do this:
- Fastening between the sheathing due to tension (as described above);
- Installation with special nails (fungi);
- Fastening with adhesives;
- Fastening with polyurethane foam.
The use of special nails is a fairly common practice when installing insulation, because they securely hold the sheets. But it has a drawback, which is the need to putty all the places where the nails are driven. It is also necessary to take into account that metal nails will act as an additional bridge for cold, because metal conducts it well. This problem can be solved with the help of plastic mushrooms.
Adhesives do not have the same problems as nails, but you need to be very careful when choosing them. So, the glue must be resistant to moisture and temperature changes, otherwise it will be useless. Most often, cement mortar with the addition of glue is used for this. As for polyurethane foam, it is rarely used for fastening; mainly, it is needed to fill all the cracks.
Required Tools
The set of tools and auxiliary materials required for gluing foam depends on the fixing agent used. In any case, you should prepare:
- polystyrene foam of the selected thickness, its quantity should be equal to the area that needs to be covered plus 10% for waste;
- a small spatula and a rag to remove excess adhesive mass; if they are not removed, hard lumps will form;
- a primer for treating the main surface to which the foam will be attached;
- wide primer brush;
- knife for cutting foam.
If you plan to additionally secure the slabs with dowels, then you need:
- hammer drill with 10 mm drill;
- hammer;
- special dowels shaped like umbrellas (fungi).
Installation of polystyrene foam on the balcony
When using a dry mixture, the following is additionally required:
- tap water;
- plastic mixing container;
- construction mixer (drill attachment);
- spatula-comb for applying the composition to the foam.
If aerosol glue is used, then a special mounting gun is required into which the can is inserted.
How to glue foam boards
To increase the efficiency of insulation, it is enough to glue the plates together. In this case, the correct choice of glue is of great importance. It should not contain components that destroy the foam. These include:
- solvents containing acetone;
- gas and oil products;
- alcohol solutions.
Experts recommend using polyurethane glue, PVA and “liquid nails” adhesive for gluing foam plastic.
Of course, it is impossible to unequivocally answer the question of how best to attach polystyrene foam. Much depends on the nature of the surface and operating conditions of the insulation.
Only compliance with foam plastic fastening technologies allows for high-quality insulation of walls.
Stages and features of work
Let's look at how to glue foam to the ceiling. Main stages:
- Disconnect the wiring.
- Clean the surface from paint residues, whitewash, old wallpaper and other contaminants.
- Remove all irregularities with a depth/height of more than 1 cm. Otherwise, the foam may break when gluing.
- Treat the ceiling with a special primer with antiseptic components. It not only protects the surface from the development of mold, but also improves adhesion to the foam. Allow the primer to dry.
- Mark the surface. Foam boards can be laid in one of several ways: start gluing entire elements from the lamp, from the center of the ceiling, or from one of the corners. To create marks, it is convenient to use a thread of contrasting color, securing it with tape.
- If necessary, shape the foam to the desired size using a mounting knife.
- If using spray adhesive, insert it into the gun, cut off the tip and squeeze the adhesive onto the back of the foam board. Usually stripes are made along the perimeter at a distance of 2-4 cm from the edge and diagonally. You can apply glue pointwise - in the corners and in the center.
Option for applying foam to polystyrene foam If using a dry mixture, it should be diluted with water and mixed thoroughly. It is applied to the foam using a small notched trowel onto at least five points, evenly distributed over the area. You can lubricate the slab with a continuous thin layer of glue.
An example of applying the mixture to polystyrene foam
- Press the plate to the surface and hold for a few seconds. Remove excess glue using a smooth spatula or a clean damp cloth.
- Glue the next tile butt to the first in the same way. If the gap between the elements is more than 2 mm, it should be puttied or blown out with foam.
When insulating walls, foam plastic is glued according to the same pattern. Typically, laying sheets begins from one of the corners. After applying the glue, the slabs must be pressed against the wall using building regulations and leveled. If additional fasteners are used, then you need to wait until the glue has completely dried, and then drill holes and drive in umbrella dowels.
Foam plastic is an inexpensive and high-quality thermal insulation material that is used in domestic construction in residential and utility rooms. To fix it, dry compounds, aerosol adhesives and “liquid nails” are used. Powdered mixtures are cheaper, but ready-made products are more convenient to use. When working externally, foam plastic slabs must be additionally secured with dowels.
Insulation from the inside under drywall and lining
The foam sheets will be covered with plasterboard
Do-it-yourself insulation of walls with polystyrene foam (see video) is an option that is used most often and is, perhaps, one of the most popular options for insulating apartments. Below we will look at what types of work we will have to do and how to do it:
- installation of mounting brackets;
- foam installation;
- installation of profiles for drywall;
- installation of drywall.
Now let's see what this looks like in practice:
- Installation of mounting brackets. Considering that the profiles for plasterboard must be installed at a distance of 40 cm from each other, so that there are four fastening profiles per sheet of plasterboard, we mark the wall with vertical lines at a distance of 40 cm. We install the fastening brackets so that they are located at a distance of 50-60 cm vertically. If the wall is wooden, then we attach the brackets with wood screws directly to the wall. If it is made of stone, brick or concrete, drill two holes with a diameter of 6 mm for each bracket and fix the brackets with screws and plastic dowels. Typically, screws 50-70 mm long are used for this. Please note that when installing brackets on a wall made of sawn shell rock, sometimes you can do without dowels - the screw is screwed directly into the stone. We give the staples the shape of the letter P.
- Installation of foam plastic. We place sheets of the required thickness directly onto the brackets, pressing them tightly against the wall surface. We try to ensure that the insulation sheets fit together as tightly as possible. But no matter how hard we try, gaps will still remain. They must be filled with polyurethane foam. Try not to leave empty spaces anywhere. This is clearly visible in the attached video.
- Installation of profiles. After the installation of the foam is completed, we can install the profiles under the drywall. We will try to ensure that there is a minimum distance between the plasterboard profiles.
- Installation of drywall. We install drywall in the usual manner. The distance remaining after installation between the foam plastic and the drywall will serve as an air cushion, which also helps to insulate the wall.