In autumn and winter, some people feel cold and uncomfortable in their apartment, even with heating. In most cases, savings have nothing to do with it. If the heating is working at full power, and you are all wearing different warm sweaters, then this means that the reason for the low temperature lies elsewhere: most likely you have cracks somewhere that allow the cold to pass through. Most often, you need to look for such places near windows and doors - there may be holes and cracks that you did not pay attention to. If the windows are metal-plastic, then there should be no problems. In this case, the entrance structure should be examined more carefully. Next, let's look at how to insulate a wooden entrance door.
Wooden entrance doors: features
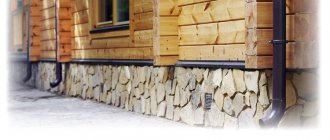
Such designs are always beautiful and elegant. As a rule, they are made from solid wood and may differ in different colors, shapes, and designs. In private homes, such structures are most often installed. Great popularity is due to the special characteristics of the material.
Advantages of wooden doors:
- beauty, elegance;
- durability;
- environmental friendliness of the material;
- good
- good sound insulation;
- affordability.
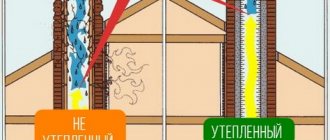
Despite such a large number of advantages, wooden doors have one drawback - they can let in cold and wind. And, if such a problem arises, it can be solved by resorting to various methods of insulating a wooden entrance door, which we will discuss later.
How to insulate a wooden door. Tips, methods, photos.
The first autumn cold has arrived unnoticed, and if your apartment or country house has become uncomfortable like autumn, you should take a close look at the front door and windows - most likely, you will have to start insulating them. We won’t touch the windows now, let’s talk about the door, since this is where the most problems occur. Especially if the door is wooden and has served for many years.
Insulating a wooden front door is not as difficult as it might seem at first glance: having a simple tool and more or less stable handling skills, your personal desire and our advice will help correct the situation and meet the cold winter with dignity.
So, there are, by and large, only two ways to insulate the front door:
- Sealing the door frame in the areas where the door leaf adjoins;
- Insulation of the door leaf using thermal insulating materials.
Door seal
To seal the doorway, you will need to purchase a special rubber seal. This sealant, in the form of a tape rolled into a roll, is widely available and inexpensive, and has an adhesive base on one side, which greatly simplifies its installation.
Before going to a hardware store or market, you should measure your door along the perimeter, the length of which will correspond to the length of the insulation you are purchasing. Pay attention to the width of the folds: folds are the place where the door leaf adjoins the frame, and it is obvious that the width of the insulation should be similar or slightly smaller. Try to determine the width of the slot gaps - the sealing tape, due to its thickness when compressed, should completely cover the gap.
Having the results of simple measurements in hand, you can choose the right rubber seal, which is very easy to install. We seal the doorway in parts - the upper part along the width of the door, having previously cut off the corresponding piece of tape, then the vertical sections along the height of the door and, finally, the lower part. To glue a strip of insulation, you need to carefully press its adhesive side to the folded part, gradually removing the protective paper strip. Make sure that the seal lies evenly, without distortions, along its entire length.
Read also Siding for the house - an ideal and inexpensive solution
As, frankly speaking, a dubious alternative to a special rubber seal, if it is not possible to purchase one, they use the “old-fashioned” method in the form of a strip of leatherette folded in several layers, which is carefully nailed down with nails every 10-15 cm.
Insulation of the door leaf
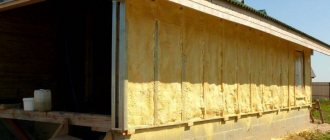
As for the insulation of the door leaf itself, you can carry out internal insulation (disassembling a door with a hollow structure and filling its internal space with heat-insulating material - polystyrene foam or mineral wool) and external insulation, which we will talk about in more detail.
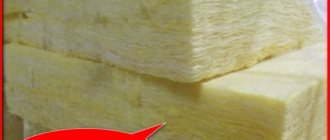
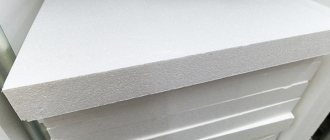
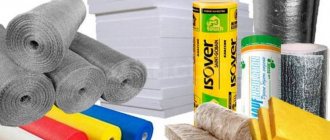
As a thermal insulating material, either polystyrene sheets (foam plastic) or soft materials are used - cotton wool, foam rubber, mineral wool or isolon, which are then covered with leatherette or leatherette. Of the listed materials, cotton wool and foam rubber are the least desirable, since they absorb moisture and become a breeding ground for harmful bacteria, and foam rubber also deteriorates over time.
Mineral wool has the only drawback - it gradually sags, deforming the original layer and disrupting the uniformity of volume; in all other respects good.
Isolon is a modern synthetic material that provides maximum thermal insulation with a small thickness. Izolon is good in every sense and can be recommended without any conditions or clarifications.
Soft door upholstery is a familiar way of insulating and decorating the front door, which used to serve as an indicator of the wealth and high social status of the apartment owner. Today, this method has not lost its relevance, except that it is now available to almost everyone. Both individual materials and standard sets are available for sale, consisting of insulation, upholstery material and decorative nails; sometimes there are materials for creating rollers for laying around the perimeter of the door.
Step 1. Remove the door leaf from the hinges and place it on trestles or stools.
Step 2. Place thermal insulating material on the insulated surface. To ensure that the sheet (or sheets) of insulation does not move during further covering with leatherette, first apply a sufficient amount of glue (PVA, “dragon”, “liquid nails” or another suitable) to the surface of the door and let the insulation stick well.
Read also How to make a cesspool on a personal plot. Expert advice. Photo
ATTENTION: the size of the insulation should be 1 cm less than the size of the door on each side, and if the side adjacent to the door is upholstered, you need to retreat one centimeter from the edge of the tightly closed door, otherwise it simply will not close later.
Step 3. We cover the door with insulation with finishing material - leatherette, leatherette, etc. To do this, you will need an assistant who will monitor the uniform tension of the canvas, preventing the occurrence of folds and distortions. You should start from the top of the door. Tuck the edge of the material evenly inward to the required width and attach it with special decorative nails, carefully nailing them at the same distance. Then, maintaining uniform tension, we nail the leatherette on the right and left sides, gradually moving towards the bottom. We finish the upholstery at the bottom in the same way.
Pay attention to the part of the door where the (previously removed) handle and mortise lock are attached: in this part it is necessary to cut out the required amount of the heat-insulating material used, also observing the “one centimeter rule”. The handle and lock installed in place will serve as additional fastening of the upholstery material. If your insulated door has a peephole installed, mark its exact location before removing it and then replace it using the previous recommendations.
Foam insulation is a slightly different method, which has two main types:
- gluing a sheet of polystyrene (foam plastic) pre-covered with leatherette using liquid nails to the surface of the door leaf;
- the construction on the surface of the door of a wooden frame with additional stiffening ribs, inside which well-fitted pieces of foam are placed, followed by lining with clapboard or laminated fiberboard.
The second method, of course, is preferable, but it can significantly increase the total weight of the door leaf, and therefore the load on the door hinges, so it is recommended to insert an additional hinge. Since polystyrene is not a material harmless to human health, it is recommended to insulate a door using it only from the outside, while for the inside, preference is given to the “soft” method described above.
Read also Outdoor flowerpots. Tips for choosing and making your own (60 photos)
As you can see, the process of insulating a wooden front door of a house or apartment is a simple process and accessible to most. In addition, the described methods are low-cost in monetary terms. Therefore, without waiting for the real cold to set in, arm yourself with our advice and get down to business: everything will definitely work out!
Main problems and ways to solve them
People often ask how to insulate a wooden door in a private house. There are several reasons why the entrance structure does not retain heat in the room.
Let's consider in what cases products can let in cold:
- The reason may be the presence of cracks. In this case, a sealant that should be used to fill the gap will help. In addition to the silicone compound, you can also use wood putty.
- The reason may also be a rotten threshold. In this case, before insulating a wooden door in a house, it must be dismantled and a new one installed, or the structure must be replaced with an insulating bead, nailing it to the outer surface of the door leaf. You can also install a strip brush.
- The door structure, due to deformation, may not fit tightly to the frame. Adjusting the hinges will help, or in extreme cases, replacing them.
- If the door leaf is warped, the problem can be corrected with a plane. Surfaces are polished.
- If it is not clear where the cold is coming from, the right thing to do is to insulate the entire wooden door. To do this, the surface is covered with a special material, and a heat-insulating layer is also sewn inside.
- If the reason for the penetration of cold lies in the cracks between the frame and the canvas, the structure should be sheathed with a seal around the entire perimeter.
How to prepare a wooden door for insulation
You can successfully insulate a wooden door in a private house or apartment with your own hands, but subject to a number of preparatory measures. First of all, you need to make sure there are no cracks by using a regular lighter. The presence of a draft will be indicated by a flickering light. If such places have been discovered, they are designated in a convenient way.
It is convenient to carry out insulation work on a door removed from its hinges
For ease of work, the door leaf is placed on the floor, a flat surface. Old upholstery, if any, is completely removed. Handles, peephole, lock, door hinges are also removed. At this stage, measurements are made of the height and width of the product. From the outside, the canvas is measured from one edge to the other. To correctly measure the inside, you need to step back from the edges by 2-3 cm.
To carry out work on insulating a wooden entrance door, you will need a set of the following tools and materials:
- screwdriver;
- mounting gun;
- roulette;
- construction stapler;
- staples;
- decorative and construction type nails;
- hammer;
- scissors;
- marker/pencil;
- grinder/milling machine;
- heat-insulating material;
- seal;
- leatherette (any covering material).
A wooden entrance door can only be insulated from the outside if it is not hollow.
Insulation of a wooden structure
Most often, the reason for cold entering the house is the gap between the canvas and the box.
In this case, a rubber self-adhesive seal will help. But, before sealing a wooden door, you need to correctly calculate the thickness of the product so that it fits perfectly. There are many options for such material on sale today, but the most economical option would be to make it yourself. Step-by-step insulation of a wooden door:
- Before sealing the wooden entrance door, we take foam rubber of the required thickness and measure its size based on the perimeter of the structure.
- Now the foam rubber must be tightly wrapped in leatherette, the color of which should match the color of the canvas. After all, you need to create an aesthetic appearance of the door.
- Having received such a roller, you need to nail it around the perimeter of the box using furniture nails.
- This simple work will help get rid of the problem with heat loss in the house.
Basic methods of insulating a wooden door
Doors made of wood are very popular today. And it is not surprising, because these products, coated with varnish, through which the pattern of natural wood is visible, look impressive. Moreover, wood retains thermal energy more efficiently and, unlike metal, is not cold to the touch. Be that as it may, even the most modern doors, for the manufacture of which noble species were used, dry out over time and begin to let in cold air currents.
Attention! If the home is new (or it is still under construction), then we advise you to purchase insulated doors made of wood, in which the panels already have insulation (expanded polystyrene or mineral wool). But if the door is already there and does not fulfill its functions, then you will have to start insulating it.
We insulate the threshold
Insulating a wooden door with your own hands also means repairing the threshold. Therefore, having compacted the structure, we move on to the bottom of the box. If the threshold has already outlived its life and is rotten, it should be completely dismantled. Now you need to install a new one: first, a wooden beam is selected, cut to size and mounted in place of the old element.
The standard threshold can be replaced with a leatherette roller. In modern interiors such products are used very often. The threshold roller, as in the case of insulating the perimeter of the box, is made from foam rubber. It is necessary to create a structure whose width, length and height will allow the bottom of the box to be insulated. The foam rubber is wrapped in leatherette and mounted in place of the threshold. It can be secured using construction nails. In the video you can see how to insulate the threshold of a wooden door with your own hands.
Door upholstery with insulation
Before insulating an old wooden door, you should prepare in advance thermal insulation raw materials and material for the finishing upholstery, which is most often used leatherette.
The whole process consists of several stages:
- Before insulating doors in a wooden house with your own hands, you need to cut the heat insulator layer to size.
- You need to step back 1 cm from each end and measure the sides, while the door should be closed.
- Next, we cut the material to these dimensions.
- When everything is ready, you should unscrew the canvas, lay it on the floor or a strong table, and remove all the fittings.
- Thermal insulation is applied to the surface and fixed with glue.
- You can also use staples or nails to insulate a wooden door with your own hands.
- Now a layer of leatherette should be attached to the insulation. A construction stapler is best suited for these purposes. Make sure that the leatherette is taut and that folds and irregularities do not form.
- When performing this work, do not forget about the holes in the upholstery for fittings.
- When the insulation process is completed, the fittings are installed in place, and the leaf is returned to the hinges in the door frame.
When choosing insulation for wooden doors, make sure that it is not too thick, otherwise the swollen structure will look unsightly.
Step-by-step instructions for insulation
Sources of heat loss can be either the doors themselves or the presence of gaps between the leaf and the frame. Therefore, it is necessary to take care of improving the properties in two directions at once, then insulation is most effective. Let's look at a specific technology that can be used to insulate door structures.
Tools and materials
Before you begin the process of insulating your front door, you need to carefully prepare. First of all, you need to acquire the tools and materials that may be required to complete the task.
It is impossible to insulate doors without the following devices:
- nail puller or installation tool;
- flat rod, meter with a metal base;
- screwdriver;
- hammer;
- hacksaw;
- stationery knife;
- tape measure along with a pencil;
- construction stapler.
This set of devices can be expanded if necessary. But such tools are quite sufficient for most cases. An electric jigsaw can be an excellent alternative to a hacksaw - the work will be done with the same quality, but it will take much less time. A simple drill is suitable when you couldn’t find a screwdriver in the house, the main requirement is the presence of a reverse, then any nail or screw will be removed without any problems.
It is also necessary to decide on the covering material. After insulation, wooden doors are usually sheathed with dermantine.
Preparatory work
Each step must be followed carefully to achieve the desired result. Only this approach will make it possible to correctly distribute forces and avoid additional repairs in the future.
Related article: Which entrance door to choose for a private home: review of the best models | +55 photos
The first step is to complete the preparatory work:
1. First, remove the door leaf so that the main obstacles are absent. A mounting tool and a nail puller will become indispensable assistants in this matter. The fabric can be easily removed from the hinges if you pry it slightly from below.
2. All components that may interfere with further work are removed from the door: lock, peephole, handle, door hinges with any fastening option.
3. If there is external casing, it must also be removed, then it will be easier to access the internal space. A nail gun or mounting tool will also help here.
Cutting and laying insulation
At this stage, you should prepare the thermal insulation material:
1. Initially, you should measure the voids in the door leaf that need to be filled and make marks on the insulation.
2. The selected heat insulator is cut along the intended lines using a stationery knife, both in length and width.
3. If the door has the form of a frame with voids, then the latter are filled completely. To do this, all pieces of insulation must be inserted as tightly as possible between the bars.
4. If the supply of material is too large, it will interfere with the final cladding. Excess parts are simply cut off with your own hands if necessary.
5. The insulation is fastened with brackets. Thanks to the construction stapler, the work is faster and easier.
New door trim
New upholstery on wooden doors is the next step. Soft materials like dermantine, a leather substitute, are excellent. The upholstery fabric must be cut, creating a certain margin of at least 10 centimeters. Then the material will bend easily and have some thickening around the entire perimeter.
It is best to use special nails when attaching dermantine. They are equipped with decorative caps that give the structure a more pleasant appearance.
In the video: upholstering a wooden door with your own hands.
Article on the topic: Apartment number on the front door: types of products and methods of fastening (+45 photos)
Installing hinges with fittings
The removed fittings are installed in place as soon as the door leaf acquires a suitable appearance with the correct thickness. The main thing is that the loops fit correctly in their nests. Carefully cut out the seat for the lock. There must be no damage around, otherwise the work will not be completed.
Seal installation
Even when the wooden entrance door is closed, a small gap still remains. Therefore, the next step is to eliminate the existing defects. The main thing is to choose a seal that has the appropriate characteristics. Manufacturers today offer rubber, silicone and foam options.
Foam rubber quickly and easily solves the problem of drafts. An ideal option even for dachas where there is no serious use. Silicone and rubber protect against drafts for a longer time. The products are shaped in such a way that they fit as tightly as possible to the base.
Once the sealing option has been selected, all that remains is to complete the installation. To do this, they usually use an adhesive strip or a harpoon in a groove. Self-adhesive products provide maximum speed of the process, but the harpoon version wins in terms of durability.
In this case, the fastening is carried out in the very corner of the quarter. Therefore, the canvas easily falls into place without difficulty.
Of course, the best option is to do most of the work yourself. Then there will be no need to additionally invite specialists. Using high-quality materials for this is not that expensive, but the proper level of protection from the cold will be provided.