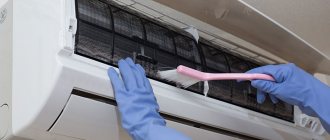
How to properly remove an air conditioner
There are three prerequisites to remove the air conditioner yourself:
- The outdoor unit must be within reach. If it is located on the facade of an apartment building above the level of the second floor, then it can only be dismantled from a window or balcony. Otherwise, you need to involve industrial mountaineering specialists.
- To remove heavy blocks from the wall and properly turn off the compressor, you need at least one assistant.
- It is necessary to rent a pressure gauge station specifically for the type of freon that is pumped into this air conditioner model.
Note. The last point concerns stations with conventional (arrow) pressure gauges. Digital manifolds are customized to the refrigerant brand.
Recommendations for dismantling split systems yourself
If dismantling (reinstallation) of a simple split system is relatively simple, then more complex devices, for example, duct air conditioners, according to recommendations, are much more difficult to carry on your own. They have a large set of components and weight, and require special approaches when being integrated into the interior of premises. The electrical line is de-energized and disconnected before the hydraulics are removed, not after. Before installing the air conditioner in a new location, it is necessary to blow out and evacuate the freon circuits of both units. Hard-walled communications are simply cut off.
If the hole is wide enough to pull them out, then start with the parts that are easiest to pull out. Then the rest are removed.
You cannot store a disassembled split air conditioner for a year or more. Over time, the freon will all disappear. Air with moisture will get inside through the drying valve gaskets and oxidize the pipelines. In this case, the entire circuit must be replaced. Often, no repairman has parts for an old air conditioner, since the entire line of compatible models has long been discontinued, and the owner is forced to buy a new split system.
Sources:
- https://kakpostroit.su/rukovodstvo-po-demontazhu-kondicionera-svoimi-rukami-s-soxraneniem-freona/
- https://stroy-podskazka.ru/split-sistemy/demontazh/
- https://TopVentilyaciya.ru/konditsionirovanie/demontazh-konditsionera.html
Precautions
If the air conditioner is out of order and cannot be repaired, then it is easy to remove it - there is no need to save freon, the tightness of the compressor, condenser and evaporator is not important.
You cannot do this with a working air conditioner. And in this case, the main thing is that dust and even air do not get inside the system. Otherwise, we can talk about guaranteed compressor output after installation and start-up of the air conditioner in a new location. The reason is the design feature of the vacuum pump.
Freon is extremely fluid, and the temperature difference at the inlet and outlet reaches several tens of degrees. None of the seals and rings used in conventional pumps and compressors will withstand such operating conditions. The required tightness is achieved through extremely precise adjustment of the surface of the moving elements of the pump to the internal geometry of the chambers. The slightest scratch from a solid particle leads to compressor failure. And such a particle could be a grain of ice formed when moisture in the air trapped inside freezes.
That is why new air conditioners are sold filled with inert gas, which is pumped out with a vacuum pump before pumping in freon.
When removing the air conditioner yourself, the freon must be pumped out and the units disconnected. This must be done so that dust and air do not get inside the system. That is, create a vacuum there. And it is advisable to save all the freon (or most of it) so that it would be easier to get the system into working condition in a new place.
Preparation
To properly remove the air conditioner, the only professional equipment you need is a pressure gauge station, which can be rented.
Every home craftsman has the remaining tools:
- a set of wrenches and hex keys;
- screwdrivers;
- pipe cutter or side cutters;
- hand bench vice;
- pliers.
Freon release
There are two ways to dismantle a working air conditioner:
- Using a pressure gauge station to collect freon in an external unit.
- Using a freon pumping and collection station connected to a special two-valve cylinder. The station has its own pressure gauge manifold and a compressor for pumping out refrigerant in liquid or gaseous state.
The first method is more “affordable”, but it can only be used when starting the air conditioner - freon is transported using a standard compressor.
The second method is universal. It can be used even in winter, when the air conditioner cannot be turned on due to low outside temperatures. The advantage of this method is that the external unit will be evacuated - without freon in the condenser. Which is much safer when transporting to a new place. But renting such a station and a cylinder will cost more than a regular pressure gauge manifold.
Freon collection in the external unit
On the side of the outdoor unit body there are two fittings from which tubes extend:
- thin - for transporting liquid freon from the condenser to the evaporator;
- thick - for pumping freon gas into the condenser.
Both fittings have shut-off valve heads under the caps. An outlet with a nipple extends from the gas head.
Freon is collected in the condenser in the following order:
- Remove the protective covers from the fittings and nipples.
- The manifold is connected to the nipple.
- Turn on the air conditioner to maximum cold.
- After a few minutes, close the valve of the liquid fitting, stopping the supply of freon to the evaporator.
- The pressure is monitored using a pressure gauge.
- When the arrow shows “-1 MPa”, tighten the gas fitting valve with a hexagon and immediately turn off the air conditioner (which is why you need an assistant) - during prolonged idle mode, the compressor pump may fail.
The pressure gauge reading “-1 MPa” means that all the freon is in the condenser, and there is a technical vacuum inside the evaporator, in the tubes and in the compressor.
After this, you can separate the blocks.
Consequences of incorrect dismantling
Improper dismantling of the air conditioner can have a number of unpleasant consequences:
- the cooling circuit will lose its tightness and/or freon will leak - fixing this problem will be very expensive;
- dust particles or droplets of water may get inside the circuit, which will negatively affect the operation of the compressor - which is why it is not recommended to remove the split system during rain or snowfall;
- there is a risk of the outdoor unit falling from a height, which will lead to its breakdown and subsequent replacement;
- Mechanical damage to one of the blocks or the route may occur, which can lead to depressurization of the housing, leakage of refrigerant, and the ingress of moisture and dirt.
Thus, so that freon does not leak out, liquid or dust does not penetrate into the system, and the equipment does not suffer damage, it is necessary to act as carefully as possible and follow the dismantling rules.
So, despite the fact that it is recommended to entrust the work of dismantling the air conditioner to professionals, if necessary, this operation can be carried out independently. To do this, you will need to assemble or rent a special tool, as well as use the instruction manual, which describes in detail all the necessary steps. During work, care should be taken not to damage the equipment. To help the home craftsman, there are many training videos available on the Internet dedicated to this operation, and the process itself is approximately the same for equipment from different brands.
Dismantling the air conditioner step by step
Disassembly while maintaining the functionality of the dismantled air conditioner is as follows:
- sealing of pipeline fittings;
- disconnecting and dismantling the external unit from the facade;
- dismantling the indoor unit in the apartment.
Below are instructions for dismantling a wall-mounted air conditioner.
Outdoor unit
To remove the outdoor unit of the air conditioner, first disconnect the tubes.
Dismantling the outdoor unit
There are two ways:
- Unscrew the union nuts that press the flared edges of the tubes to the flanges of the fittings of the outdoor unit. And in place of the nuts, pre-prepared caps are screwed on. The advantage is that the tubes remain intact. The disadvantage is that there is a high risk of air getting into the compressor.
- Side cutters are used to cut copper tubes (about 15 cm from the fitting). The edges are folded and clamped (caulked) using a vice. The disadvantage is that new tubes must be installed in a new place. The advantage is that the operation is quick and the likelihood of dust getting inside with air is much lower.
Note. The other cut edge of the tube must also be caulked to protect the evaporator of the indoor unit.
The next step is to disconnect the cables (signal and power), remove the fastenings of the unit to the frame on the outer wall and lift it into the room.
Compressor
One of the situations when it is necessary to remove the outdoor unit may be to replace the air conditioning compressor. And in this case, the dismantling algorithm is slightly different. The differences are as follows:
- Freon must be completely removed from the system. The correct way is to collect it in a cylinder using a freon pumping station. Incorrect, but simple - release it into the atmosphere (if the compressor is replaced in the warm season and the air temperature is higher than the boiling point of freon at normal pressure).
- There is no need to caulk the tubes - after installing a new compressor, the system is “pumped out” with an external vacuum pump.
It is impossible for a non-specialist to replace the air conditioning compressor on his own. In addition to the vacuum pump and pressure gauge station, it is necessary to have a gas burner to disconnect the suction and outlet pipes of the old compressor from the system, and then solder the new unit to the system. And even if you rent equipment, you need to have the skills to handle it.
You can remove the unit yourself, but it is better to invite a professional to replace the compressor.
Indoor unit
Most household split systems have a wall-mounted indoor unit (although there are other placement options). But with the exception of a ducted air conditioner, the remaining types are dismantled according to the general principle.
To remove the internal wall unit, proceed as follows:
- remove the housing cover;
- disconnect cables and wires;
- cut and caulk the copper tubes that go to the evaporator of the indoor unit;
- cut off the drainage pipe and drain the condensate;
- “snap off” the latches securing the housing to the mounting plate;
- remove the block and unscrew the plate from the wall.
When is it not necessary to remove the air conditioner?
Depending on the scale of the repair and how tightly the housing fits against the wall, there are several options for solving the problem.
1 case . Let's say we plan to re-glue the wallpaper, and the gap between the wall and the block allows us to do this neatly. Then there will be no point in dismantling the block (extra money down the drain). Here you can “snap” the internal unit from the plate and, without disconnecting the communications, hang wallpaper.
2 case . If plastering and leveling of walls is carried out during repairs, then dismantling of the indoor unit will be required. It is important that after the completion of the repair work, the length of the communications is sufficient to install the unit back. During the repair process, you can hide the “route” in the wall (grind and putty). Read more about removing only the indoor unit here.
3 case . There are situations when the indoor unit has to be removed along with the route. This may be due to the following reasons:
- if you plan to “lower” the ceiling (the hole through the wall will be lower);
- if the nuts connecting the route to the indoor unit are inside the wall (installation features or errors);
- to prevent the nuts from connecting inside the wall after repairs;
- to move the indoor unit.
In these situations, it is necessary to dismantle the air conditioner. Read this article on how to dismantle a split system.
Dismantling in winter
The air conditioner can also work in winter. And not only as a heater, but also in cooling mode (for example, in rooms where servers are located).
Note. It is possible to collect freon in the condenser of the outdoor unit only when operating in cooling mode - in heating mode it already works as an evaporator.
The peculiarity of working in winter in this mode is that there is a lower temperature limit, which is affected by the type of refrigerant, type of air conditioner and additional equipment. This dependence is also related to the design features of the compressor - it is oil-based, and oil thickens at low temperatures. For conventional air conditioners, the lower operating temperature ranges from +5°C to -5°C, for inverter air conditioners - up to minus 15-25°C.
Before dismantling the split system, these nuances must be taken into account. And if the temperature is below the specified limit, and the air conditioner is not equipped with a “winter kit” with heated compressor crankcase, then to remove the outdoor unit you must use a freon pumping and collection station (it has an oil-free compressor).
Preparation stages
At the preliminary stage, it is necessary to retain the refrigerant in the system. It is located in a circuit that consists of a compressor, evaporator, condenser, and connecting pipes.
Freon enters the evaporator in a liquid state, so small diameter tubes lead here. As the refrigerant evaporates, it enters the compressor in the form of gas. Here the branch size is larger.
The purpose of the preliminary stage: to collect all the gas in the condenser. To do this you need to follow these steps:
We recommend that you read: Air conditioning with fresh air supply
- The air conditioner is switching on in cooling mode. The lowest temperature is set. The unit operates for 10 minutes.
- There is a valve with a fitting on the external block. A thin tube approaches it, through which freon moves. There is a protective cap on top. When you remove it, splines appear. A key is thrown on them and the valve is closed.
- The pressure gauge is monitored, the needle of which should drop to zero after 1 minute. Immediately after this, the same procedure is carried out with the outdoor unit. The protective cap is removed and the second valve is screwed on. The air conditioner is then turned off using the remote control. All the refrigerant accumulates in the outdoor unit.
If there is no pressure gauge on the unit, then wait 1 minute and close the second valve, turning off the device.
Features of dismantling
There are several features of dismantling that you need to familiarize yourself with in advance.
Cassette devices
Some people install cassette models of devices in their apartments. Their main feature is the presence of reinforced block protection. Before you start removing it, you need to get rid of it using special electrical appliances. Then the device is disconnected from the network, after which the refrigerant is pumped out and the pipes are unscrewed.
Duct
Duct devices are more difficult to remove because they are so large.
Therefore, experts recommend dismantling with the help of another specialist who will assist in removing the structure.
Disassembling a duct air conditioner
Dismantling a duct split system begins with dismantling the air ducts. The work begins where the duct grilles communicate with the air in the cooled rooms. Having removed the channels, they begin to remove indoor and outdoor equipment modules. Run the air conditioner after pumping freon into the outdoor unit - the valves holding it must be closed and insulated using plugs. When the system is purged, the power cable is disconnected.
Air conditioner installation instructions
If the tools have been purchased, the air conditioner has been delivered and unpacked, you can get to work. The outdoor unit is installed first, and then the system is installed indoors. During the installation process, we must not forget about safety precautions, especially if the work is carried out at the level of the second floor and above.
Mounting the outdoor unit
Installing an outdoor unitChoosing a location for installing the air conditioner
When installing an air conditioner in a private house, there are no particular difficulties in placing the outdoor unit, but in an apartment building the location must be chosen very carefully. The unit body should not block the view of neighbors, and condensation should not flow down the wall of the house. In this case, the air conditioner should be mounted within reach from the balcony, since such equipment requires periodic maintenance.
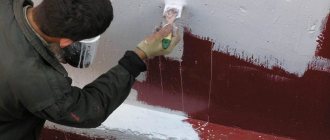
Drilling
It is best if the block is fixed on the east or north side of the window or balcony, and preferably in its lower part. This way it won’t disturb anyone, and you can easily reach it through an open window. Using a level, mark the mounting locations for the brackets and drill holes in the wall for the anchor bolts. To lay interconnect communications, a through hole with a diameter of 80 mm is drilled. In a brick wall, it is recommended to drill along the seam between the bricks - this will take less time and the hole will be more accurate.
Installation of brackets
The brackets are installed according to the markings, aligned and the bolts are securely tightened. The outdoor unit itself is fixed so that at least 10 cm remains between the radiator and the wall surface. The connection is made a little later, and then the resulting gaps are sealed. If the block is securely attached to a vertical surface, you can proceed to the next step.
Installation of the outdoor unit
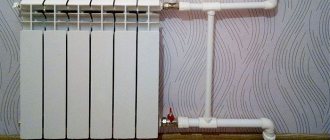
Installation of the indoor unit
The indoor unit must not be mounted behind curtains, above a battery, or in rooms with sources of electrical interference that could cause damage to the block processor. After choosing a location, be sure to check the wall for the absence of already laid communications - electrical wiring, water or heating pipes.
Installation of the indoor unitInstallation of the indoor unitHow to attach the panel of the indoor unitAt the installation location of the indoor unit, a mounting plate is attachedInstalling the indoor unit
If the area is free, attach a mounting plate: step back 10 cm from the ceiling, 5 cm from the corner of the wall and mark a horizontal line with a pencil. Drill holes for fasteners and securely screw the plate. The indoor unit of the air conditioner is mounted on the plate, after which a hole is drilled in the side wall for a communication connection - electrical wiring, pipes, hoses for condensate drainage.
Connecting electrical wiring
For the unit, they lay their own wiring indoors, the minimum cross-section of which is 1.5 square meters. mm. Be sure to install an automatic shutdown. When the wiring is laid, it is connected to the input panel: a yellow wire with a green stripe is connected to the neutral wire. To determine zero and phase, you should use an indicator.
After this, insulated stranded wires connect the terminals of both blocks, passing them through a hole in the wall. The names of the terminals must match the wires; the entire connection diagram is clearly described in the instructions supplied with the air conditioner.
Pipe laying
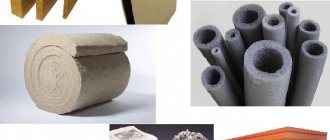
Copper tubes must be cut, leaving a margin of about a meter for bends. When bending tubes, special tools are used to avoid wrinkles, dents and cracking of the metal. The prepared tubes are covered with thermal insulation - polyurethane foam hoses. Foam rubber is not suitable as a sealant, as it has a short service life.
Rolling for copper pipes
Threaded flanges are placed on insulated pipes, and the thread should be located at the end of the tube. The next stage is tube flaring. Flaring must be carried out very carefully so that cracks and grooves do not form on the tubes. The nut should fit easily onto the flared joint, and it is better to tighten it with a torque wrench - this will prevent the flared joints from being squeezed out of the nut.
The pipelines are alternately attached to the corresponding fittings, which are difficult to confuse due to different diameters. The flanges are screwed onto the fittings so that the connection is tight, but not pinched, otherwise there is a risk of damaging the tube. Finally, a piece of plastic tube with a reinforced body is connected to the drain pipe. Fastening is carried out with a piece of heat-shrinkable tubing or a threaded flange, if included in the kit. The drainage pipe should be taken away from the load-bearing wall as far as possible.
Pipe laying
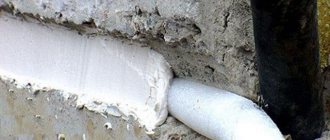
Now the pipes are inserted into the hole, aligned, and secured from the outside tightly to the wall with clamps. The wiring cable is fixed nearby and the pipeline is connected to the external unit. The hole is blown out with polyurethane foam or filled with silicone. All external connections are checked for leaks using a bicycle pump and soap solution. If air is leaking somewhere, tighten the thread more tightly. After checking, the soap deposits are wiped off the threads with a clean cloth.
Laying the wiringConnecting the wires to the outdoor unit of the air conditionerConnecting the wires to the outdoor unit of the air conditioner
Evacuating the system
Evacuating the system makes it possible to remove the smallest particles of dust and moisture. This process is carried out after sealing the threaded connections, otherwise it will not be possible to completely pump out the air. To do this, connect a vacuum pump to the system and pump out the air for an hour.
Evacuation of the air conditioner
Filling and testing the air conditioner
Connection diagram for vacuuming and refilling the air conditioner. It is very important to follow the basic rules for using the air conditioner.
The refrigerant from the cylinder must be pumped into the system. An adapter and a pressure gauge are connected to the cylinder, and then, strictly monitoring the pressure, the tank is filled. When the process is completed, the circuit breaker on the air conditioner is turned on, after which the system independently enters test mode. If everything works smoothly and the circulation of cold air becomes uniform, you can close the hole in the wall, remove the consequences of installation and enjoy the coolness.
Turning off the split system in winter
A modern air conditioner is both a fan heater and a cooler. In cold weather, careful pumping of freon may not be necessary - the temperature in the outdoor unit is quite low to keep it in a liquid state. By closing the valves, you can almost immediately, as the freon pressure drops to zero (in seconds), close the valves, remove the electrical wires, drainage and freon lines. If the valves are frozen and do not move, warm them up, for example, with a hairdryer. Do the same with the compressor if it does not start.
Do not try to do the opposite - pump liquid into the indoor unit. It doesn't have the same valves. Theoretically, the coil of the indoor unit could withstand such pressure. But don’t think that if it’s negative outside the window, then they’ll act differently. In both hot and cold weather, freon is liquefied for storage in the outdoor unit, and not in the indoor unit.