Repair of coolant leaks in heated floors
Here is a selection of materials:
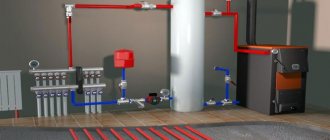
Everything you need to know about heating and climate control Features of the selection and maintenance of boilers and burners. Comparison of fuels (gas, diesel, oil, coal, wood, electricity). Do-it-yourself ovens. Coolant, radiators, pipes, heated floors, circulation pumps. Chimney cleaning. Conditioning
After six years of operation, collets on a metal-plastic pipe began to leak. Apparently, the rubber gaskets dried out and wore out. And this pipe lays heated floors throughout my entire house. Moreover, some connections are made so that they are accessible for inspection and repair, and some are located inside the walls. If open ones began to leak, then leaks probably also appeared in hidden ones. The pressure in the heating system began to gradually decrease. I had to add water to the circuit every two days, although no water leaks were observed. With such an intensity of the leak, the water apparently had time to evaporate. But I'm afraid the leak may have gradually worsened.
I used car radiator leak sealant (radiator sealant). I took a bottle designed for 15 liters. I have 80 liters of coolant in my system. The next time water was added to the system, sealant was also pumped into the system. The leak did not stop immediately. As water was added, I added another bottle of sealant. I filled 4 bottles in total. Eventually the leak stopped completely.
Of course, there is no guarantee that this method will help. If the leak is due to a large hole, then the sealant will not help. But if the leak is not very intense, 5-7 liters leak out per day, then you can try.
Steps to eliminate a leak with liquid sealant
Before repairing a leak in a heating boiler or heating pipe system, it is worth preparing a certain tool. This could be a welding machine or a thermal imager. To eliminate a leak, use the following instructions:
- It is best to “enlighten” a hidden leak with a thermal imager. Such diagnostics will allow you to accurately find the location of the breakdown and prevent minor fistulas that can become a problem. Elimination of the problem area is carried out by replacing the emergency section of the heating main or tightening the connecting element.
- If the integrity of the membrane in the expansion tank is damaged, repairs are not performed. In this case, you need to buy a new product in the store.
- A crack in the heat exchanger is one of the most difficult problems to diagnose. If you have welding experience, you can try to weld the fistula yourself. However, it is better to seek the help of a qualified specialist or take the heating equipment to a service center.
- A faucet that is not completely closed is the most harmless reason that people often forget to check. Eliminated by a complete revision of all shut-off valves. They are stretched and set to the required value.
Of course, it is possible to fix a heating boiler leak without welding. In this case, it is necessary to act depending on the location of the breakdown. The first thing to do is turn off the entire system and allow the coolant to cool. After this, you need to drain all the liquid from the system. If a leak is detected in an open section of the heating main, apply a plumbing clamp with a rubber gasket. The leak on the heat exchanger can be sealed with liquid welding.
The increased heat resistance of some special sealants makes it possible to use them for the rapid repair of heating boilers
It is not always possible to use external agents to repair heating. What to do, for example, if the location of the leak cannot be detected because the house had hidden pipes and installed a heated floor? Will we really have to break down the walls and open up the floors? No, you don't have to! In such situations, a relatively new method of eliminating leaks is used - by pouring liquid sealant for heating pipes into the system. This sealant is also suitable for radiators when it is not possible to apply a clamp to a leak.
The fundamental difference between liquid sealants for heating systems is their ability to eliminate leaks not by applying to the damaged area from the outside, but directly from the inside.
In an emergency, it is permissible to pour sealant intended for car radiators into the heating system
The essence of this method is that when mixed with a coolant, the sealant remains liquid, and only upon contact with air penetrating into the system does it polymerize. Gradually hardening, the sealant clots are sealed from the inside of the crack exactly in those places where the integrity of the system is compromised.
We invite you to familiarize yourself with Sandwich pipes for chimneys: design, dimensions, installation
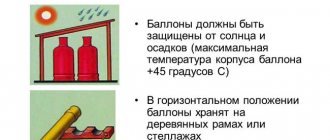
Several types of liquid sealants for heating are produced, each of which is adapted to special conditions of use, in particular:
- the coolant is water or antifreeze;
- gas or solid fuel boiler;
- heating or water pipes.
You should not try to look for one universal sealant for your home heating system. It is better to purchase a specialized composition for the specific parameters of your heating system.
The most famous among consumers are liquid sealants for heating systems produced by the German company BCG. The use of these products is considered an ideal solution for eliminating hidden coolant leaks. When used correctly, liquid sealant does not pose a danger to heating boilers and does not cause damage to the circulation pump and measuring instruments.
Sealant for pipes and heating radiators must remain in the system for a long time. Once you add this sealant to your heating system, you can forget about leaks for several years.
Sealants for closed heating systems eliminate pressure losses associated only with leaks in pipes and radiators, but are powerless in cases where the membrane in the expansion tank is damaged.
Before you start sealing possible leaks in the heating system, you need to make sure that the expansion tank is in good condition.
The procedure for using liquid sealants to repair your home heating system can seem quite complicated. In some cases, clots of sealing fluid cause partial blockage and impede the movement of the coolant. Therefore, in order not to cause damage to the heating equipment due to your inexperience, it is better to invite a specialist. In any case, you need to study the instructions for using a specific type of sealant for radiators and strictly follow them.
Having decided to use a liquid sealant to fix a problem in the heating system, you need to make sure that:
- the reason for the pressure drop is precisely the leakage of coolant, and is not related to a malfunction of the expansion tank;
- the selected type of sealant for heating systems corresponds to the type of coolant in the system;
- The sealant is suitable for this heating boiler.
German liquid sealant BCG-24 is used to eliminate leaks in heating systems
When using liquid sealant for pipes and radiators, it is important to maintain the correct concentration. On average, its values range from 1:50 to 1:100, but it is advisable to determine the concentration more accurately, since the effectiveness of eliminating leaks can be affected by factors such as:
- coolant leak rate (up to 30 liters per day or more);
- the total volume of water in a given heating system.
We suggest you read How to make a tent from improvised materials
If the volume does not exceed 80 liters, 1 liter of sealant will be enough to pour into the heating system. But how can we more accurately calculate the volume of water in the system? You need to calculate how many meters of pipes and what diameter were laid in the house, and then enter this data into one of the online calculators. To the resulting volume of pipelines, you must also add the passport characteristics of the volumes of all radiators and the boiler.
- Dismantle or cut off all filters with taps so that they do not become clogged with a viscous solution of sealant for heating systems;
- Unscrew the Mayevsky valve from one radiator (the first one in the direction of coolant flow) and connect a pump to it (the “Baby” type);
- Start the heating system and let it warm up for an hour to a temperature of 50–60°C at a pressure of at least 1 bar;
- Open all taps on pipelines and radiators to allow sealant to flow freely through them;
- Remove air from the entire system, including the radiators and circulation pump.
- You can also pour liquid sealant into the heating system using a hand pump for pressure testing.
Drain about 10 liters of hot water from the system into a large bucket, use most of it to prepare a sealant solution, and leave a few liters for subsequent flushing of the pump;
- Shake the canister (bottle) with sealant for radiators and heating pipes, then pour its contents into a bucket;
- Rinse the canister thoroughly with hot water so that all remaining sediment gets into the solution being prepared.
Solutions of sealants for heating systems must be prepared immediately before use so that the liquid does not come into contact with atmospheric air for too long.
Pouring sealant
Liquid sealant for heating systems must have time to mix with the coolant before it reaches the boiler, so it is more advisable to pour it into the supply:
- Introduce liquid sealant solution into the system using a pump;
- Pump the remaining hot water through the pump so that absolutely all of the sealant sediment gets into the system;
- Bleed the air from the system again;
- Raise the pressure to 1.2–1.5 bar and maintain the system operating cycle for 7–8 hours at a temperature of 45–60°C. This period is needed for the sealant to completely dissolve in the coolant.
We suggest you read: Why a heating boiler smokes, what to do: problems with a gas and solid fuel boiler, how to fix them.
Locations of water leaks
Leaks can occur along the entire water path. If a double-circuit gas boiler is leaking, the problem may be in the following components:
- heat exchanger;
- pipes;
- expansion tank;
- places of detachable connections.
The level of complexity of the upcoming repair largely depends on the location of the water leak.
The easiest way to eliminate leaks is at detachable connections. It is more difficult to repair a leaking pipeline inside the equipment. The most labor-intensive process is repairing or replacing the heat exchanger.
The double-circuit boiler is equipped with pipes for connecting 4 pipes through which water is transported. If the joints are not properly sealed, a leak of coolant, cold or hot water occurs.
Leaks must be repaired as quickly as possible after they occur. Loss of coolant can lead to automatic shutdown of the boiler.
An attempt to compensate for the loss of coolant by periodically adding a new portion is fraught with accelerated wear of the boiler. Water is saturated with oxygen, which accelerates the corrosion of metal components, which reduces the life of heating equipment.
Sensitivity is the key to rapid wear.
Of course, everyone likes a comfortable temperature. Modern systems offer fine-tuning of heat exchangers that are able to maintain a strictly specified temperature in the room.
With volumetric gas boilers, everything is clear - 100 or 200 liters of water will take an extremely long time to cool, even by one degree. However, the situation is completely different with wall-mounted appliances with a volume of up to 10-12 liters. There the count goes on in minutes, which causes clocking. The situation is especially typical during the off-season.
Near-zero temperatures outside the window are a difficult problem for boiler automation. Heat transfer to the environment is not strong enough for constant operation even at low powers, but still manifests itself in the absence of heating. A small range of 2-4 degrees causes constant starting and interruption of the cycle, which significantly wears out the boiler. The right decision would be to increase the spread to 10-12 degrees.
Scale deposits inside the heat exchanger
The heat exchanger can be clogged not only with combustion products, but also with scale and limescale that forms with each portion of water entering the boiler. Scale is formed as a result of heating hard water.
Inside the heat exchanger, solid deposits of salts turn into a kind of insulator, reducing heat transfer from heating. The larger the scale layer in the heat exchanger, the worse the heat transfer from fire to water will be, because heat will not be able to penetrate a thick layer of solid deposits. This significantly reduces the energy efficiency of the entire system and the boiler stops reaching the desired temperature.
To remove scale, the heat exchanger must be removed and descaled using a special acid. As a preventative measure, it is recommended to maintain the operating temperature in the boiler.
Traditional methods for descaling include the use of ordinary table vinegar (3-10% acetic acid solution). Table vinegar is poured in equal parts with water, the solution is left to interact with the scale overnight. Cationation and reverse osmosis methods are also used.
Repairing leaks mechanically
If you want to reliably repair the system and forget about the problem for a long time, you will have to spend money. Moreover, the list of means used is significantly expanded (the price of the product is indicated in brackets):
- clamp clamp for car cooling pipes (0.4 cu);
- pipe bandage with 4 bolts (0.7...10 cu depending on the material and workmanship);
- self-vulcanizing tape (2.5 cu);
- saddle clamp used for insertion, plus a plug (2...10 cu);
- reusable Kibosh clamp from the ROTHENBERGER brand for emergency leak repair (20 euros).
In addition to these devices, “original” fittings – couplings – are used to restore the tightness of plastic lines. The branch of the system is emptied, the pipe is cut at the point of leakage, then the ends are joined using a coupling.
Metal bandage (left) and plastic saddle clamp (right)
Another simple connector for steel is a reinforced hose of suitable diameter. The latter is installed instead of the cut out rotten section of the water supply system. Fastening method: tight or wire clamps.
Now we will explain one by one the technology of using mechanical sealing means:
As you can see, only vulcanizing tape is suitable for all types of damage. The remaining clamps and bandages are mounted on straight sections of pipes; it will not be possible to seal the battery, joint or bend. But there are various chemicals for this purpose.
How to fix a leak
If a breakdown is detected, it must be repaired. Even a small drip, if left unattended, can develop into a major leak that can destroy the entire heating system. Boiler leaks can be eliminated using soldering. To do this, you need to remove water from it and wait until it cools completely. After this, markings are made, the device is disconnected from the network and the places where water is leaking are sealed with a gas burner. When the leak is eliminated, water is poured into the boiler again and the device starts up.
In order to repair the boiler as little as possible, and perhaps not at all, it should be carefully inspected at the time of purchase for defects or defects.
Pay special attention to the quality of knocks and connections. Only by fully checking the purchased unit can you be sure of its quality and serviceability.
Signs of depressurization
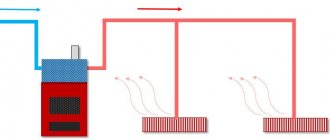
The heating systems are all built according to the same scheme - boiler - supply pipes - appliances - return pipes - boiler. It's looped. The pressure and circulation of the coolant in central heating systems is maintained using pumps. In private sector houses with an autonomous open heating system, pressure and circulation are provided by the boiler when heating. The cottages have an autonomous closed heating system, the coolant is always under pressure.
In heating systems, pressure control occurs using instruments, but small leaks are still difficult to detect; automation equalizes a slight drop in pressure. Pressure gauges are not installed in private houses. Therefore, in both cases, residents have only one way to control the tightness - visually.
When inspecting heating appliances and pipes suitable for them, pay attention to damp places. In areas of obvious leaks, water will drip or flow, leaving traces of rust. But those who hid metal risers in boxes that one of them is leaking will most likely find out from the neighbors to whom the water flowed
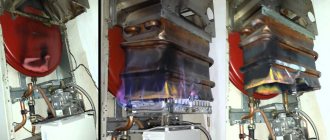
Damage to the heat exchanger and pipes
If the heat exchanger of a gas boiler is leaking, the wall may have burned out, a crack or a fistula has formed. Based on the material used, heat exchangers are divided into copper, steel, and cast iron.
Cracks in metal are formed under the influence of thermal stress and hydraulic pressure. Corrosive processes lead to the formation of fistulas. Repairs are carried out by soldering.
Main stages of the process:
- dismantling the heat exchanger;
- cleaning and degreasing the area around the leak;
- soldering using flux and solder;
- trial;
- installation.
If there is a leak in an easily accessible place, complete dismantling of the heat exchanger for repair is not necessary. It is enough to remove the casing, turn off the gas and water, disconnect the electrical wires, and drain the remaining water.
For soldering, select a solder that corresponds to the material of manufacture, for example, copper-phosphorus solder containing silver is suitable for copper heat exchangers; the temperature regime at the soldering site must be observed
The soldering area is cleaned and degreased with a solvent. Soldering is performed using a soldering iron or gas torch. The heat exchanger is installed in place and communications are connected to it.
Tests are carried out by crimping. The circuit is filled with water, the pressure is increased to the test value and monitored using two pressure gauges for at least 5 minutes. If no pressure drop is detected and no leaks are noticed during a visual inspection, the repair can be considered complete.
In case of severe damage, repairing the heat exchanger is impractical. It is simply replaced with a new one. It is also impossible to solder many Chinese-made heat exchangers, since they are made of thin-sheet alloys that cannot withstand soldering.
Soldering a gas boiler heat exchanger
All water, air and solids are removed from the exchanger. Blow through a hose by machine, and blow out the residue with your mouth.
Four components are used for soldering:
- soldering tool (gas torch, blowtorch or soldering iron);
- solder;
- flux;
- tools for stripping before and after.
- PMC-36 - from 825 °C;
- PMC-42 - from 833 °C;
- PMC-54 - from 860 °C.
- abrasive;
- solder paste;
- tinning acid.
Solder is a material for joining workpieces that has a lower melting point than the base being processed. Solders are usually made from metals. They are produced in the form of wire, embedded parts, pastes, foil, powders, rods and granules. Wires are most suitable for soldering the heat exchanger. Take this one.
To repair the heat exchanger, choose high-temperature solder with a lower melting point, but not lower than 700 °C, from the same material and with similar physical and mechanical properties. The anti-corrosion properties and conductivity of the wire are also taken into account.
Copper, stainless steel and cast iron are common raw materials for exchangers, and zinc is often added to the base. For soldering copper heat exchangers, copper-zinc solders with inclusions that neutralize the dangerous effects of fumes are often used.
Solder in rods is not as convenient as wire solder, but it can also be bent by hand, even with a large diameter, and the resulting solder will be quite rigid
High-temperature hard solders are marked PSR, PMC, PMT, etc.
Copper-zinc is designated PMC and is numbered based on the melting point:
A standard gas boiler heat exchanger can be soldered by anyone, but whether this can be done depends on the materials of the part.
Good solders produce sealed seams. The components of such alloys penetrate into the soldered surface by diffusion, and the base is dissolved in a small amount in the auxiliary material. After hardening, a homogeneous layer appears.
Flux is a substance for removing oxides from the soldered base, increasing the fluidity of the solder, reducing surface tension, and better wetting the workpiece. Universal and special products are combined with heat exchangers. Solder pastes usually contain copper, which is good for the heat exchanger. Mixtures with silver are also suitable.
Preparing materials before soldering
The soldering iron tip is tinned. The tool is heated until the tip is slightly reddened and covered with a thin layer of solder, while the oxidation film is removed. The tip and wire are dipped into flux. At the tinning stage, you can use rosin or resin for this.
After the smoke is released, the sting is held for a few more seconds. Then the soldering iron with solder is dipped into the flux three or four more times.
Devices become tinned after purchase, and then from time to time - with frequent use. The tip of another soldering iron is sometimes used as a basis for tinning.
The photo shows tinning - after this it won’t hurt to press the tip to a wooden board with resin, which will also even out the solder layer
If the condition of the solder is not the best, then it should be cleaned of dirt and oxides. Heat the end of the solder wire to operating temperature and immerse it in the flux, pressing it firmly against the hard surface on which it is located.
If there is no new wire, then the old one can be treated with base cleaning agents, such as:
Before soldering, remove dust from the surface of the heat exchanger so that sparks do not appear during operation. The area with the fistula is treated with a cleaning sponge or fine-grained sandpaper and wiped with a solvent to remove all chemical compounds.
Then the problem area is heated with a hairdryer for better performance and to evaporate any remaining moisture. Otherwise, it will come out sharply during operation and dislodge the solder joint. After warming up, the area is cleaned again.
How to solder a boiler heat exchanger?
A small fistula on the heat exchanger is found by green spots, but if such a shade is present on most of the device, then the condition of the coating and evenness of color are taken into account.
The soldering agent is chosen according to the situation. A soldering iron is suitable for fine work. A large flame from a gas burner will warm up the problem area well, but the power of the device may not be enough, contrary to expectations. You also need to choose a powerful soldering iron.
You should select the correct nozzle for the burner - the flame should be approximately 2 cm wide, and rotate it for convenience, and while working, hold it so that the fire is distributed evenly over the surface
Most of the work looks simple. Flux is placed on the heated area, after which they begin to solder. The solder is placed on the heat exchanger with its tip, the soldering iron is placed against it and gradually heated. The wire will begin to interact with the flux and base. The remaining uneven mass after soldering is distributed.
In the case of a gas burner, take a regular autonomous one or something more efficient. For example, powered by a large cylinder. Never turn on the maximum flame mode. Apply solder after the flux color becomes brighter, for example silver instead of gray.
Keep the burner at such a distance that the wire melts more from the heated heat exchanger, rather than from the fire. To treat a small fistula, half a minute of soldering may be enough. Detailed soldering instructions can be found in this material.
Do not overheat the base and solder during soldering - the latter will not be fixed well. Make sure that the resulting structure is not loose and the color is not matte. Soldering ideally restores the entire problem area, and if this is not the case, then another approach will be needed.
Raise the temperature of the soldering iron to 20 degrees above the melting point of the solder. To clean the finished joint, use braids and spring removers - the tools will also remove flux residues. Wipe the exchanger with a damp cloth and remove all microparticles.
For normal operation of the boiler combustion chamber, the soldering area must be cleaned, and some disruption of the shape for the primary heat exchangers does not matter
Water cannot flow through the repaired heat exchanger for another 5-10 minutes. In any case, let the part cool completely. Turn on only clean water on the first day after repair. Make sure there is no rust.
Remove air from the system again and test run the boiler. Check operation at full load. Pass cold and hot water through the exchanger. After several temperature cycles, it may turn out that the exchanger is leaking again.
The repaired part must withstand thermal deformation. To be on the safe side, coat the joint on the exchanger with heat-resistant paint to increase strength. In the following days, retest the heat exchanger.
We also recommend reading about other malfunctions of gas boiler heat exchangers. For more details, follow the link.
AnswersMail.Ru Gas boiler clocking. On time
what is 17 kilowatts of coolant? it should be in liters
17 kilowatts of coolants? This parameter is the OK losses and in double-circuit ones, the consumption for heating DHW. The on/off time depends on the temperature of the coolant and the internal temperature of the room.
Clocking the boiler, in principle, does not interfere with its operation, but the less often it turns off, the better. The boiler needs to be adjusted to the system or immediately select the boiler power for the heating system. You can reduce the power by going to the engineering menu or inviting a specialist so as not to mess things up yourself.
from home conditions and from the weather and from the sensitivity of the boiler....
Important Operating Instructions
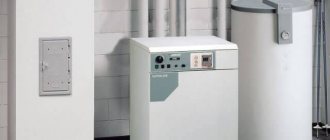
In terms of operation, gas boilers with a closed combustion chamber are considered safer. Their firebox does not communicate with the room air. However, the power of such boilers is significantly inferior to the power of boilers with an open combustion chamber. Therefore, in private households a second type of boiler is often installed.
The choice of future coolant depends on the goals and operating conditions of the system. If the boiler is expected to be turned off frequently, then it makes sense to think about using antifreeze
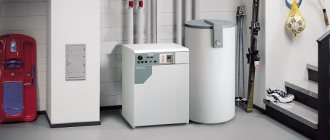
The operation of such boilers requires compliance with safety precautions. So, to install a powerful floor-standing boiler, it is customary to use a separate room with a certain size. The boiler is mounted at some distance from the walls. Nearby walls should be protected with fire-resistant material to prevent fire.
A ventilation system must be installed in the boiler room. There should also be a source of natural light. The width of the entrance door must be at least 80 centimeters. The chimney is laid in accordance with the instructions for the boiler and from heat-resistant material. The chimney must rise above the roof ridge by at least half a meter.
One safety measure is to install carbon monoxide detectors. The gas detector will promptly detect the leak of a volatile toxin and warn users about it. It can also be configured so that the ventilation is automatically turned on and the gas supply is turned off. Modern automation allows the implementation of a variety of smart systems.
If the temperature, pressure or gas sensor fails, you must immediately turn off the boiler and call a service technician. Using a boiler without these devices is fraught with serious negative consequences.
SNiP requirements state that a gas boiler must be connected to the main line using a copper pipe or a bellows hose. In this case, a faucet must be installed
If signs of a gas leak are detected, you must immediately turn off the gas tap and open the windows to ventilate the room. Do not turn on the light and try to illuminate the room by lighting matches or a lighter.
The gas boiler must be serviced at intervals specified by the manufacturer. Information about the necessary procedures is indicated in the instructions for the device. For example, you need to clean the chimney, remove scale from the heat exchanger, or clear the fumes from the burner. Then the boiler will last a long time, and the risk of serious malfunctions will be significantly reduced.
When using a gas device, do not turn it on at maximum power for a long time. This may result in the release of steam, which is unacceptable.
Sometimes the boiler begins to make unusual noises and vibrations. This may be due to the operation of the fan. We warn you that all actions that require disassembling the boiler casing automatically deprive the owner of the right to warranty repair or replacement.
However, the owner of the unit needs to monitor the operation of mechanisms and systems that protect the boiler from fire. It is necessary to maintain the temperature in the circuits at around 50 degrees, which significantly reduces the likelihood of mineral deposits forming on the internal surfaces of pipes and devices.
Troubleshooting Lemax boilers
The gas boiler Lemax Premium 12.5 with automatic equipment 710 MINISIT is in operation. Is it possible to reduce the boiler power? Tell me, what is the principle for setting a low flame? Can you tell me what pressure should be set to reduce the power? Remove the handle, there will be a large screw under it! Try turning it all the way, there is no low flame. Half a turn of unscrewing gives an average of 50 mm of pressure. From the factory there should be a quarter turn, about 30 mm. Strange boiler clocking does not mean that everything is bad. Remove the “twist” handle, there are 2 screws near it, unscrew them. Disconnect the ignition wire and remove the cover. (I don’t remember exactly what the other bolt on the cover holds - either the cover, or just the piezo ignition, if the former, unscrew it). There are 2 screws under the cover, the smaller ones for adjusting the pressure on the igniter, the larger ones on the burner. Tighten - reduce pressure. Make sure that the flame does not sag too much on the burners. From the extreme tightened position, unscrew the screw no more than 4 turns. After adjustment, check for gas leaks under the screw. Put the handle on without much force, according to the grooves. There are plug screws on the pressure measurement pulses, not to be confused with the adjustment screws. The first ones are not under the lid, but outside. Boiler Lemax Leader. In theory, if there are no abnormal heat losses, then the water in the system cannot cool the boiler water in 3 minutes. It's just a little unclear to me. It’s clear with a wall-mounted one, but not with a floor-mounted one. Everything is very simple. A powerful boiler gives a difference between supply and return of 20 degrees (or maybe more), and gives this difference quite quickly. The thermostat is set to supply, and its hysteresis is about 10 degrees. The process is as follows: the burners turn on, the water in the boiler quickly heats up to the temperature set on the thermostat, the thermostat works, turning off the burners, but circulation has not yet begun (at EC) or has only passed half a circle. Then the circulation continues to work (with the burners turned off), pushing the next cold portion into the boiler, the thermostat turns on the burners and the cycle repeats. If the volume of the system is 20 times the volume of the boiler, then it will cycle for a long time. And if the circulation is also very weak, then the following situation may occur - the boiler seems to be powerful and cycles constantly, but the house is cold, because it heats and pushes only 20 liters out of a 300 liter system. I want to purchase a Lemax Premium KSG-16 or Premium Nova gas floor-standing boiler. I have a question about burners. They use three burners - Eurosit 630, Minisit 710, Sit 820 Nova. The first two support smooth throttle control, while Nova sit 820 only works in the on/off mode. It seems that everyone is trying to avoid clocking when setting up the boiler, then why does the newest burner operate in this mode? What's the point? It is clear that it is better to keep the temperature a little with low heat than to wear out the burner and heat exchanger with intermittent fire supplies. Who can advise on this issue and the choice of boiler? Firstly, not burners, but automation. Secondly, modulated automation does not provide for connecting a room thermostat. Recently, we installed a Lemax gas boiler with SIT 820 NOVA mv automation and the ability to connect an external room thermostat. Only the boiler itself and the coolant were replaced, all other CO remained unchanged. The chimney temporarily remained the same from the old boiler, but was installed with a 130 to 120 mm adapter. When heating and cooling, the device begins to click and squeak. The sound is loud and comparable in level to the built-in thermostat when turned on and off. It starts clicking after 15-20 seconds. after turning on the burner. It usually repeats with a frequency of about once every 5-10 seconds, depending on the temperature in the system and continues until the burner turns off. Then the reverse process occurs, but with much less intensity. During some periods there are no clicks at all, or it may randomly click only 2-3 times, while only the operation of the burner is heard. The source of the noise is very difficult to understand, but I still assume that the noise comes from the heat exchanger. What I tried to do. I increased the coolant circulation rate by switching speeds on the pump. Turned off the pump completely. By the way, this situation also often happens on an old boiler if the power supply was turned off for up to 6-8 hours. At the same time, the room, of course, cooled down, the boiler continued to fire, but turned on very rarely. I increased and decreased the gas pressure on the burner using the gas inlet valve. Turned off the burner completely and let it cool. Checked the air in the system. It completely blocked all the heating radiators, while naturally the device turned on very rarely. I removed the chimney, and after a minute the draft sensor was activated and the gas was completely turned off. Clicks occur during heating and shutdown, in places where metal parts of the boiler touch (connect) one part heats up more than the other, mutual displacement occurs, the parts are tightened with bolts and smooth movement does not occur, hence the clicks. This situation can arise when using extremely concentrated antifreeze (Lemax does not recommend the use of antifreeze-containing liquids). As for ethylene glycol containing antifreeze, any leak from the heating system can be detrimental to health. Such problems arise from consumers who did not flush the heating system when replacing the boiler with a new one. Why did I ask about the circuit, there are situations when it is not properly secured (boilers with circuit o in the description, i.e. Premium - 16 V), when the temperature of the coolant increases, the circuit (copper coil) begins to make sounds, these devices are manufactured by the manufacturer exchanges for new ones. A Lemax KSG-20 floor-standing boiler was installed and connected - square (old model). Automation Eurosit 630. There are 2 problems. When Eurosit 630 extinguishes the main burner (it is hot and even at 40 degrees overheating occurs), the pilot burner burns, but somewhat unusually - a periodic noise phenomenon is observed. Here, as it were, the main flame of the pilot burner is 1-2 millimeters at the base and breaks away from the burner itself for 0.5-1 seconds, then everything falls into place. Is it possible to install nozzles from smaller boilers of the same series. Will there be anything wrong with the burners or should I try to lower the boiler using the gas tap? The pilot light can go out for various reasons. It’s better for a specialist to figure it out on the spot. Problem with traction extension, perhaps if there should be traction breakers. The pressure on the igniter is adjustable. Your nozzles are 2.6, replacing them with 2.5 will result in a reduction to 19 kW. You should also adjust the main and small flames so that the boiler does not go into the small flame earlier than it should and heats up the heating. The Lemax Leader 16 boiler is in operation. I set the power regulator to 1 or 2, and the boiler works normally for 4-5 hours. But then the house warms up to +25, and the boiler first switches to a low flame, then to a high flame, then again to a low flame and the main burner turns off. About the boiler operation settings - I would like not to increase the low flame, but to reduce it - thereby ensuring constant operation of the boiler. That is, they have heated up to the desired temperature, switched to a low flame, but it must be adjusted so that it maintains combustion and a smooth decrease in temperature until the main burner turns on again at full power. Is it possible to adjust the small and large flames only on a cold boiler with the burner off? According to the small and main flame of the burner. Is it possible to slightly reduce the power by using the main burner adjustment screw to reduce the gas flow on a high flame without changing the jets (how to understand the range by how much you can reduce it). How to correctly set it to the desired gas flow? Try to see if the thermocouple will move further or try the position of the thermocouple without the nut, how far it will rest. Look, if you can, how it is washed by the flame of the igniter. All thermocouple contacts must be secured. Do not press the thermocouple tightly into the socket; the tin on (+) may begin to come into contact with the ground. The flame needs to be adjusted on the working boiler, generally only by specialists. From the fully recessed position of the adjustment screw to its maximum unscrewing, you cannot make more than 4 turns. On the Eurosit 630 automatic there is also a gas regulator at the inlet, but I could never use it to reduce or increase the gas pressure. Perhaps he only reduces from very high pressure to less. With everything, of course, the igniter tube and nozzle must be clean. The Lemax Leader 25 boiler keeps going out. We cleaned the pipe, the draft is good. After that, problems began, it constantly went out, and it was very inconvenient to light it. They called the gas guy several times and he said it was not the pipe. I think it can be replaced? It might be a thermocouple issue. We installed a Lemax KSG-12.5 Premium gas boiler. After turning off the main burner, a clicking sound occurs after a couple of minutes, what is the reason? Tell me? There are holes inside the boiler with dampers in them. If they fit tightly, this is what causes metal clicks. Also check the boiler level. In operation, Lemax Patriot 10, I set it to 70, but it goes out at 60, then it stays on - only ignition. The pipes cool down, drops below 40 and that’s it. You adjust it to 90, it goes up to 60 again and turns off, what should I do? Look at the system - there is no circulation or it is airy, maybe a valve is closed somewhere. Maybe the temperature sensor is not working. We installed a Lemax Leader-16 boiler (cast iron), it started clicking and could be heard throughout the entire heating system. What to do with him? The problem is not with the boiler, most likely the old heating system was not cleaned. We installed a floor-standing gas boiler Lemax KSG-10. After ignition, it turns off automatically after a few minutes. Tell me, what is the reason, and can it be eliminated? The reasons for the problem described may be the following: when the main burner is turned on, the igniter is knocked out, the gas pressure on the igniter is not adjusted, poor draft or insufficient supply ventilation. First of all, check the traction in the system. In the vast majority of cases, it is problems with the chimney that cause the boiler to shut down. This device has high efficiency, so the temperature of the flue gases is quite low (up to 120 ° C). Because of this, draft may be lost in uninsulated chimneys. In this case, the sensor is triggered and the gas supply stops. This automation ensures safe operation of the equipment. In addition, we recommend checking the gas pressure settings on the igniter and the ventilation valves in the room (the grilles must be open). Tell me, which arrow in the thermomanometer shows pressure? I have a Leader 25 series boiler with a cast iron heat exchanger. Red bottom arrow or black? If it’s black, then I have almost zero. How to increase blood pressure? So what if it falls? Is this very bad? The red arrow on the thermomanometer shows temperature, the black arrow shows pressure. Most likely there is a leak in the system. A drop in pressure will result in no water circulation. In your case, you need to find and fix the leak. Boiler model Premium KSG-16. Why does it often go out even in light winds? Your problem has nothing to do with the design or characteristics of the device. Attenuation may be due to the following reasons: when the main burner is turned on, the igniter is knocked out, the gas pressure on the igniter is not adjusted, poor draft or insufficient supply ventilation. If there is no draft, the sensor is triggered, the gas supply stops and the boiler goes out. In addition, attenuation occurs in light winds. Most likely the chimney is below 5 meters. Please check that its design meets the requirements stated in the passport. This is important for stable and safe operation of the equipment. We also recommend checking the gas pressure settings on the igniter and the draft in the system. Please note that due to the relatively low temperature of flue gases (110–120 °C) draft may disappear in uninsulated chimneys. In 94% of cases, this is precisely what causes problems with gas equipment of this type. Also check if there are any problems with the supply ventilation. Open the ventilation duct grilles if they are closed. Gas boiler Lemax KSG-7.5 with UGG-9 (Danko-26). Worked great for 6 years. The house was stuffy and hot even at -35 below zero. But this winter, apparently, some spare parts have expired. There was a smell of gas, the burner went out and so did the wick. When I tried to turn it on, a flame flared up from under the burner with a solid blue fire. Please tell me what could have broken? Most likely, the lye spring has failed - the resource has expired. It is not possible to replace this part separately, because... they are no longer produced. You can purchase and replace the entire gas valve assembly. The automatic comfort control has stopped working, the flame does not fall on the wick, what could be wrong? Who knows? I installed it about 6 years ago, everything worked. Flat burners 3 pieces. Model KSG 7.5 The whole problem is in the traction sensor, or rather in the connectors. Take it off or move it and the boiler starts working. The KSG-12.5 boiler is in operation. The intensity of combustion, and therefore the quality of heating, directly depends on the ambient temperature. Yes, yes, not on the temperature of the coolant (water), but on what the weather is like outside. That is, if it is warm outside, but at this time it is still cold at home, the boiler stops working. Even with increasing gas supply, the main burner does not burn, only the wick burns. But when it’s cold outside, the battery becomes hotter than ever, even with reduced gas consumption. Can anyone explain what the cause is and how to fix it? Most likely, there are surges in gas pressure in the line, and because of this, the boiler is operating unstably. In order to confirm this assumption, it is necessary to measure pressure under various conditions. In such a situation, a gas pump and stabilizer can be a solution to the problem. However, we cannot say that the reasons for interruptions in the operation of the boiler are related specifically to pressure surges in the system. Lemax Premium 20 kW boiler, installed yesterday, tried to start it up today. The nozzles turn on, after a minute or two the nozzles and wick turn off. Someone please tell me what is the reason. The problem you described with starting the boiler may be due to the following reasons: when the main burner is turned on, the igniter is knocked out, the gas pressure on the igniter is not adjusted, insufficient supply ventilation or poor draft. If the draft is weak, the sensor is triggered and gas does not flow to the main burners. Check the pilot gas pressure settings and system draft. Please note that due to the relatively low temperature of the flue gases (110–120 °C), draft may disappear in boilers with high efficiency in chimneys without insulation. It got cold at home, I wanted to turn on the boiler, but it didn’t light up. You hold the wick for a certain time (according to the instructions) and it goes out. No gas is supplied to the main burners. What to do? Such a malfunction may be due to the following reasons: the gas pressure on the igniter is not adjusted, when the main burner is turned on, the igniter is knocked out, insufficient supply ventilation or poor draft. In the latter case, the draft sensor is triggered and gas does not flow to the main burners. Check the pilot gas pressure settings and system draft. A Lemax KSG-10 gas boiler was installed in the system. This fall I encountered the following problem: we updated the system, turned on the boiler, the temperature on the sensor was rising, but the pipes were cold. The water is bubbling at the top of the boiler. The pipes adjacent to the boiler are equally hot, and the return and supply, at a distance of 2 m, are already icy. I understand that air has accumulated in the boiler. But how to get it out of there? I did not find any valve on the boiler. I have already changed the system 2 times. In this case, the problem is not with the boiler, but with the heating system. Please clarify what exactly you changed in it. It is difficult to give specific recommendations without an on-site inspection. In any case, we recommend calling a specialist to inspect the gas equipment. We installed a Lemax Premium 16 boiler. Switching from the wick to the main burner scares me. It turns out two claps. Is this how it should be? Most likely, it is necessary to adjust the automation according to the gas pressure. The device shows error e72, what should I do? The boiler produces this error in several cases. 1) When installing the boiler, they forgot to put the diaphragm rings in the chimney; the rings are selected depending on the length of the coaxial chimney. 2) If the boiler was put into operation incorrectly, “hot start”, during the first start the pump shaft was not turned, the boiler turned on and burned the pitot tube, error E 72 3) If the pressure switch fails. We installed the Lemax Leader 16 floor-standing boiler. I started it up, everything is fine, but I can’t figure out how to set it up. When the boiler heats up to, say, 60 degrees, it turns off and cools down to 40 degrees. Then it raises it again to 60. Now the question is how to remove this gap so that it constantly remains at 60? As an option, you can install a more sensitive thermostat, perhaps a room thermostat with a slight temperature offset. Your boiler has a gas valve 820 Nova, this valve has the ability to connect peripheral devices such as a room thermostat or a turbo nozzle. The thermostat can be installed to replace the existing one or in one circuit with the thermostat that is installed on the boiler. We installed Lemax premium KSG-7.5 kW. There's a problem. The wick lights up. There is no further movement. The burner does not light up. We set the switch correctly. We waited for about an hour. The wick burns, but the burner does not light. What could be the reason? After the wick remains to burn, the regulator must be translated into the necessary amount counterclockwise, each checkbox corresponds to an average of 15 C. The lemax of the premium 20 kW series is installed. I have such a question, the gas is very often disconnected. When I notice, the control handle is transferred to the position. But what will happen if this is not done? For example, when the disconnect and turning on the gas will occur in my absence. Will the gas leak occur? You will not have anything terrible, the boilers are installed on a power -dependent Italian automation, if there is no gas supply, automation will turn off completely regardless of the position of the regulator handle. Lemax KSG-10 Lemax boiler. Installed in December 2014. He worked normally. This year they launched a few days ago and immediately began to fail - the main burner is turned off at a temperature of 60 degrees (and if you turn off the water pump - at a temperature of 70 degrees). What kind of malfunction? The reason may be in a faulty thermal attemptor (with a round control handle to set the desired boiler temperature). You can check by closing with each other contacts going to it. The KSG-16 boiler worked for 10 years more or less normally. This year the beginning of the season worked well. When cooling, I had to add the temperature on the boiler, and here the problem arose. Until the fourth works without failures, but then i.e. On the five and the six, it gains temperature and turns off. What could it be? The problem is the cold plug of the chimney, insulate the upper part of the chimney and you will have heat. House 70 m. Lemax premium boiler 12.5. Tell me, can there be overrun gas due to the fact that the power is exceeded? If so, how to fix it? You can try to reduce the power of the main burner.
How to fix a leak
To stop a leak in the radiator, you can use the soldering method. Before draining the water, unplug the device and wait until the boiler cools down. If the heat exchanger leaks, drain the water from the circuit.
Now remove the radiator:
Unscrew the screws of the outer casing and camera protection and remove them. Disconnect the wiring of the sensors and tubes that are connected to the node. Take a photo or mark with a marker the correct connections to make the connection. Turn off the fan and smoke detector. Carefully remove the heat exchanger.
Soldering is carried out with a gas torch. First, the area of corrosion is cleaned with fine sandpaper, then degreased. Solder is used for soldering; upon completion of work, the damaged area can be covered with aluminum for protection.
To avoid further operational problems, when purchasing, inspect not only the outer casing, but also the internal components. Radiator material, quality of seams, joints, connections. Follow the manufacturer's recommendations regarding flame modulation and temperature.
Why does water drip from the heating boiler and how to fix the fistula with your own hands?
There are actually not so many reasons why the boiler leaked. First, corrosion may be the culprit. What is corrosion? It is the destruction of the metal structure under the influence of the external environment. Internal corrosion of a gas boiler is caused by the influence of oxygen in the water, external corrosion is caused by combustion products.
The next cause of leakage may be the poor quality of the metal from which the heat exchanger is made and the quality of the seams of its connections.
High pressure in the system or water hammer also cause leaks in boilers. Burnout of the heat exchanger walls also causes a leak.
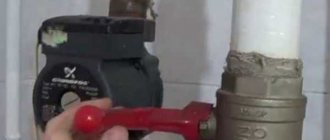
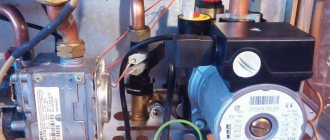
In some cases, when water is dripping from your boiler and you think your boiler is leaking, it may actually be condensation from the chimney that is flowing down the chimney pipe and onto the burner. If this situation occurs frequently, a moisture collection cup should be installed in the chimney. When it drips near the circulation pump, the bolt located in its center may have become loose. Tighten the bolt.
Below we will consider each case separately in more detail and describe what to do if this happens.
Wall thickness and corrosion
Heat exchangers installed in heat generators can be made of copper, steel and cast iron. Each of them has its own pros and cons. Copper heat exchangers are corrosion resistant and durable if the boiler is used correctly. Steel heat exchangers are the most common, due to their low cost, resistant to thermal stress due to their ductility, but are more often subject to corrosion.
Heat exchanger corrosion
Cast iron is resistant to corrosion and has a long service life, although they are susceptible to temperature changes and water hammer. Most manufacturers do not use anti-corrosion coatings. But in the latest models of Ferroli gas double-circuit boilers, steel heat exchangers are covered with an anti-corrosion aluminum coating with environmentally friendly internal insulation.
On Baxi units, copper heat exchangers are coated with a special anti-corrosion compound. Protherm, Buderus and Beretta have a cast iron heat exchanger, which is coated with a special anti-corrosion compound. In addition, such a heat exchanger consists of separate sections that can be replaced if they are damaged without completely replacing the heat exchanger.
Wall-mounted boilers Rinnai, Celtic, Bosch are equipped with copper heat exchangers, Vaillant and Navien are made of stainless steel, it is believed that they are less susceptible to corrosion.
Frequent feeding of the boiler has a great influence on the formation of corrosion. Ideally, so-called “dead water”, without oxygen, should circulate in the heat generator. It is oxygen that promotes the formation of corrosion.
If you often have to recharge the heat generator, you should eliminate the reasons for the pressure drop in the unit. Oxygen corrosion forms an ulcer on the inside of the heat exchanger, which is very dangerous. Growing inward, it forms through rust and destroys the heat exchanger.
Workmanship
The strength of the boiler depends on the quality of the welded joints. If a weld seam has cavities or irregularities, sooner or later this seam may leak. The void located inside the seam is considered especially dangerous. Ideally, the seams should be X-rayed, but not all manufacturers do this.
Although heating boilers are pressure vessels and must be subject to increased manufacturing requirements, defects sometimes occur. And, as a rule, it drips from the heating boiler after the warranty expires. It is not always possible to weld the boiler inside and stop the leak.
It depends on how the heat exchanger is designed. In models where a bithermal heat exchanger is installed (the secondary and primary are in the same housing, heat exchange occurs thanks to the two-in-one design), this is problematic. But, even if you did this, as practice shows, this will not help you for long.
High system pressure
Excessive pressure in the system can also cause a boiler leak. There can be many reasons for high blood pressure. The main reason may be a malfunction of the expansion tank, air locks in the system, a clogged strainer, a malfunction of the safety valve, or the make-up tap.
A malfunction of the safety valve is indicated by constantly leaking liquid from the tube. High pressure can not only cause a crack in the boiler, but also cause an explosion. Monitor the serviceability of the pressure gauge and relief valve; sometimes the valve jams due to the formation of a layer of salts on it. Wash it in citric acid.
Heating boiler safety valve
It is necessary to regularly check the correct pressure on the valve and in the expansion tank. When installing an expansion tank, it is necessary to calculate the volume of coolant. How to calculate - there is a calculation formula, and the average value is -1.5 Atm or 0.2 Atm lower than in the system. For prevention, do not forget to wash the filters at the inlet and outlet of the heating circuit; after recharging the system, it is necessary to ventilate the batteries.
Burnt out walls
The cause of the leak may be burnout of the combustion chamber wall. Steel and cast iron burn out when carbon evaporates from their composition, so the metal in the combustion chamber becomes thicker. As a rule, burnout occurs when the height of the combustion chamber is incorrectly set, the burner power is set incorrectly, the burner is not adjusted to minimum and maximum power, or the flame is too high.
Burnout occurs when the boiler is constantly operating at maximum power; this occurs in the case of insufficient insulation of the home or when the heat generator is selected without taking into account the heated area.
When purchasing a boiler, read reviews on the Internet and give preference to reputable manufacturers. It is better to buy a heat generator with a little more power, with reliable flame modulation and entrust the settings to specialists.
How to stop a leak with your own hands
How to repair a leak - the leak repair algorithm is the same for both solid fuel boilers, such as Don, KChM, and gas boilers, for example, AOGV, Alixia 24, Ariston, Deu, Arderia, Electrolux.
- Turn off the device.
- Drain the water.
- Wait until the boiler cools down completely.
- We will describe how to remove the heat exchanger below.
- Solder and eliminate the fistula.
What does a heat exchanger look like - it is a metal or cast iron body, heated by a burner flame and transferring thermal energy to the liquid that is inside it.
To disassemble it and solder it yourself, you need to remove the front panel, protective casing and combustion chamber protection using a long screwdriver. Then disconnect the sensor wires and the pipelines suitable for the heat exchanger, try not to damage the pipes and pipes, hold them with a wrench.
In order to connect everything correctly later, you should first take a photograph of the inside of the heat generator. Then disconnect the fan and smoke detector. When removing the heat exchanger, do not use force or make sudden movements; do everything with extreme caution.
If you find a gap between the circuits in the tube, it is impossible to repair such a hole; you will have to change the heat exchanger. The heat exchanger cannot be welded; soldering with a gas torch should be used.
Soldering the heat exchanger
In order to do soldering yourself, you must first clean the place where the fistula has formed. This can be done using fine sandpaper. Soldering is carried out using an oxygen gas mixture with solder containing the same chemical elements from which the heat exchanger is made.
Tin cannot be used in this case, since such repairs will again lead to the formation of a fistula after some time. After soldering, a protective coating, for example, a layer of aluminum, should be applied to the problem area.
Prevention of fistula formation
When purchasing a heat generator, carefully examine the quality of the soldering of the connecting seams, both on the water and on the primary heat exchanger; there should be no sagging or unevenness.
Set up the burner according to the instructions in the instructions. To avoid the appearance of fistulas, it is necessary to take timely measures in the presence of high pressure and airiness in the system. Avoid frequent refilling of the system with water; find out the cause of the pressure drop in this case and eliminate it.
boilervdom.ru
How can you tell if your boiler is leaking?
A coolant leak reduces the hydraulic pressure in the heating system. Let us say right away that pressure can change for other reasons, for example, due to changes in the density of water. But if the pressure gauge needle stubbornly falls down or a notification about a lack of water in the system appears on the display, you must definitely check for leaks.
Problem areas are inspected: primarily detachable connections, including taps. But the location of the leak cannot always be determined visually, because the coolant will not necessarily flow in a continuous stream, flooding the floor. Most often it just drips. When the droplets fall on hot surfaces they evaporate.
Therefore, you need to pay attention not only to wet places, but also to traces of drips and rust stains. It is better to look for leaks with a flashlight; inspect hard-to-reach areas with a mirror
Place napkins under possible leaks. Getting them wet will confirm that there is a coolant leak.
A mandatory element of the heating system is a pressure gauge that measures hydraulic pressure; a drop in pressure may indicate a coolant leak.
If a leak is indicated only by a drop in pressure, the problem may not be in the boiler, but in other elements of the heating system, including radiators, which also need to be checked.
It can be done as follows: water is drained from the circuit and air is pumped in using a compressor. It will come out of the leak with a characteristic noise. If the pipes are laid under tiles or in concrete floors, you will have to use a phonendoscope to hear the sound of the air escaping. Also in this case, leak detection can be done using a thermal imager.
High system pressure
Excessive pressure in the system can also cause a boiler leak. There can be many reasons for high blood pressure. The main reason may be a malfunction of the expansion tank, air locks in the system, a clogged strainer, a malfunction of the safety valve, or the make-up tap.
A malfunction of the safety valve is indicated by constantly leaking liquid from the tube. High pressure can not only cause a crack in the boiler, but also cause an explosion. Monitor the serviceability of the pressure gauge and relief valve; sometimes the valve jams due to the formation of a layer of salts on it. Wash it in citric acid.
Heating boiler safety valve
It is necessary to regularly check the correct pressure on the valve and in the expansion tank. When installing an expansion tank, it is necessary to calculate the volume of coolant. How to calculate - there is a calculation formula, and the average value is -1.5 Atm or 0.2 Atm lower than in the system. For prevention, do not forget to wash the filters at the inlet and outlet of the heating circuit; after recharging the system, it is necessary to ventilate the batteries.
How to eliminate leaks in hidden wiring pipes
To quickly seal hidden heating pipelines, use mustard powder or a ready-made special sealant. The existing substance is added to the expansion boiler and the system is put into operation. After a few hours, the sealant (or particles of mustard powder) will seal the damaged area, eliminating the leak.
Such repairs will give time to prepare for a complete restoration of the heating circuit. However, if a large damage has occurred in a hidden area, then the internal sealant is unlikely to help. The heating circuit will have to be drained and repaired immediately.
Affordable repairs begin with the correct design and installation of the heating system. All detachable connections must be accessible for inspection. Hidden areas must be made of high-quality, durable materials and not have detachable connections. Timely replacement of worn-out equipment will allow you to live peacefully in cold weather, enjoying warmth and comfort.
Causes and localization of leaks in the heating system
Leaks in the heating system occur for various reasons and in different places in the circuit: in straight sections or at pipe joints.
Leaks on straight sections
The cause of leaks in metal heating pipes that have been in use for more than one year in more than 95% of cases is corrosion (rusting) of the metal.
Even thick-walled galvanized pipes in heating circuits are eaten away by rust over time. The destruction of metal upon contact with water is a natural process that has not yet been completely overcome.
The trigger for metal destruction can be:
- mechanical, chemical internal damage to the pipe;
- changes in temperature or pressure;
- damage to the protective outer layer.
Note! If a leak occurs in an old heating pipe, then most likely this is a warning about total wear and tear of the entire system.
In autonomous heating systems, which are installed from modern polymer materials, leaks are caused by the wrong choice of pipes.
When the owner, out of ignorance or for reasons of saving money, purchases pipes for cold water or pipes not intended for use under pressure for hot water supply systems or a heating system. In this case, simply sealing the leak is not enough; often a complete replacement of communications is required.
Leaks at connections
Leaks in the connection area occur if the thread has become unusable (for example, it has become stuck and was torn off).
If there is a leak at the fitting installation sites, the prognosis for effective local repair is more favorable. Here you can fix a leak in the heating system by replacing a worn gasket that has lost its elasticity.
In more serious cases, it may be necessary to replace the connecting (adjustable) fitting or valve.
Why does a gas boiler click and why are these noises dangerous?
Knocking, clicking, vibration or sometimes even an “explosion” in gas boilers most often occurs due to the build-up of dirt and fossils in the hot water heat exchangers or in the main heat exchange center of the heating system.
The clicks or hums themselves do not pose a danger to the residents of the house. No defects or problems will appear due to them.
The most they will bring is discomfort.
Reference! However, clicks (and other noises) usually become an indicator of malfunctions in the gas boiler. This could be either a serious breakdown of the part or a build-up of dirt.
The gas boiler clicks during heating, switching on and/or switching off.
During power on
- In case of malfunction of the three-code valve.
- If you hear a loud bang or knock, the ignition system is most likely faulty. This happens when the spark ignites much later than it should.
In this case, a large amount of gas accumulates. When a spark appears, the gas ignites and a bang is heard.
- Such noise is caused by a clogged wick (if the gas boiler is semi-automatic) or a defect in the chimney. At the same time, the electrodes (in boilers with automatic ignition) also become clogged, which short-circuit and click. When heated, they deviate more.
- Clogged nozzles in the burner lead to a poor-quality mixture of natural (or liquefied) gas and air. This is evidenced by the noise when lighting a fire.
During heating
- The gas boiler makes noise if the radiator mounting brackets are installed incorrectly. Then during heating (sometimes during cooling) the thermal expansion in the heating system will not be balanced.
- A clogged mesh in the housing also leads to clicking sounds. At the same time, the draft decreases when heated.
- Sometimes resonance occurs in the system due to improper operation of the pump.
- The evaporation of a large amount of water is also accompanied by various sounds.
When cooling
A lot of free space is needed for heat to spread, and if the pipes were installed without taking this into account, then most likely the boiler will click or crack.
This phenomenon is most noticeable when cooling the heating device, when the temperature changes downward.
Why does moisture appear in gas boilers?
In addition to condensation in the chimney of a gas boiler, moisture can also form in the water pipes. The main reason lies in the temperature difference.
The appearance of “dew” on pipelines is also affected by:
- improper ventilation operation (insufficiently powerful exhaust hood);
- high level of humidity in the room;
- incorrect operation of heating equipment.
The design of a gas boiler does not allow you to completely get rid of condensate. However, you have the power to reduce the rate of moisture formation and its amount.
Fighting condensation in an atmospheric boiler
If an atmospheric wall-mounted or floor-standing gas boiler is installed in the house, then the combustion products heat up to 170-200°C. The gases formed during combustion also contain water. However, it does not condense, but turns into steam and is discharged through the smoke channel along with other smoke and volatile soot particles.
When starting up floor-standing gas equipment after a long period of inactivity, a small amount of condensation is allowed to appear, which will evaporate after the boiler warms up. During the cold season, the boiler operates non-stop, so the appearance of liquid is unlikely
If condensation forms in the chimney pipe, then the problem is poor-quality thermal insulation of the chimney. Moreover, the formation of condensate drops on the smoke duct can occur either due to insufficient insulation or due to excessive insulation.
In pipes made of stainless steel, the problem of condensation formation can be solved by installing a condensate neutralizer and adding an element for removing condensation moisture that settles on the surface of the pipe.
When assembling conventional metal chimneys and sandwich chimneys, it is imperative to follow the order of assembly and connection of elements, which provides for spontaneous drainage of condensate outside the smoke channel.
Warning of “dew” in a turbine boiler
Models with a closed burner are equipped with a coaxial chimney. It has a slope of 3° in the outward direction, i.e. from the boiler, it ensures spontaneous drainage of condensate to the street.
The internal channel of the coaxial system is constantly cooled by the air flow coming from outside, due to which the temperature difference during normal operation is minimal.
The standard length of a coaxial smoke exhaust system is 1.2 meters. If extension is necessary, (necessarily indoors) the distance should not exceed 6 meters. There must be at least 0.6 m between the outlet of the outer part of the coaxial chimney and the nearest obstacle (wall, large tree, etc.).
If the boiler is equipped with a coaxial chimney, problems with condensation formation arise during frosty periods. They are solved by insulating the part of the smoke duct located outside the house, increasing ventilation or starting the boiler at full power.
When using a boiler with a coaxial chimney in the northern regions, it is advisable to insulate the outer part of the exhaust pipe. This way you can prevent the formation of condensation on the chimney of a gas boiler. After all, the difference between the temperatures of the incoming air flow and the outgoing flue gases will be reduced.
You can temporarily provide the boiler with air flow from the room. Most turbine models of floor-standing and wall-mounted gas boilers are designed for the possibility of installing separate supply and exhaust systems. You just need to find the plug for the hole to which the exhaust pipe should be connected and open it slightly.
With the exhaust duct plug slightly open, you can wait out the frost. Then it should be covered tightly. In these cases, it also helps to increase the boiler power during frosty periods. In automated systems, a temporary reduction in the interval between the boiler activation and shutdown temperatures set by the owners works well.
Features of condensing boilers
The ideal solution would be a condensing boiler that is correctly balanced with the heating system, correctly configured and operating in the appropriate mode. In this case, the appearance of condensation is absolutely not harmful, because its energy is rationally used by the system itself.
The amount of gas saved directly depends on the amount of condensate formed. The condensation heat generated during operation of the equipment is collected and redirected to the heating circuit. The efficiency of such a boiler is 98%.
Causes of boiler leaks
Any type of leakage has a logical explanation and reason for its occurrence. Sometimes the problem is related to the loosening of an important connection, such as the central screw on the circulation pump or the connecting fitting. In case of such defects, you will need to tighten the listed element, and the leak will be eliminated.
However, sometimes heating units are subject to more complex problems that lead to the formation of a hole in the structure. In the absence of mechanical damage, the root of the problem must be sought in the specifics of the operation and operation of the equipment.
Poor weld quality
Photo source: zdesinstrument.ru
One of the key reasons explaining why a gas boiler leaked is the poor quality of welding. Poor welds are one of the most vulnerable points in the system. When they appear, the boiler unit stops coping with its tasks and begins to leak. Often you have to buy a new device to solve the problem.
High-quality seams are free of such troubles, but if they are made by an amateur without experience and special equipment, failures may not appear immediately, but after a couple of years of operation, when the warranty period expires. In this case, it will be difficult for the user to prove to the manufacturing company that the problem is due to a manufacturing defect.
Leading foreign factories use automated equipment for welding, but domestic enterprises continue to use X-ray technology for stitching seams. To prevent breakdowns, it is important to carefully monitor the accuracy of the connection and not deviate from the established rules.
Burnout
When figuring out why the heating boiler leaked and what to do in such a situation, you should pay attention to the problem of burning out the combustion chamber. Since mainly steel and cast iron are used for the production of boilers, they tend to burn out under intense exposure to open fire. When using the device in a normal environment, the problem rarely occurs.
Photo source: kladempech.ru
If a gas boiler leak is associated with burnout of the walls, this may be due to the following reasons:
- The unit was operated at maximum loads at high temperatures for a long time.
- To heat the room, a weak boiler with insufficient power was used.
- The operating mode has not been adjusted correctly.
- The quality of the burner remained questionable.
To prevent leaks in heating equipment at the purchase stage, you need to choose powerful units from trusted brands.
You should also follow the operating rules and monitor the efficiency of work, avoiding overloads. Otherwise, it may be necessary to purchase a new boiler.
Network pressure has increased
To supply gas, a specified pressure is maintained in the boiler pipes. To monitor its values, manufacturers install special devices - pressure gauges. If the indicators are exceeded, possible causes of failures should be considered.
They are often associated with damage to the expansion tank, the appearance of air pockets in the boiler pipes or clogging of the boiler body. The device ceases to withstand such pressure and begins to deform.
Corrosion
Corrosive processes are considered the main enemy of plumbing units, and the heating boiler is no exception. With constant contact with water, corrosion begins inside the walls and other important elements of the unit.
The rate at which a structure becomes covered with rust depends on many factors. If the system is made of copper or stainless steel, the problem will be eliminated, since the listed materials are not subject to corrosion and scale formation.
However, products made from such raw materials are expensive and not available to everyone, so in most cases the average buyer chooses boilers made of simple steel or cast iron alloys.
Cast iron installations are not afraid of rust, but due to their large mass they are unpopular. Cast iron is also afraid of temperature changes and can become deformed, which will lead to the appearance of a leaking tube or other defect.
Traditional varieties of steel are renowned for their distinctive properties and affordability. However, they are afraid of corrosion processes, and even with anti-corrosion protection, the surface of such boilers often rusts.
In addition to the appearance of a red coating, corrosion contributes to the destruction of metal structures and leads to a problem such as heat exchanger leakage.
The degree of negative impact is determined by the volume and type of liquid that is used in the heating circuit. The more air and impurities the water contains, the faster corrosion processes will begin.
Therefore, experts categorically prohibit the use of river or well water for heating. For this purpose, only a distilled composition that does not contain heavy metals or harmful impurities is allowed.