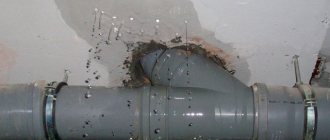
A leak in a heating battery is quite a big problem for home owners. This situation most often occurs at the most inopportune moment - during the heating season. But even this problem can be quickly solved if you take into account a few simple but effective recommendations from experts. To achieve the desired result, you must determine exactly where the battery is dripping, as well as prepare all the necessary tools and devices.
Detection of a fistula in a cast iron product
Factors that cause radiator damage
In order not to have to figure out ahead of time how to properly fix a leak in a cast iron heating battery, you need to understand that structural damage is most often caused by temperature changes in the system and water hammer. Despite the fact that such radiators have increased resistance to various negative factors, they can also fail. Large changes in the temperature of water or other filled coolant negatively affect the condition of the batteries.
If liquid hotter than 100C circulates in the system, gaskets and sealants may eventually be damaged. When water boils, the pressure in the central system can rise several times. This situation does not exclude damage to entire sections. In some cases, the radiator may even burst.
When a previously working battery leaks, the main reason may be due to improper installation of the equipment. This problem can arise just 1-2 years after installation. If cast iron products were chosen to complete the system, then the risk of manufacturing defects cannot be excluded. That is why it is better not to save on heating equipment, so that in the end you do not have to overpay for unscheduled repair work.
Destruction by rust
What to do if a leak is detected
One of the main causes of leaks is wear and tear of materials. But due to different types of connections, leaks need to be eliminated in different ways. This means that the only answer to the question “what to do if the radiator leaks?” does not exist.
To avoid flooding, the following rules should be followed:
- If a leak is detected, it is tedious to place a basin or jar in a certain place, but after this it is necessary to immediately take measures to eliminate the problem. If you increase the amount of containers used, this will ultimately lead to more serious damage to the radiator.
- After eliminating the leak on your own, you should think about replacing faulty components, because it will be more difficult to eliminate a leak in one place the second time.
- Until the problem is resolved, the water in a certain section of the heating system should be completely shut off.
But what to do if the heating battery leaks in winter? In this case, you should use several proven methods. If a serious leak appears and hot water begins to splash, then for protection you should first throw a blanket over the radiator, which will stop even strong pressure and direct the water to the floor. You should also find several large containers for water.
Most common faults
If the homeowner decides to independently figure out how to quickly eliminate the resulting leak, then it is necessary to familiarize yourself with what types of defects of this kind exist:
- Violation of previously created pipe tightness.
- Cracks in the casing of tubular, sectional and panel radiators.
- Formation of a leak in the area where the structure is connected with the pipeline.
- Violation of the tightness of the seam that serves as the connecting element of the sections of the device.
Even the most minor breakdown inevitably leads to a leak in the heating unit. This is a clear sign that the system is out of order. Even an untrained person can detect such a problem. More serious problems can only be identified by a qualified specialist who has at his disposal a special device for measuring pressure in pipes. This approach is especially relevant if the characteristic sound of a leak is heard, but the damaged compartment cannot be found.
The most problematic area
Causes of radiator leaks
Scheme for sealing a leaking radiator.
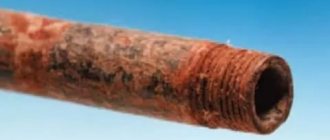
Very often, the cause of leaks in the heating system is corrosion processes affecting metal (of course, if the radiator is not plastic). Thus, metal pipes are exposed to liquid from the inside, which constantly circulates in the system. It is difficult to call it water, since very often various chemical compounds of unknown origin are added to it to improve the properties of the coolant. From the outside, the material is susceptible to moisture and temperature fluctuations. These factors together lead to corrosion and, as a result, leakage.
Plastic pipes are not subject to corrosion processes, but they do have their drawbacks. Thus, pipes made of polypropylene or polyethylene can leak if the installation was carried out incorrectly or the consumables were selected incorrectly. A common mistake is the strong desire to save on materials. Pipes designed for cold water are much cheaper, and many people mistakenly use them for heating systems. Hot water has a destructive effect on them: under its influence they can burst, swell or become deformed.
Metal-plastic radiators are also susceptible to leakage: this can be a consequence of non-compliance with the bending radius or poor-quality installation work. When installing a heating system, you should be guided by what to seal the radiator with, depending on the material from which it is made and the location of the leak.
A leak can occur at the most unexpected moment in any place - on a flat section of the radiator, at threaded connections or fastening fittings, at the junction of radiator sections.
Damage to a piece of material that does not have a thread
You can qualitatively eliminate a leak in an operating heating radiator on your own. This is an excellent option for those situations when there is no time to wait for representatives of the housing and communal services organization, and a welding machine is also unavailable. Many deformations occur due to poor-quality welds and corrosion damage.
There are several available ways to restore the system:
- At a plumbing store, you need to buy a factory-made clamp, which is designed to combat leaks. The disassembled product is placed on the pipe so that the durable rubber gasket is located opposite the leak. At the final stage, the clamp is tightened with bolts.
- The problem can be solved with the most common aluminum clamp, which is designed to tighten hoses on fittings. First, a thick rubber gasket is applied to the current areas. The structure is clamped with a regular screwdriver. This option is distinguished by its accessibility and simplicity.
- If you don’t have time to visit stores, but you urgently need to solve the problem and eliminate the leak, then you can safely use thick copper or annealed steel wire. The product is folded in half and the gasket is pulled to the location of the detected leak in order to twist it with pliers.
Attention! If the user does not know how to cover up the formed hole, and paint streaks are clearly visible at the leak site, then the structure is first cleaned with a knife. The performer of such painstaking repair manipulations should be prepared for the fact that after the completed manipulations, the liquid pressure will increase slightly.
An accessible way to unscrew the plug
Why is the heating battery leaking?
Before figuring out how to fix a radiator leak between sections or in another place, you need to understand the causes of the problems that arise:
- Cast iron radiators are heavy and are mounted on durable hooks. With minimal error, radiators sag under their own weight, and a misalignment of several millimeters causes the formation of air pockets. Corrosion begins in these places - the cast iron becomes thinner and over time a fistula forms. A minor leak appears, which it is advisable to quickly fix.
- In houses with a centralized heating system, water hammer often occurs, which sometimes causes radiators to leak at the joints (especially for bimetallic radiators).
- Cast iron radiators are rough inside, so all kinds of debris and foreign inclusions linger on the surface: pieces of metal, rusty sediment, etc. Gradually, the channels begin to clog, and deterioration in coolant circulation leads to the risk of a breakthrough or leak. This is another reason why batteries, both cast iron and steel, leak.
- Gaskets and nipple threads are the weak points of heating radiators, so leaks can form in these places.
When calling a technician online,
practice shows that leaks in aluminum, steel and other radiators do not appear suddenly. First, characteristic signs appear: the air temperature in the room decreases, plaque forms on the radiator, and corrosion spots form on the surface.
Do not remain idle when you notice these signs, but decide what to do - the battery is already leaking. If you ignore the situation, an accident may occur. You may also soon find a puddle of water under the radiator, and the humidity level in the room will increase noticeably. You can repair the leak in the heating radiator yourself or contact a professional. An experienced plumber from our company will quickly fix leaks in any radiator: aluminum, steel, bimetallic, cast iron.
Many people are concerned about the question: if the battery is leaking, who should they call? If you live in an apartment with central heating, contact the management company or us. In other cases, you can do without a management organization - it will not help you.
How to fix a leak from a locknut
There can be several reasons for this problem:
- As a result of mechanical impact, the tightness of the connection was broken. A common problem often occurs as a result of someone simply becoming naked on the pipe.
- The used plumbing linen burned out.
- The thinnest section was destroyed by corrosion.
If a person has not yet figured out the best way to seal a small leak, then it is best to adhere to the following scheme:
- The heater risers must be turned off and reset.
- Use an adjustable wrench or a gas wrench to unscrew the lock nut in order to be able to clear the threads of winding residues. After the manipulations have been completed, you should carefully inspect the structure.
- If the technician does not find any signs of fistulas, then you can rewind the locknut with flax and paint, sealant or drying oil. As an affordable alternative, you can use a polymer thread, which should be tightened with moderate force.
- At this stage, outside help will be needed, since when starting the risers it is necessary to monitor the damaged area.
- If the technician managed to repair the leaks in the battery the first time, then the repair work can be considered complete. You just need to bleed the air. If after rewinding the locknut the leak was not eliminated, then the fistula formed precisely in the thread.
- It is necessary to push the radiator cap and locknut all the way down the pipe. Now you need to carefully disconnect the wiring from the radiator. The existing thread should be driven with a die and an additional six threads should be cut. Be sure to clean the surface of paint first.
- All that remains is to cut the pipe to the problem area in order to run the thread with a die again. After this, connect the radiator.
- At the final stage, all that remains is to launch the system to fully heat the rooms.
Important! Experts recommend applying very little oil to the pipe, since in this case the die will go much easier and will not leave unwanted damage on the metal.
How to deal with battery leaks on your own
Soldering the radiator method 1
It includes the following steps:
- Surface preparation. This process must be done carefully. It consists of cleaning the treated area from all dirt and paint residues. Clean the aluminum surface using emery cloth and solvent. Preparation also includes degreasing the treated area (for this, preparations containing alcohol are used), as well as wiping the metal dry.
- Preparation of iron rosin flux. To do this, the crucible is placed on a gas stove and heated. You can heat it with a blowtorch. A piece of rosin is placed in a heated crucible. It needs to be completely melted. Next, add iron filings little by little and immediately stir the mixture. The ratio of rosin and sawdust should be 2:1.
- Applying flux to the prepared area. The solution is applied so that the desired part of the radiator surface is completely covered. Otherwise, oxygen will have access to the aluminum, and the hole will not be soldered well. At the end, the entire soldering surface should be under a layer of flux.
- Soldering. It involves introducing solder into a liquid flux environment. You need to take small portions of solder onto the soldering iron. Solder is applied to the soldering area so that it is under the flux layer. At the same time, perform circular movements. During these movements, the soldering iron constantly dislodges some particles of solder. The displacement of iron particles leads to the destruction of the oxide film. Rosin prevents air from penetrating the aluminum.
This method should be used to eliminate small defects. If the damage is large, then you can only solder the radiator using homemade flux.
Damage to the radiator plate
Heating of residential premises must be of high quality and reliable. But too thin, corrosion-resistant battery metal will eventually develop a leak that needs to be fixed quickly. If a spare plate is not at hand, then cold welding can be used. This material is a two-component epoxy adhesive with the addition of fine steel filings. All further actions must comply with the following scheme:
- When a heating device leaks, it is necessary to reset the risers. Damaged areas are cleaned of paint and rust. It is advisable to degrease with acetone or gasoline.
- Apply the glue evenly. Detailed instructions must be indicated by the manufacturers on the packaging. It is best to treat an area of at least 4 cm2.
- You need to wait enough time for the composition to harden. After 40-50 minutes, you can start the system and bleed off the accumulated air.
Damage to worn-out products
What to do if a leak has formed between two sections of the battery
This problem often occurs as a result of a decrease in the temperature of the charged coolant. If the user decides to seal a tiny defect, then there is no need to rush into performing this procedure until the next frost. The temperature of the battery will gradually rise, causing the naturally expanded sections to again compress the leaky gasket.
Comprehensive leak control includes several stages:
- The first step is to turn off the system and gradually disconnect the radiators from the supply lines.
- You need to measure the distance from the nearest end of the heating device to the leak in order to throw a thick steel rod into it, which is flattened at the end. The master needs to try to hook the problematic nipple. The technology for placing this part directly depends on the side from which the key was inserted.
- The nipple must be tightened along the thread until it stops. In this situation, additional efforts can be made.
- All that remains is to tighten the plugs furthest from the liner. The unit is connected to the riser, the air is vented and started up.
Attention! When disconnecting the liner, it is better to substitute a capacious basin, since a certain amount of water necessarily remains in the riser.
Formation of cracks between different sections of heating installations
The most effective methods for eliminating leaks in the battery
With the onset of the cold season, many apartment and house owners discover that a recently working radiator has begun to leak. In such a situation, you need to try to shut off the water supply as quickly as possible and drain all the coolant from the circuit. In emergency situations, the battery simply needs to be replaced. If the structure is collapsible, then the financial costs for restoration work will be minimal, since to fix the problem you can purchase only one new section or plate.
Important! Before a comprehensive replacement of equipment, you should try to take all measures to restore tightness and eliminate leaks. It is for these purposes that experts have provided several simple and affordable home repair options.
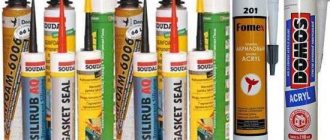
Universal hermetic seal
Leaks often occur in an aluminum radiator, which are directly related to various unfavorable operating parameters. To restore the integrity of the structure, a high-quality sealant can be used, which can be purchased at any hardware store. The product that manufacturers produce specifically for heating radiators, consisting of polymers or a special powder, has proven itself to be excellent.
Attention! Due to its specific composition, upon contact with air, the sealant simply polymerizes.
After complete hardening, the applied composition perfectly eliminates leaks, so you can avoid large financial investments in major repairs. If the homeowner has previously worked with sealants, he can quickly take emergency measures so that the system can continue to heat the house.
The use of rubber gaskets and conventional clamps
Before repairing bimetallic heating radiators, you should prepare some materials and equipment:
- Pliers.
- Aluminum clamps.
- Wire.
- Classic gasket made of durable rubber.
The repair technology includes a certain list of important stages. A gasket is placed in place of the leak and everything is secured with a clamp. If you don’t have the right tools at home, then a simple wire and a bicycle tube will do just fine. From this material you can carefully cut a piece of rubber of the appropriate size. You can secure the homemade gasket with strong wire. To achieve a good tie, you need to use pliers.
Types of leaks and their elimination
There are several classifications of heating pipe failures. Each of them is affected by different reasons and provides individual ways to eliminate the problem. Let's look at the main types of breakdowns associated with heating batteries:
Radiator section leaking due to a crack
Is your heating battery leaking? Such a leak occurs due to the constant load on the heating pipes: maintenance work, heating supply, hydraulic measures. All this creates a threat of destruction of the integrity of the pipe and subsequently leads to the appearance of cracks.
This problem can be easily eliminated using a welding machine, if you have one at hand. You can learn how to solder copper pipes or how to solder polypropylene pipes from our articles.
You need to wipe the battery very well so that the radiator is dry. Then use cold welding, clamping the accident site and holding this point until it is completely glued. After half an hour, the problem will be eliminated, and the heating pipes will become operational again.
Loss of tightness at the junction of the riser and radiator pipes
The reason is the incorrect factory assembly of the battery itself. For example, significant differences in the size of pipes when they are connected. Incorrect threads can also cause pipe failure and leakage. Also the cause is the deformations that occurred as a result of using the radiator.
Under no circumstances should you place any objects on the battery, sit down, or exert any other physical force. This also leads to a similar kind of breakdown.
To eliminate the accident, a clamp is needed. It is sold in hardware stores, so in case of an emergency it is better to buy it in advance and put it at home. If such a product is not available at home, you can use a bandage made of small wire and rubber. This auxiliary tool can be used as a tourniquet, which should be used to tighten the section of the battery where the leak has occurred.
The appearance of “tears” in places where heating pipes are connected
It's all due to corrosion. The appearance of rust on the pipes that connect to the radiator leads to the destruction of the equipment and the appearance of a small amount of water at the leak site. As soon as a small amount of liquid is detected leaking from the hole in the battery, appropriate measures must be taken immediately.
To eliminate the accident, you can use the same clamp. You don’t have to buy it, you can make it yourself. You will need steel plates, several pieces of rubber and bolts to connect it all together. A rag or cloth that contains epoxy glue works well. Next, you need to carefully tighten the leak and wait half an hour until it is completely glued. You can use a few pinches of table salt, sprinkled on a damp piece of cloth and wrapped around the problem area. After a couple of days, the leak will be eliminated.
The integrity of the common pipes that connect the radiator and the riser has been damaged
Impurities, air, and harmful substances that enter the battery along with water can, over time, lead to the destruction of sections of heating pipes. This can happen at any time of the year, since preventive work with water pumping is carried out constantly. This again leads to corrosion and damage to the integrity of the pipes. Replacing equipment often does not lead to a successful result because the same faulty pipe may be installed.
If the situation has not yet gotten out of control and the leak is small enough, it can be fixed with cement and gypsum diluted in water.
It is necessary to soak small bandage strips in a solution of cement and plaster, wrap the emergency area and wait until everything hardens. The bandage should be thick and tight. If there is a leak in the thread, cover the area with a wet cloth soaked in table salt. This will help stop the problem for a short period of time.
Innovative moisture-resistant adhesive
In this case, the technician will not be able to rehabilitate the heating without draining the water. If liquid begins to drip at the junction between the metal sections, then to eliminate this damage you will need a cloth that must be soaked with glue that is resistant to high humidity and high temperatures. When the composition hardens, the leak will be reliably eliminated. For these purposes, it is better to buy universal epoxy glue.
The video provides interesting information about cold welding and its versatility:
Bandage based on plaster and cement
To figure out how to repair a damaged radiator, you can use this technology. To work you will need prepared alabaster, sharp scissors, a regular bandage, a container for water, and cement. In a vessel you need to prepare a solution of a thick consistency, into which you need to dip the pieces of bandage. One strip should be 35 cm long. Bandages thoroughly soaked in alabaster are applied to the detected leak area. To achieve maximum results, you need to apply several layers at once. This option is actively used by both beginners and professionals.
Eliminating leaks at the connection between the pipe and the riser
Leaks in such places may occur due to improper installation. In most cases, the problem occurs as a result of careless connection of elements. If the reason is the incorrect selection of pipe diameter, this will become noticeable within a few months after installation. Also, many pipes do not withstand physical stress when apartment owners use elements of the heating system as support.
To stop the leak in this case, you can use car clamps or rubber elements and wire. For example, to seal a leak, you can take a piece of a bicycle tire and wrap it around a pipe, securing it with wire or a clamp. To do this, you need to prepare strips about 5 cm wide and 35 cm long. To secure the material at the leak site, it is better to use clamps, as they evenly distribute the load, eliminating the possibility of leakage.
Application of universal welding
Thanks to this device, you can eliminate absolutely all traces of leakage. Welding allows you to eliminate leaks in any type of battery in just a few minutes. The master can purchase a high-quality installation in a specialized store.
Important! Classic welding copes well with all types of cracks and breakdowns, due to which you can quickly return the system to its previous tightness.
This option is in great demand, since the result of the manipulations performed is not afraid of the negative effects of moisture and high temperatures. Welding is one of the most reliable ways to eliminate leaks in a heating system. If a person has not previously encountered such a device, then it is better to entrust all manipulations to a specialist.
A variety of products for filling holes in cast iron products
Cement-plaster dressing to eliminate leakage of the heating radiator
Before fixing a leak in the heating battery, you need to prepare the required materials and tools:
- cement;
- alabaster (plaster);
- container with water;
- salt;
- medical bandage
To eliminate the leak, a bandage is applied to the damaged area.
The procedure after turning off the water is as follows:
- dilute cement in a container with water to the consistency of thick sour cream;
- cut the bandage into strips 25-30 centimeters long;
- thoroughly soak the bandage with the cement mixture;
- wrap strips around the damaged area.
The process is repeated until a durable bandage is obtained.
If it was not possible to turn off the water, then instead of cement you need to use alabaster, which dries much faster. Then a cement bandage is applied to the plaster cast.
If the heating battery leaks at the threaded connection, you can use salt:
- wet strips of cloth or bandage in water;
- roll the material thoroughly in salt;
- wrap the leak area.
The gap will close as a result of the salt dissolving in the water. A cement bandage is applied on top.
Fixing a leak between two sections
The technician needs to perform additional sealing of the joints. Those areas that are located between the two sections are distinguished by their unique rectilinear shape and small area. Thanks to this, you can find a defect much faster and eliminate it efficiently. Experts recommend using a simple algorithm of actions:
- You should try to strengthen the guide screw using a classic car clamp.
- If desired, the master can make the fastening element himself. To work, you will need several plates made of durable steel (aluminum blanks). The hinges can be tightened using a classic bolt connection.
- Before using clamps, you should isolate problem areas using a rubber gasket. You can also use a piece of fabric that is impregnated with epoxy glue.
Attention! The winding between the batteries must be done as carefully as possible so as not to overtighten the connection. Particular care is also taken when fastening the clamps.
Combating defects that have formed at the junction of the riser and the pipe
Damage to the heating battery used may be caused by incorrect installation of the equipment. The first problems become noticeable to the user after the first start-up of the heating system. To connect the riser to the pipe, experts use threads or conventional welding. But poor-quality assembly, failure to comply with basic techniques, as well as the use of pipes of different diameters can provoke the occurrence of leaks, which is why unscheduled repairs are simply inevitable.
If a large mechanical pressure is applied to the created structure, this can provoke the formation of a fracture at the junction or distortion. This situation most often occurs when a person needs to get to the top of the window or due to careless play by children. The salvation in such a situation is the use of a clamp in strict combination with a rubber gasket.
Professional approach to repairs
The heating battery is leaking: what to do depending on the type of defect
All recommendations can be specified in accordance with the location of the problem phenomenon; in this case, it is worth considering the 4 most common situations.
How to seal a leak between two sections of a radiator?
Here additional sealing of the joint area is necessary. The areas located between two sections of cast iron batteries, as a rule, have a rectilinear shape and are characterized by a small area, thanks to which the defect can be quickly found and eliminated in a short time.
It is worth using the following algorithm:
- strengthen the guide screw using a regular car clamp,
- You can make a clamp yourself using several steel plates (aluminum blanks will not work here). To tighten the loop, a bolted connection is used,
- Before applying the clamp, the problem area must be isolated with a rubber gasket. It can be replaced with a rectangular piece of fabric soaked in epoxy glue.
You need to wrap the joint between the radiators very carefully so as not to overtighten the connection; the same caution should be exercised when using the clamp further.
Elimination of a defect at the junction of the riser and the pipe
Here, the cause of the appearance of moisture may be incorrect installation; the problem becomes noticeable after starting the heating system. The riser and pipe are usually connected by welding or threading; in both cases, careless assembly, inaccurate welding, and the use of pipes of different diameters cause leaks and necessitate immediate repairs.
If strong mechanical pressure is applied to this, for example, during children's play or when it becomes necessary to reach the top of the window, even small loads can cause a break at the joint or distortion. In this case, a temporary measure, as in the previous case, can be a clamp in tandem with a rubber gasket.
Repairing a crack in the radiator
The optimal solution may be to use classical welding, but this technique, firstly, is dangerous and labor-intensive, and secondly, it requires the availability of equipment and appropriate skills.
Cold welding is an excellent method for repairing a crack in a radiator.
A suitable alternative is cold welding. The problem area of the radiator needs to be prepared - thoroughly dried and degreased. Next, you need to take a small cold-welded ball and press it firmly to the leak site. The material polymerizes within a few minutes; half an hour is enough for it to completely harden. This battery can be put into operation within a day, but after the end of the heating season it will need to be replaced - cold welding is considered a temporary measure.
Restoring the integrity of the heating pipe
To supply coolant, steel pipes are used, and bandages with a gypsum-cement mixture are applied to them:
- dilute the cement in a small container to a medium-thick consistency,
- prepare cuts of bandage approximately 30 cm long,
- bandages are soaked in cement mortar,
- with force, the workpieces are wound onto the damaged area in several layers to ensure the strength of the connection.
If it is not possible to turn off the tap, the first bandage to be wound should be soaked in an alabaster solution. The next layer can be used with cement dressings.
Fighting cracks of different diameters
Elimination of such defects has its own characteristics. The most suitable option is to use traditional welding. But this option is quite labor-intensive, and also implies the presence of appropriate equipment and minimal skills. As an excellent alternative, you can use special glue. First, the technician needs to prepare the problem area of the battery. The process itself is based on cleaning the surface and degreasing it.
The prepared cold weld fragment is pressed against the crack formed with a certain force. This material stands out for its quality and reliability, since it polymerizes within a few minutes. It takes 35-45 minutes for the formed seam to harden. The very next day, the restored battery can be put into operation, but after the end of the heating season, such a device will need to be replaced, since such welding falls into the category of temporary repair work.
Rewinding the cork for better sealing
Restoring the integrity of pipes
If the structure is already leaking, then you simply cannot do without a plaster-cement dressing. The repair of heating equipment itself includes several main stages:
- Cement is diluted in a pre-prepared container to a consistency that is convenient to use.
- A classic medical bandage is cut into pieces 35-40 cm long.
- The prepared strips are thoroughly soaked in the prepared cement mortar.
- The fastening blanks are carefully wound onto the formed crack in several layers so that maximum joint strength can be achieved.
If the user does not have the opportunity to turn off the tap on his own, then the first dressing must be treated with an alabaster solution. All subsequent layers can be based on classic cement.
Welding all cracks and large holes on the battery
Troubleshooting methods
Now let's look at what and how you can seal the leak if the above cases are not suitable or do not help for some reason. The main ways to solve the problem if the battery is leaking are the following:
- Cold welding
- Application of a cement-plaster cast
- Using table salt
- Thermo- and moisture-resistant adhesives
Cold welding
There are highly durable and easy-to-use 2-component epoxy resin adhesives. A certain variation of cold welding has been created for each metal, but there are also universal options. For example, you can buy a repair rod to seal cracks, seal holes and eliminate leaks in cast iron, steel and bimetallic radiators.
Before covering the leak, you will have to dry and degrease the surface. If necessary, remove corrosion with a brush or sandpaper. After this, apply cold weld according to the instructions on the package.
Filling made of cement and gypsum
If there is no cold welding, and a cast iron or other battery is leaking heavily, what should you do in this case? Use a cement-plaster cast. You will need a bandage, plaster or cement. Dilute the dry mixture to a creamy consistency, soak a bandage in it and wrap it around the area where the cold or hot battery is leaking. Make several layers to form a strong bandage. If it is not possible to drain the coolant, replace the cement with alabaster or gypsum. It is recommended to apply 1-2 layers of bandage soaked in cement mixture on top.
Table salt
The simplest way to remove a radiator leak at home without the help of a professional is to use table salt. The product is suitable for leaking threaded connections. Soak a first aid bandage in water and roll in salt, then wrap it around the leaking area. When the salt dries, the hole will be securely closed. A cement bandage is applied on top for reliability.
Adhesive compositions
When the leakage is minor, you can use heat-resistant and moisture-resistant adhesives. They are applied to gauze or a bandage and then wrapped around the leaking area (for example, the joint between two sections). When the glue dries, the leak will be sealed. Such repairs do not last long, so after the end of the heating season and draining the water from the system, it is better to repair the radiator in a more reliable and durable way.
If the problem cannot be fixed on your own, it is better to turn to professionals to avoid trouble. San Remo company technicians will eliminate the cause of the leak inexpensively and in a short time. And if necessary, they will install a heating radiator with high quality.