We welcome our regular reader and offer him a new article on heating devices.
Since the appearance of the first fire in a cave, people have been constantly looking for the most convenient, safe and economical methods of heating. We want the house to be warm, but the pipes and radiators are not visible. Engineers came up with the idea of hiding the heating pipes in the floor under the screed - this allows you to get a very comfortable, efficient and almost ideal heating system.
Fireplaces and stoves are not suitable for apartments and large houses, local heating is also not very comfortable; The traditional heating system using radiators or registers has some disadvantages:
- Warm air rises, and it becomes cool below the floor.
- Radiators and communications take up space and collect dust.
- Constant air convection increases the amount of suspended dust in the air.
- Wiring and radiators do not decorate our houses and apartments at all;
- Radiators covered with decorative screens and curtains provide worse heat.
When heating using underfloor heating, all these problems are solved; in addition, such heating is approximately 15-20% more economical compared to radiator or convection heating.
Therefore, the idea of creating a warm floor in housing is becoming increasingly widespread in both private houses and apartments.
Heating of the screed can be done using wires and electricity or using pipes and hot water. Heating with electricity is more expensive - gas or other types of fuel are cheaper. The cost of more expensive installation of a pipeline system pays off after several years of operation. If you weigh all the pros and cons of the “warm floor” system, the pros definitely outweigh.
Principle of operation
The principle of operation of a water heated floor system: a system of pipelines through which the coolant is supplied is laid in the screed. Warm pipelines heat the screed, the screed transfers heat to the floor covering, and the covering transfers heat to the room. The floor under the furniture is not heated.
Such a heating system creates a favorable temperature distribution over height and helps save the amount of heat consumed (and finances) compared to a radiator system. With a conventional heating scheme, warm air from the radiators rises to the ceiling, heats it, and only then heats the room - with the convection method, the energy loss for heating the ceiling, walls and windows (batteries are installed under them) is quite large.
It is especially effective to use lower heating in a house if there is second light or high ceilings - in this case, savings increase, according to some data, even up to 50%.
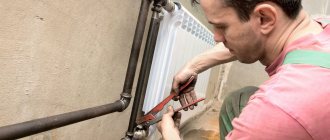
Heating conversion in a new building
And what could this depend on: incorrect installation of radiators or due to the fact that they may not supply high-quality models?
if you don't mind taking 10 minutes to read
marked the advantages in red
cons in blue
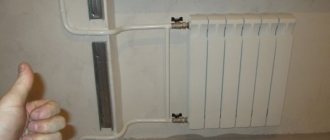
Many who have received the keys to their apartment do not even suspect what pitfalls lie in their difficult, so to speak, repair path. We will talk about a horizontal heating system, which is currently quite often used in new buildings.
And one of the most important and expensive problems is heating - so to speak, “the heart of your apartment”
The problem is not in the radiators themselves, although it happens that you come across steel radiators that are not long-lived; in central heating where there is a lot of oxygen, they quickly fail.
The most dangerous connection is to radiators, such as “from the floor” without using a steel tube or with its incorrect installation (without a fixing angle to the floor)
There are many dangerous connection moments and you simply don’t realize about them; a surprise pops up later, after the repair.
For example, a developer often uses a tee heating system, workers quite often did not tighten the sleeves, hydraulic testing of each apartment was not done, in a hurry to quickly hand over the object, tests were carried out immediately at the moment the entire house was launched during the heating period, naturally, somewhere it leaked right away, somewhere a little later.
There were a lot of such leaks in the first residential complexes where this horizontal heating was used, there were lawsuits from the owners of the premises in which there were these same leaks, but unfortunately all of them ended not in favor of the owner.
At that time, I was just starting to work with heating in these houses, and even now I work and from time to time communicate with plumbers from these and other housing and communal services, who, in turn, share with me quite “interesting facts”
So if your radiators heat well, this is far from an indicator of reliability; you know, Lada cars also drive.
Many people ask what do you mean by “Comfortable and safe heating”?
I answer: this is a ray circuit with the installation of a collector in an apartment. Each radiator has its own route, reinforced, without connections. Each line is supply and return and works the same way, i.e. heat is supplied to all radiators equally and not as often from the developer sequentially - one battery is hot - the last one is barely warm.
In the radial system that I am installing, it is possible to turn off any route, in case of any blockage or damage, until the fault is eliminated, the remaining batteries will work, but with a sequential system, you cannot be left completely without heat.
With a radiant system, heating routes are laid in the passage places, where you walk with your feet and not where the developer put it - for example, along the wall under the kitchen unit and God forbid this route ends up under the refrigerator, consider your refrigerator definitely will not withstand heating.
A radiant heating system is not only pipes without connections, but also heating the screed where it is needed. There is also an option without heating using “special” insulation. One example: the customer asks to lay it along the kitchen unit to the radiator, so that the housewife feels warm under her feet and cooks comfortably, and I do it. I dare to reassure you - this is allowed, it is not a “warm water floor system”, which is prohibited in apartments. All work is carried out without violations of SNiP and SP, so such heating is easily subject to approval.
So let's summarize:
Disadvantages of the system from the developer -
- tee system with danger of leakage and poor balancing
— the tracks are in a corrugated heated floor in the wrong place
— dangerous connections to radiators “from the floor”
Pros of the new system:
— collector system with good balancing and uniform heating of batteries
— one-piece reinforced pipe without connections in the floor
- legal heated floor where you need it
- reliable connection to radiators from the wall
————————————————————————————————————
My work is ordered not only by those who will live in this apartment or their loved ones, many order it in order to later sell this apartment with an already improved heating system and make good money from it, so I don’t mind)
You can clearly see a video of my work in the “Portfolio”
Why do pipes in the floor need to be insulated?
Pipes in the floor must first of all be isolated from dynamic mechanical influences when people move and static loads from furniture standing on top. Although heating wiring is not installed under the furniture, there will still be chairs, dining tables, tables, ottomans, flowers and other easily movable pieces of furniture on top. Communications in the screed must be thermally insulated from below so that heat is not wasted on useless heating of the floor structures.
It is necessary to distinguish between the laying of a low-temperature underfloor heating pipeline in the floor and the laying of heating pipelines. Heating has a temperature of 70-80-90°C, communications with this temperature strongly heat the floor and screed, causing a temperature difference - this can cause cracking of the screed and concrete structures. Therefore, heating with high temperatures should be insulated.
Internal heating pipes
Types of internal pipe routing in a one-story house
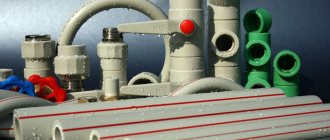
Most often, open installation of pipelines is performed. This is the optimal and most economical method, but first you must install all the system components - radiators, batteries, boiler. Only after this can the installation of highways be carried out. For better sealing of joints, radiator gaskets should be used. They can be rubber (for low-temperature systems), paranitic (high-temperature) or plastic.
What are the best ways to lay heating pipelines in a one-story building? This depends on the characteristics of the future system.
Underfloor heating installation
Laying heating pipes under the floor
The basic rule for laying heating pipes under the floor covering is the maintainability of the system. This means that, regardless of the material the floor or pipes are made of, free access to certain main components should be ensured.
These include branches, installation sites for collectors, and corner elements. To do this, inspection hatches should be installed. Their size should ensure the repair and maintenance of systems, especially if heating pipes are being laid in a wooden house. What else needs to be taken into account when installing this type of installation?
- Heat losses . If installation is carried out in a cement screed, it is recommended to use protective materials with a high heat transfer resistance. These include foamed polyethylene, expanded polystyrene, etc.;
- If heating pipes are laid in a plastic floor, the difference in thermal expansion of the materials used to make the line is taken into account. To do this, compensation loops should be installed;
- If installation is carried out directly into the insulation, its operational parameters must be taken into account . In particular, the maximum possible exposure temperature.
| Material | Maximum exposure temperature, °C |
| Foamed polyethylene | 80 |
| Expanded polystyrene | 90 |
| Styrofoam | 60 |
| Basalt (mineral) wool | 700 |
Installation of pipeline fastenings is carried out in places of turns and branches. On straight sections, the installation interval of fasteners depends on the material of the pipes. SNiP for laying heating pipelines does not regulate this. But to ensure the reliability of the system and reduce noise, it is recommended to fasten steel lines in straight sections every 300 mm, and for plastic ones - every 200.
If a diagonal method of laying heating pipelines in a one-story building under the floor is used, furniture cannot be installed where the pipeline passes. This will lead not only to its damage, but also to excessive thermal effects on the floor screed.
Heating installation under baseboards
Baseboard heating
To lay heating pipes in baseboards, you must first purchase the appropriate consumables. The best option is to buy special skirting boards with installed pipes and heat exchange plates.
Considering the material of manufacture, the cost of such baseboard convectors is quite high - from 700 rubles/m.p. Therefore, most often they install radiators in the wall, and then install the baseboard.
The features of such an organization of the system are:
- It is not allowed to make grooves in a load-bearing wall. An alternative is to install pipes under the floor;
- The material used to make the plinth should not change its properties under the influence of temperature;
- Regardless of the method of laying heating pipelines in a one-story building, the minimum distance between pipes (direct and return) should be 15 cm.
After installation, the joints are first crimped, the tightness is checked during the first test run, and only then the decorative plinth is installed.
When laying heating pipes in baseboards, you need to calculate the number of rotary units. If possible, it is necessary to avoid installing unnecessary angles, since they increase the hydrodynamic resistance when the coolant moves.
Advantages of closed installation
There are many advantages to a closed floor heating system:
- The main advantage is that a correctly installed and well-functioning system creates ideally comfortable conditions in the room: the air above the floor is very warm, the air near the head is warm, and cooler near the ceiling. Parents of small children will especially appreciate this method of heating their homes.
- The second advantage is efficiency - the coolant temperature is lower, heat is consumed more efficiently, the living area of the room is heated - windows, walls, ceilings, air under the ceiling, and the floor under the furniture do not heat up. With a ceiling height of 2.5 m, the savings are about 15-20%, with higher ceilings or second light – sometimes reaching 50%. Quite expensive installation of pipelines pays for itself in several years.
- Durability - a water heated floor system will last about 30-40-50 years (depending on the material. Copper structures will last 100 years). Floor heating operates at a low temperature and low pressure - therefore, all pipelines and collectors operate in a gentle mode and wear out less.
- Easy to install. The only difficulty is in the design work.
- Easy to use.
- The screed has a high thermal inertia - the room slowly cools down when the heating is turned off.
- Saves space indoors.
- Saves the housewife's cleaning efforts.
- The warm floor is not noticeable - and radiators with wiring usually disrupt the design of the room.
- The system is quite easy to combine with an existing radiator system.
- You can only heat floors in separate rooms - children's rooms, bathrooms.
- In the presence of radiators and constant convection, there is quite a lot of suspended dust in the air; when heated from below, such strong convection does not occur, there is less dust in the air - this is especially important for allergy sufferers and asthmatics.
Crimping method
There is no need to purchase separate tools to make a crimp connection. Use fittings, a press ring, and a wrench.
A pipe cutter is needed to remove uneven edges. To increase the internal diameter of the pipe, calibration with a countersink is intended. How to make a crimp connection?
- The edges of the pipes must be smooth. To do this, measure 2-3 cm from the end of the product and set a mark. Using this mark, a pipe cutter is used to form the correct chamfer; remove part of the outline.
- Fittings are selected depending on the size of the diameter of the circuit, but the connecting elements have round rubber inserts-seals. To prevent their deformation, it is necessary to slightly increase the diameter of the pipe. To do this, use calibration with a countersink. The tool is inserted inside the contour and rotary movements are performed. Chips are removed from the inner surface. This increases the diameter.
- A crimp ring is placed on the pipe.
- Insert the fitting.
- Press the ring onto the fitting. Screw the crimp nut by hand. In the future, 2 keys are used. One is for holding the fitting, the other is for tightening the press-on nut.
- Check the assembly of metal-plastic pipes.
We recommend: How to install heated floors under porcelain stoneware?
This connection method is used most often. Installation is quick and does not require expensive equipment. The crimp nut securely holds the metal-plastic contour.
Press crimping with electric crimper
In order to connect individual sections of the highway using a crimp, an electric crimper is used. The kit includes nozzles with holes that correspond to a certain pipe diameter for “warm floors”. Pressure testing is carried out as follows:
- carry out preparatory work: form a chamfer and increase the diameter of the product using calibration with a countersink;
- install the fitting;
- a compression ring is put on one end;
- a nozzle is attached to the tool; it is made in the form of tongs; they are separated, a pipe is inserted;
- connect the tool to the electrical network;
- connect tongs; a click will be heard;
- hold them in place for 2-3 seconds;
- disconnect the pliers and check the crimping area.
Installation is quick. The line connects reliably, withstands high coolant pressure, and no leaks occur. The disadvantage is the use of expensive equipment. IN
In place of an electric crimper, you can work with a hydraulic tool. It costs less, but crimping requires physical effort.
Press crimping with hydraulic device
The hydraulic crimper is a pliers. Nozzles for pipes of a certain diameter are installed on them; they have the shape of a semicircle; use nozzles in pairs.
The diameter size is indicated on the surface of the product. One semicircle is located on the body of the forceps, the other on the head. The nozzle is inserted into the grooves until it clicks.
- Preparatory work is carried out: a chamfer is formed and the diameter is increased.
- Put on the crimp nut and insert the fitting. The fitting has holes. They determine the correct location of the pipe.
- Place the junction on the body of the forceps and close the head.
- Enlarge the handles of the crimper. This will increase the load during crimping. The handles are at an angle of 1800.
- Connect the handles. At the same time, the forceps are compressed. The fitting and ring are connected.
- The handles open and the head of the device opens. To open the head, you need to hit it with your palm.
- Remove the pipe and test the connecting assembly.
If there is a rupture in the line, then the space on the floor is cleared of the screed and the circuit is opened. Wash the internal and external walls. Make sure that debris does not get inside the pipeline.
Connect individual sections of the circuit. It is recommended to cover the unit with pipe insulation. The material will protect the fittings from oxidative processes. Fill the line with a building mixture for “warm floors”.
Manual hydraulic press Viar
Connection nodes are installed closer to the boundary of the water circuit so that they are easily accessible; They do not open the entire “warm floor”. The fittings are protected with plastic or insulation. The circuit diagram is transferred to a sheet of paper in order to further determine where the main connection nodes are located.
We recommend: How do we fix pipes for heated floors?
Metal-plastic pipes for “warm floors” are a good alternative to polyethylene products. When using the main line, it is necessary to monitor the heating mode.
Do not allow increased pressure in the water circuit to exceed 10 bar, or liquid temperature to exceed 90 0C. The “warm floor” is connected to the boiler, to the collector or to the radiator.
YouTube responded with an error: The request cannot be completed because you have exceeded your quota.
- Related Posts
- What kind of substrate is needed under a laminate for a warm water floor?
- What is the pipe consumption for underfloor heating per m2?
- Should I use penoplex for heated floors?
- How to install heated flooring in a garage?
- How to make a dry heated floor?
- How to choose a wire for a heated floor?
Disadvantages of placing heating pipes in the floor
Disadvantages of the "warm floor" heating system:
- The most serious drawback is the difficulty of repairing communications if they are damaged. The rule of laying only a single piece of pipeline in a screed should be strictly observed.
- Flooding of housing with warm water due to a leak creates considerable problems.
- Significant cost of the entire complex of work on installing the system.
- Significant cost of the pump, manifold with mixing unit.
- It is necessary to allocate space for a manifold cabinet - one cabinet for each floor in the house;
- Design complexity - it is advisable to involve specialists.
- Such a system cannot be installed in apartment buildings in which it was not provided for in the project (and this only happens in new buildings). The large weight of the screed creates a large load on the floor slabs and creates the risk of breaking the load-bearing structures of the house. The law prohibits connecting underfloor heating systems from central heating and hot water supply systems.
- The height of the entire screed + insulation structure reaches 110-120 mm, the weight of the screed is large - this should be taken into account when designing a house (both in terms of the height of the room and the strength of the floor structures).
- The heating system limits the choice of floor covering - carpet, parquet with good thermal insulation properties make the heating ineffective. Preferably tiles, stone, porcelain stoneware, laminate. Only high-quality linoleum can be used - in cheap varieties, when heated, substances with an unpleasant odor will be released.
- Significant thermal inertia - the screed warms up slowly.
- Water heating systems cannot be cooled below zero - it will not be possible to heat a porch, terrace, garage and paths or equip a “weekend” cottage with such a system. You can use antifreeze, but it is expensive, and antifreeze is very poisonous.
Underfloor heating: advantages and disadvantages
Before hiding heating pipes in a concrete screed, it is necessary to study in detail all the pros and cons that this heating system demonstrates. They should not be ignored, because this will guarantee that the finances will be invested wisely.
Let's look at the advantages of an underfloor heating system.
- Long period of use.
- Uniform heating level.
- The system in concrete poured into the floor is distinguished by cheaper maintenance when compared with classic options.
- Easy care.
- No moisture.
- Economical use of space.
- Complete safety (installation of the system in a concrete screed allows you to avoid child injuries and burns from hot pipes).
- The required level of humidity is constantly maintained in the air.
There are not many disadvantages of a network under a screed, but you need to familiarize yourself with them.
- First of all, when laying the heating line under the screed, the height of the room is reduced.
- Repairing pipes is not as easy as in classic cases, because finding a leak in a hidden pipeline is not easy.
- It will not be possible to carry out installation in specific places. These include a flight of stairs, etc.
IMPORTANT! These buildings in mansions can be carried out without restrictions, but an apartment will require a different approach. In apartment buildings, you need to make sure that the central network can cope with the large hydraulic load.
The disadvantages must be carefully studied, and you need to be prepared for the fact that sooner or later the heating in the screed may leak. Do not forget that pipe leaks in such structures are not easy to detect.
And after determining the location of the leak, repairs will not be easy. Therefore, it is important to approach the work with full responsibility.
Types of floor pipes
Four types of pipes are used for heating installation: cross-linked polyethylene, metal-plastic polypropylene, corrugated steel, copper (and copper in a plastic sheath). Copper is very expensive, difficult to install, and requires equipment and a welding specialist. Therefore, despite their strength and durability, they are very rarely used in underfloor heating systems.
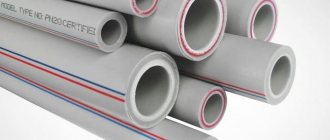
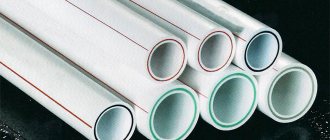
Metal-plastic polypropylene
Polypropylene is the most popular heating material. It is resistant to corrosion, quite durable, somewhat fragile (compared to other plastics), quite plastic, chemically inert, and can withstand hydraulic shocks. The big advantage is the low price and easy installation.
Can operate at high temperatures, but has a high coefficient of thermal expansion and elongates greatly as the temperature rises. Reinforcement with aluminum foil reduces this disadvantage. A pipe, especially a reinforced one, does not bend well - it is mounted using soldering/welding. Therefore, this is a budget and reliable, but not ideal material option for installing heated floors.
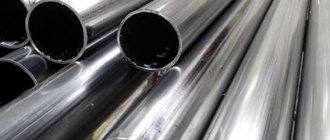
Corrugated stainless steel
Corrugated stainless steel pipes are also produced. The advantages of such a pipe:
- Strength.
- Long service life.
- Corrosion resistance.
- Chemical inertness - they practically do not become overgrown with calcium and magnesium salts from the inside.
- Flexibility over a very wide range.
- High resistance to mechanical loads.
- High temperature resistance.
The disadvantage of metal corrugation is its rather high cost. This variety has not become widespread only because of low consumer awareness.
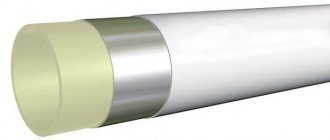
RE-X pipes
Cross-linked polyethylene has cross-links between its molecules, resulting in the formation of a three-dimensional cellular network with cross-linked molecules. Cross-linked polyethylene (PE-X) has significantly greater strength than low- and high-density polyethylenes, and greater strength compared to metal-plastic. The durability of cross-linked polyethylene is about 50 years.
PE-X is resistant to high temperatures - can withstand heating up to +95°C (for a short time - up to +110°C); has other advantages of plastics: not subject to corrosion, resistant to hydraulic shocks, plastic, not fragile, chemically inert, not overgrown with salts from the inside. Compared to polypropylene, it has a lower coefficient of thermal expansion.
The disadvantage of RE-X is its relatively high cost.
Requirements for pipes
Water is often used as a coolant. Much less common are solutions that use ethylene glycol or antifreeze for these purposes. The efficiency of the entire heating system will largely depend on the correct choice of pipes. When choosing pipe material, preference is given to one of these options:
- Polypropylene pipes.
- Pipes made of cross-linked polyethylene. There are low, medium and high densities.
- Metal-plastic products.
- Copper pipes.
We recommend that you familiarize yourself with: Insulation for protecting pipes, made of foamed polyethylene (thermal insulation)
You should focus on the following important indicators:
- Strength. It has a direct impact on the resistance of the pipeline to changes in pressure and temperature.
- Resistance to corrosion.
- Thermal expansion coefficient. Should be as small as possible. Insufficient values of the indicator are fraught with violation of the integrity of the pipeline and concrete screed. The indicator is measured in absolute elongation for every 10 meters of pipe when heated to +50°C. Polypropylene can elongate by 80 mm, polyethylene by 70. A hybrid metal-plastic product has an indicator of 10-15 mm, copper has the lowest coefficient - less than 10 mm.
- Thermal conductivity. Characterizes what proportion of thermal energy will be given to warm the room.
- Environmentally friendly. Safety of the material for the health of people in the room.
- Pipe bending radius. Affects the possibility of constructing circuits of various configurations. Polypropylene products bend the worst (the bending radius is equal to 8 pipe diameters). Polyethylene can be bent without loss of quality with a bending radius of no more than 5 diameters. Copper and metal-plastic are very flexible, but it is better to entrust the bending procedure to a pipe bender, or use springs. This will allow the bend to maintain a round cross-sectional shape.
It is important! The number of pipe connections in the circuits should be as small as possible. Ideally, each circuit should be a single piece of pipe.
The pipeline is laid according to one of two main schemes - a snake or a snail (spiral):
- In the first case, the loops go from wall to wall with a 180° rotation.
- In the second, the pipe runs in a circle from the wall to the center of the room.
For residential premises, a volute is more often used; this scheme ensures more uniform heating of the floor surface. In addition, spiral laying involves only one sharp bend, in the central part of the pattern. Here it becomes possible to use pipes with a large bending radius.
Tips for choosing
The choice of pipes for pouring into the screed depends primarily on your financial capabilities. But it’s not worth saving on structures that are poured into a screed for decades - it can be very expensive.
The best and most durable pipes are copper and plastic-coated copper. They can last 100 years or even more. But they are the most expensive, they have complex installation - you will need a specialist.
Stainless steel corrugation is very durable - you can count on 50 years. The price is lower and installation is easier. Cross-linked polyethylene will last approximately 40-50 years. Pipes made of polypropylene metal-plastic are less durable. In addition, it will not be possible to lay them in a screed without welding using couplings and angles - the pipes bend poorly and are supplied in 6 m sections. Any connection increases the risk of leakage.
In practice, pipes made from PE-X are chosen. It has almost optimal price-quality ratio. But more and more often they use stainless steel corrugation. In any case, the choice is yours.
approximate cost
The cost of cross-linked polyethylene pipes with an oxygen layer with a diameter of 16 mm is from 70 rubles; stainless corrugations with a diameter of 15 mm - from 150 rubles; copper products with a diameter of 15 mm - from 270 rubles per linear meter. Metal-plastic polypropylene products cost from 15 rubles per meter.
Installation methods
The pipeline is laid using two methods:
- Spiral laying - “snail”. This form of installation is suitable for large rooms and ensures a more uniform distribution of heat over the entire area of the room.
- Parallel laying - “snake”, “double snake” (or “meander”). This method is more often used in small rooms. Its disadvantage is uneven heat distribution. The pipes are positioned so that the beginning of the pipeline (the warmest slab) is located at the coldest wall - the outer one with windows.
When laying the system, the laying step (distance between pipes):
- In bathrooms, bathtubs, swimming pools - 100 mm.
- In living rooms - 150 mm.
- In auxiliary rooms - up to 300 mm.
The diameter of the pipes ranges from 12 to 20 mm, in very rare cases -25 mm (in public buildings).
For filling
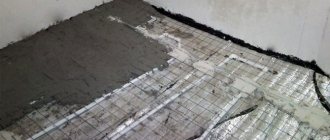
Most often, pipes are filled with screed. This method is used if floor heating is installed in rooms with reinforced concrete floors. Thermal insulation is laid on the ceiling, then waterproofing, then pipes, then the screed is poured and the finished floor is laid.
Under wooden covering
Most often, a warm floor is installed in a screed, but what to do if both the house and the floor are wooden? In this case, you can also install a heated floor.
The layout of the pipeline and connection to the collector completely coincides with the installation of a heated floor when poured into the screed.
Logs are installed on the wooden floor. Cuts for pipes are made in the joists. Insulation is laid between the joists, and pipes are laid on top of the insulation. Then they cover it with boards or durable plywood and lay the finished floor - usually laminate or linoleum.
Another option for installing a heated floor on a wooden floor: insulation is laid between the joists, sheet material is laid on the joists - plywood, OSB, chipboard, plates 20 mm thick are cut from the same material, the width of the plates is equal to the distance between the pipes, the plates are screwed to the sheet material, in Foil and pipe are laid in the grooves, then laminate. A layer of galvanized or aluminum can be laid on top of the pipe for better heat transfer.
DIY installation
Installation of a heated floor system is quite simple and can be done independently.
Required tools and materials
For installation you will need:
- A container and mixer for mixing the solution, buckets, shovels, a crowbar, usually a trowel, a long trowel.
- Drill, pliers, construction knife, glue, construction tape.
- Grinder, discs, calibrator, round file.
- Fittings, pipes, reinforcement mesh 50×50 mm, pipe fastenings, pipe cutter, insulation, cement mixture, waterproofing film, press pliers.
- For wooden floors - joists, saws, pipes, pipe cutters, fittings.
Leveling the surface
It is very important to level the surface of the ceiling. There are two reasons:
- Thermal insulation boards will not adhere firmly to the ceiling and may sag during operation - this will lead to cracking of the screed and may lead to a violation of the tightness of the pipes.
- If the difference in the base is more than half the height of the pipe, then there is a high probability of air pockets in the raised parts of the pipe, interfering with the movement of warm water and reducing the efficiency of the system.
Most often, the surface of the subfloor is quite flat, but in some cases it is necessary to repair the surface with mortar or install a new leveling screed.
Preparation of the thermal insulation layer
Insulation must be installed under the heating pipelines - usually slabs of dense extruded polystyrene foam (not expanded polystyrene) of high density with a thickness of at least 35 mm (preferably 50 mm). Sometimes hard slabs of mineral wool are used, but this is not the best way. You can use a cork. It’s good if the insulation is foil. You can lay a foil waterproofing film. Do not lay penofol.
The thermal insulation is protected from above with a waterproofing film. There are films with markings, heat-insulating boards with clamps and markings.
A damper tape is fixed along the wall. Sometimes it is recommended to lay a strip of insulation along the wall.
Pipe laying and fastening
Pipes are laid on the waterproofing according to the design. The length of one circuit should not exceed 150 m - otherwise the hydraulic resistance of the pipes simply will not allow the pump to push water through the pipe. The contours should be approximately equal in length.
If pipes need to be bent, do it carefully, preferably using a template so that folds do not form on the pipes at the bending points. If there are no fasteners on the thermal insulation, then special plastic strips (mounting rails) with locks are installed to secure the pipes at the required distance from each other. You can secure pipes with U-shaped anchor brackets (clips). It is necessary to secure the pipe so that it does not “float” when pouring the screed.
Rules for assembling heated floors
After laying, the pipes are connected to the collector using fittings. Each circuit must be able to be switched off using taps at the inlet and outlet.
Then the system is tested, filled with water and heated. Test technology: pressure and temperature are gradually increased over several hours. If possible, the pressure is adjusted to 0.6 MPa (6 bar, 6 atmospheres). Test the system for at least 24 hours, bleeding the air several times.
Then the temperature and pressure are reduced, but the system is left filled with water - the screed is poured when the system is filled.
Creating a reinforcement mesh
Then the reinforcing mesh is laid - for this, a mesh with a cell of 50x50 mm is used.
Installing reinforcing mesh and pouring screed
The system is then filled with solution. The pipeline should be filled with water at room temperature - 20-23°C, the pressure should be 0.3 MPa. It is better to use a ready-made cement dry mixture marked “for water-heated floors.” You can add plasticizers for heated floors to ordinary cement mortar.
The screed is poured from the walls. It’s a good idea to cover it with polyethylene - this improves the maturation process of the solution and improves its quality. Drying out the surface for the solution is undesirable, and it is impossible to moisten a large area. The screed completely hardens after 20 days, but you can walk on it a couple of times after 10 days, not earlier.
How to install heating pipes under the floor in your home
It is quite simple to provide heat to a country estate or house using the classic scheme of supplying coolant from the boiler to the convectors. There are several options for routing supply lines and waste liquid return branches. In any of the options, you cannot do without laying heating pipes in a private house, and an accurate calculation will help to correctly design the system and save the project budget.
You can install heating in your home using different types of pipes.
Rational use of energy resources and correct operation of the heating system in the house are not myths. Ensuring the simplest possible maintenance of heating equipment in a private building, the optimal cost of installing the system in a wooden house, and obtaining optimal efficiency at a minimum cost are quite real. The main thing is to choose the right type of heating system and lay all the pipes in the house so that the installation work is completed before the onset of the heating season.
Options for installing a heating system can be very different: from laying heating pipes in the floor screed, to external installation directly on the internal walls of rooms, from laying communications under the floors in a wooden house, or using protective boxes and special foam covers directly in the ground.
For heat-conducting lines of heating systems, different types of pipes can be used. The simplest option is metal pipes (steel, copper), suitable for laying in the ground in specially equipped concrete trays. A more convenient to install, economical and no less reliable option is reinforced plastic pipes, which are used to lay heating pipes in the floor. Polypropylene multilayer pipes with an oxygen barrier are used for “warm floor” systems; they are laid in a screed on the prepared surface.
Metal pipes are the simplest solution for heating installations
Theoretically, everything is clear and understandable, but in practice a number of questions arise that need to be resolved: how to design a system for implementing autonomous heating, what type of energy carrier to use so that the system is effective and at the same time economical? And how to lay a heating pipe in a private house of an old building and at the same time preserve the uniqueness of the interior - to solve such a problem you need to think more than once.
Important! To connect the hot water supply circuit from the boiler and connect the return branch of the system, exclusively metal pipes are used, the length of which must be at least half a meter.
Installation work of a heating system in a country house or private building is carried out, as a rule, at the final stage of construction. By this time, the building is awaiting a cycle of finishing work, and in order to ensure that the heating circuit does not remain visible, the pipes are usually laid in the floor screed. For basement floors, this is the best option, and the laying of heating pipes in a wooden house on the second floor and above can be carried out in the space between the walls of the premises, and thermal insulation of each circuit of the heating system must be used.
The danger is the air that is inevitably present in an open heating system. To avoid the formation of steam and a critical increase in pressure in the system, a so-called “expansion tank” is installed, the circuit is supplemented with an air pipe and Mayevsky valves at the upper points of the system; laying heating pipes of complex geometry is impossible without an air release valve.
In systems with top supply of coolant, the storage tank, installed at the top point of the system, most often in the attic, must be reliably protected from the cold, especially in the attic of a wooden house. Pipes laid in the ground are also supplemented with a layer of thermal insulation.
If you plan to lay heating pipes in the ground, you need to think about their insulation
The heating circuit, implemented in the house according to the principle of single-pipe wiring, is a system that consistently transfers heat to the heating radiators. It is used in small buildings, in a wooden or brick house, in case of a shortage of budget funds allocated for the implementation of the heating system. Part of the contour can be laid directly in the screed.
In the simplest implementation, the single-pipe system is not supplemented with additional adjustments on each heating radiator, and the coolant consistently loses temperature. The heated water (or other liquid involved in the circulation circuit) arrives at the final heating radiator at a minimum temperature; the pipes are laid in a screed using thermal insulation materials, or in the ground, protected with foamed polymer boxes.
- minimum pipelines;
- simple implementation;
- possibility of natural coolant circulation;
- independence from the power supply network.
- there is no possibility to individually configure radiators;
- an inevitable decrease in coolant temperature as it passes through the heating circuit.
By supplementing the single-circuit system with shut-off valves at the inlets and outlets of the radiators, and a return flow circuit (bypass) at the inlet of each convector, we obtain a full-fledged “Leningrad” heating system.
A single-pipe heating system is the simplest option for heating a home
Important! Including a pump in the circuit to force circulation of the system increases the efficiency of the system. But without the electricity needed to operate the circulation pump, the efficiency of the system is significantly reduced.
The main advantage of this heating system is that each radiator is provided with its own direct and reverse coolant supply system. This opens up the possibility of precise individual temperature control in a private home. You can choose a comfortable temperature regime in any room, this is especially important in a wooden building, and maintain the temperature of the coolant present in the main supply manifold. The disadvantage of the system is the large number of pipes. Laying external circuit pipes in the ground is unacceptable without thermal protection of the pipes or above the freezing depth.
Any type of heating system, be it a system with natural or forced circulation of coolant, differs in the type of supply implementation: a system with a vertical supply and a horizontal system.
In turn, vertical systems are divided into two subtypes:
- systems with bottom wiring, in which the supply main pipeline runs along the floor of the first floor (or in the ground in the basement), from which vertical supply risers are implemented;
- in a system with overhead distribution, the coolant is supplied, first of all, to the attic of the building (or under the ceiling of the upper floor, in a wooden house), passes through the main risers, then through heating radiators the waste liquid is returned to the heating boiler.
In each case, the heating boiler is installed at the lowest point of the system, on the ground floor or in the basement. Installing the boiler directly on the ground is prohibited; the installation surface must be fire-safe, especially in a wooden house. Laying heating pipes in the ground is used if other installation options are impossible.
In multi-storey buildings, a vertical heating system is often created
The horizontal system is divided into three subtypes, each of which operates on the principle of forced coolant circulation.
The dead-end wiring diagram of the horizontal system is implemented on the principle of connecting the input of each radiator to a single supply system, the return outlet of the waste coolant is also connected to a common circuit;
A system with associated circulation differs in that the coolant supply is provided as in the first case, from a single system, and the waste liquid is discharged first into a common collector for all radiators, which is connected to the return coolant circulation branch;
The most optimal option is a scheme with collector distribution, where each branch of heat supply and removal is carried out through a common collector group, separate for the heated coolant and for the cooled coolant. The laying of heating pipes is selected according to the optimal option.
The main advantage of your own heating system implemented in a private building is the ability to choose the optimal temperature maintained in the house.
Complex heat supply systems are characterized by a large number of control elements that allow maintaining the required temperature in each individual room. In a small private building, simple systems with natural coolant circulation, determined by the laws of thermodynamics and gravity, are most often used. The use of simple systems in a house is justified if the heated area of the premises is small and the overall construction budget is limited.
Installing heating pipes into houses is a very important task with many nuances, the success of which is determined by the efficiency factor.
To achieve maximum efficiency of the coolant in the radiator, you should carefully approach the installation. There are several types of heating system wiring, differing in design and number of pipes involved.
Classification of heating system wiring:
- plinth
- single-pipe;
- two-pipe;
- collector
There are also four options for mounting circuits:
- Hidden. In this case, the pipes are recessed into grooves in the wall or screed.
- Open. The pipes are placed outside, this option is less labor-intensive.
- Vertical.
- Horizontal.
Natural and forced flow of water in the pipeline is possible.
In general there are two types of system:
- Open. In this case, the expansion tank comes into contact with the environment. Because of this, you need to constantly monitor the water level in the middle.
- Closed. In this design, constant internal pressure is usually established. The expansion tank includes a rubber bulb with a metal casing. In this case, the liquid does not come into contact with the external environment.
This option for routing heating pipes is also called sequential.
- You can make a self-flowing circuit;
- A fairly economical option, its implementation requires a minimum of materials;
- Compatible with open systems;
- Depending on the distance of the sources, the temperature of the radiators changes, the closest one will be the warmest, the furthest one will be the coldest;
- It is necessary to install bypasses, otherwise if any battery is clogged, the system stops working;
- For forced fluid flow, a powerful pump is required;
- Strict restrictions on the number of radiators in the riser.
But the use of modern solutions makes it possible to partially or completely eliminate all the disadvantages of this type of wiring. Single-pipe systems can be vertical or horizontal. In the first option, the coolant flows upward through a pipe located under the ceiling or in the attic. Then from there the pipes go down to the radiators. The use of a vertical system allows for natural fluid flow, so its operation does not require connecting a pump.