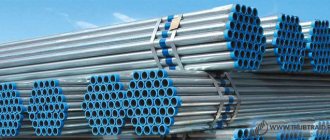
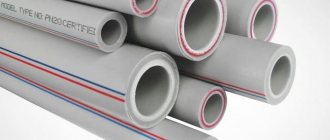
In our time, metal pipes in the construction of heating systems are used less and less every day; they are being replaced by plastic products. This material is used in the construction of not only heating systems, but also water supply and sewerage.
Compared to pipes made of cast iron and steel, plastic products have many advantages, such as long service life (more than 30 years), affordable price, ease of installation, high strength, corrosion resistance, and they are made from environmentally friendly materials. These factors determine the widespread use of plastic pipes, incl. for the installation of heating systems.
Heating pipes must meet the following requirements:
- Strength. The product must withstand the pressure of the coolant in the system.
- Tightness. Maintaining optimal temperature conditions and the integrity of the heating system depend on this.
- Resistant to high temperatures.
- Availability of protective anti-corrosion coating.
- Low noise level.
- Aesthetic appearance.
- Easy to install. The installation process should not be too labor-intensive.
- Long service life.
Kinds
Manufacturers offer several types of plastic products that are used in heating installations:
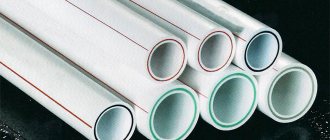
- Polypropylene.
- Made from cross-linked polyethylene.
Polypropylene
Polypropylene products are considered an excellent option for installing a heating system in an open-type private house with a traditional method of laying structural elements. The product is light in weight, easy to install, and uses a special soldering method for connection.
Technical characteristics of polypropylene products:
- Density 0.91 kg/cm3 ensures strength and abrasion resistance.
- Low thermal conductivity.
- Heat resistance.
- High coefficient of thermal expansion.
The advantages include:
- They are the cheapest in their category.
- Good flexibility (thanks to this quality, products can take on the required shape).
- Long term of use (over 45 years).
- Withstands temperatures up to 95 degrees.
- Ability to maintain performance properties at temperatures below 0 degrees.
- High heat transfer coefficient.
The disadvantages of the product are:
- Not suitable for centralized heating systems (not able to withstand pressures exceeding 6 bar and temperatures above 90 degrees for a long time).
- Not suitable for closed systems due to their oxygen permeability.
Cross-linked polyethylene
This type of material is intended for organizing internal heating systems and is designed for operation at temperatures not exceeding 90 degrees Celsius. In exceptional cases, temperatures up to 110 degrees can be maintained for a short time. The manufacturing process ensures resistance to high temperatures and pressure.
Specifications:
- Density 0.94 kg/cm3.
- Melting point at +200 degrees Celsius.
- Combustion temperature at +400 degrees Celsius.
- tensile strength
- Flexibility.
- Impact resistance (retains at temperatures down to -50 degrees).
- Service life over 50 years.
The positive qualities of pipes include:
- Heat resistance and strength.
- Corrosion resistance.
- No formation of internal layers. This property maintains the optimal flow speed of the pipes.
- Possibility of restoring the shape of a product due to various deformations. When exposed to low and high temperatures, the material tends to shrink and expand to a standard size.
- Light weight.
- Easy installation. Laying can be done according to different schemes. The use of pipeline connecting parts makes it possible to join pipes simply, without requiring soldering, gluing or welding.
- Environmental safety of the material.
The disadvantages are:
- Poor resistance to ultraviolet rays. Prolonged exposure to UV rays contributes to the gradual destruction of the product.
Soldering plastic pipes for heating
soldering diagram
The most critical stage of the technological process of installing a heating system is pipe welding.
Soldering is carried out in the following sequence:
- Cutting pipeline parts to the required length.
- preparation .
- Heating and joining of pipes.
- Maintaining a still state.
First of all, large sections should be welded, which will later be placed in the designated location.
The connecting elements are placed in the iron attachment. In this case, the part that will be placed in the other is heated from the outside (the nozzle is put on it with the side intended for external heating). In another fragment, for heating from the inside, the nozzle is placed with the “cap” side.
Please note that it is necessary to put the parts on the nozzle and join them together until they stop.
Over the course of 7-10 minutes, the parts cool down completely motionless, resulting in a reliable connection.
The soldering depth is determined according to the diameter of the pipes:
- at 16-25 mm – the depth is 13-15 mm;
- 32-50 mm – 16-20 mm;
- 63-110 mm – 24-32 mm;
The heating duration is also set according to the diameter of the product:
- 16-20 mm – 5 seconds;
- 25 mm – 7 seconds;
- 32 mm – 8 seconds;
- 40 mm – 12 seconds;
- 50 mm – 18 seconds;
- 63 mm – 24 seconds;
Other methods of threadless pipe connection
Pipe connections without welding or threading are also now available. To do this, use one of several devices:
- a special coupling, which you can purchase in a store or make yourself;
- Gebo fitting;
- flange.
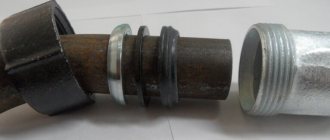
Connecting pipes using a coupling
The connection of metal pipes without welding and threading can be realized using a special coupling.
This fitting consists of the following elements:
- body (3), which is best made of cast iron or high-strength steel;
- two nuts (2) located at different ends of the coupling. If you make a fitting yourself, then brass or bronze is used to produce nuts;
- 4 metal washers (4) installed inside the coupling;
- rubber gaskets (5) used to seal the joint.
Connection fitting device
The diameter of the nuts, washers and gaskets must correspond to the diameter of the pipes being connected.
To install the coupling you will need:
- insert the ends of the pipes (1) through the nuts (2) to the middle of the coupling. The pipes must also pass through washers (4) and gaskets (5);
- the nuts are tightened all the way, while squeezing the gaskets. The connection is quite strong and durable.
Connecting pipes using a Gebo fitting
To connect pipes without welding and Gebo threads with a fitting made of plastic, you will need:
- purchase the required item. Gebo fitting consists of:
- housings;
- O-rings;
- clamping rings;
- clamping rings;
- nuts
Device of a special fitting for joining pipes
- Carefully place the coupling in the unscrewed state onto the ends of the pipes requiring connection;
- secure the joint with nuts.
To obtain a more reliable connection, the nuts can be tightened using wrenches.
Gebo fittings are available for plastic and metal pipes. PVC pipe couplings are also made of plastic. Accordingly, fittings for metal pipes are made of metal.
Gebo fitting for metal pipes
The connection of metal pipes without threads with a Gebo coupling occurs in a manner similar to the one described above. It is recommended to clean the pipes before joining.
Gebo fittings allow you to make pipe joints as airtight and aesthetically pleasing as possible.
Ready-made connections are not subject to temperature changes and pipe vibration. Couplings can be used for all types of pipelines.
Flange connection
A flange is a product designed for joining pipes and installing additional equipment on the pipeline.
The flange consists of several mounting bolts and nuts located around the perimeter of a metal or plastic surface. There is an O-ring in the middle.
Fitting used to join pipes
Currently, a large number of different flanges are produced. Joint elements may differ:
- by diameter (corresponding to the diameter of the pipes);
- in shape: square, round, rectangular and so on;
- by material of manufacture: plastic, metal. Metal products can be made of stainless steel, copper, brass;
- by purpose: for pipes carrying cold and hot water, gas, aggressive substances, and so on.
It is necessary to select a flange based on the parameters and characteristics of the pipeline.
Using a flange, you can connect a metal pipe to a plastic pipe without threads. To connect pipes, you must:
- install flange parts at the ends of the pipes being joined. For reliability, you can resort to the welding method (how to do this is described above);
- install the o-ring;
- secure the connection using fastening bolts.
Particular attention must be paid to installing the O-ring. It must be clearly fixed between the pipes, otherwise the joint will not be reliable
It is not difficult to connect pipes without using threaded elements. Before choosing a method for joining pipes, you need to determine their diameter and the type of material from which they are made. Some methods require special equipment and initial skills to use, others can be performed by novice craftsmen.
Connecting pipes to each other
socket welding
There are 2 methods of connecting plastic pipes to each other:
- Socket welding.
- Welding using connecting elements.
Socket welding technology involves the use of a manual machine. The essence of its application is that when the material is heated, the process of diffusion of molecules occurs (the molecules of one component combine with the molecules of another, resulting in the formation of a seamless shell).
With this welding method, one end of the product is placed into the pre-expanded end of the other.
To carry out soldering using fittings, the end of the pipe and the coupling are inserted into a soldering iron nozzle of the appropriate size and heated at a temperature of 260 degrees.
The temperature can be set on the iron's thermostat. After the required time has passed for heating the material, the components are removed from the nozzle and then combined.
Products with a diameter of more than 63 mm are connected by butt welding.
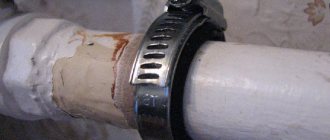
Thread sealant and sealing
In places where pipeline elements are connected, liquid can flow and gas can escape. To protect yourself from such situations, seal the threaded connections of pipes with thread sealant. The product may look different, but its purpose is the same - to seal joints.
Teflon tape
Among the many sealing materials we can highlight:
- Teflon tape, which is the simplest sealant;
- mastic or red lead paint in combination with tow. This seal has been used for several decades, and is still relevant today;
- sealants containing special solvents.
Important! Choose a high-quality seal that will provide a reliable threaded connection, which is especially important when laying gas pipes.
A one-component paste is also used, with which you can easily achieve reliable sealing of not only threaded, but also other types of fittings and risers.
Important! Work with this sealant is accompanied by quick installation and maximum accuracy. The substance does not shrink and does not pollute the internal cavity of risers.
The great advantage of the material compared to Teflon or tow is that with the help of paste, minimal gaps or cracks in the system are ideally filled, which ensures absolute tightness. This cannot be said about Teflon tape, which can collapse under dynamic loads and contaminate the internal pipe space.
Working with tow is accompanied by some inconveniences in the form of contamination of risers and floors. In addition, it is characterized by strong creep and shrinkage.
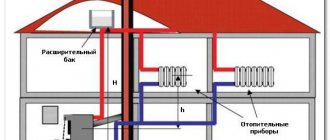
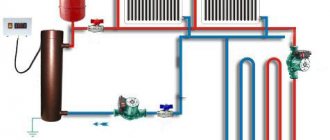
Heating installation
The heating system is installed in the following sequence:
Radiator installation
First of all, you should determine and prepare a place for their placement . Typically, heat exchangers are mounted under window openings, this is due to high-quality air flow circulation. It is important to accurately calculate the distance from the support base where the battery will be located.
Upon completion of the preparatory work, for hanging the batteries, markings are made for the consoles. To do this, the heat exchanger is centered along the window opening at a distance of 11-12 cm from the floor covering and window sill.
Then, at the marks, using a hammer drill, holes are drilled for fasteners, which are subsequently screwed in so that there is a gap of 3-3.5 cm between the wall and the back side of the heat exchanger. For 1 radiator mounting, you will need 4 brackets, for installing a cast iron battery - 6.
Installing plugs for piping the mounted heat exchanger
Almost all heating batteries have 2 open inlet holes on both sides, some of them are closed with plugs during the installation process, and others are closed with threaded passage plugs.
Most often, in the process of installing a heating system, they use the connection of batteries on one side, which provides for the supply of thermal mass from above the heat exchanger, and the return is carried out from below the same side of the battery. On the other hand, in the upper part of the battery, a Mayevsky valve is mounted to remove air, and the lower hole is closed with a plug.
Installation of taps on a heat exchanger
Upon completion of the installation of the plugs, a regulatory element is installed in them, which can serve as valves with a spherical lock . To carry out manual regulation of the movement of thermal mass, you can use conventional radiator taps; for automatic regulation, taps with thermostatic heads can be used.
Typically, American ball valves are used, which ensure quick shut-off of water. To install such a faucet into the battery plug, you will need a special key that is placed in the faucet connecting adapter.
The joint between the passage plug and the tap should be sealed with elastic sealing paste or flax fiber. To do this, check the tap threads in advance by connecting them without a sealing agent. After densely filling the entire depth of the thread with fiber, paste must be applied to the winding and the element must be screwed in.
In the case of using metal shut-off valves, in order to switch to plastic, it is necessary to screw in threaded couplings. As in the previous case, winding is also used here.
Installation of the Mayevsky tap (due to the presence of a rubber gasket) does not require tightness.
Upon completion of work, the heat exchanger can be installed in the designated location.
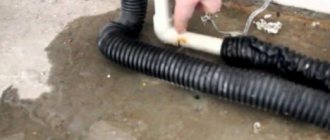
Pipeline laying and assembly
In the process of installing a heating system, the primary thing is to groove grooves in the floor and walls. When using a two-pipe system, the best solution is to lay it in the floor, and connect the heat exchangers from the walls. The layout can be carried out in a cement base, by cutting a groove, or laid before the screed is poured. It is advisable to place the supply and return pipes in isolated channels, at a distance of at least 10 cm from each other.
When laying plastic products, they should be separated with polyethylene foam to ensure thermal expansion. The space around the connecting elements is also filled.
It is not recommended to use rigid fasteners for fastening, which will prevent linear expansion. For these purposes, elastic clamps or plastic brackets are used. In this case, the pipes must be firmly fixed at the point where they exit the wall.
Laying should be carried out vertically or horizontally on the walls, bends should only be made at right angles.
Installation should be carried out in the direction from the risers to the installed heat exchangers. The place of the last welding is preliminarily determined; it should be convenient for working with a soldering iron (as a rule, this is the area between the radiator and the wall).
The material is prepared based on the number of straight zones determined by the diagram. Their sizes are determined by measurements using a centimeter tape. Please note that about 1.5 cm of the pipe length extends into the connecting element.
Price and selection criteria
Pipes PN-20
Estimated cost of plastic products depending on type and diameter:
- Model PN20 , reinforced with fiberglass - 90-1500 rubles per linear meter.
- PN20 , reinforced with aluminum foil - 110-2700 rubles per linear meter.
- PN25 , fiberglass reinforced - 60-3000 rubles per linear meter.
- PN25 , reinforced with aluminum foil - 90-2500 rubles per linear meter.
- Pipes made of cross-linked polyethylene - 50-1700 rubles per linear meter.
When choosing a material for a heating system, you should consider some characteristics:
- Operating conditions , which take into account the properties and composition of the coolant, its pressure and temperature.
- Laying method (open or closed).
- Interaction of product properties with the properties of auxiliary elements of the heating system.
It is important to pay attention to the markings; for heating, PN20 and PN25 products with a reinforcing layer of fiberglass or perforated aluminum are used.
The diameter of the material is no less important, because a large diameter will lead to excessive consumption of the coolant, which leads to higher heating costs. A smaller size will reduce the pressure of thermal mass and the quality of heating.
To install a single-pipe heating system, it is recommended to use products with a circumference of 20, 25 and 32 mm: for risers - 25 or 32 mm, for supply to batteries - 20 mm.
For a two-pipe system, the choice of product diameter depends on the length of the sections and the number of heat exchangers.
So, if more than 8 radiators are installed or the length of the section exceeds 30 meters, products with a diameter of 32 mm are used; when installing fewer radiators and connecting 1 battery in a section of less than 10 meters, you can use material with a diameter of 20 mm.
Blitz tips
- During the soldering process, it is necessary to use elements of the same material.
- The material must be cut strictly perpendicular to the axis.
- When welding material reinforced with aluminum, the metal layer should be stripped from the side where welding will be carried out by 1-1.5 cm. A product reinforced with fiberglass does not require stripping.
- The surface of the parts that are connected must be cleaned and degreased with ethyl alcohol.
- Soldering should be done quickly. This is due to the fact that cooling the molten surface leads to adhesion of poor quality and strength.
- The joining of parts must be done evenly in all planes.
- To avoid the occurrence of internal solders , the pipes must not be overheated during the welding process. Upon completion of the work, you should check the reliability of the installation, this happens as follows: the pipeline is blown out, and if air flows freely, the work has been done efficiently. If adhesions are detected, their location is identified and they are eliminated. To do this, it is enough to install a connecting element or replace a section of pipe.
- To ensure high-quality soldering, pipes and connecting components must be completely dry.
- Plastic pipes are used to construct heating systems, the temperature of which provides for a heating medium heating level of up to 90 degrees Celsius under the condition of a pressure of 1 MPa.
Methods for connecting metal pipes to plastic
Areas of use:
- repair, replacement of old pipeline;
- construction, when installing a gas pipeline, plastic pipes are used, but in a residential area, gas should only be in metal pipes.
In such cases, several connection options are used:
- Welding-threaded. In this case, combined couplings are used. Here one side has a thread, the other a coupling. The thread connects to the metal end. The other side has a plastic end. Such adapters are used for small diameters.
- Flanged. For larger diameters, flanges are used. In some cases, metal hoses are used.