In most city apartments, heating pipes have not been changed for decades. The heating network is very worn out. That is why in many private houses and apartments, even with the heating turned on at full strength, it is quite cool. The fault is the deterioration of the pipes. Many people change them even in new high-rise buildings. Changes are also made in houses.
Instructions for replacing heating pipes
Why do you need to change pipes?
Traditional heating systems made of steel pipes and cast iron radiators are becoming obsolete not only morally.
The main disadvantages of such systems are:
- the tendency of steel and cast iron to corrosion - after many years of operation, a leak may occur from the pipeline;
- “overgrowth” with calcium salts and significantly low efficiency, littering of radiators with rust;
- inability to bleed air from the radiators in the apartment.
Old wiring is often not done according to the design or the design was not well thought out - as a result, the room is cold. The presence of air in the coolant also creates inconvenience in the form of cold radiators and noisy risers.
When is the best time to replace pipes?
A good time to replace your heating is summer. There is no coolant in the system and neighbors in an apartment building will not complain. There is time to purchase materials, think through everything, and complete the work carefully and without haste.
But if a leak occurs and repairing the heating pipes in the apartment is impossible or ineffective (it is impossible to close many rusty places with clamps), then there is nowhere to go - we replace them at any time of the year.
It is better to replace heating pipes in the summer
Features of installation of one-pipe and two-pipe heating systems
Before you start laying the pipeline, it is worth deciding which of the two heating schemes will be implemented in the apartment: one-pipe or two-pipe. Each option has the right to exist and has its own strengths and weaknesses:
- A single-pipe system assumes the presence of a single pipeline through which the media circulates. The heating of radiators in such a scheme occurs unevenly, since the carrier reaches the furthest fuel elements when it has already cooled down greatly. But you will definitely be able to save on the implementation of such a project, since much less pipes and connecting elements will be required.
- A two-pipe heating system has two working circuits through which the media circulates. Through the first (supply) hot water flows into the radiators, through the second, the cooled medium is collected from the radiators and removed for subsequent heating. In such a system, you can replace one or more elements at any time without disconnecting the entire riser. However, for all these advantages you will have to pay for double the number of pipes, taps and connecting elements.
We recommend that you read: Polypropylene pipe reinforced with fiberglass - a guarantee of reliability
Material selection criteria
When choosing heating pipes, you need to pay attention to the following issues:
- The internal diameter of the pipes, which determines the passage of water.
- The power of the heating boiler and the type of energy used, the size of the heated room.
- Type of heating (closed or open). The characteristics also depend on this.
- Method of laying contours. That is, a conventional system is installed or hidden in the walls or floor. And this applies not only to the underfloor heating system. Many owners do hidden wiring when using conventional convectors and radiators.
- Methods of movement used in the heating system: forced or natural. This is reflected in the cross-sectional dimensions of the highways.
- The maximum heating temperature of the coolant, the pressure created in the heating system.
- Pipe installation methods.
After all the questions regarding the selection conditions have been answered, you need to decide on the optimal pipe material.
In specialized stores, manufacturers present pipes made from the following materials:
- metal is steel, stainless steel or copper;
- polymers – PP (polypropylene), PEX and PERT (cross-linked polyethylene);
- metal-plastic - aluminum and plastic are used for production.
In order not to make a mistake when choosing pipes for a heating system, you need to understand their main characteristics. Then it is easier to draw conclusions about their suitability for the planned operating conditions.
Replacing heating pipes in an apartment has its price
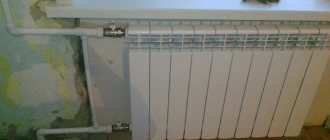
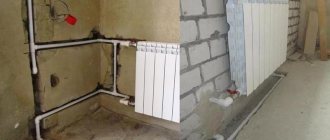
Radiator installation
To avoid heat loss, you need to know how to change the heating in an apartment correctly.
Radiators are installed as follows:
- The device is hung strictly level, and depending on the type of brackets, one or another mounting method is used. If there are no brackets, the wall is drilled to a depth of 8-10 centimeters using a 9.5 mm drill and a dozen reinforcement is hammered into the hole. When the radiator is installed, the fittings are cut in place and bent upward;
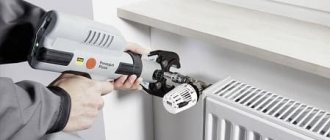
- For bimetallic radiators, the standard cross-section of the plugs is 25 millimeters, so the thermostat and valve are screwed on using adapters. In order to ensure sealing of the joint, flax with sealant or paint is used. The thermostat head is mounted horizontally so that warm air from the line does not pass through it;
- an adapter is mounted on the pipe from below and above the riser and on the valve with a thermostat;
- To connect a corrugated pipe to a fitting, it is inserted into the hole and the nut is clamped with an adjustable wrench, at the same time the silicone seal securely compresses the ribbed surface. The liner is also made level, but it should not be positioned strictly horizontally, since a minimum slope is required to prevent airing of the heating system and radiator.
Replacing the heating system in an apartment, details in the video:
Installation and replacement stages
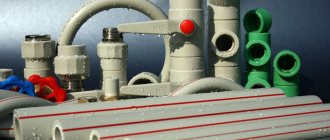
Required tools and materials
In addition to a large piece of pipe, it is desirable to have a welding machine and the appropriate skills in your hands.
Skills in welding sealed seams together with the mirror are required. Gas welding makes it easier to work in difficult conditions.
If there is welding, you need welds - short and long threads, shut-off valves and radiators will fit them.
In addition, you need:
- 3 locknuts, one per radiator;
- 3 drives - one each for the jumper and liner;
- 3 valves DN20.
The valves will, in various positions, block the flow of water through the jumper or direct all the water to the heating device. Or limit the passage of the battery when the jumper is open.
The valves are exclusively ball valves. It’s better to forget about screw valves.
As an option, you can install a thermal head or throttle on one of the connections. Very reliable, hassle-free and convenient design. When assembling by hand, you will have to purchase a die with a lock and turbine and a steel cutting circle. All straight sections with threads will be completed on site. You will need all the listed parts: 2 tees (brass or cast iron) and 2 couplings. The threads must be cut in a vice.
Replacement of pipes requires certain tools
Reset risers
In houses with bottom filling, the risers are connected in pairs. You will have to find out exactly how the riser of interest is connected. An easy way to find out is to go to a top floor apartment and look at the lintels. Top pouring means that you will have to turn off one valve in the attic and in the basement.
How to find valves: follow the entrances - in the basement the stairs are always visible. If the required entrance is found, finding out the position of the valve is a simple matter. All valves are closed, then the vents are opened or the plugs are unscrewed.
Wait for the water to drain to ensure that the fittings are fully functional. If there are relief valves instead of plugs, starting and resetting will be easier.
Turning off the riser during the heating season is only possible if there is a passage to the upper apartment.
If no one lives in it, then you will not be able to start the heating by bleeding the air.
A simple way to disassemble heating devices is to cut off their connections with a turbine. Then the locknuts and a piece of liner are unscrewed from the radiator cap. Two factors depend on cutting the riser: relations with neighbors below and above. It makes sense to replace risers through the ceilings. Corrosion most quickly destroys the pipe inside the ceiling. You need to cut the pipe in the place where you can weld the finished one or trim the thread on it. Preferably not close to the wall or floor. A grinder is convenient for chamfering and cutting off the riser before trimming the threads.
The first step is to reset the risers
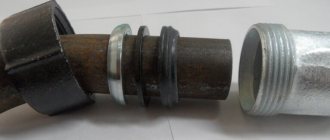
Thread cutting
But cutting threads for the first time can be quite difficult.
What to take into account:
- The chamfer is removed from the pipe using a turbine or file and an entrance is made for the die.
- The holder with the die is installed on the pipe with the long side. This is necessary so that the die is strictly perpendicular to its axis.
- Short threads are cut on the riser - no more than 5 threads.
- When the die finds the pipe, you need to squeeze the holder with the maximum available force.
- The riser itself must be held with a key after the first cut thread. The force is directed in such a direction as to compensate for the rotation of the die at the moment. The situation of tearing off threads from the radiator lower or higher up the riser is quite possible.
- Threads are cut clockwise. The force directed towards the key goes in the opposite direction.
The exception is a convector installed for welding. You will not tear off a pipe welded to the convector. There is no need to hold the riser when cutting threads.
Long threads are cut off on the connections to the radiator (you will have to fit locknuts and radiator plugs onto them) and on the outlet in the jumper. When cutting, the pipe is clamped in a vice so as not to crush or damage the already cut threads.
The next stage is threading the heating pipes
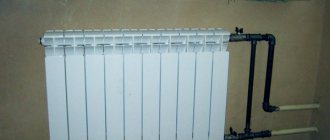
Assembling risers and connecting radiators
Cut pipes with threads cut on both sides are passed through the ceilings and connected with couplings to the threads on the riser.
Winding - linen with silicone sealant or red thread. Good results from polymer thread too. The price of winding is much higher, but for one-time work you can buy it.
Linen ensures tightness. Silicone protects against fading and rotting. Then tees are screwed onto the threads. The gap between the threads directed towards the heating device is exactly half a meter along their axes.
The next valves to be screwed into the tees are the valves with female-female threads with small pipes or male-female threads. Long pipes are screwed into the radiator shut-off valves - pipes with a long thread at one end and a short length at the other. You immediately need to push the stop of the radiator cap and locknut onto them.
The jumper is mounted in the same way as any drive.
Then the radiator is connected. It is hung on brackets so that the axes of the threads coincide with the axes of the eyeliners. Next, pre-wound plugs are driven into it. Same with locknuts.
If welding is available, you can get by with a small number of threads.
After cutting the threads, you should connect the pipes to the radiator
Pressure testing and first launch
There is only a little work left: we need to start the riser and test the structure under pressure, resuming movement in it.
We start with tests. At this stage, it is desirable to have an assistant who, if there is a leak, will inform you about it in the simplest way - by tapping on the riser or by calling the phone.
Open the valve on the jumper and close all the valves leading to the radiator. This way we limit the number of threads that are under pressure during the first start-up. We close the vents at the bottom or tighten the plugs. Open the valve on the new riser a little.
As soon as the water in the open valve subsides, the bottling pressure in the risers can be considered equal. The valves on the risers (in the case of top filling - in the attic) open at full strength. Then - a visual inspection: upon arriving at the apartment, we open the valves on the supply lines (slowly, allowing the radiator to fill with water without consequences) and carefully inspect all the threads for leaks.
If there are screw valves on the risers, open the valve where the arrow from the filling to the apartments is installed. By opening another standing valve, you can tear the valve away from the stem.
Now all that remains is to bleed the air and begin moving.
How to do it:
- In houses with bottom filling, in an apartment on the top floor, open the Mayevsky tap on the jumper between the risers. When water flows from the tap, do not leave: air bubbles may remain in the radiators and be delayed near the vent. Only a heated riser indicates that the movement has definitely begun.
- Top filling does not require active action: the air lock will go into the expansion tank in the attic. If its volume is small, it is better not to be lazy and open the air vent on the top of the tank.
Pressure testing of the heating system
Prices for crimping machine
crimper
Possible errors and problems
The most common mistakes when replacing heating:
- using heating pipes that are not intended for this purpose;
- the diameter of the heating pipes does not match that described in the project;
- heating structure made of pipes made of different materials;
- heating wiring is done incorrectly;
- installation of a room thermostat, which controls the operation of the boiler, in the wrong place;
- lack of required headroom when installing heated floors;
- did not check the underfloor heating system for leaks before covering it with the finishing floor covering;
- they made a screed on a system of plastic pipes, but did not fill it with water;
- dilatation gaps are not made or made incorrectly;
- We turned on the heated floors for heating when the screed had not yet dried. Study the long-burning solid fuel boiler at the link.
Cost of replacing heating system pipes
Prices for replacing heating pipes in an apartment:
| 1 | Installation, battery wiring | from 3,500 rub. | |
| 2 | Installation, battery piping (apartment) | from 4,000 rub. | |
| 3 | Installation of heating risers up to Ø 40 mm | from 150 rub. | |
| 4 | Installation of a heating system heating system up to Ø 40 mm with insulation, 2 pipes (without excavation work) | from 700 rub. | |
| 5 | Installing a heating pump | from 3,000 rub. | |
| 6 | Installation of RB heating | from 3,000 rub. | |
| 7 | Installation of taps, gate valves, balancing valves | from 600 rub. | |
| 8 | Pressure testing of the heating system of a private house | from 3,000 rub. | |
| 9 | Diagnostics of the heating system, on-site (up to 50 km) | from from 2,000 rub. | |
| 10 | Repair and modernization of the heating system | price according to agreement | |
Replacing heating pipes is a difficult but important process
Starting the heating riser
When starting the risers, you need to screw the plugs onto the winding and fill them with coolant.
At the same time, we should not forget about the following nuances:
- when screw valves are mounted on the riser, it is necessary that water flows from the spill in accordance with the arrow on the body, otherwise the valve may tear off;
- First you need to equalize the pressure in the riser and bottling by opening one of the valves and waiting until the noise of the water subsides. Then you need to fully open this and the other valve.
When replacing a radiator during the heating season to restore circulation, the main thing is to remember to bleed the air in the radiator on the top floor.
For reference: refusing to heat the apartment and turning off the heating system for other residents in the house can result in undesirable consequences.