Problem
The main problem that my relatives told me about was absolutely cold radiators in two adjacent rooms, while in other rooms the radiators became noticeably warmer with the start of the heating season.
- In rooms with warm radiators, the average daily temperature was +17C;
- In rooms with non-working heating +13C.
As they say, feel the difference...
For several days, calls from neighbors and relatives to the heating network ended in approximately the same way - nothing, because... the house is a cooperative one, and its maintenance is not their responsibility, except in emergency cases.
And for a cooperative of 60 apartments (4 entrances), where more than half of the residents are people of deep retirement age, it was expensive to maintain its permanent plumber out of pocket. The part-time specialist only made sure that there were no leaks during the startup of the system, and nothing more.
Searching of decisions
Having arrived at the place, the first thing I do is check the taps on the radiators and on the bypasses - everything is in the open position in both rooms. I open the Mayevsky taps on each radiator - a thin stream of water informs that there is pressure in the system and the radiator is not air-filled. But you need to find out whether there is any coolant in the system at all.
For this purpose I go to the basement of the house. From the elevator unit I determine the direction and find “my” supply and return pipes.
This is our highway.
Having reached the location of the apartments at our entrance, I see two pipes - supply and return. To the touch, both pipes differ quite noticeably, so it was not difficult to determine that the colder one was the return pipe.
In the foreground is the return line.
I use my hands again - both risers are cold, although literally a meter before this section the temperature was more than comfortable. The reason is the airing of the system on the upper fifth floor, which is why the coolant does not circulate.
I leave the basement and go to get acquainted with the neighbors on the upper floor, simultaneously inquiring from other residents about the presence of shut-off valves and their condition. As you would expect, they all have cast iron radiators installed 30 years ago.
The fifth floor is a bridge between rooms.
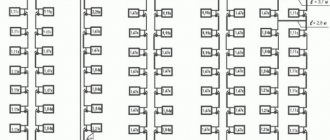
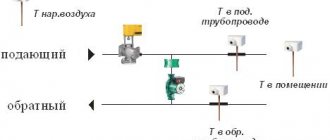
In Khrushchev-era houses there is no technical floor, so the coolant is supplied from below from the basement. To clarify the operation of the heating system, I propose to consider the diagram presented below.
Red arrows show the direction of movement from the supply, blue arrows indicate the return direction.
We return to the fifth floor apartment. In two rooms of a family of pensioners, cast iron radiators with 12 and 7 sections were installed. They were the ones who had to be ventilated.
The reason for the lack of heat is the accumulated air inside the radiator.
The only way available for this is using a nipple (a prototype of the Mayevsky tap) embedded in the radiator plug.
Upcoming job.
- Old galvanized bucket 12 liters;
- Pliers;
- Two flat blade screwdrivers;
- Several floor rags - splashes will be inevitable.
Here it is our simple tool.
I install a bucket under the radiator.
Since a lot of splashes are expected, I provide a place to work around the radiator - I remove flower pots and move the furniture further away
Then I take a screwdriver and carefully, so as not to lick the edges, unscrew the screw counterclockwise
The effort has to be excessive.
- The old system did not work on the first try, I had to use pliers - with their help I turned the screwdriver until the screw came off the stuck place;
- The hiss of air marked the beginning of the air lock coming out. Within 3-4 minutes, the air left the radiator, after which cold water flowed in a thin stream;
- Having adjusted the screw so that the water poured into the bucket, I gave it time - in about half an hour, when the bucket was half filled, the temperature of the water changed from ice to warm, after which I screwed the screw back.
How not to remember the classic: “Oh, it’s getting warm...”
I did the same operation with a cast iron battery in another room. A few hours later, the apartments became noticeably warmer - the thermometer showed an increase of a couple of degrees. Of course, there is no need to talk about a complete solution to the problem of cold in the apartment, because... The coolant temperature is far from 75C, but it’s not yet a bitter winter outside.
I hope that my experience will be useful to some of you. If the symptoms are similar, negotiate with the neighbors on the top floor and ventilate the riser before the onset of winter. Good luck, comrades!
How to hide heating pipes in the bathroom
The bathroom differs from all other rooms in high humidity. This will be the peculiarity: you need to use materials that are not afraid of moisture. The solutions here are basically the same: hide them in the wall or make a box for them. Naturally, you need to lay pipes in the wall before laying the tiles, but the box can be built after.
How to hide heating pipes in a bathroom box
Hiding heating pipes under the baseboard is one way to get by with “little loss”
The construction principle is no different: you make a frame and then sheathe it. But the difference will be in the materials. You need to use galvanized profiles, and drywall should be moisture resistant. Even taking into account the fact that you will be gluing tiles on top. The tile will most likely have to be cut to fit the frame format (or the dimensions of the frame should be made taking into account the size of the tile), and the corners and cuts can be covered with special corners to match the tile, contrasting color, white, etc. - the choice depends on your desire and the design of the bathroom.
One of the panels of the box can be made removable. It can be held on by magnets, corners, stops. This will not violate aesthetics and will provide access to communications.
There is an option that, if suitable, will allow you to get away with “little loss”: there are special plastic baseboard boxes. So if heating pipes in a bathroom or other room run along the wall above the floor, you can hide them in such a plinth.
If for some reason none of these methods suits you, you can try decorating them.
The principle of constructing a heating system
Speaking about the operating principle of the heating scheme for multi-storey buildings, a few words should be said about its construction. It's actually quite simple. Most modern houses use a single-pipe centralized heating scheme for a five-story house or a house with fewer/more floors. That is, the heating scheme of a 5-story building is a single (for one entrance) riser, in which the coolant can be supplied both from below and from above.
In accordance with the location of the supply element, there are two types of coolant orientation. So, provided that the supply pipes are located in the basement, there is a counter-movement of the coolant. And if the supply element is in the attic, then the direction is in the same direction.
Many people are interested in how to determine the radiator area for a particular room. In fact, everything is quite simple - you just need to take into account the cooling rate of the coolant used (water).
Most of us mistakenly believe that the higher the house, the more complex and confusing the heating scheme of a multi-storey building is. But this is a wrong opinion. In fact, the calculation of heating in an apartment building is mainly influenced by the number of apartments that need to be heated.
1. 2. 3. 4. 5.
An apartment in a multi-storey building is an urban alternative to private houses, and a very large number of people live in apartments. The popularity of city apartments is not strange, because they have everything a person needs for a comfortable stay: heating, sewerage and hot water supply. And if the last two points do not need special introduction, then the heating scheme of a multi-storey building requires detailed consideration. From the point of view of design features, the centralized one has a number of differences from autonomous structures, which allows it to provide the house with thermal energy during the cold season.
Advantages of panel heating systems
Heating with panel devices has a number of advantages, among which the following points can be highlighted:
- The heat from the devices is evenly distributed throughout the entire room.
- Energy savings, thanks to which the price of heating equipment quickly pays off.
- Saves space because there is no need to install piping and radiators.
- Aesthetics - radiators, in most cases, spoil the appearance of the room, while the panels are not so noticeable and look more attractive. That is why panel devices fit well into any interior design.
- Prevents the occurrence of cold walls, as with classical types of heating.
- It is allowed to provide local heating, for example, such a “warm rug” can be placed near a computer desk.
- Electric heating panels are easy to install yourself.
Advice! When choosing the decorative design of panel heaters, focus on the color of the floor. In this case, electric heating panels will look harmonious.
Due to these circumstances, “warm floor” systems and electric heating panels have become widely used not only in apartments and buildings, but also in office premises.
Here, in fact, are all the main features of panel heating.
How to hide heating pipes in a private house by decorating
Hiding pipes in a wall or box significantly reduces the heat transfer of heating elements. Sometimes these activities are contraindicated. This is why pipe decor is widely used to cover communications.
In this version, you can safely listen to your imagination. The main thing is that the original effect fits harmoniously into the interior of the room. You can simply paint the pipes to match the color scheme of the room.
Requirements for paints:
- Mechanical resistance;
- Thermal strength;
- Non-toxic.
You can use jute or hemp rope as decoration. But this will reduce the heat transfer of the pipes. You can also try split bamboo. You can additionally decorate it with branches and leaves, creating a branch. Highly located pipes can be covered with curtains.
To paint communications, water-dispersion, acrylic or alkyd enamel is used.
It is easier to hide pipes at the stage of laying communications. Then it becomes possible to install the system as discreetly as possible. Also in this case, it becomes possible to make a warm floor.
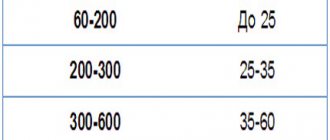
Choosing a radiator
When the procedure for obtaining permission has been successfully completed, it is time to choose a room heating element that is suitable for the loggia.
All batteries are divided into 3 types:
- economy segment;
- middle class;
- premium
The main criteria for differences are cost, quality of materials and duration of operation.
Cast iron
The best and most durable metal of all times has been and remains cast iron. The shelf life of such radiators is more than 35 years. They are stronger than analogs made from other materials, but they weigh a lot. It is recommended to install it on the loggia only from the side of the house wall. The balcony can support no more than 600 kg of weight.
We recommend: Classification of rolled metal products
There is no need to additionally load it, because there is an installed double-glazed window, finishing, tiles on the floor (or other covering), and furniture. They look quite massive and the classic look does not always fit into a modern interior.
Aluminum
They weigh much less, are made in a modern design, and conduct heat well. The only negative: they can rust and deteriorate if the water they receive is of poor quality. Recommended for private homes where the source of water is known and autonomous.
Bimetal
Radiators of this type are most often used in apartment buildings. Bimetallic structures are compact and look laconic. They come in different sizes, conduct and release heat well. Ideal for a balcony or loggia due to its light weight and versatility in installation.
How to hide heating pipes in an apartment using a box
The box is considered a good option when the heating system is already installed. The casing can be sheathed with plastic, plasterboard, or wood. Before work, you should ensure the integrity of communications.
Required tools for installation:
- Metal profile;
- Self-tapping screws with dowels;
- Material for the box;
- Screwdriver;
- Drill;
- Scissors for metal.
First you need to make the frame of the box. The manufacturing material is secured using self-tapping screws. First, the location of communications is marked. The dimensions of the pipes, the thickness of the material and the interval between the walls of the box and the communications are taken into account.
Pipes cannot be installed close to the duct. It is optimal to leave a distance of 3 cm.
Next, building profiles are installed. Then the guides are secured. To fasten the profiles together, cutters are used.
Then the corner profiles are installed. If the interval between the posts exceeds 25 cm, then additional jumpers should be made. If the height of the racks is more than 150 cm, then install horizontal jumpers. When the frame is ready, its design begins. The plasterboard is chamfered before installation. But if tiling is planned in the future, then this process can be omitted.
They begin installing the walls of the box from the side parts and move towards the central ones. After installing the walls, the box must be decorated decoratively. To do this, use tiles, wallpaper, paint.
If you want to hide the batteries, you can build a false wall. The execution technology is similar to the box. First, the frame is made, then the walls are sheathed. A significant disadvantage of this method of decoration is the reduction in room area. If you don’t want to bother with installing these elements, you can purchase a ready-made box at a hardware store.
What the law says
Issues of maintenance and repair, reconstruction and redevelopment of residential premises in an apartment building are regulated by the norms of the Housing Code (LC RF).
Relocating a battery is essentially a refurbishment of a living space that requires changes to the technical documentation.
Guided by the provisions of Art. 26 of the Housing Code of the Russian Federation, before you begin redevelopment of the heating system, changing the location of the radiators, you must obtain permission from local authorities.
Primary treatment of the wall behind the battery
The picture above clearly shows that the wall behind the battery has not been treated. If you are removing the battery for the first time, then most likely there will not be a white wall at all, but a gray dusty wall, with old, stubborn paint. It is clear that you cannot immediately put wallpaper on such a wall. If you are planning not to glue wallpaper, but to cover the wall with a decorative panel, as can be clearly seen in the pictures in the article, then in any case, the wall needs to be treated at least in order to remove the smells of old walls and old renovations (advice from my personal experience ).
So where to start? We begin to knock off the extra bumps on the wall, the remains of the old putty and paint with a hammer and chisel. We especially go through those places where we need to attach the baseboard. Planned time about 1 hour:
Then you must remove all debris and prime the wall (see section).
We prime the wall 2 times. The priming itself takes 10 minutes, but the drying time for each layer is 1.5 hours.
Total: cleaning + priming the wall + drying time is about 4 hours.
Design features of the heating circuit
Modern buildings often use additional elements, such as collectors, heat meters for batteries and other equipment. In recent years, almost every heating system in high-rise buildings has been equipped with automation to minimize human intervention in the operation of the structure (read: “Weather-dependent automation of heating systems - about automation and controllers for boilers using examples”). All the described details allow you to achieve better performance, increase efficiency and make it possible to more evenly distribute thermal energy throughout all apartments.
Battery replacement options
- Batteries with pipes are built into the facade walls.
Most likely, any work in this case will be strictly prohibited. After all, the design of the building includes heat from these pipes along the facade. And any individual changes are simply unacceptable. The only solution would be to order a rework of the heating system throughout the house with insulation of the external walls. It will be necessary to break through the ceilings, install risers, and only then connect new radiators to them.
- Piping in internal slabs.
There are serious restrictions on load-bearing walls. As a rule, batteries were embedded in them. And any demolitions or penetrations are not allowed. The only thing that can be done is to find “mortgages” in the corners of the slabs. These are pockets in the concrete where the slabs and heating risers were connected to each other. These places are easy to find by tapping. After connecting the pipes, the voids were filled with a solution, which sounds very different from industrial concrete. Then the coil in the wall is tightly closed and a new radiator with a bypass is inserted.
- The batteries are inside, but there are riser outlets outside.
In some series of houses, although the radiators are located in the walls, pipe bends can be seen in the corners of the rooms. Everything is much simpler here. It won't be difficult to get close to them and crash into the system. In addition, you don’t have to create a project and go through lengthy approvals.
Whatever the situation, you need to clearly understand that the battery embedded in the wall is in fact a common riser for the entire entrance. And any changes in it affect the quality of heating for all neighbors above and below. Whatever is done, the riser must not be blocked or narrowed.
Only a specialist can accurately determine the series of the house and the configuration of the pipes inside the panels. It will be necessary to bring up documents of Soviet projects. You can only roughly find by touch where such a battery is located.
All this work will cost a lot of money. But problems with heat can be completely different.
Before “removing” the radiators from the walls, you should contact the house management company and demand that they identify the reasons for the lack of heat in the rooms. It is possible that an air lock has simply formed in the embedded pipes or there are deficiencies in the sealing of the seams. Or the insulation inside the panels has simply decayed over time. In many cases, they will fix the problems without reworking the heating system or will have to install an external radiator for free.
Radiator niche size
There are two options for placing the battery in a niche - when it protrudes slightly relative to the wall into the room, and when it is flush with it or deeper. Which one to choose depends on the thickness of the wall.
Arranging a niche under the window does not pose a danger to the structure of the building. If you are making a niche in an external load-bearing wall, you should consult a specialist. The thickness and material, as well as the load experienced, determine how deep the radiator can be recessed into the wall. Do not forget that the thickness and material of the wall determines how much weight it can withstand. For example, the weight of a cast iron radiator will not allow it to be installed on a partition half a brick thick.
The depth of the niche should be such that a heat-reflecting screen or a layer of good insulation can fit behind the battery. The distance from it to the radiator should be at least 2 cm.
If the wall is external, then the top and sides of the niche should be insulated. Expanded polystyrene, polystyrene foam or a similar material 2-3 cm thick is suitable for this. It will not so much insulate the niche as it will prevent the heated air from cooling.
The presence of a screen will significantly increase the thermal energy output of the radiator. Many people believe that batteries heat as specified in the specifications or manufacturer's instructions. In fact, the actual power of the radiator is lower than that indicated in the data sheet.
The distance from the floor to the battery should be at least 5 cm. But it is better to make it larger to make it more convenient to remove dust and wash the floors.
Important
We give minimum distances, but the larger they are, the better. The niche for the battery in the wall should be such that air can circulate freely. Small distances between the radiator and the wall will interfere with natural convection.
Battery completely recessed into the wall
In this case, the distance to the top of the niche should be:
- At least 10 cm for a radiator without air cutoffs;
- At least 5 cm for a radiator with air cutoffs.
The distance to the side walls is at least 5 cm, but preferably about 10 cm. Alternatively, you can make slopes at 45 degrees, but in appearance they do not look so attractive.
The photo shows that the radiator is completely recessed into the wall, but the distances allow air to circulate fully.
Protruding radiator
If the battery protrudes from the niche, the distance to its top should be:
- At least 5 cm for a radiator without air cutoffs;
- At least 3 cm for a radiator with air cutoffs.
The distance to the side walls should be 3-8 cm, depending on how recessed the radiator is. It can be roughly calculated as follows: the depth of the niche from the main wall should be the same as the distance from the side radiator fins. But the minimum 3 cm must be left in any case.
Heating system wiring diagram
When moving heating devices indoors or during repair work, the question of pipe routing often arises. Standard schemes: beech P or inverted beech W. Which particular scheme is implemented in your apartment depends on the panel house.
Two risers are located next to each other. Sometimes they are separated by a wall separating the rooms. In this case, the riser has the shape of the letter T, 2 risers are located on one side and one on the other. They pass through the walls. Output of structural connection zones - ceiling and floor.
Heating pipes installed in walls are usually made of metal. The advantages of this material are durability and reliability. In addition, when doing repair work using a hammer drill, you don’t have to worry that the drill will damage the structure. When you come into contact with metal, you can quickly understand that work needs to stop at this point.
Advantages and disadvantages
Should you rejoice or prepare for the harsh winter period if you moved into a panel house with heating pipes embedded in the wall? Let's consider the pros and cons of this option. Among the main advantages it should be noted:
- Aesthetics. Structures brought inside often spoil the overall appearance of the apartment. The system inside the partition allows you to maintain the design of the room without this “eyesore”;
- Space saving. This factor is especially relevant for small apartments. Heating elements do not take up free space, which is already small;
Efficiency. Do not be afraid that all the heat will go into the partition. Heating elements in such designs are designed for high power, which is enough to properly warm up the room. In addition, to increase the efficiency of the system, designs with calibrated diameters are used and the most suitable wiring diagram is used.
However, heating pipes in the wall also have disadvantages:
- In some cases, low power. The capacity of the system largely depends on the service provider. Sometimes the heat from the heating elements is not enough;
- Difficulties with carrying out repair work. In the event of an emergency, getting to the structure will not be easy. However, such contingencies arise very rarely;
Problems when working with a partition
If you want to drill a partition, you need to do this with great care so as not to touch the structure. To do this, you first need to study the wiring diagram in your home; Difficulties with carrying out cosmetic repairs in the apartment
Hot structures can cause cracking of the plaster. Wallpaper may also come off.
It is difficult to say for sure how effective and convenient heating pipes in the wall will be. It all depends on a person's personal preferences. Some people want to bring the heating pipes inside the room, while others, on the contrary, want to bury them in the wall. But, in any case, it should be remembered that work with risers must be previously discussed with the relevant services. Unauthorized intervention in the design of structures can entail a considerable fine.
Pipes will never add sophistication to a design
Even the most thoughtful design can easily be ruined by exposed heating pipes on the walls. They are disharmonious on their own, and if the highways also intersect, then the room becomes like a utility room or technical room. You can avoid such a situation if you think about in time how to hide the heating pipes from prying eyes.
Methods for installing heating in the walls of a room
Direct wiring diagram for a double-circuit gas boiler.
- Wall-mounted pipeline circuits or warm water walls are connected to the general hydraulic heating system of the entire apartment or house.
- Cable heating systems are used as an addition to the main heating system, electric or cable. They are a heating cable that is attached to the wall in the form of mats or along a certain trajectory, and has an autonomous connection to the network.
- Warm infrared walls are rod or film mats that are attached to the wall and connected in parallel to each other. Typically, such wall heating is used as an addition to the main heating system.
Where is the best place to place a wall heating system:
- on the coldest wall of the room or in a corner room;
- the space in the room in front of such a system should not be filled with furniture or hung with carpets.
Wall systems are operated at temperatures no higher than 35-40 degrees; this temperature level is considered the most comfortable for the human body. To maintain this optimal temperature, additional insulation of the room walls is required to reduce heat loss from the room to a minimum.
Installation of heating equipment using plaster coating:
Piping diagram for a double-circuit boiler with a storage boiler.
- To do this, you will need to prepare the wall, clean it, place the wiring and electrical boxes.
- Install the heat mixing unit.
- Glue polystyrene foam boards onto the wall, and on top of them make a vapor barrier or use foil insulation (for example, penofol).
- Attach mounting rails to the wall to accommodate the pipeline. If warm walls are installed in the bathroom, then the heating system can be moved beyond the surface of the wall and used as a heated towel rail.
- Place the pipeline along the wall in a serpentine manner, bypassing those areas where the furniture will be placed.
- Connect the pipes through the manifolds to the heat mixing unit.
- Under pressure 1.5 times greater than the worker, press the pipes.
- Secure the reinforcing mesh.
- Cover the wall with a thin layer of gypsum plaster.
- Attach a temperature sensor under the top layer of plaster.
- As soon as the first layer of plaster has dried, immediately apply the second. To prevent the layer from cracking and interfering with heat transfer, the second layer is made of lime-cement and above the pipes its thickness reaches 3 cm.
- To avoid the formation of cracks when heated, reinforcement should be made in the form of a thin mesh on top of the putty plaster.
Installation of heating equipment using a false panel:
- Attach thermal insulation material to the cleaned wall - foil foam or expanded polystyrene.
- To install pipes, strengthen the tires.
- Place a pipeline along the wall and connect it to the manifold cabinet.
- Install a metal frame or one already assembled from bars.
- At the end, attach prepared slabs or panels made of plasterboard, plastic or fiberboard to the frame.
Decorating the walls behind the radiators. Think small
It turns out that when people make renovations in their apartments, they completely forget that finishing the walls behind the radiators is just as important as finishing the main walls. And after finishing the work, they realize that the batteries are, in fact, unfinished, the wall behind them is ugly, and of course it needs to be brought into appropriate shape.
Why is this happening? Here are some reasons:
- the heating radiator covers part of the wall, so there is no need to do anything behind it;
- there will be long curtains from the eaves to the floor and the radiators will not be visible at all;
- Decorative screens will be hung on the batteries.
It’s hard to disagree with these points, because they are absolutely fair. But not every family is able to plan all future renovations, as they say, on a turnkey basis, and many little things are figured out along the way. For example, after the repair is completed, it becomes clear:
- Probably in this room with such wallpaper, blinds or short curtains to the window sill, and not to the floor, would be better suited;
- the room is relatively small in area, and if you hang decorative screens on radiators, they will look very bulky and steal the space in the room.
So it turns out that the primary vision regarding batteries has changed. It turns out there will be no long curtains or decorative screens. So what then? A terrible unfinished wall behind the radiators, which in the absence of curtains is very visible? By the way, there are houses where there are 2 windows in the rooms. So 2 scary walls will be visible?
What is the difficulty, you ask? Just think, a small piece of wall, it can be done in a couple of days. However, this is, at first glance, an erroneous opinion. If the wall behind the radiators is really crooked or has potholes, then you can’t just stick wallpaper on it; most likely it will have to be leveled at the very least, which means you’ll have to tinker with primer, plaster, and putty. Read my detailed article about. After gluing the wallpaper, you need to remember to cut out the and, which under the radiators are solid external and internal corners. The worst thing is that if your main repairs have already been completed, then the apartment is relatively clean. And just imagine, in a mini-version you will actually have to repeat the entire renovation from start to finish with a small piece of the wall.
True, I can reassure you a little, since there are certain assumptions that will still allow you to reduce the time. So let's begin. In parallel, I will take into account the time spent on such repairs.
Battery near the wall: what to do with it?
Let's start with the important things. Maybe this will even be news to some. In general, the fact is that nowadays it is not customary to be shy about radiators. In many modern design projects, batteries are displayed in prominent places. Often they are even emphasized. They are turned into a decorative object or a style-forming element.
So if this is unimportant, if the battery is located in a corner and does not bother anyone, you can simply buy a new beautiful radiator and not try to disguise it.
The second thing I would like to remind you of. Do not close the radiator tightly. It must perform its main function - heating. If you hide the battery in a cabinet behind solid doors, its heating efficiency will significantly decrease. It is necessary to leave at least the top and bottom of the structure or the entire facade free for air movement (by making it perforated).
Well, now to other solutions.
Conclusion
As we can see, there are quite a lot of options for plastering various surfaces. However, upon closer examination of the technology, it turns out that there is nothing super complicated about it.
For example, having figured out how to plaster OSB, even a novice builder can do this work, so there are no impossible tasks when finishing a house with plaster. Additional information on this topic can be obtained from the video in this article.
Very often, during construction work, heating pipes are hidden in the wall, pros and cons
This method of hiding pipes needs to be studied thoroughly to determine whether this method is suitable for you or not. Otherwise, not only the functioning of the heating, but also the design of the room may suffer.
It is better to carry out hidden pipe laying at the construction stage. In an already functioning house, this issue is much more difficult to resolve. If previously communications were left attached to the walls, then a significant advantage of modern high-quality repairs is that these options are not acceptable.
Is illegal installation possible?
Naturally, very often you can find cases where the removal of a heating radiator into the loggia is carried out without any approval. Moreover, all installation work is carried out independently, because many mechanics and craftsmen will definitely ask to see permits before starting the installation of a heating radiator. If they do not exist, then few specialists will engage in such work.
Illegal removal of a heating radiator onto a balcony is punishable by a fine. In accordance with the current Code of the Russian Federation on Administrative Offenses, the fine is several thousand rubles. In addition, it will be necessary to carry out work to dismantle the radiator and return everything to its place.
However, after the work has been completed, you can try to get started with paperwork and legalization of the redevelopment.
Although this is a complex process, such a development of events still has the right to life. If the apartment owner refuses to pay fines or remove the heating radiator from the loggia, then the housing company may take extreme measures - go to the courts.