During cosmetic repairs, very often old pipes begin to catch the eye and spoil the entire appearance. Even if these plumbing elements are painted with fresh paint, this will not make them attractive and will not make the room more beautiful. Usually in small bathrooms, during a light renovation, the question arises of how to decorate the pipes in the bathroom in such a way that they fit well into the interior and do not attract attention to themselves. In this article we will tell you how to arrange a bathroom with open pipes and provide photo examples.
In what cases are pipes painted?
Painting the surface of pipes
Before decorating the pipes in the bathroom, they must be prepared for finishing with the selected materials. Most of the products available today for laying pipelines for various purposes do not require painting, since they are made from materials such as:
- plastic;
- non-ferrous metals (copper, brass);
- stainless alloys;
- asbestos.
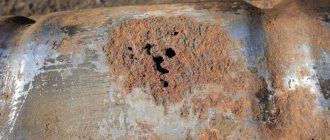
For owners of old apartments, where all the plumbing is made of ferrous metal (steel, cast iron), finishing the pipes in the bathroom is a necessity, since these materials are susceptible to corrosion and require special protection. Even if modern products are used in the bathroom, painting the pipes in the bathroom is used so that the pipes do not catch the eye and do not disturb the entire color scheme of the interior with their contrast. If, during a major overhaul, the pipes are hidden in walls or special boxes, there is no need to apply paint at all.
Bathroom pipes
It is important to remember that even if the pipes are covered with plasterboard boxes but are made of steel or cast iron, then paint for the pipes in the bathroom is still necessary, since it will provide the metal with protection from corrosion and will significantly extend its service life.
How to paint a sewer pipe. Sequence of work
Over time, sewer pipes become depleted, wear out, and lose not only their aesthetic appearance, but also their functionality. In this case, it is necessary to either completely change the sewer system or renew old pipelines. Of course, repair work will be cheaper, and in some cases this solution can extend the service life of the sewer system by more than one decade.
One of the simplest and most effective ways to repair a sewer pipeline and refresh its appearance is simple painting. But often owners do not know how to paint a sewer pipe correctly, what tools are needed for this, or what compounds to use.
Painting is especially important in an apartment where cast-iron pipes are not of the first freshness. Metal, as a rule, tends to corrode. It literally eats up the material, causing leaks and breakthroughs. Paint solves two problems at once - it renews the aesthetic qualities of the pipeline and fights corrosion.
Compositions for painting cast iron pipes
The choice of product for painting cast iron sewer pipes must be carefully considered. Any paint will not work here. If you choose the wrong composition for painting sewer pipes, over time the layer may peel off, fall off, or collapse. Most often, the following types of paints are used for painting pipes:
Pipeline coloring agent
- Alkyd paint provides high quality painting of pipe surfaces. Its main difference is that the paint layer does not fall off when exposed to high temperatures. Some products can withstand temperatures up to 1000 degrees.
- Water-dispersion paint refers to compositions that retain their technical properties for a long time. The main advantages of the paint are its environmental friendliness, quick drying, and durability.
- After painting a sewer pipe with acrylic paint, an attractive gloss remains on it. The paint contains only natural solvents. The enamel is resistant to fading and does not crack over a long period. The disadvantage of paint is that it does not adhere well to the surface of the pipe, so before applying a layer of paint, the pipe should be thoroughly primed.
- Sometimes oil paints are also used, however, it is worth considering that they can lose their attractive appearance over time, turn yellow on the pipes and gradually crumble.
Note!
Before painting a sewer pipe , its surface should be carefully prepared.
How to paint plastic pipes
Plastic pipes have certain features compared to cast iron products. They have a very smooth surface. On the one hand, this is an advantage, since the smooth surface does not allow sediment to accumulate inside the pipe. Some types of pipes cannot be painted at all. Polyethylene and polypropylene pipes can be painted, however, the paints crack and darken.
Painting plastic pipes using spray paint
So, how to paint a plastic sewer pipe? The coloring agent must be selected taking into account the following requirements:
- organic composition;
- the paint must dry in less than 12 hours (drying time is indicated on the label);
- layer hardness and color density.
Note! Plastic sewer pipes should be painted in rooms where the temperature fluctuates within +18 degrees.
Before you begin the painting process, you should carefully prepare the surface of the pipe. If it is an old cast iron pipe that has already begun to be damaged by corrosion, then you need to clean it with sandpaper.
Then the surface is degreased and a layer of primer is applied to it.
Preference should be given to primers with an anti-corrosion effect, this will ensure more reliable contact between the pipe and paint, and also prevent the progression of corrosion.
Preparing the pipeline for painting
You also need to prepare the tools and materials that may be needed during the work:
- paint for sewer pipes, selected taking into account the operational needs and technical characteristics of the pipeline;
- a bucket from which you could conveniently remove paint;
- several brushes of different sizes, preferably made of natural bristles;
- masking tape;
- primer;
- protective equipment (glasses, rubber gloves).
Note! It is much easier to work with pipes that are freely accessible. Certain difficulties may arise when painting sewer pipes in a bathroom or toilet, where communications are hidden from prying eyes.
Sequence of work
Painting sewer pipes can be done in two ways. You can paint over the old layer or completely remove it and paint over the surface of the pipe. The work should be performed in the following sequence:
- choosing paint for covering a sewer pipe from a wide range available in hardware stores;
- surface preparation, cleaning, removing the old layer;
Painting of cast iron thick-walled pipelines - treating the pipe surface with a primer, which will protect the pipeline from corrosion;
- the surface of the pipe must be completely dry before applying a layer of paint, otherwise the paint will not adhere and will peel off soon;
- After the primer has dried, you can begin applying a coat of paint.
Preparing plumbing fixtures for decoration
Tools and materials for preparing for painting
Before painting the pipes in the bathroom, they must first be cleaned of old paint and provided with a dry surface for applying a new protective layer. For plumbing fixtures made of steel and cast iron, two cleaning methods can be used:
- mechanical;
- chemical.
The mechanical method of removing old coating uses tools such as;
- grinder with cleaning disc;
- sharp spatula;
- metal brush.
For chemical cleaning, special aggressive substances are used that destroy the molecular structure of the paint. Typically, the chemical method is used only after the mechanical method in hard-to-reach places.
The need for insulation. Causes and consequences.
Thermal insulation of cold water supply pipes from condensate is needed as armor to protect against: freezing, gusts, rust and condensate puddles.
This raises a completely logical question: “Where does the accumulation of moisture called condensate come from?” And here are a few reasons why this happens:
① Temperature difference. If fairly cool water flows through the pipeline, and the ambient temperature is an order of magnitude higher, then the interaction of such different temperatures causes condensation to form.
② Excessive moisture. Many of you probably like to take a hot bath. Especially during the cold season. And we don’t leave the doors open to keep cold air out. Thus, steam from hot water, when interacting with cold air in the room, forms a lot of excess moisture. This is perhaps the most common situation in which condensation forms in the bathroom. By the way, it is precisely for such cases that forced ventilation in the bathroom comes in handy.
③ Lack of proper ventilation of the room. All rooms of your home must be ventilated periodically, regardless of the time of year and the temperature outside. Both you and your living space need fresh air. Insufficient aeration can lead to the formation of unpleasant odors in the house/apartment, as well as to the greenhouse effect.
④ Water supply system malfunction. I think everything is clear with this point. Any leaks and mini-bursts lead to what we want to protect ourselves from with the help of insulation.
Now let’s see what the above factors can lead to:
❶ Formation of puddles on the floor.
❷ Loss of the “appearance” of the highway.
❸ Formation of mold and fungi, which will result in an unpleasant smell of dampness.
❹ The appearance of rust on the metal pipeline. Painting can help get rid of corrosion, but not condensation.
To avoid the consequences, you will need external thermal insulation, or rather a moisture-resistant and sealed thermal insulator.
If we are talking about small diameter pipes, then you will need a pipe casing made of porous foam. This is the simplest type of insulation that you can install yourself without any skills. Just choose the material in the right size. It is not difficult. The outer diameter of the channel must correspond to the inner diameter of the insulator.
The process itself will look like this: cut the thermal insulation along its entire length and put it on the pipeline. Be sure to dry the line first. The cut is then sealed with tape or glue. Ready. As I said, everything is quite simple.
In the case of insulating a large-diameter collector, a material of greater thickness and coverage is used. The seam is fixed using rubber tape, clips or the same glue.
Painting metal pipes
In order to decorate pipes in a black metal bathroom, the entire process will take place in the following sequence:
Why are the pipes making noise in the bathroom? Causes and solutions
- cleaning metal from old paint, rust and other unusual excesses;
- then coat the metal surface with a primer in order to create a reliable base for the paint and varnish substance;
- applying one or more layers of paint, depending on the type of substance used.
The high-quality decor of pipes in the bathroom largely depends on the choice of paint and varnish materials. For priming metal products, it is best to use a mixture of the domestic manufacturer GF-021. As for paints, it is better to use substances based on alkyd, oil or pentaphthalic. Below are several photos of decoration options.
Options for decorating metal pipes
Before painting pipes in the bathroom, it is important to remember that for metal products only paints and primers based on solvents such as “acetone 640” and similar analogues are used. Such paints cannot be used for plastic pipes, as they violate the molecular integrity of the plastic.
Modern manufacturers still offer special paints and varnishes that act as both primer and paint, but such products have a limited color palette. Below we offer several photo options on how to decorate a riser in a bathroom made of metal pipes.
Dye selection
Various types of coloring compounds can be used as a coating for polypropylene pipes, among which the following items stand out:
- standard paints used to protect metal surfaces;
- classic dyes intended for wall decoration;
- acrylic compositions, as well as mixtures designed specifically for plastic;
- polyurethane based dyes.
All of these types of coloring mixtures are commercially available and can be purchased at a hardware store.
Additional Information. When choosing a material suitable for painting polypropylene pipes, we advise you to contact the manager of a trade organization who will advise you on this issue.
When determining the coating application method for polypropylene, we proceed from the characteristics of the selected composition. Let's consider each of the options proposed above in more detail.
We recommend that you read: Connecting pipelines made of polypropylene pipes
Coloring of plastic pipes
Decorative pipes in the bathroom made of plastic or polypropylene are rare, since these products make it possible to sew the pipes into boxes or hide them in the wall under the cladding. The material itself does not rust and does not need additional protection. However, there are times when it is not possible to hide plastic sewer and water pipes for various reasons, and you have to figure out how to decorate the pipes in the bathroom so that they do not spoil the entire appearance. For such products, no preliminary priming or cleaning is required; you just need to wipe the pipes with a damp cloth and detergent to remove dust and grease stains before painting.
It is important to remember that paints based on aggressive solvents cannot be used for plastic pipes. It is recommended to use water-based, acrylic and organosilicon water-based paints and varnishes.
Before painting pipes in a plastic bathroom, it is recommended to study the product recommendations. In many cases, you can use acrylic or pentaphthalic paints, which contain a neutral solvent such as White Spirit. Below we present several photographs that show how to decorate pipes in a plastic bathroom.
How to get rid of condensation on pipes - basic methods of combating
The harmful effects of moisture on plumbing equipment and premises make us think about methods to combat the formation of condensation. Most of them are relatively simple and inexpensive.
Installing an exhaust fan in the bathroom
First of all, excess moisture is eliminated by an influx of fresh air. If there is no ventilation at all, it is advisable to organize it.
The operation of the existing system may be hampered by debris accumulated in the ventilation duct. You need to unscrew the grille and carefully clean out the dust and cobwebs from the hole.
You can verify the presence of traction by holding a lit match to the hole. If the draft is still insufficient, you need to buy and install a fan in the duct.
Installation of insulating tubes
High-quality insulation is one of the most effective ways.
Effective and inexpensive vapor-tight thermal insulation is made from polyethylene foam. This material is called energyflex and is sold in the form of finished tubes of various diameters or in rolls. Before use, the pipeline must be dried, then cut the elastic tunnel lengthwise and put it on the pipe. The joints are treated with polyurethane foam and secured with waterproof tape.
Applying epoxy putty
Homemade thermal insulation can be made from epoxy putty and old fabric scraps. The pipe is cleaned of traces of rust with sanding paper, wiped with acetone to remove grease and additionally with a special anti-rust agent.
Now a base layer of epoxy putty is applied to it and the still wet surface is quickly wrapped with strips of rags. Having wound two or three layers, the fabric is fixed with wire and a finishing layer of epoxy putty is applied on top of it. Now you need to wait until it dries and you can clean and paint the surface.
Temporary methods
If you do not have the necessary materials, or it is impossible to carry out the work at the moment, you can use simple methods. But you need to remember that they are not suitable for long-term use.
- Wrap a bandage around the wet pipe and place the tip in a container to collect water.
- Keep doors open at all times.
- Place moisture absorbers in the room, for example, silica gel balls in bags.
