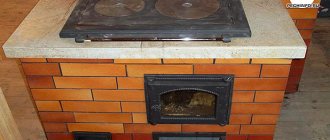
Do I need a cap on the chimney pipe?
It seems obvious to many that a cap on the pipe is necessary.
The main task of the device is not limited to protecting the chimney from precipitation, dust and debris. The functions of the pipe umbrella include:
- protection from the so-called tipping the draft - blowing smoke back into the chimney in strong winds;
- protection against birds and small animals entering the chimney;
- extending the service life of brick or steel pipes;
- chimney decoration.
The main role of the cap is obvious - it protects the chimney from the penetration of atmospheric moisture into the heating system, which is extremely undesirable and negatively affects the operation of the boiler equipment.
But there are counterarguments against installing a cap:
- the design may interfere with the removal of smoke and combustion products from the chimney, being an obstacle to the air flow;
- the cap can reduce draft in the pipe;
- Due to the presence of water vapor in the exhaust gases in winter, ice forms on the canopy, and combustion products do not come out, but return back through the pipe in a concentrated state, poisoning the air in the room.
A cap on the chimney pipe will not interfere, provided that it is correctly selected and installed taking into account the requirements of SNiP and safety regulations.
Although some modern types of chimneys provide special devices for removing moisture and condensation, installing a wind vane on the pipe will protect the chimney from clogging and birds from entering the pipe opening.
Important! A metal cap is not an eternal design. With constant exposure to high temperatures and acidic components in fuel combustion products, thin sheet steel quickly breaks down. Depending on the device, the pipe nozzle must be changed every few years.
Types of caps
Regardless of the type of boiler equipment, all chimney caps are divided into different types according to shape:
- gable;
- pyramidal;
- conical;
- hip;
- spire-shaped;
- flat.
Most devices in appearance resemble a birdhouse or a small house without walls with a roof on small supports and a base for installation on the head of a pipe. Different manufacturers offer weather vanes with various functional elements - mesh partitions to protect against birds, dampers, viewing windows, doors.
There is a separate type of cap for chimney pipes - deflectors. These are functional devices designed to enhance draft by creating a low pressure area at the top of the pipe.
Deflectors are a more complex design that comes in several varieties, including mini-rotary turbines made of sheet steel. The deflector improves the performance of boiler equipment by 20%.
Which weather vane to install on the chimney depends on the efficiency of the boiler and the type of fuel used.
It is important! When choosing a design, it is necessary to take into account safety requirements. For example, it is undesirable to cover high-power boilers with an efficiency of more than 85% with a conventional cone-shaped design. It is better to install a deflector or an open nozzle on it for free release of exhaust gases.?
For furnace equipment operating on solid fuel, you can use hoods of almost any type - conical, pyramidal, hip. It is important to provide additional protection against the corrosive effects of combustion products on steel by installing another stainless steel sheet inside the structure.
We recommend reading: Why heating pipes in an apartment make noise or hum, and how to fix it
How the hood works
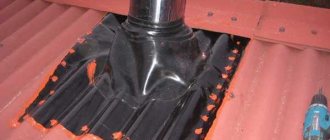
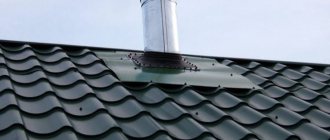
The operating principle of the cap is clear: it creates a mechanical barrier to atmospheric moisture, precipitation, wind, particles in the air, and leaves. The shape of the security element is usually conical or pyramidal, i.e. pitched. This ensures free flow of water from the cap onto the roof, bypassing the chimney opening.
For this purpose, the cap device is designed in such a way that the diameter of the cap exceeds the diameter of the pipe. The base of the visor - the drip apron - partially covers the mouth of the pipe, preventing the draft from tipping over.
Varieties
The abundance of shapes and types of chimneys force manufacturers to produce caps of various shapes, styles, and sizes. In construction stores you can find the following types of products:
- Standard weather vane. Her umbrella is a pyramid made of sheet metal, attached to a drip apron using brackets.
- Four-slope weather vane. The top of such models resembles a hipped hip roof. As a rule, they are used for rectangular brick pipes.
- Wind vane with a semicircular umbrella. It is used for installation on the roofs of European-style houses. From the point of view of increasing traction, it has low efficiency, however, it looks beautiful on the slope.
- Flat weather vane. It is equipped with a flat rectangular umbrella and is used for buildings in the minimalist and modernist styles. The flat cover of the hood does not allow snow to roll off, which is why the brackets of such models experience increased load and sometimes become deformed.
- Round weather vane with a cone-shaped umbrella. They are used to protect round stainless steel pipes; such models are not equipped with a drip line.
Types of chimney caps Different types of chimney caps
Note! Wind vanes are equipped with additional functional elements: dampers, double roofs, folding doors. Don’t get carried away with elaborate details, because the main thing in choosing a deflector is durability and efficiency. An ill-conceived shape can cause noise or vibration in the pipe.
Additional materials and tools
In addition to the material, for manufacturing you will need:
- Small hammer
- Gloves
- Rubber mallet
- Special clamps
- Gibs
- Metal corner
- Metal bar
- Metal scissors/jigsaw
- Marker
- Ruler.
Types and principle of operation of the visor
There are several main types of canopies that act as a chimney canopy, which differ in the type of chimney and the shape of the roof. As for the types of chimneys, they are divided into the following types:
- Standard canopy - most often made in the form of a house with a pitched roof
- Canopy with weather vane
- Smoker with a semicircular top
- With opening lid
- Canopy with gable roof.
The visor with a weather vane, in which a special damper is placed, deserves special attention. It allows combustion products to exit the chimney even in the calmest weather.
In addition, chimneys with an open lid are very practical devices. They allow you to clean chimney passages if necessary.
Based on the shape of the chimney roof, the following types of canopies are distinguished (all of them can be made with your own hands):
- Vaulted
- Four-pincer
- Tent
- Flat
- Four slopes
- Spire-shaped
- Gable.
The types of chimney caps differ primarily in the material of manufacture and their design. The level of traction and protection from external influences will depend on the quality of the visor.
Details on how to make a chimney canopy are given in the video:
Pros and cons of a spark arrestor
Sometimes a spark arrestor is installed between the chimney and the cap. Most often, this function is performed by a metal mesh. This is true for boilers operating on solid fuel. In addition to protecting the roof and the environment from possible sparks, the mesh additionally protects the chimney from debris and does not allow birds to land on its edge.
But the spark arrestor mesh has its drawbacks. Along with the smoke, water vapor comes out as one of the elements of combustion products. Having a high temperature, in winter it condenses on the cold metal of the head and mesh, immediately turning into ice. As a result, icing of the spark arrestor prevents further smoke from escaping. Backdraft is created. Moreover, smoke and gases enter the room and can lead to poisoning. To avoid this, the grid cells must be large. But sometimes that's not enough. For boilers with high efficiency, the installation of a spark arrester should be completely eliminated.
How to choose the right chimney cap?
The operating characteristics and reliability of deflectors are directly dependent on the types of heating device and fuel.
If you are using a gas boiler, you can choose an open type design with a nozzle. The canopy for the chimney must correspond to the type of installation and fuel; this rule is enshrined in regulatory documents.
Gas boilers have a low combustion temperature, which means the gases escaping into the chimney are heated to a certain low temperature. At the point where steam escapes, especially at low temperatures, condensate begins to freeze and the air channel gradually closes with ice. If the pipe is made of brick and the boiler runs on natural gas, then installing a deflector is prohibited.
But stoves and boilers operating on solid fuel heat the gases to 2600 at the exit from the chimney. Therefore, such pipes can be protected with caps of any shape, made of different materials.
If high-quality pallets are used, the efficiency level and temperature of the exhaust gases increases significantly, such chimneys are equipped with an open nozzle design. But on brick pipes, you will need to install protection with an umbrella. It will prevent water from entering the channel and destroying the brick.
Bottom line - when choosing a hood for a gas boiler, it is better to buy one with an open nozzle. For heaters burning all types of solid fuel or diesel fuel, all types and shapes of structures can be installed.
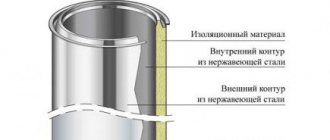
Manufacturing technology of the Tsaga deflector with drawing
Manufacturing drawing of the Tsaga deflector.
(Click to enlarge) First, you need to decide on the dimensions of the outer and inner girth pipe. Measurements must be accurate.
The outer diameter of the stove hood fits tightly onto the chimney pipe.
The main parts are made in proportion to the internal diameter:
- the inlet pipe is placed on the pipe;
- the outer cylinder is a diffuser, its size should be approximately 30% larger than the internal diameter of the pipe;
- cover, its size should be about 90% of the pipe diameter.
In order to correctly calculate the dimensions of the deflector, a table is provided.
Please note: although the installation of a deflector or nozzle may be simple, the proportion must be maintained, and if this is disturbed, the expected result of traction will be lost. . A drawing is made on paper to match the shape and dimensions of the cap. The patterns are applied to a metal surface and cut out with metal scissors. The resulting parts must be bent according to the design and connected with rivets. The finished parts of the deflector are assembled in the workshop, and at a height they are only fixed above the pipeline.
- A drawing is made on paper to match the shape and dimensions of the cap.
- The patterns are applied to a metal surface and cut out with metal scissors.
- The resulting parts must be bent according to the design and connected with rivets.
- The finished parts of the deflector are assembled in the workshop, and at a height they are only fixed above the pipeline.
Please note: it is correct to install the smoke shaft at a height of up to 2 meters above the roof level. Remember that work carried out at height requires special care and compliance with safety regulations.
Characteristics of the chimney canopy
The purpose of the hood is to enhance traction by deflecting the air flow. A properly designed deflector protects the chimney from snow or water from slanting rain.
And the mesh, which can also be installed in the chimney, prevents debris and birds from entering the structure.
Dimensions of the chimney cap in accordance with the dimensions of the chimney pipes.
Main functions:
- Increased traction.
- Improvement of chimney efficiency up to 20%.
- Protection from rain, snow and debris.
- Strengthening brickwork.
- Improving the appearance of the roof.
A properly made wind vane will prevent turbulence and air turbulence, which cause noise and vibration in the chimney.
How to make a visor
First of all, you need to find out the external dimensions of the head where you plan to attach the umbrella, and then sketch out a hand-drawn sketch depicting the future structure. To develop it, use simple rules:
- the dimensions or diameter of the product must be 10 cm larger than the dimensions of the pipe, so that the edges protrude 50 mm on all sides;
- slope angle of the slopes – from 30 to 45°;
- the minimum height from the chimney cut to the fungus is 100 mm, as shown in the drawing.
In addition to the traditional umbrella, there are other design options - a deflector and a rotating weather vane - “sycophant”. The first allows you to actually increase traction due to wind pressure, which creates a vacuum inside the cylindrical body, where the smoke channel exits. But in calm weather, this device not only loses its advantages, but also worsens the traction force in the pipe, creating increased resistance at the exit of combustion products.
Deflector operation diagram
For reference. The same effect is created by rotating spherical nozzles, an example of which is shown in the picture.
The attachment is beautiful, but not very effective
A semi-cylindrical weather vane, assembled from several segments and rotating on a special bearing, was called a “sycophant” due to its ability to turn with the wind. If it were not for the high price and dubious reliability of the bearing, it would be an ideal cap for any round chimney, since it successfully protects the mouth from blowing and precipitation.
Various materials are used to make chimney canopies - thin sheet steel with zinc and polymer coating, stainless steel and even copper. To make a pipe cap with your own hands, we recommend the first 2 options - galvanized or painted metal with a thickness of at least 0.5 mm.
Making a simple round umbrella
To perform this work, you will need the usual tools - metal scissors, a drill, a hammer and a device for setting rivets. Having determined the required size of the fungus, proceed in this order:
- Screw 2 screws into the wooden strip at a distance equal to the radius of the product plus 15 mm. Get an improvised compass, with whose help mark the center of the circle on the metal and draw its outline.
- Cut the workpiece with scissors, and then draw a sector with an arc length of approximately 120 mm (the figure resembles the first piece of a round cake).
- Cut out this wedge, then forcefully align the outer edges of the circle and secure them in a vice.
- Drill 3 holes along the resulting seam and connect the ends of the part with rivets or M4 screws with nuts. The upper part of the weather vane is ready.
Drawing a circle (left) and connecting the edges of the fungus (right)
The legs for the fungus and the clamp surrounding the pipe are made of steel strips made by bending a thin sheet 2-3 times. These parts are also attached to the umbrella with rivets, which is clearly demonstrated by the master in the video:
Gable weather vane
To make this type of cap, it is advisable to use a sheet bending machine or contact the appropriate workshop for this service. In extreme cases, you will have to bend the elements manually along the line, carefully tapping the metal with a rubber hammer on a wooden block.
As in the previous version, the first step is to take the external dimensions of the brick chimney, and then calculate and sketch the pattern, as shown in the drawing. Formulas for determining the length of the sides of the elements depending on the initial dimensions of the pipe and the height of the wind vane are also given here.
Types of chimney caps
The shape of the chimney must correspond to the cross-section of the pipe.
Thus, chimney caps can be:
- round; square; rectangular.
Main design options for chimneys:
- cap-house with a hipped roof; house with a gable roof; chimney with a semicircular roof; cap with a cone-shaped umbrella; with a flat umbrella.
Smokers can be equipped with additional elements:
- spark arrestor; forged ornament; weather vane and so on.
If the spark arrester is a purely functional element, then openwork forging is necessary to give the cap an original and attractive look. It also serves as protection from debris and birds, but a regular grill will cope with these tasks. The weather vane not only shows the direction of the wind and acts as a decoration - thanks to its presence, the draft in the pipe increases.
Making and installing a hood with your own hands
When assembling a simple model of a cap at home, you can do without special rolling machines, just simple tools and devices.
Required tools and materials
The set of necessary tools for the manufacture and installation of a weather vane should consist of:
- metal ruler;
- marker;
- wedge-shaped mallet;
- metal scissors;
- electric drill;
- special clamp;
- sheet bender;
- mandrels;
- small hammer.
Materials you will need:
- sheet of cardboard;
- sheet metal;
- metal plate;
- screws;
- primer for metal;
- dye.
Drawings and diagrams
A simple cap made of galvanized sheet metal 0.6 - 0.8 mm thick for a square or rectangular brick pipe can be easily made with your own hands. It has a pyramid-shaped lid and is cut using a pattern from a single sheet of metal.
For chimneys and ventilation shafts of circular cross-section, a TsAGI deflector is used. It is called so because it is an invention of the Central Aerodynamic Institute. It can be made from a sheet of thin stainless steel or galvanized steel.
You can also install a Grigorovich deflector on a round chimney.
Size calculation
The chimney must cover all planes at the end of the pipe, and if the design includes a head, then the cap must also cover its horizontal surfaces.
The future product should be quite easy to put on the pipe, so each of its length and width needs to be increased by 4-5 mm.
The wings must be of such a size that they cover the horizontal surfaces of the head.
Work progress
The process of assembling and installing the hood consists of the following steps:
- Making a pattern from cardboard according to the calculated dimensions.
- Transferring its contours to a sheet of metal and cutting out the umbrella blank using metal scissors.
- Place the workpiece on the workbench with the markings facing up, so that it is more convenient to bend first the lines marked with a dotted line in the drawing to a right angle, and then the lines marked with the letter “d”.
- Rolling a cone. The connection point must be secured with rivets.
- Making a dropper. The contours of the apron-drip parts are drawn according to the pattern on a sheet of metal and cut out. Bends along the edges of the elements are made using a sheet bender. Rivets are also used to connect parts.
- Attaching the brackets. They must first be cut from metal plates, and then welded at one end to the apron and umbrella. To treat welding areas, use a metal primer.
- Cap finishing. All surfaces of the chimney are covered with 2 layers of paint, which will protect the metal from corrosion and give the product a more aesthetic appearance.
- Installation of the cap on the head of the smoke exhaust pipe. The mounting option for the product is selected depending on the type of pipe. In some cases, screws are used or an additional clamp is installed.
How to choose a cap
Most often, heads with a hipped roof are used for brick pipes, and chimneys with cone-shaped umbrellas are used for round pipes. However, it is worth paying attention to other options. For example, a cap with a gable top provides better protection from snow.
If you want to ensure that leaves and other debris, as well as birds, do not get into the pipe, you need to opt for a cap with a mesh located under the umbrella. The role of the mesh can be played by artistic openwork forging; such heads not only cope with the tasks assigned to them, but also have an excellent appearance.
- Painted chimneys are not suitable for pipes of wood-burning stoves, since the paint on them quickly fades. Heads with a sealed double cover better withstand exposure to hot air, and two-story models allow for better ventilation. A cap with a deflector will provide the best possible draft and thus increase heating efficiency. If install a cap with a hinged lid on the pipe, it will be easy to clean.
When choosing a cap, you need to find a model that not only looks good, but also harmoniously combines with the rest of the elements of the roof and the house in general and will fit well into the exterior of the building.
Types of different caps
For buildings that have a distinctly modern look, caps with a flat roof are suitable, and for most standard “classic” brick houses, the best choice would be a cap with a hipped, gabled or semicircular cap.
To correctly select the size of a cap umbrella for a brick pipe, you need to measure its length and width. If there is an extension at the top of the chimney, the umbrella must cover it too, which means that it is necessary to focus specifically on the dimensions of the outer perimeter of such an extension. The base of the cap should fit easily onto the chimney, but it should sit tightly; to find the required dimensions of its long and short sides, add 4-5 mm to the length and width of the pipe.
Types of ventilation hoods for the chimney and ventilation pipe
There are many types of umbrellas designed to work in different conditions. Let's look at the most common of them:
Round
These structures are designed for installation on round pipelines.
Most of them are manufactured in accordance with standard sizes, which makes them suitable for use in conjunction with ready-made ventilation or smoke ducts. They have different types of connections; the materials used for manufacturing are ordinary or stainless steel, copper.
Rectangular
These devices differ from other umbrella designs only in shape. They are designed for installation on rectangular ventilation ducts or chimneys.
In addition to standard designs, homemade umbrellas are widespread, since the shape and size of the chimney most often has its own size that does not correspond to standard products. Making an adapter in terms of labor costs is quite comparable to creating a new umbrella, so it’s easier to just make an umbrella right away.
Sewer
They are installed on sewer pipe risers and, in addition to the usual functions, help normalize the pressure in the system.
A distinctive feature of such umbrellas is the material - they are installed on polypropylene pipes, therefore they are also made from this plastic or, as an option, from PVC. The main task is to ensure the resistance of the material to UV rays and temperature changes, therefore, during manufacturing, appropriate additives are added to the plastic composition.
Ventilation
In this case, there is some confusion in the names. Ventilation hoods are installed at the beginning of exhaust lines and are designed to more effectively collect emitted pollutants, exhaust gases or excess heat during operation. They are used only indoors, functionally representing the direct opposite of outdoor umbrellas used at the exit of ventilation or smoke ducts.
Types and production of chimney boxes
A chimney box is installed for 2 reasons: mandatory - to prevent heating of the materials from which the ceiling or roof is made, and optionally - to create a decorative decoration for the pipe, especially if it is radically different from the design of the roof.
In addition, such structures are used as cladding for brick air ducts to protect the surface from destruction. They can be made from various non-combustible materials. The process of self-installation directly depends on their choice.
Chimney in a box
When is box installation necessary?
When installing chimneys, it is necessary to adhere to fire safety rules and the requirements of regulations in this area. One of the requirements of the documents regulating the work is the mandatory creation of space between the pipe and the walls of the hole in the floors and roof. This is necessary so that during the passage of hot smoke the walls of the device do not heat up everything around them and cause fire and destruction of materials.
Such boxes have a height slightly greater than the thickness of the ceilings. They are filled with high-temperature resistant materials and heat insulators. Such structures perform only a functional role, since they are not visible either from the room or from the street.
If the chimney is made of brick, it must be protected from the destructive effects of the external environment, precipitation and temperature changes. After all, the solution tends to absorb moisture and, as a result, lose its strength characteristics.
Also, a chimney box is installed on the roof to create a unified composition of the roof and chimney. To achieve this, manufacturers produce additional elements in single collections.
Types of chimney boxes
Often the box for the chimney pipe is made of metal and then painted in various colors. Such products can decorate the roof for many years, thanks to their high strength characteristics. The main material is galvanized and stainless steel. To expand aesthetic solutions, structures can be covered with a protective layer of plastic.
If a cavity forms between the pipe and the box, it is filled with mineral wool. This design is considered universal protection. At the same time, it can reduce heat loss and eliminate the formation of condensation.
In addition to products made of galvanized or stainless steel, the following casings are also available:
- from wooden panels that hide brick chimneys with possible subsequent lining with metal or plastic;
- made of fireproof plasterboard, which is mounted on pipes made of any materials, puttied and painted, creating a structure that imitates the walls of the room.
Making and installing a box with your own hands
The high cost of materials plus production costs dictate the high cost of components from which the casings are assembled. For this reason, many who want to own such a product are wondering: how to make a chimney box with their own hands and how this process occurs.
All stages boil down to the following:
- drawing a detailed diagram based on the diameter of the pipe, calculating the width of the ceiling or roofing, choosing the chimney material;
- assembling a box from selected materials;
- cladding of the finished structure (if necessary).
Required tools and materials
At the first stage of manufacturing a casing for a chimney pipe, it is necessary to decide what it will be made of. Depending on the chosen base, you may need:
- construction tape, level;
- metal scissors (for working with sheets of stainless and galvanized steel), a hacksaw or electric jigsaw (for sawing wood), a stationery knife (if the base is made of plasterboard);
- drill or screwdriver, riveter, hammer;
- pliers, vice.
European cap
This model is more designed to prevent the formation of condensation and has a rounded appearance. A chimney of this type can be made independently using a steel sheet and hand-made holders.
How to make a European cap:
- Take a standard metal sheet and carefully bend it around the pipe, or directly along the contour of the chimney.
- They remake the spoons that will hold the cap directly on the pipe. It is best to do this with a special machine or ask a welder you know. You can also make transverse cuts that do not go all the way and carefully bend the strips using pliers.
- These cuts do not have to be transverse. It is permissible to use longitudinal strips if the piece of metal is quite long. A rectangle is cut out along the edges and the tails are left in the center. After this, roll the sheet in the shape of a semicircle and press the tails with a clamp.
- Gently bend the legs.
It is permissible to use a regular chimney pipe clamp to mount such a cap on the pipe.
To make a European cap, all you need is a piece of sheet metal and a grinder disc.
Choice of protection
Umbrellas can be called differently: cap, chimney, weather vane, fungus, umbrella. But the essence is the same for everyone.
First of all, you need to decide what types of chimney umbrellas exist, their shape and functionality.
- Cap for a 4-slope chimney (wind vane)
- Chimney umbrella.
- Cap (double-pitched) with gable roof.
- Pipe head cap with flat top.
- Wind vane with opening roof.
- Cap with installed weather vane.
From all the variety, you need to choose the one that will most effectively protect the pipe from debris and precipitation, and will not itself be subject to corrosion.
In addition, when choosing, you need to pay special attention to the dimensions of the structure.
If you make a mistake with the dimensions and purchase an umbrella for the chimney pipe with a larger cross-section than needed, then there is a possibility that its installation will become difficult and, as a result, it will be too low. And this threatens the occurrence of reverse thrust.
Installation of a canopy on a chimney
- You need to draw a plan for assembling and installing the visor.
- The drip tray must have a skirt to prevent precipitation from falling onto the chimney. This way the cap will prevent moisture from getting in or out.
- The visor is located in a place where there is no access to constantly monitor it. Therefore, to make it weather resistant, you need to choose quality material.
Materials suitable for making a visor
- Galvanized iron.
- Stainless steel iron.
- Copper alloys.
- Copper.
- Steel sheets.
- Titanium.
- Titanium alloys.
- Chromed iron.
- Zinc alloys.
Tools you will need to create a visor
- Scissors for cutting metal.
- Wooden hammer.
- Metal rods.
- In order to attach the visor. Corners.
- Special hammer.
To make the correct calculations , you need to draw a visor on paper and write down all the required dimensions. And from this drawing it will be easier to make a visor with your own hands.
According to the drawing, you need to start cutting the titanium sheet and begin bending the sheet according to the drawing.
Installation recommendations
It is important to correctly calculate the height and diameter of the cap, the height of which must be at least 10 cm from the pipe cut.
Installing a finished roof cap is quite simple if you follow safety precautions.
The structure should fit onto the chimney pipe, and not fit into it. If you leave a small gap of up to 3-4 mm, the cap will easily fit on the head. If the nozzle fits tightly and does not fluctuate with gusts of wind, there is no need to strengthen it. Otherwise, a clay or adhesive solution is used to further secure the nozzle to the pipe.
Manufacturing of the Grigorovich–Wolpert deflector
It is made by analogy with a conical cap:
- Two umbrellas are made and the edges are connected to each other. In the upper cone, cuts are made along the edges for attaching racks to them. The diameter of the cones is twice the diameter of the chimney pipe.
- The deflector has a width of 1.5 and a height of 1.6 times the diameter of the smoke channel. The outer cylinder is manufactured similarly to the diffuser cylinder. Having rolled the blanks, they are joined with rivets.
- The umbrella is connected to the diffuser using claws, and the entire structure is inserted into the outer cylinder.