What to look for when choosing
The most important thing is to understand the simple truth that installing any type of panels on a radiator leads to a decrease in heat transfer from it. At best it will be 5%. But if you choose a blind grille with a minimum of holes, then the percentage of losses can increase significantly.
It doesn’t seem like much, but during the heating season, heat meters can charge a serious premium. Therefore, the screen should have a maximum of slots for the unhindered movement of warm air.
To smooth this out and increase heat transfer, you need to hang a heat-reflecting screen made of foil material behind the battery on the wall. The heat will be reflected from it into the heated room, instead of pointlessly heating the wall.
Another way to reduce heat loss is to paint the inside surface of the decorative panel black. In this case, the screen will absorb more heat from the radiator and transfer more of it to the room.
The structure should be easily removable and disassembled. The radiators will need to be flushed and the water drained in the summer. Constantly dismantling the decor will only bring additional trouble and inconvenience. In addition, the battery valves must remain unobstructed.
The easiest way is to make a screen for a heating radiator with your own hands from MDF. To do this, you will have to knock down a rectangular box from bars or chipboard to the size of the radiator and cover it with a decorative MDF board. There are a lot of different hole shapes and colors on sale. In addition, you can order cutting of MDF boards on a programmable machine according to an individual sketch.
Radiator grille fastening elements, types of fastenings
The grille can be fixed either to the wall or using hangers on the heating radiator itself.
Mounting the grille to the wall Another option for attaching the grille to the radiator is to simply hang it on brackets. The option is the simplest, but not very aesthetic. An option when the grille is fixed to a trapezoidal block screwed to the wall. Option with a lid, without side walls.
The ease of installation depends on the option you choose and the location of application.
Everything is clearly shown in the instructions, if you have any questions, please ask in the comments! I wish you success! Leave your tips and comments below. Subscribe to our newsletter. Good luck to you and good luck to your family!
DIY battery screen protection and comfort for your home
The interior of any room should have a complete, unified style.
A wide variety of decorative elements are used as finishing touches
They complement or accentuate attention, hide flaws or increase the functionality of one or another component of the interior
In this case, you can make a screen for the heating battery with your own hands.
But there are also decorative products that combine several functions at once. You can make a screen for the battery yourself or purchase it ready-made.
For example, such a decorative panel in the living room will cover up the unpresentable appearance of an old radiator, serve as a shelf for flower pots, and at the same time transform the entire decor of the room with its appearance.
From a practical point of view, the main task of any screen covering the radiator is to protect anyone who accidentally touches it from being burned.
What is especially important when small children are running around the house?
Active radiator grille
Typically, through an opening in the front of the body, cold air enters the engine compartment and cools the radiators. High-end cars use active radiator grilles. Structurally, this is a series of controlled movable blinds that are controlled by the engine control unit - they increase or limit the oncoming flow. The advantages of such a node are obvious. At the first start, for faster warm-up and fuel economy, the grille closes, reducing heat transfer. As the temperature rises, the blinds open to a larger angle, providing sufficient cooling. Some models of active grilles improve the aerodynamics of the car.
Active radiator grille of the BMW M760 Li
Brutal mesh netting
The most common material that replaces the standard factory radiator grille is a fine-mesh chain-link grille. These can be products made of aluminum, plastic and even steel. You can find such a product in many places, and it will cost very modest money. Also, for the lattice transplant operation you will need the following equipment and tools:
- hacksaw for metal;
- file;
- needle file;
- sandpaper;
- self-tapping screws or plastic clamps;
- cold welding.
Before you make the radiator grille in accordance with your own taste, you need to remove the original one from its original places. Usually it is held in place with plastic grips that you just need to squeeze out, after which everything can be easily removed. It is very undesirable to break the fastenings and frame of the grille, since the old structure will serve as a frame for new achievements. The same applies to the chrome trim, if any. After this, all the bars of the lattice, both vertical and horizontal, are cut off “at the root” with a hacksaw or file. Don’t be alarmed if the part has noticeably lost its rigidity, because this is a natural side effect of such tuning.
All “stumps” and burrs will have to be carefully processed with a file and needle file. To seal ugly holes from removed ribs, cold welding is most often used. It dries quickly, so after 10 minutes you can continue working. The production of the frame is completed by sanding the surfaces with sandpaper with a fine abrasive fraction. Next, the mesh is cut to the size of the frame. Its fastening can be done either with small self-tapping screws or with plastic clamps (when you have something), used for twisting wires. If self-tapping screws are used, it is recommended to heat them over a fire before screwing in, so as not to cause cracking of the material. The plastic mesh can also be easily glued on.
Variations of the updated radiator
Decorative mesh on the radiator grill is an original decoration element for any car. It is quite difficult to develop radiator protection yourself; it is easier to use the existing factory form.
The design, made of ABS plastic, can be easily replicated with a soldering iron, paint and skillful hands. The creation of a new grille occurs by sawing out the second rib; the parts are connected in the area with the cut-out emblem of the car brand. This simple method allows you to get a solid structure.
The decorative radiator grille can be made of fiberglass mesh. The old frame is completely dismantled, the emblem is cut out with a hacksaw. Using a factory product, a new mesh is cut along the contour. Small allowances should be made at the edges, which will allow the product to be fixed in the inside of the frame. For fastening, use any available mounting adhesive, plastic clips, putty, silicone or screws with rings.
Using silicone glue, the emblem can be attached to the radiator grille. In addition to it, the grid can be decorated with various letters, all kinds of drawings and brand labels. The main thing in this process is the tireless imagination of the owner and a number of various available means.
How to install the product
Before you begin installing the mesh, you will need to remove the grille. On some cars this can only be done together with the bumper. As a rule, to dismantle you need to unscrew the retaining bolts that are hidden under the hood, and then bend the clamps at the bottom of the grille. After this, it can be carefully removed from its place. For other models, the fastening is so simple that you don’t even have to lift the hood lid: just pry the edges of the grille with a flat screwdriver and remove it from the grooves. You can find more detailed instructions in your vehicle's owner's manual.
Required Tools
To install the protection on the grille, prepare the following set of tools:
- ready-made protective mesh
- flathead screwdriver;
- a set of hex keys for dismantling the grille;
You will need these tools regardless of your preferred mounting method. But besides them, you will need the fasteners themselves. Depending on how you connect the mesh to the grating, you will need one of the following tools:
- standard holders
- cable ties about 18–20 cm long
- screws and industrial hair dryer
- welding machine.
Mounting options
You can secure the mesh in four different ways:
- using standard holders;
- using cable ties;
- using self-tapping screws;
- fusing the stacks into the lattice.
Each of these methods has its own pros and cons. For example, the best option is to install it on standard clamps. Another option is to install the mesh on self-tapping screws. True, before this you will need to heat the screws and thereby prevent further cracking.
Rare motorists resort to the fusion method. Firstly, you need to have special equipment. Secondly, if the grate is made of plastic, it can easily be melted. Well, in the end, you can’t redo a crookedly fused grille, and the entire part will need to be replaced.
For these reasons, drivers who decide to modernize the radiator grill on their own most often use plastic construction clamps. They are low cost and available at any hardware store. To make the ties invisible, purchase them in the color of the future grille and mesh.
Installation instructions
When the mesh itself is ready and the installation method has been selected, you can begin the installation process.
- Carefully remove the radiator grille. Be careful not to damage the cells.
- Wash the parts and remove any debris that has accumulated during use.
- Apply the mesh to the outside or inside of the radiator depending on the final location.
- If you are installing the mesh outside, fold in the seam allowance at the edges.
- Secure the mesh to the grill with clamps. It is best to use a symmetrical circuit. The ties arranged in a checkerboard pattern look beautiful and hold tightly.
- Cut off the long tails of the zip ties. Make sure that the fastening is not broken and the clamp does not fly off.
- Place the grille back into the car.
Connect the mesh and radiator grille strictly along the contours
How to make a radiator grille with your own hands
The radiator grille is manufactured independently in several stages.
Materials
First you need to purchase the following materials:
- thick cardboard;
- polyester resin (200 - 300 g) and hardener;
- glass mat with a density of 300 - 450 g/m². You need approximately 500 g;
- universal putty;
- masking tape;
- bars for grouting;
- sandpaper;
- degreaser;
- acrylic primer;
- solvent.
The tools you will need are a screwdriver, a spatula, scissors, bolts and keys.
Matrix manufacturing
The creation of a lattice begins with the manufacture of a matrix. The standard radiator grille acts as the frame. But it can be replaced with a car bumper with the addition of foam, cardboard, wood, etc.
Transparent tape is glued to the frame in the right places. Painting tape is applied to it. This way the base will be protected from the aggressive effects of polymerization of materials.
Formation of fiberglass
Polyester resin is used to form fiberglass. It is diluted with the hardener. Take 100 g of resin per 2 g of hardener. The proportion must be observed.
The prepared glass mat is applied in 2 - 3 layers. At temperatures from +18 to +25 °C the product will dry in 2 - 3 hours. After drying, the part is separated from the grid. It looks like a frame. Excess fiberglass is removed with a grinder. Then the part is returned to its place for modification of the matrix.
Refinishing is done using cardboard. It is glued on the back side. Fiberglass mat is applied from the front in one layer. After work, the brushes are soaked in solvent.
During the formation of fiberglass, rubber gloves are put on your hands.
Part processing
After drying, the fiberglass part is leveled. All excess material is removed from it. The gaps are made equal and even. It is recommended to try the processed product on a car grille. If necessary, another layer of fiberglass is applied. Next, the base is processed with sandpaper to create irregularities.
This is interesting: Crankshaft position sensor: 3 ways to check functionality and instructions for replacing it
After the work has been completed, the part is ready for applying putty. The surface of the fiberglass is cleaned of dust and degreased. The putty is diluted with a hardener. Proportions are determined by eye. The prepared solution is evenly distributed over the product. The putty is applied in several layers.
Priming and painting
After processing the part and drying the putty, it’s time to prime. The solution can be applied in several layers. This will ensure further even distribution of paint. The coloring composition is applied to the part, which has dried well. Painting is carried out according to the standard scheme.
After drying, the grille is installed on the car. This will allow you to identify defects and errors that are invisible in the draft version. If the part looks good, the product is considered ready.
Why do you need a protective mesh for the radiator grille?
First, let's figure out what functions the radiator itself performs. The radiator is one of the main elements of the car's cooling system, which is located in the nose near the bumper.
During operation, a spark is formed inside the internal combustion engine, which ignites the fuel. It, in turn, releases thermal energy, which is subsequently converted and becomes the driving force for the car. It's no surprise that the engine gets hot all the time. However, overheating of this part can cause partial or complete breakdown of the car. Therefore, cooling is a necessary process for the proper operation of the car.
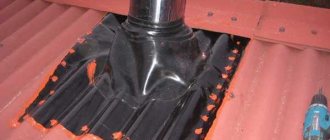
This is precisely why automakers invented the radiator. It is a system of metal plates and tubes through which coolant circulates. A grille is installed on the outside, which covers the technological openings for oncoming air.
A car radiator is one of the main elements of the cooling system.
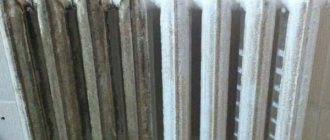
Unfortunately, the radiator grille has rather large cells, so it often gets dirty due to particles of dust, sand, gravel and even insects flying into it. Not all motorists pay enough attention to cleaning this element of the car. Professional car washes are guilty of the same thing. Large amounts of debris prevent the cooling system from functioning properly, which can lead to overheating and engine failure.
This is what an unprotected car radiator looks like after use.
There are radiator grilles with small mesh on sale, but their cost is higher than that of conventional grilles.
A protective mesh that is installed on the inside or outside of the grill will help to avoid this. Its small cells prevent even the smallest insects from entering the radiator. In addition, it is quite easy to remove and clean. At the same time, it does not have a negative effect on the oncoming air flow and does not interfere with the operation of the system.
The protective mesh will protect the car radiator from contamination
Mesh on the outside of the grille
Most often, the mesh is installed on the outside of the radiator grille. This method has many advantages:
- you don’t have to dismantle the bumper and grille to install the mesh;
- such a mesh is easier to remove and clean;
- the grill itself will also remain clean;
- You can diversify the appearance of the car.
A protective mesh can be installed in front of the radiator grille
. However, not everyone likes such changes in the appearance of the vehicle. If for this and any other reasons you do not want to mount the mesh from the outside, there is another method for you.
From the inside
In cars of a high price category, even the radiator grille is a design element. Just remember BMW cars: their grilles cannot be confused with any others, they fit so organically into the overall image. It's not surprising that many motorists don't want to hide them. In this case, the method of installing the mesh from the inside comes to the rescue.
The protective mesh can be installed behind the radiator grille
The mesh hidden under the radiator grille will not be conspicuous. At the same time, it will protect against all contamination no less effectively. However, installing an internal mesh also has its drawbacks. For example, the need to dismantle the grill itself. And some cars are designed in such a way that the grille can only be removed together with the bumper. This will take you extra time and effort, but the overall design of the car will remain more harmonious.
In any case, the choice between appearance and effort is up to you, because the functionality of the part will not decrease.
What to choose: paint or film?
There are several ways to decorate the outside of the radiator grille. Many car owners prefer to paint this decorative element of the body. Before starting work, you should remember that painting any part must occur before it is attached to the frame - this rule is relevant in the case when two parts will be decorated in different colors. If the design is planned to be made in one color, then, naturally, painting the radiator grille should be carried out only after all parts have been completely assembled. The assembled product must be primed; it will be better if the primer and paint are of the same brand.
Some car owners with a creative approach cover the factory or home-made frame with colored decorative film; most often you can see colors such as carbon and chameleon. It is better to carry out such manipulations before the structure is thoroughly connected. There are usually no particular difficulties when pasting; you just need to first prepare the surface to be pasted. It will need to be cleaned of dirt and degreased, then wrapped with a film using a hairdryer and a flexible squeegee, which will have to be carefully smoothed.
Coloring
The mesh can be left in its original form, or it can be painted. This way you will give it an original look. Moreover, you can paint not only the mesh itself, but also the grille along with it. As you might guess, the mesh is painted before connecting to the grille, unless you want to make them the same color.
To do this, you need to thoroughly degrease the surface of the mesh. For better adhesion of paint and surface, apply a layer of primer. Choose primer depending on the type of material: different compositions are used for metal and plastic.
After this, you can safely start painting. To avoid cleaning paint stains from the garage floor, lay down unnecessary newspapers or an old rag. The easiest way to paint is using an aerosol can. Keep it 40–45 cm from the surface. Apply 2 thin coats. Give each one about an hour to dry. Make sure that no sagging occurs. If desired, you can coat the mesh with the grille with an additional layer of varnish.
Lay newspapers or fabric under the mesh and then apply spray paint
As you can see, there is nothing complicated in making a protective mesh for the radiator grill yourself, as well as subsequent installation. All the necessary materials and tools can be purchased at any construction supermarket or automotive parts store without any special expenses. Speaking of costs: making a mesh with your own hands is several times cheaper than buying a ready-made one. You will only need a little time and effort to give it the desired shape and install it in its place.
Tuning the radiator grill with your own hands. Toyota Allion.
We make an “unusual” radiator grille from fiberglass with our own hands for Toyota Allion.
The advantage of fiberglass is that you can easily make anything from it. We did not saw or cut the standard radiator grille; it will remain completely intact and unharmed, because you cannot make from it what you can from fiberglass. The idea was initially simple, they wanted to make a radiator grill like everyone else’s, that is, throw out the middle, insert a beautiful aluminum mesh there for tuning and that’s it. But in the process of work, ideas came up to also make eyelashes for the headlights, so that the face of the car would become more aggressive. First, we made a radiator grille from fiberglass; there are no detailed photos, but I will try to describe this process. We take a standard radiator grille, glue it with adhesive tape, first regular transparent tape, then masking tape. When the surface is covered, we take an impression of the standard grille. We only need the frame, we don’t touch the middle. You should now have a radiator grille surround that needs some finishing.
We invent a model of the recess from cardboard or some other materials (what is also called a shelf), we try to make the cardboard model as even as possible, the final appearance of the product depends on this. When the model is ready, we dilute the resin, take the glass mat and add the grate.
And here it is, a brand new fiberglass radiator grille.
The next stage was making the eyelashes, even the headlights were already covered with tape, but then we got the idea to put it all together. We figured it out, thought about it and decided to glue it all together))
We carefully covered the car with newspapers and started working with resin and fiberglass. And this is what it looks like.
I advise you to immediately mark with a marker the edges that you will then trim. When the surface is impregnated with resin, the marker imprints perfectly on the fiberglass part, this is very convenient.
After drying, remove this structure from the car and remove all covering materials. Using a grinder, we saw off all the excess.
We attach the part to the car.
We carefully measure every centimeter of the radiator grille, maintain symmetry, and make sure that everything is visually even. If there is a flaw somewhere, it is better to eliminate it with a block of sandpaper. Do not saw with a grinder, as such jewelry work cannot be done with such a rough tool. It is best to take these measurements when the fastenings are ready and the radiator grille is securely screwed to the car body. Fastenings can be made from the same fiberglass, for example, by gluing bolts or creating platforms into which screws can be screwed. I do it differently, depending on the design features of the car.
Only after a clear “fit” of the part do we proceed to puttying.
First we need to remove all the roughness and unevenness from our fiberglass part. You can do this manually, with a block and sandpaper, but I prefer to save time and effort, so I use an orbital pneumatic machine. It is better to use the coarsest sandpaper or wheels; I use 40 grit wheels.
After rough processing of fiberglass, you will see many small holes, craters and other flaws. We will eliminate all this by applying a thin layer of putty. The putty can be used both universally and with various fillers (plasticizer, aluminum and others). If you glued the matrix together clumsily, the puttying process may take quite a long time, so try to glue it as carefully as possible.
Installing the radiator grille.
As I wrote earlier, it is necessary to make fasteners for installation in standard holes; some of the fastenings for this grille were made from pads for self-tapping screws, and some others were made in the form of glued bolts. We glued the eyelashes to the hood of the car using 3M double-sided tape. Naturally, the cilia do not stick to the headlight, since the grille is a monolith with the radiator grille.
The fiberglass radiator grille is ready.
As you can see, making a radiator grille from fiberglass is quite easy.
Manufacturing and installation
Now, you need to take a fine mesh and fold it in half, so that the edge fits under the edge and it folds more tightly. The edges of the galvanized mesh are incredibly sharp and tenacious, so protect your hands with gloves. After the mesh is folded as tightly as possible, we temporarily fix it with ties in the four corners. Next, we put the same layout on this grid and cut out the future grid. The most convenient way to cut such a mesh is with metal scissors.
The second step is to place the mesh on the frame. To use as a base, a mesh with larger cells will serve. According to the layout, you should cut out the desired outline from it. Then we place a piece of fine-mesh mesh on top of it, and align the edges so that they match perfectly. If you use a model when cutting out parts, be careful and attentive, then all three parts will be the same size and, when placed on top of each other, will give a smooth, perfect, three-layer edge. If everything is correct, we fix our parts in this position, tightly tightening them together with ties
It is important to place the ties in compliance with a certain pattern - either in a checkerboard pattern, or every even row, with distances of three cells. The accuracy of geometric shapes is always fascinating and after final decoration, the view will be even more transformed
Our hand-made mesh for the radiator grille turned out to be much stronger than the factory one and much denser, however, it is perfectly ventilated and does not create any obstacles to the air flow. Now you need to process the edges of the finished lattice. To do this, we take the car door seal, and carefully, slowly - so as not to tear it by accidentally catching on the sharp edge of the mesh, “put it on” it. Starting from the bottom right corner, millimeter by millimeter, it isolates the sharp edges of the grille edge, plunging them into the depth of the seal. Having completed a full circle, we will return to the starting point, now we can trim off the excess.
In fact, the grille is already ready for use, but it would be nice to give it a more presentable look. Tuning the radiator grille with your own hands is also a completely feasible task, and you need very little to do it. First of all, you should cut off all the hanging “tails” of the ties - not remove them completely, but rather cut off the excess, hanging part. Now place the grid on a clean sheet of paper, face up. Shake the can of paint well and start painting.
First, standing on the right, then, after waiting a little (an hour or an hour and a half), standing on the left of the grate. Such a coloring that “crosses” the directions of the jet will more thoroughly cover the entire surface of the craft.
If you approach the question of how to make a radiator grill with your own hands, you can get a high-quality and reliable grille within just a few hours.