There are many options for making a heated floor in a bathhouse. Thanks to the diversity, everyone is able to find exactly the option that best fits into a specific situation.
For example, you can install heated floors in a bathhouse from a stove, or, as an option, use electric analogues. Each option has its own characteristics, both in terms of characteristics and in terms of installation work.
This article will discuss the most popular types of underfloor heating:
- water heated floor;
- cable heated floor;
- infrared heated floor.
The issues of insulating wooden floors in a bathhouse or sauna will also be discussed.
What are the advantages of heated floors and are they really needed in a bathhouse?
The question of whether such a heating system is necessary for a room where the temperature will already be high seems unnecessary. Before you become interested in how to properly make a heated floor in a bathhouse, you need to understand what advantages it provides:
- Extends service life. Since the steam room is a place of high humidity, the risk that wooden surfaces will begin to rot or develop fungus under its influence is high. A dry and hot air flow from the floor solves the problem of dampness, regularly drying the room.
- No drafts. Like any structure, the bathhouse can be blown by the wind. To prevent air from wandering around the room and causing colds in steam room visitors, infrared heated floors in the bathhouse will be especially useful.
- Extra comfort. Stepping on tiles or wood at a temperature that is pleasant to the human body is something that is often missing in bathhouses. Especially when it comes to individual buildings outside the walls of the house.
- Maintaining the bathhouse in good condition.
Regular heating with the help of floors will protect the steam room from premature destruction, and it is not at all necessary to use the stove.
All of the above must be taken into account, however, it is necessary to point out the features of such a heating system:
- Price. Even the most budget solutions will require significant costs.
- Installation features. Each type of heated floor has its own characteristic requirements and considerations. If they are ignored, there is a risk of the entire system being incapacitated.
- Repair. Replacing or repairing any part of the system is fraught with difficulties. So, in the vast majority of cases, the need for repairs means the mandatory removal of the top floor covering and screed.
In addition, some types may require utilities and will significantly increase utility costs.
Types of electric heated floors that can be used in a bath
Warm floors in bathhouses have been used since the Roman Empire. Now times have changed. And if earlier they used smoke for heating, now they mainly use electricity. But unfortunately, not every electric heated floor is worth installing in a bathhouse.
Warm screed floors
Typically, a heated floor system is installed under the tiles or directly into the screed. This reduces the likelihood of moisture getting on the contact elements or directly on the heating elements. But installation options under linoleum, laminate and other types of surface are possible. But such options are not suitable for a bath and therefore should be excluded.
Note! Installing a heated floor under surfaces such as wood, laminate, parquet, cork, carpet and other materials with low thermal conductivity significantly reduces its effectiveness. After all, such materials do not transfer heat well, and they cannot be heated too much to avoid damage.
Electric underfloor heating with heating cable
So:
- The most widespread are the so-called heating cables and thermal mats . The principle of their operation is based on the flow of current through a special cable, which in the process heats up and transfers excess thermal energy to the floor surface.
- This thermal cable is produced in coils and thermal mats. The price for a regular heat cable coil is slightly lower, but here you are faced with problems of proper installation. After all, such a cable cannot be bent as you please. In addition, intersections and contact should not be allowed. Therefore, thermal mats, which are a mesh with a heat cable already laid, are much easier to install.
- Another nuance that should be mentioned when choosing a heat cable is the number of cores. After all, such an electric warm floor for a bath can be one or two wires. The peculiarity of installing a single-core cable is that it must be laid in such a way that the beginning and end of the cable are in the same place.
- Liquid electric floors, which appeared not so long ago, are also intended for installation in screeds . The principle of their operation is based on the use of a conventional heating cable, which is laid in a pipe filled with water. The water circuit has a closed structure and has no circulation.
- Such heated floors in electric baths are distinguished by increased electrical safety, higher thermal energy storage capacity and, most importantly, maintainability. After all, you can replace the heating cable without removing the tie.
Warm floors under tiles
But if the screed is already installed, then it is quite possible to install a heated floor under the tiles. This option is less labor-intensive, but such heating has a lower thermal capacity. The disadvantages of this installation method include lower electrical safety.
The photo shows rod carbon heated floors
So:
- Warm electric floors in a tiled bathhouse should have a small diameter so that the layer of adhesive required for them is minimal. It is based on this requirement that there are heating cables of smaller diameter, which are supplied with thermal mats and can easily be used for installation in a layer of tile adhesive.
- There are also rod carbon heated floors. Their operating principle is based on the flow of current through special carbon thermal elements, which release heat. Such heated floors have the appearance of a rope ladder, where the power cable acts as a rope, and thermal elements act as ladders.
- A good option is heated floors based on amorphous metal strips. In its structure, it resembles a regular mesh, but is made of special quickly cooled metal. Due to this, the thickness of such a mesh is only a few millimeters. In addition, the instructions for their use state that they have high energy efficiency and low levels of electromagnetic radiation.
Note! Warm floors based on amorphous metal tape should only be used in combination with other types of heating or if it is well insulated. Otherwise, its maximum temperature of 40⁰C is unlikely to be enough to heat the entire room.
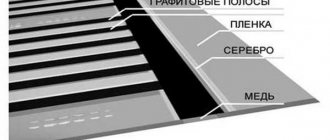
- The last possible option is film heated floors. Moreover, it is possible to use only heated floors based on bimetallic tape. Its operating principle is based on a combination of aluminum and copper alloys, which generate heat when current flows.
Bimetallic film heated floor
- Such film warm electric floors are used quite rarely in bathhouses. After all, it should be installed under the tile only using special reinforcing mesh or laying plasterboard on top of the heating elements. Otherwise, the tile will peel off.
Bathhouse: preparation before installing heated floors
As a rule, wood is widely used as flooring in bathhouses. This is explained by the fact that it has lower thermal conductivity and the floor temperature in such cases remains comfortable.
You can often find tiles: then a concrete screed is used as a base, which cools the tiles down nicely.
In order to insulate heated floors in a bathhouse with your own hands, it is enough to take care of an additional layer of heat-protective material in advance.
It can serve as:
- felt;
- glass wool;
- expanded clay;
- Styrofoam.
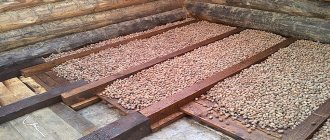
An example of floor insulation using expanded clay
If we are talking about wooden floors, then the insulation is located between the joists, and the top is covered with a layer of waterproofing. The latter is often played by a special waterproofing film. Before laying everything described above, it is also necessary to make a vapor barrier layer using:
- roofing felt;
- glassine;
- special film with a thickness of at least 0.2 mm.
To make the concrete floor in the bathhouse warm, the insulation is placed between two layers of concrete. In order to save space, the latter is made thinner than the base one.
It is important to note that logs and other elements of the subfloor must be treated with moisture-repellent and antiseptic preparations.
Cabling
When the base is prepared, laying the electrical cable begins. This is done in strict accordance with the project. It is advisable to save the installation diagram after completion of work. This will avoid damage to the wiring when performing other work and during operation of the bathhouse.
The cable for the underfloor heating system is produced on a reinforcing mesh. Additionally, the kit also includes fastening elements that make it easier to attach the laid wire to the floor surface. Guides and fasteners help to position the cable correctly, complying with all regulations and standards.
The thermostat is first installed in a convenient place for operation. The grounding of the heated floor system is connected to it through a special tap. This ensures the safety of using the electrical device.
A metal mesh is laid over the cable, which does not have a protective sheath. It is connected to the grounding bus. If the wire has a protective coating, then it can be directly connected to the ground bus. For additional safety of using heated electric floors in wet rooms, it is necessary to install RCDs (residual current devices) or special circuit breakers that are placed on the panel.
Next, you can fill the screed. The required thickness of the cement composition is no more than 4-5 cm. Ready-made self-leveling mixtures can be laid to a thickness of no more than 3 cm.
After hardening, the finished floor is laid on top of the screed. It can be made from ceramic floor tiles. This is a relatively inexpensive and durable material that is resistant to significant temperature changes. To process the seams, a special grout is used that is resistant to moisture and temperature. When installing electric floors in a bathhouse, you can also use wood flooring for finishing.
Warm floors: a brief overview of types
Today, a warm floor in a bathhouse relaxation room is a common occurrence and has already become an integral part of comfort. Especially when it comes to tiles and not wood.
To ensure surface heating, the following types of floors can be used:
- water;
- electrical cables;
- infrared;
- air.
Example of water heated floors
At the first stage, the choice should be guided by the financial situation and the requirements of the floors themselves:
- Mermen. A perfectly flat surface is required. You will have to purchase additional equipment to control the temperature. Quite an expensive type, although self-sustaining.
- Cable. They consume a lot of power, so you should make sure that the current wiring can handle the voltage. Cheaper than water ones.
- Infrared. They do not have any specific requirements. Accessible.
- Airborne. Very expensive to install.
Example of electric cable floor
More details about all types, except air, which is too expensive, later in the article.
Comparison
For comparison, only the heating cable and amorphous tape remained.
This will look more clearly in the table, provided that the comparison is made not in absolute criteria, but in relative ones. That is, relative to each other.
| Heating cable | Amorphous tape | |
| Working temperature | 50–80˚C | 38˚C |
| Increasing floor height | Minimum 4 cm (1 cm cable 3 cm tie) | 0.2 cm (thickness of mat with amorphous tape) |
| Actual heating area, relative to the floor | 1–3% | 20–30% |
| Zebra effect | Present | Absent |
| Heating rate/thermal inertia | Medium/high. To reach the operating mode, you need to heat the screed layer. | High/absent. |
| Energy consumption (all other conditions being equal for power and operation) | High | Low. Compared to the energy consumption of the cable system, it is 40–50% lower. |
Regarding uneven heating, it should be explained separately. In the cross-sectional image of an electric heated floor, it is clearly visible that the amorphous tape heats up at a lower temperature of the working element, but at the same time the area is much larger than that of the cable.
This figure schematically shows the principle of formation of the “Zebra” effect. The fact is that the minimum distance between the turns of the cable is 8 cm. And to the floor surface is at least 4.5 cm (3 cm minimum screed thickness 1 cm tile thickness 0.5 cm thickness of the adhesive composition).
The temperature sensor is located between the turns of the cable, at an equal distance, that is, approximately 4 cm.
We invite you to familiarize yourself with Window openings in a house made of timber
At a superficial glance, the heating rate should be the same. But according to the Debye model (1912), during heat transfer, the phonon energy is weakened when moving from one medium to another. And in this case, there is a transition of thermal phonons from the screed to the glue, then to the floor covering.
If you increase the thickness of the screed so that the heating is uniform, this will increase the energy consumption and inertia of the structure.
A thinner screed will not be able to perform protective functions and at the same time the likelihood of cracking is much higher.
From all the above factors, it follows that the use of amorphous heating tape when organizing an electric heated floor in a bathhouse is the only investment option to achieve the optimal balance between price, efficiency and reliability.
Water heated floors: features and installation work
Before making a warm water floor in a bathhouse, you must:
- make sure that the mounting surface is level;
- think over the route of laying pipes;
- select pipe material.
At its core, such a floor is an analogue of a conventional heating system, only sewn into the floor: a heat transfer fluid moves through the pipes, which is heated by a boiler or furnace.
Water often acts as a coolant, but if the bathhouse is not heated additionally, then it makes sense to use antifreeze. This will avoid freezing of the liquid inside the pipes and, accordingly, the risk of their rupture.
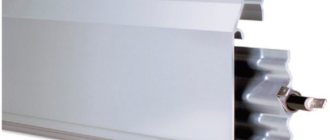
Corrugated bending pipe
A warm water floor in a bathhouse has the following advantages:
- environmental friendliness;
- efficiency;
- ensuring gradual natural heating;
- absence of electromagnetic radiation.
It is important to remember that making a heated water floor in a bathhouse with your own hands is quite problematic, since this is a multi-stage process that requires utmost attention. The slightest mistake can lead to incorrect operation of the system.
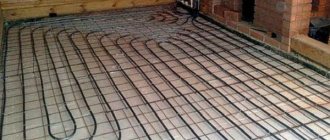
Layers of warm water floor
In particular, the pattern according to which the pipes are laid is carefully selected:
- snail;
- snake;
- double snake.
The distribution of heat also depends on which water floor layout in the bathhouse is chosen. For a bathhouse, a snail is preferable, since it is it that ensures uniform heating of the surface, while a snake cannot provide this: gradually cooling down along the way, the heat transfer liquid may not heat some areas of the floor.
Most often, in order to heat heated floors in a bathhouse from heating, the system is connected to a classic heating circuit, and therefore to a boiler, but the bathhouse allows you to replace it with a stove.
This is appropriate if the steam room itself is a separate building.
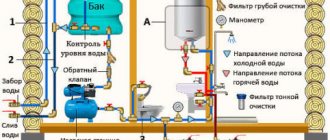
In order to organize a heated water floor in a bathhouse from a stove, it is necessary to install a metal tank above it - it is in it that the water for the entire system will be heated.
Installation diagram for a warm water floor from a stove
There is an option to locate the container below floor level, but in both cases there is a need for a pump: it will ensure proper circulation of liquid in the pipes. Heating the floor in a bathhouse from a stove is a somewhat lengthy process, so a separate wood-burning boiler is often used. Regardless of the method of heating water, the procedure for installing the floors themselves does not change:
- Leveling the surface. The base on which the pipes will run must be level. If we are talking about logs and wooden floors, then special openings for pipes are made in the necessary places.
- Thermal insulation. To increase the efficiency of heat transfer, a layer of thermal insulation material is placed under the system.
- Installing the mounting surface. Most often, this role is played by a special heat-insulating mat with bosses, between which a flexible pipe is laid. However, fastening can be achieved using other suitable means.
- Laying the pipe. It is important to take into account that there should be no sharp turns in the turns.
- Connecting and checking the system. At this stage it is checked whether there are leaks.
- Screed and laying flooring.
An example of connecting a water floor to a heating circuit
It is important to ensure that there is no slope. The pump will cope with the water supply, but the excess pressure created can quickly damage the entire system. Such a warm floor in a bathhouse under tiles and under a wooden covering is suitable. The system will equally cope with heating.
Installation of floors in the bathhouse
“ads1”]In the past, simple wooden baths were ubiquitous; they were placed directly on the ground without a foundation or buried in the ground. It's both simpler and cheaper. But gradually they moved away from this method. Now the baths are placed on the foundation.
A drain hole about 50 cm deep is made in the ground and filled with sand or gravel. To prevent the smell from rotting water from getting inside, the water is diverted several meters from the bathhouse.
Floors are divided into leaking and non-leaking, i.e. in the first option, water passes through the cracks in the floors, and in the second, the boards are laid tightly and the stack goes on top, in the direction of the slope. Both cases have their pros and cons.
- Leaking (or spilling) floors Their advantage can be considered that the boards are not nailed to the joists, but are simply laid on them. Therefore, at any time you can take out the boards and ventilate them, as well as clean and maintain the underground area. The inconvenience can be attributed to the labor intensity; constantly taking out and bringing in boards is troublesome, and if insulation is laid between the joists, then for routine cleaning you need to disassemble it too.
- Non-leaking floors From this perspective, such floors are more convenient, because once they start operating, they end up completely replacing them as soon as they rot, without maintenance. The board must be a floorboard, with a tongue-and-groove profile, and laid tightly, with standard board ties using wedges or staples. A general slope is made towards the drainage pit, and a hole is made in the floors and a siphon is connected. But you can also install a special tray along the entire length and with a slope of the floors, along which water will also flow.
When installing floors that do not leak, the underground space is usually filled with insulation, which is not at all necessary, and the best insulation can be considered ordinary polystyrene foam, extruded polystyrene foam, to put it professionally.
Perlite, expanded sand and expanded clay work well as insulation, although any insulation can be used, since this place is considered dry.
Let's look at how to pour a concrete floor
First of all, a foundation for the stove and a system for removing used water from the bathhouse must be prepared - in other words, a drainage system.
If the soil on the site is sandy and absorbs water well, a so-called absorption pit may be sufficient. Such a hole is dug in a washing room. Its depth should be at least half a meter, and its dimensions should be 60x60 cm or even more. Broken brick, crushed stone, gravel, and sand can be used as pit fillers. The soil in the washing room is compacted, maintaining a slight slope towards the absorption pit. A layer of crushed stone and gravel is poured onto the soil prepared in this way. A layer of clay is laid on the ground near the foundation.
Pit for a bath
In the washing room of a bathhouse built on an area with clay soil that does not absorb water well, a pit is made. The purpose of the pit is to collect water for its removal to an absorption hole dug outside the bathhouse. The dimensions of the pit are relatively small - 30x30 cm. The depth can also be no more than 30 cm.
A drainage pipe extends from the pit, passing through the foundation (or under the foundation) at a slight slope. The water used for washing accumulates in the pit, and from it flows by gravity through the drain pipe into the absorption pit. The pit is closed with a drainage grate. To prevent unpleasant odors from the absorption pit from entering the bathhouse, the drainage pipe can be equipped with a water seal.
On the prepared soil, a backfill of gravel and sand is made. The bedding should be about 15 cm thick. When compacting it, they repeat the slight slope of the soil towards the absorption pit or pit. After the bedding has been sufficiently compacted, it is covered with concrete. The concrete layer should be up to 5 cm.
Then the concrete is covered with a thin layer of cement mortar, and the floor surface is thoroughly leveled. Using the bathhouse will be much more pleasant, and the bathhouse will have a more aesthetic appearance if the concrete floor in the washing room is covered with floor tiles.
In bathhouses that are built in regions with cold climates, it is recommended to insulate the concrete floor of the washing area. This insulation is done simply:
- When mixing concrete, expanded clay is used as a filler.
- You can also lay a layer of insulation between two layers of concrete; Construction felt impregnated with bitumen or mineral wool are used as insulation.
- The junction of the concrete floor and wall is filled with bitumen, which ensures reliable waterproofing.
Briefly about how to make a wood floor
- A wooden floor is made from boards or thin beams.
- Boards (or beams) are laid on wooden logs. If the bathhouse is being built large, a sheathing of beams can be placed on the logs; and the boards are already laid on the sheathing.
- The logs are held in place by specially folded brick pillars. The cross-section of the columns can be arbitrary, but the recommended cross-section is 25x25 cm.
- When constructing columns, rubble stone can be used. The role of brick pillars and wooden logs can be successfully performed by asbestos-cement pipes.
- Before laying the pipes, the soil is well compacted and a fill of crushed stone and sand is made.
Now that we already know how to build a floor in a bathhouse, let's look at additional improvements and important details.
Don't miss: How to insulate plastic windows if it's blowing with your own hands
Electric cable floor: characteristics and installation method
This heating system is based on a heating cable. The installation of warm electric floors in a bathhouse is completely safe, since there will be no direct contact with moisture.
The cable itself can be:
- Single-core. Has more electromagnetic radiation, both ends must be fixed to the thermostat.
- Twin-core. Less electromagnetic radiation, the second end is not attached to the thermostat.
In general, it is almost impossible for an ordinary person to notice the difference in the work of these two types.
An example of an electrical cable floor connection diagram
Before making an electric floor in a bathhouse, you need to decide on the installation scheme. Since there is no heat loss along the entire length of the cable, a snake is most often used - it is easier to install.
It is important to note that during installation, you should observe not only the standard 5 cm from the wall and 10 cm from other heat sources, but also the pitch between the turns. Each manufacturer has its own requirements in this regard. You can see specific numbers on the packaging.
The installation procedure itself is simple. A special mesh is often used as a basis for fastening, but tape can also be used. Following all the rules, the cable is laid over the entire required floor area.
It is important to remember that it is better to avoid placing the cable in the area where furniture will be placed.
If you follow all the steps step by step, you can install an electric heated floor in a bathhouse with your own hands. However, it is recommended to use the services of professionals to connect it.
The undoubted advantages of such a system include:
- full temperature control;
- the ability to heat the bathhouse at any time;
- quick heating of floors.
However, it is necessary to recall that such a warm floor consumes a lot of electricity. For this reason, it is unlikely to be suitable if you plan to use the bathhouse very often.
Electric floor
A two-core cable is easier to install, since you do not need to connect the other end to the thermostat.
Externally, the floor heating cable is very similar to a regular television wire. But its functional purpose is completely different. The heating cable converts electrical energy into heat and transfers it to neighboring materials. The main indicator that characterizes different types of electric floor heating systems is specific heat release. On sale you can find systems with an indicator from 150 to 400 W/m². But an electric heated floor in a bathhouse must have a specific heat release value of at least 250.
Attention: the electric cable for floor heating can be two- or single-core. For a single-core cable, electromagnetic radiation is higher, but within normal limits. In addition, a two-core cable is easier to install, since the other end does not need to be connected to the thermostat.
If the lower floors in the washing compartment are wooden, then when laying the cable with your own hands, special attention should be paid to fire safety. All wooden structures are treated with fire retardants. Despite the fact that there will be no direct contact of the cable with wooden elements, all connections and joints must be carefully insulated. In addition, before installation in a Russian wooden bathhouse, it is necessary to check the integrity of the insulating layer of the heating cable.
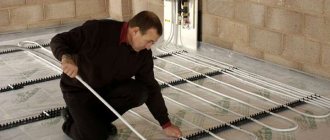
After laying the electrical mats and checking the operation, you can lay the screed or tiles
Work on installing floors with an electric heating system is carried out in the following order:
- After the preparatory work on waterproofing and insulating the base of the floor, you can proceed to laying the heating elements.
- To make it easier to lay cables with your own hands, manufacturers of warm electric floors sell them on special grids, complete with special fastening devices and guides. The guide elements will help maintain the normal distances between cables during installation, and the fasteners will make it easier to fix the elements on the floor.
Important: the minimum distance from the cable to the walls is 50 mm. The maximum permissible distance between cables is indicated in the instructions for the heating system. It is necessary to retreat at least 100 mm from any heating elements.
- We lay the cable evenly on the floor surface, without kinks or tension. Remember to maintain the required distances, otherwise it may cause overheating and short circuit.
- After laying the cable, the system is connected and tested.
- Only after this is the reinforcing mesh laid out on the floor surface and the screed is poured.
- After 28 days, the cement-sand screed will become strong and will be ready for laying a facing covering, for example, ceramic tiles. If you use dry factory mixtures to fill the screed, the hardening time is significantly reduced. In addition, such a screed can be additionally reinforced with fiberglass.
It is important to know: the cable can be laid in a snake or snail pattern. You should not lay heating cables in the areas where equipment and furniture are supposed to be located.
Video instructions for installing heated electric floors:
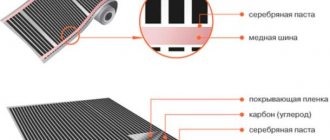
Infrared floor: what you need to know about it
The easiest way to make a warm bath floor yourself is when it comes to infrared floors. Initially, this type was developed so that it could be easily installed in any conditions. This kind of floor is also called film: inside the transparent material there are special heat-conducting inserts.
Installation stage of infrared floor
The advantages of such a system include:
- affordable price;
- simple installation;
- precise temperature control;
- If one plate fails, the others will continue to work.
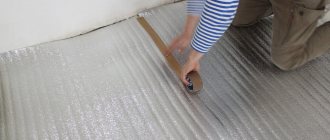
Installing heated floors in a bathhouse with your own hands must begin with thermal insulation. In principle, this type of heated floors can be laid on any surface, since there are no requirements in this regard.
The rolls are rolled out over the entire area of the room, after which they are connected to the thermostat and to the general power supply.
You can make heated floors in a bathhouse within a day, which is also a nice feature of this electric heating system.
The floor covering is placed directly on top of the film. Installing a heated floor in a bathhouse under tiles or wood is equally possible, although tiles are preferable - they conduct heat better.
Installation of film heated floors
To install a film-type heated floor, the existing floor covering must first be removed. Additional insulation with a heat-reflecting base and waterproofing is installed under the film. The film is spread as the top layer.
Might be interesting
Thermal insulation
How to insulate a roof from the inside and not make mistakes?
Thermal insulation
Roofing and drainage: heating rules
Thermal insulation
Insulated Swedish stove: pros and cons
Thermal insulation
Penoizol: self-production
A temperature sensor is fixed under the heating area of the system. To ensure that the surface is smooth and the installation location of the device does not stand out, a special niche should be made in advance. Builders use means for fixing films with a heat-reflective coating and waterproofing.
The thermostat is installed next to a switch or DC source. The clamp with a copper base is securely fixed at the edges of the film. Care is taken to insulate the junction and cut point to eliminate the risk of electric shock or short circuit during system operation. If the entire installation complex is carried out correctly, the installed coating should work effectively. After completing this installation stage, the top layer is covered.
The main advantages of this system include reliability and efficiency during long-term operation; there is no harmful electromagnetic radiation that negatively affects human health.
The floor remains protected from moisture. The parallel type of connection of heated floor elements for a bath allows the device to continue functioning after the failure of one of the components.