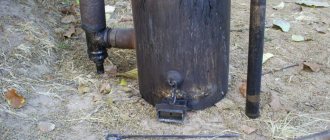
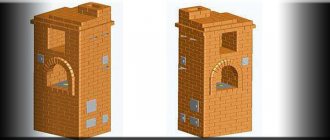
The housekeeper stove is essentially a modified concept that is familiar to everyone - Russian. The difference lies in the combustion chambers; if the Russian device has one chamber, then the housekeeper is conventionally divided into two halves: one of them consists of 2 heating chambers of different sizes. The upper part has a kitchen stove and a vault. From this article you will learn how to build it yourself, based on the drawings and recommendations of experts. You will also be informed about the main functions and technical characteristics of fireboxes.
Device and functions
Depending on the thickness of the seams, the dimensions are approximately 1400 * 890 * 2240 mm. Outstanding features are the ability to warm up over the entire height, starting from the floor. The temperature spread will be only a few degrees. In addition, there is an attempt to implement several advantages at the same time.
The presence of a cooking chamber is like in an ordinary Russian one - two fireboxes of different power, a cast-iron stove, ventilation and moderate dimensions. For cooking, use the crucible and both fireboxes. Moreover, the first one is used in the summer, avoiding unnecessary heating of the room. The greatest thermal efficiency is achieved when using the main firebox, and the second firebox can be heated or heated. You can install a water heating box, the device will change.
Design features of the furnace
A distinctive feature of the housekeeper's stove is its small size. The width of such a device is usually no more than one meter, and the height is up to two meters. Thanks to these parameters, the installation of furnace equipment can be carried out in rooms with a small area.
The structure of the housekeeper is almost the same as that of a traditional Russian stove. The main distinguishing feature is the presence of heating in the lower part of the structure, which makes it possible to completely warm the air in the room. The heating and cooking device operates using various types of fuel.
The structural feature of the housekeeper's oven is:
- Two separate fireboxes. One combustion chamber is used for both heating and cooking. The second is only a cooking one, which is used in the summer. The fireboxes have separate ash pans, ash pans and grates located parallel to them. The fuel compartments are connected into one chimney, which allows the gases to escape together. The doors of the combustion chambers are located on adjacent walls of the furnace.
- Cooking panel. The housekeeper stove has a large cooking chamber in which the horizontal cooking baffle is not adjacent to the back wall. This leaves a compartment that allows hot gases to enter before exiting through the chimney system into the cooking chamber.
- Inspection grooves. There are four recesses in the design for cleaning the chimney channels of the firebox.
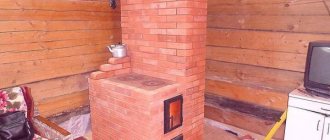
An example of a Russian stove housekeeper
The oven is equipped with two cooking burners. The device can be supplemented with a special box for heating water.
Main differences
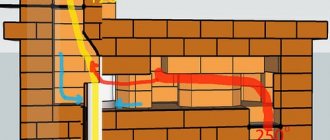
Both lower combustion chambers (2 and 3) have their own grates and doors, above them there is a cast-iron plate (5), with concentric rings. Combustion products move along the path: a small firebox, a large one, after the heating and cooking chambers. Access to the space, called the pole, is open from two sides. The hanging corner of the over-pipe is supported on a support made of an angle or pipe (11). To strengthen the outer pole, a metal corner is used, which is called earthenware (4 and 10). A 25th corner of 3 mm thickness is used, which, like the doors, it is advisable to wall up in the seams using wire. The cooking space can be closed with a damper (12) with a handle.
On the front side there are valves to close the smoke and ventilation ducts in the pipe. The latter begins above the hearth, making it possible to remove odors arising above the stove and ventilate the room. The heating cavity is divided into two sections. The partition (16) consists of 3 separate columns, forming the so-called undercuts (20), measuring 12 by 21 cm and a solid wall. The hot smoke, passing through both sections, cools down and exits into the hearth slot (15), into the cooking space. Passing and heating it, the gases move to the forehead, where they go into the pipe.
A little about the housekeeper stove
A housekeeper stove is a very common occurrence in rural or rural areas, and you’ve probably been visiting relatives or friends in the village, so you know exactly what we’re talking about right now. The photo shows the same housekeeper stove, made by hand.
So, ordering is a process that is responsible for the sequence of all work on the way to a single result. As a matter of fact, the video and photo show exactly the order.
The housekeeper stove is a kind of structure with small dimensions (apparently hence the name). As a rule, this is a length equal to a meter, a width reaching 90 centimeters, and a height that cannot exceed 2.5 meters.
Typically, the housekeeper, according to the reviews they write about it, includes two fuel compartments in its design (this is exactly what is demonstrated in the photo below):
- The main heating tank is used as the main one.
- An additional heating tank is provided just in case and for severe frosts.
It is worth mentioning that the housekeeper stove warms up first at the bottom, after which the temperature rises, so we get a high-quality heated room not from above (as is customary in the system of other heating units), but vice versa.
Ordinal masonry plan
In the first layer, the bricks along the perimeter are taken whole, but the middle can be filled with halves and broken bricks.
In the second, partition columns, cleaning windows and a vent for the larger firebox should be installed. It is better to trim the lower edges at the exit of the ash pan for ease of cleaning.
Third layer - the door of the filled ash pan and the door are installed. To increase the volume, you can lay the ash pan of a small firebox, or you can do this in the next row. (cleaning doors are not shown on the diagram)
The fourth is installing a small firebox door. We block the cleaning holes. If you decide to replace the doors, leave the windows open until the end of the masonry. At the end of the work, you can finally clean the remaining clay and lay it in the protruding halves. It will be easy to find the holes using the protrusions.
Fifth - the barrier of columns becomes solid and connects to the walls. The door of the large blower is covered, and the perimeter of the large blower is reduced before installing the grate. At this point, under the partition, there should be openings through which smoke will flow from the first section to the second. To increase the mass accumulating heat inside, the partition is lined with bricks lying lengthwise and crosswise.
The sixth layer will be laid on all the grates, and they will overlap slightly. It is advisable to make the front and rear overlap of the small grate beveled, this can be seen in the diagram. Thus, the coals will roll towards the center, which will make it easier for even wet wood to burn in a small firebox.
In the seventh, a large door is installed, and in the 8th, a small one is installed, and with the help of cut ribs, an expansion of the chimney is formed towards the heating partition.
In the ninth, the outlet from the firebox narrows, hanging over the previous river.
In the next step, the exhaust path is blocked from above, along with half of the heating chamber. In fact, this is the first layer of the double bottom of the crucible itself. We leave the gap open, through which the smoke will enter the cooking area. It will stretch from one wall to the other, and will be a quarter wide. The side section shows that the underside consists of two layers laid flat. It is supported by the masonry above the folds. When using it for cooking, it should be heated like a Russian one, cleaning the underside if necessary. If the main firebox is lit, the cooking chamber and stove can be used. It is noteworthy that a smaller firebox burns fuel more energetically, while being less demanding on it.
Next, you can block the firebox doors and lay a second solid layer, leaving a gap.
12 – place the cast iron plate on a thin layer of clay, and strengthen both edges of the pole with a metal corner. Conditional “cheeks” are laid.
The 13th and 14th are completely unsophisticated, the linkage is being made. In the next step, for reinforcement, tapes or wires with washers or threaded ends at the ends are laid in longitudinal layers along the edge. The forehead itself is covered with a metal corner, and not with an arch for simplicity. The lower ribs, which form a narrowing, can be trimmed off.
The 16th is laid in the same way, but this time the reinforcement is done across, and the forehead is overlapped along the metal. The second row of narrowing lies rough.
17 - very similar to 15 and also has a metal fastener. The top “faience” is installed on a pipe or other support. When starting to design the vault, it is easier to start laying it at an angle rather than cutting off each edge. The shape itself should be chosen as a dome, due to its geometric strength. At the same time, it is still advisable to strengthen the supports of the vault by laying additional rods or tape, like the sixteenth. Fill the voids remaining between the wall and the dome with adobe, consisting of thick clay mixed with fragments and sand.
This is exactly how it is recommended to lay the 18th row. Under the tray side of the first stones of the vault, adobe is also laid, and the first units are laid on the metal reinforcement of the cross-pipe.
The 19th closes the vault, but retains four or more openings that subsequently flow into the collection path of the 20th. He is the mentioned collecting channel and narrowing of the over-pipe. Its width is reduced from 25 cm to 18 cm, and the right corner is laid with a lock.
In the 21st, the prefabricated one takes on a form that unites it with the overpipe. A ventilation hole of 7 by 25 cm is immediately laid.
In the twenty-second, the section decreases, it is better to cut off the ribs. The ventilation duct becomes half a brick.
23 – there is a shift to the rear wall.
24 – the ventilation valve is installed.
25 and 26, prefabricated, narrows and turns into a smoke one.
27 – smoke valve.
28 – paths are being merged.
29 – the ventilation part is covered with metal strips.
30 – 33 a three-row plug is placed above the ventilation duct, in accordance with fire safety requirements. The chimney acquires a cross-section the size of a brick.
The profile of the latter goes up to the ceiling, after which a fluff is arranged to pass through the ceiling. The wall thickness of the fluff can be no less than one and a half bricks and rise above the level of the attic floor by 25-30 cm. The pipe can be extended from other materials, but be sure to use fireproof insulating materials. I would like to warn you about the presence of orders on the network that have errors. You should first understand the logical compatibility of the entire masonry.
The effect of pyrolysis and its application in furnaces
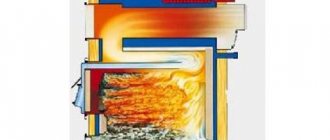
The functional purpose of long-burning heating units is based on the effect of pyrolysis, a process that is the decomposition of natural chemical compounds in the absence of oxygen. As a result, a large amount of heat is released.
Pyrolysis refers to the decomposition of solid fuel. The fact is that when it burns, it is the gaseous products that are released when heated that ignite, and not the wood itself. Thus, if an ordinary fire is lit, a person is faced with pyrolysis.
The difference is that under standard conditions, wood combustion occurs in the presence of oxygen, and this ultimately negatively affects the overall efficiency of the heating device. A full-fledged pyrolysis process requires limiting the supply of oxidizer and burning gases separately from smoldering solid fuel.
Now there are many options and design solutions for how to make a long-burning stove. Such devices, despite the presence of technical differences, have a similar operating principle.
In order to ensure efficient use of fuel, economy units operate using the pyrolysis process. As a result, the main amount of thermal energy is produced through the combustion of gases that are released as a result of smoldering wood - hydrogen, methane and others. In this case, oxygen is supplied to the furnace in doses using a regulator.
First, the fuel is given the opportunity to burn well for about 30 minutes, and then the access of the oxidizer to the firebox is minimized. Smoldering firewood under such conditions releases the maximum amount of flammable gases, which, when burned in a separate chamber, can provide heating to the body of the pyrolysis unit.
This type of heating device must be made completely sealed. Quite often, the design of a pyrolysis furnace provides for the arrangement of a water heat exchange circuit, thereby turning it into a boiler intended for the operation of a heat supply system.
Foundation
The integrity and strength of any structure largely depends on the foundation. As in most cases, it should be laid under it to a depth of about 50 cm. The dimensions are increased by 10-25 cm on each side and standard layers are filled. Sand, crushed stone and crushed with a rammer, spilling with water. Filling with cement with rubble stone or other filler. Dry and hard soil will allow the use of more intact bricks and chips, provided there is good waterproofing. If the soil is pliable, then a more rigid base is needed, possibly with reinforcement.
Preparing for work
Start your DIY project by completely re-sorting all the bricks. Set aside the most even and smooth bricks for the hearth, vault and fireboxes. Set aside bricks with obvious defects separately; they will be cut. Bevel all masonry bricks along the front edge.
Start by completely re-sorting all the bricks. Set aside the most even and smooth bricks for the hearth, vault and fireboxes. Set aside bricks with obvious defects separately; they will be cut. Bevel all masonry bricks along the front edge.
Before preparing the solution, you need to soak and grind the clay on a sieve. It is convenient and easy to grind an already liquid consistency, so soak the clay in advance. While the clay gains the required moisture, you will do the rest of the preparations. When preparing the solution yourself, you can use a medium-power drill; 600 W will be enough . . Install a special mixing attachment into the power tool. Sand must be sifted to prepare a high-quality solution. Also prepare several containers for the mortar and for pre-soaking the brick: wet brick lays better and takes moisture away from the mortar. As a last resort, simply dip each brick in water for a few seconds to release air bubbles from the pores. For carrying the solution and direct work on site, ordinary buckets are suitable; for mixing it, a large tank, trough, bathtub or something like that is suitable. Immediately prepare latches, doors and other hardware on site. Inspect them for burrs, sharpen if necessary. To install valves and doors, prepare a sufficient amount of asbestos cord.
Foundation
It has already been said many times that under any more or less capital heavy structure it is necessary to build a foundation. The process of installing it yourself will also be classified as preparatory work. Because after pouring or laying (whether you pour or lay out stone or brick, it doesn’t matter) enough time must pass for the mortar to harden and approach its ultimate strength. For economical stoves, the foundation is laid in the same way as for Russian ones - solid, with an indispensable deepening. You can dig iron pillars in the corners or pour them separately, but the depth of immersion in the ground must be at least 50 cm , otherwise the structure may fail. of 10 cm or more is poured onto the poured pillars ; it must be reinforced and reinforced with dry cement after leveling the surface. After the foundation has dried, after 8-12 days, you can begin laying the stove yourself.
Materials
The composition of the mortar on which the masonry will be laid cannot be underestimated. Naturally, the easiest way is to buy a proven dry mixture for masonry. But if you are forced to save, you will have to study ways to determine the fat content of clay and the mixtures necessary for masonry. Don't miss the fact that you will need three different formulations:
- Durable, heat-resistant using fireclay, in the area of fireboxes.
- Moisture-chemical resistant, lime for smoke passages and pipes.
- Durable and at the same time elastic, clay for the base.
Methods for determining the fat content of clay by dried balls, the degree of sticking on a stick, or by throwing cakes are easy to find on the Internet. The thickness of the seams should be within 3 - 4mm. The masonry will be more stable, and the solution will have much less chance of crumbling.
Brick should also be given its share of attention. Not every clay one is suitable. In short, a truly suitable one can be determined visually by the way it is produced.
Characteristics
Regarding appearance, the classic and economical stoves are quite similar. The laying process is also not much different. The whole secret is in the design and choice of materials that will reduce heat loss to a minimum. The modified furnace consists of several chambers connected by a common channel. Thanks to this feature, heat is not lost, but is concentrated below. The cooking chamber is equipped with a damper and can be used for cooking. There is a pole open on both sides, along the contour of which a frame called “faience” is made from a metal corner.
It is located on the lower and upper parts. To strengthen the building and provide protection from destruction, it can be reinforced with pipes or a metal frame. As a result, such a furnace rationally consumes thermal energy and requires a small amount of fuel. Any raw material for heating is suitable - the main thing is that it is solid. If all rules are followed, heating will occur evenly and smoothly, which will eliminate cracks in bricks and burning out of clay.
Molding technologies
- semi-dry pressing
- plastic molding
- slip casting
- raw atmospheric drying, etc.
- We are interested in the second option. It can be distinguished by the expressive marks of cutting raw materials, transverse marks and grooves on the edge called the bed. This molding is similar in appearance to clinker molding. However, it is heavier and more expensive, making it less attractive.
- From clinker you can make a base for a heavy structure or a mini-oven, which will have good thermal inertia.
- At the preparation stage, it is worth sorting the stone by quality, smoothness and integrity. Use all the rejects on the base and lower layers. The spoon surfaces that will be inside the channels can be further processed by grinding off irregularities or protruding small fragments.
- During the installation process, each unit must first be soaked in water for about 20 seconds.
- Of course, places exposed to high temperature loads should be lined with fireclay. These can be the walls of the firebox, the beginning of the smoke channel and the partition. Purchasing fireclay now will not be a problem.
Advantages and disadvantages of use
With the help of a housekeeper's stove, you can maintain a comfortable temperature in the room at different times of the year. The main advantages of using such a device in private homes are:
- low fuel consumption for heating the room,
- complete heating of the air in the room,
- the ability to heat the room and cook food at the same time,
- The stove can be heated with any different type of fuel.
The device is equipped with auxiliary ventilation channels, due to which odors released during the cooking process do not enter the room.
The disadvantage of using such a stove is the need for constant cleaning of the ash pans, as well as the relatively long heating time of the stove. To fire wood equipment, logs of the same length are required.
Using the "Economy"
For predicted results of use you should know:
- You should not light both fireboxes at the same time, since the performance of the larger one can lead to smoking of the smaller one through the stove rings and door leakage.
- If a fire is lit in the main firebox, the small door and the vent should be closed tightly. You will avoid rapid consumption of firewood and will be able to regulate combustion.
- During combustion, the damper must be closed, and when opening, the ventilation valve must be opened. This minimizes the possibility of smoke and gases entering the room.
- Effective use of the “crucible” is possible after a good warm-up. You can put the dishes on the stove after 5-10 hours. For baking, you will need to determine the heating of the surface of the hearth. If a pinch of flour thrown on it turns brown, the temperature is right. White or black color will indicate overheating or vice versa.
Drying
For drying, we put a maximum of 2 kg of firewood in the combustion chamber, light it, and after burning, remove all the ash and remnants of firewood from the firebox and ash pans. After the surfaces have completely cooled, we repeat the work. So we carry out up to 3 drying operations per day for 3-4 days.
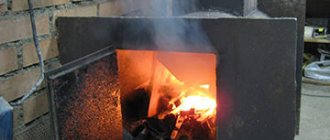
When burning wood for the first time, the stove will smoke heavily. Don’t be alarmed, this will evaporate moisture from the ceramic and burn off dirt and grease from the surfaces of the hob and other metal parts. All doors and windows in the room must be open.
On the second day, we begin to examine all surfaces for defects and places where smoke can pass through. If detected, these places are cleared of mortar and sealed with fireproof sealant and fireclay clay solution.
